SpringBoot整合junit&mybatis
SpringBoot整合junit&mybatis
- 3,SpringBoot整合junit
-
- 3.1 环境准备
- 3.2 编写测试类
- 4,SpringBoot整合mybatis
-
- 4.1 回顾Spring整合Mybatis
- 4.2 SpringBoot整合mybatis
-
- 4.2.1 创建模块
- 4.2.2 定义实体类
- 4.2.3 定义dao接口
- 4.2.4 定义测试类
- 4.2.5 编写配置
- 4.2.6 测试
- 4.2.7 使用Druid数据源
3,SpringBoot整合junit
回顾 Spring 整合 junit
@RunWith(SpringJUnit4ClassRunner.class)
@ContextConfiguration(classes = SpringConfig.class)
public class UserServiceTest {

    @Autowired
    private BookService bookService;

    @Test
    public void testSave(){
        bookService.save();
    }
}
使用 @RunWith 注解指定运行器,使用 @ContextConfiguration 注解来指定配置类或者配置文件。而 SpringBoot 整合 junit 特别简单,分为以下三步完成
- 在测试类上添加
SpringBootTest注解 - 使用
@Autowired注入要测试的资源 - 定义测试方法进行测试
3.1 环境准备
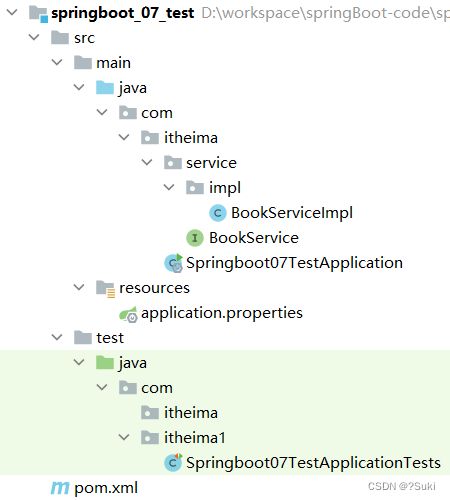
创建一个名为 springboot_07_test 的 SpringBoot 工程,工程目录结构如下
在 com.itheima.service 下创建 BookService 接口,内容如下
public interface BookService {
    public void save();
}
在 com.itheima.service.impl 包写创建一个 BookServiceImpl 类,使其实现 BookService 接口,内容如下
@Service
public class BookServiceImpl implements BookService {
    @Override
    public void save() {
        System.out.println("book service is running ...");
    }
}
3.2 编写测试类
在 test/java 下创建 com.itheima 包,在该包下创建测试类,将 BookService 注入到该测试类中
@SpringBootTest
class Springboot07TestApplicationTests {

    @Autowired
    private BookService bookService;

    @Test
    public void save() {
        bookService.save();
    }
}
==注意:==这里的引导类所在包必须是测试类所在包及其子包。
例如:
- 引导类所在包是
com.itheima- 测试类所在包是
com.itheima如果不满足这个要求的话,就需要在使用
@SpringBootTest注解时,使用classes属性指定引导类的字节码对象。如@SpringBootTest(classes = Springboot07TestApplication.class)
4,SpringBoot整合mybatis
4.1 回顾Spring整合Mybatis
Spring 整合 Mybatis 需要定义很多配置类
-
SpringConfig配置类-
导入
JdbcConfig配置类 -
导入
MybatisConfig配置类@Configuration @ComponentScan("com.itheima") @PropertySource("classpath:jdbc.properties") @Import({JdbcConfig.class,MyBatisConfig.class}) public class SpringConfig { }
-
-
JdbcConfig配置类-
定义数据源(加载properties配置项:driver、url、username、password)
public class JdbcConfig {
    @Value("${jdbc.driver}")
    private String driver;
    @Value("${jdbc.url}")
    private String url;
    @Value("${jdbc.username}")
    private String userName;
    @Value("${jdbc.password}")
    private String password;

    @Bean
    public DataSource getDataSource(){
        DruidDataSource ds = new DruidDataSource();
        ds.setDriverClassName(driver);
        ds.setUrl(url);
        ds.setUsername(userName);
        ds.setPassword(password);
        return ds;
    }
}
-
-
MybatisConfig配置类-
定义
SqlSessionFactoryBean -
定义映射配置
@Bean
public MapperScannerConfigurer getMapperScannerConfigurer(){
    MapperScannerConfigurer msc = new MapperScannerConfigurer();
    msc.setBasePackage("com.itheima.dao");
    return msc;
}

@Bean
public SqlSessionFactoryBean getSqlSessionFactoryBean(DataSource dataSource){
    SqlSessionFactoryBean ssfb = new SqlSessionFactoryBean();
    ssfb.setTypeAliasesPackage("com.itheima.domain");
    ssfb.setDataSource(dataSource);
    return ssfb;
}
-
4.2 SpringBoot整合mybatis
4.2.1 创建模块
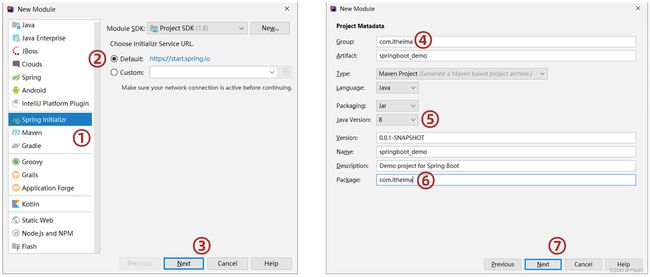
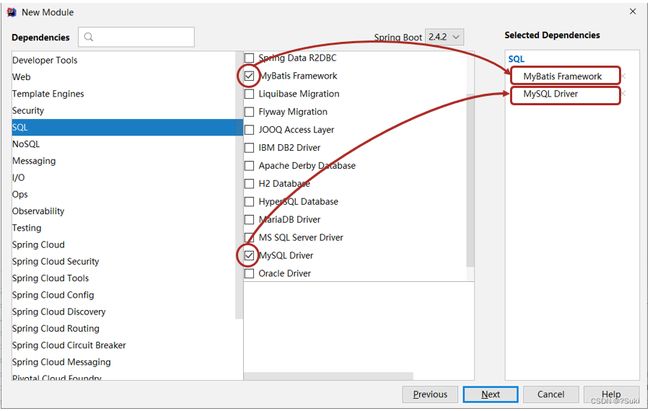
- 创建新模块,选择
Spring Initializr,并配置模块相关基础信息
4.2.2 定义实体类
在 com.itheima.domain 包下定义实体类 Book,内容如下
public class Book {
    private Integer id;
    private String name;
    private String type;
    private String description;

    //setter and  getter

    //toString
}
4.2.3 定义dao接口
在 com.itheima.dao 包下定义 BookDao 接口,内容如下
public interface BookDao {
    @Select("select * from tbl_book where id = #{id}")
    public Book getById(Integer id);
}
4.2.4 定义测试类
在 test/java 下定义包 com.itheima ,在该包下测试类,内容如下
@SpringBootTest
class Springboot08MybatisApplicationTests {

	@Autowired
	private BookDao bookDao;

	@Test
	void testGetById() {
		Book book = bookDao.getById(1);
		System.out.println(book);
	}
}
4.2.5 编写配置
我们代码中并没有指定连接哪儿个数据库,用户名是什么,密码是什么。所以这部分需要在 SpringBoot 的配置文件中进行配合。
在 application.yml 配置文件中配置如下内容
spring:
  datasource:
    driver-class-name: com.mysql.jdbc.Driver
    url: jdbc:mysql://localhost:3306/ssm_db
    username: root
    password: root
4.2.6 测试
运行测试方法,我们会看到如下错误信息
错误信息显示在 Spring 容器中没有 BookDao 类型的 bean。为什么会出现这种情况呢?
原因是 Mybatis 会扫描接口并创建接口的代码对象交给 Spring 管理,但是现在并没有告诉 Mybatis 哪个是 dao 接口。而我们要解决这个问题需要在BookDao 接口上使用 @Mapper ,BookDao 接口改进为
@Mapper
public interface BookDao {
    @Select("select * from tbl_book where id = #{id}")
    public Book getById(Integer id);
}
注意:
SpringBoot版本低于2.4.3(不含),Mysql驱动版本大于8.0时,需要在url连接串中配置时区jdbc:mysql://localhost:3306/ssm_db?serverTimezone=UTC,或在MySQL数据库端配置时区解决此问题
4.2.7 使用Druid数据源
现在我们并没有指定数据源,SpringBoot 有默认的数据源,我们也可以指定使用 Druid 数据源,按照以下步骤实现
-
导入
Druid依赖<dependency> <groupId>com.alibabagroupId> <artifactId>druidartifactId> <version>1.1.16version> dependency> -
在
application.yml配置文件配置可以通过
spring.datasource.type来配置使用什么数据源。配置文件内容可以改进为spring: datasource: driver-class-name: com.mysql.cj.jdbc.Driver url: jdbc:mysql://localhost:3306/ssm_db?serverTimezone=UTC username: root password: root type: com.alibaba.druid.pool.DruidDataSource
学习笔记 from 黑马程序员
By – Suki 2023/4/6


