spring security 深入浅出(一) session认证方式(1)
最近由于教学需要,关注了一下spring security,网上有好多关于spring security 的学习资料,本人作为一个培训讲师,对网上的这些学习资料感觉(有的讲解spring security的底层代码实现、有的直接代码演示....)这些其实不能够让学生深入了解和学习,就这些问题个人总结了一下对spring security的学习过程。Spring Security做为一个基于Spring的企业应用系统提供声明式的安全访问控制解决方案的安全框架。它提供了一组可以在Spring应用上下文中配置的Bean,充分利用了Spring IoC,DI(控制反转Inversion of Control ,DI:Dependency Injection 依赖注入)和AOP(面向切面编程)功能,为应用系统提供声明式的安全访问控制功能,减少了为企业系统安全控制编写大量重复代码的工作。
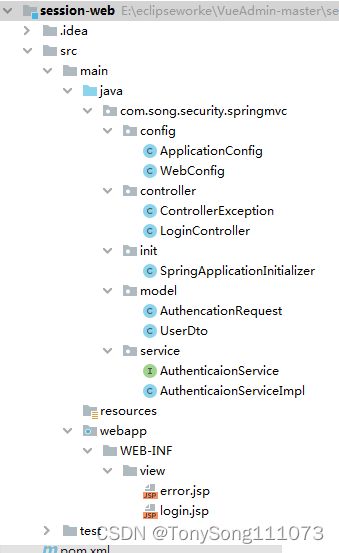
首先我们要搞清认证和授权的流程,从web出发,无外乎基于session的认证和token认证。那么session和tokent的区别在哪里,它们的应用场景是什么? 今天先看第一部分关于web的session认证。首先我们创建一个基于web的maven项目。项目结构如下:
pom.xml文件
    4.0.0

    org.example
    session-web
    1.0-SNAPSHOT
    war


        UTF-8
        1.8
        1.8


            org.springframework
            spring-webmvc

            5.2.22.RELEASE


            javax.servlet
            javax.servlet-api
            4.0.1
            provided


            org.projectlombok
            lombok
            1.18.24


        session-web


                     org.apache.tomcat.maven
                     tomcat7-maven-plugin
                     2.2


                     org.apache.maven.plugins
                     maven-compiler-plugin

                         1.8
                         1.8


                     org.apache.maven.plugins
                     maven-resources-plugin

                         UTF-8
                         true


                                 src/main/resources
                                 true

                                     /**/*


                                 src/main/java

                                     /**/*.xml
config包下的WebConfig.java
package com.song.security.springmvc.config;

import org.springframework.context.annotation.Bean;
import org.springframework.context.annotation.ComponentScan;
import org.springframework.context.annotation.Configuration;
import org.springframework.context.annotation.FilterType;
import org.springframework.stereotype.Controller;
import org.springframework.web.servlet.config.annotation.EnableWebMvc;
import org.springframework.web.servlet.config.annotation.ViewControllerRegistry;
import org.springframework.web.servlet.config.annotation.WebMvcConfigurer;
import org.springframework.web.servlet.view.InternalResourceViewResolver;

/**
 * Created by TonySong on 2022/6/26 0026 下午 6:49
 * 此类相当于spring mvc中的spring-mvc.xml
 */
@Configuration
@EnableWebMvc
@ComponentScan(basePackages = "com.song.security.springmvc",
    includeFilters = {@ComponentScan.Filter(type=FilterType.ANNOTATION,value = Controller.class)})
public class WebConfig implements WebMvcConfigurer {

    @Bean  //配置视图解析器
    public InternalResourceViewResolver internalResourceViewResolver(){
         InternalResourceViewResolver internalResourceViewResolver =
                 new InternalResourceViewResolver("/WEB-INF/view/", ".jsp");
         return  internalResourceViewResolver;
    }

    @Override
    public void addViewControllers(ViewControllerRegistry registry) {
        //注册默认的视图控制器: 前缀+login+后缀
         registry.addViewController("/").setViewName("login");
    }
}
ApplicationConfig
@Configuration
@ComponentScan(basePackages =  "com.song.security.springmvc",
        excludeFilters = {@ComponentScan.Filter(type = FilterType.ANNOTATION,value = Controller.class)})
public class ApplicationConfig {
     //配置数据库连接、业务等
}
init包下Spring容器初始化
package com.song.security.springmvc.init;

import com.song.security.springmvc.config.ApplicationConfig;
import com.song.security.springmvc.config.WebConfig;
import org.springframework.web.servlet.support.AbstractAnnotationConfigDispatcherServletInitializer;

/**
 * Created by TonySong on 2022/6/26 0026 下午 7:57
 * 相当于web.xml 文件
 */
public class SpringApplicationInitializer extends AbstractAnnotationConfigDispatcherServletInitializer {
    //spring 容器: 加载 applicationContext.xml
    @Override
    protected Class[] getRootConfigClasses() {
        return new Class[]{ApplicationConfig.class};
    }

    //servletcontext: 加载: spring-mvc.xml
    @Override
    protected Class[] getServletConfigClasses() {
        return new Class[]{WebConfig.class};
    }

    //url-mapping
    @Override
    protected String[] getServletMappings() {
        return new String[]{"/"};
    }
}
实体类:
@Data
@AllArgsConstructor
public class UserDto {
    private String id;
    private String username;
    private String password;
    private String fullname;
    private String mobile;
}

@Data
public class AuthencationRequest {

    private String username;
    private String password;
}
业务接口和实现类
public interface AuthenticaionService {

      UserDto authentication(AuthencationRequest anthencationRequest);
}
package com.song.security.springmvc.service;

import com.song.security.springmvc.model.AuthencationRequest;
import com.song.security.springmvc.model.UserDto;
import org.springframework.stereotype.Service;
import org.springframework.util.StringUtils;

import java.util.HashMap;
import java.util.Map;

/**
 * Created by TonySong on 2022/6/26 0026 下午 8:25
 */
@Service
public class AuthenticaionServiceImpl implements AuthenticaionService {
    @Override
    public UserDto authentication(AuthencationRequest anthencationRequest) {
        //判断账号或密码为空
        //StringUtils.isEmpty()已经过时了,此处使用的是hasLength
        if(!StringUtils.hasLength(anthencationRequest.getUsername()) ||
          !StringUtils.hasLength(anthencationRequest.getPassword())){
             throw  new RuntimeException("账号或密码为空!") ;
        }
        //判断账号是否存在
        UserDto user= this.getUsername(anthencationRequest.getUsername());
        if(user==null){
            throw new RuntimeException("账号不存在!");
        }
        //判断密码是否正确
        if(!user.getPassword().equals(anthencationRequest.getPassword())){
            throw new RuntimeException("账号或密码错误!");
        }
        return  user;
    }

    private UserDto getUsername(String username) {
        return map.get(username);
    }

    private Map map = new HashMap();

    {
        map.put("zhangsan", new UserDto("1001", "zhangsan", "123", "张三", "12345"));
        map.put("lisi", new UserDto("1002", "lisi", "123", "李四", "123456"));
    }

}
控制器部分:
@RestController
public class LoginController {
    @Resource
    private AuthenticaionService authenticaionService;

    @RequestMapping(value = "/login",produces = "text/plain;charset=UTF-8")
    public String login(AuthencationRequest request){
        UserDto user= this.authenticaionService.authentication(request);
        return  user.getUsername()+"登录成功!";
    }
}


/**
 * 异常处理
 */
@ControllerAdvice
public class ControllerException {

    @ExceptionHandler(RuntimeException.class)
     public String runntimeExceptionHandler(RuntimeException e, Model model){
         model.addAttribute("mess", e.getMessage());
         return "error";
     }
}
页面:
<%@ page contentType="text/html;charset=UTF-8" language="java" %>
Title
异常页面:
           错误提示
           ${mess}
测试:
![]()
添加Session会话功能,修改登录控制器:登录成功将用户信息保存到session中,增加books资源访问,从session中获取用户信息。
 @RequestMapping(value = "/login",produces = "text/plain;charset=UTF-8")
    public String login(AuthencationRequest request,HttpSession session){
        UserDto user= this.authenticaionService.authentication(request);
        if(!Objects.isNull(user)){
            //使用session进行存储
            session.setAttribute("logUser",user);
        }
        return  user.getUsername()+"登录成功!";
    }

 @RequestMapping(value = "/books",produces = "text/plain;charset=UTF-8")
    public String findBooks(HttpSession session){
        Object logUser = session.getAttribute("logUser");
        if(Objects.isNull(logUser)){
            return "对不起,您还没有登录";
        }else{
            if(logUser instanceof UserDto){
                  UserDto userDto = (UserDto) logUser;
                  return "欢迎"+userDto.getFullname()+"访问图书资源。";
            }
        }
        return "";
    }
没有登录则:
增加session的认证,利用拦截器实现。首先在实体类中添加一个权限集合:
@AllArgsConstructor
@Data
public class UserDto {
    private String id;
    private String username;
    private String password;
    private String fullname;
    private String mobile;

    private Set authors;

}
业务类添加
 {
        Set authors1= new HashSet<>();
        //绑定图书资源
        authors1.add("books");

        Set authors2= new HashSet<>();
        //绑定用户资源
        authors2.add("users");
        map.put("zhangsan", new UserDto("1001", "zhangsan", "123", "张三", "12345",authors1));
        map.put("lisi", new UserDto("1002", "lisi", "123", "李四", "123456",authors2));
    }
添加阿里的Fastjson依赖:
            com.alibaba
            fastjson
            1.2.50
创建拦截器:
import com.alibaba.fastjson.JSON;
import com.song.springmvc.security.pojo.UserDto;
import org.springframework.stereotype.Component;
import org.springframework.web.servlet.HandlerInterceptor;
import sun.net.www.protocol.http.HttpURLConnection;

import javax.servlet.http.HttpServletRequest;
import javax.servlet.http.HttpServletResponse;
import java.io.IOException;
import java.io.PrintWriter;
import java.util.HashMap;
import java.util.Map;
import java.util.Objects;

@Component
public class SimpleAuthorInterceptor implements HandlerInterceptor {

    private void write(int code,String message, HttpServletResponse response){
        response.setContentType("application/json;charset=UTF-8");
        try {
            PrintWriter out = response.getWriter();
            Map map= new HashMap<>();
            map.put("code",code);
            map.put("message",message);
            String jsonString = JSON.toJSONString(map);
            out.write(jsonString);
            out.close();
        } catch (IOException e) {
            e.printStackTrace();
        }
    }
    @Override
    public boolean preHandle(HttpServletRequest request, HttpServletResponse response, Object handler) throws Exception {
        //获取请求的url,
        String requestURI = request.getRequestURI();
        //获取session,从而判断是否登录
        Object logUser = request.getSession().getAttribute("logUser");
        if(Objects.isNull(logUser)){
            this.write(401,"请登录",response);
            return false;
        }
        //获取用户对象
        UserDto user=(UserDto)logUser;

        //判断是否有books的访问权限
        if( requestURI.endsWith("books") && user.getAuthors().contains("books")){
            return true;
        }
        //判断是否有users的访问权限
        if( requestURI.endsWith("users") && user.getAuthors().contains("users")){
            return true;
        }
        this.write(403,"权限不足", response);
        return false;

    }
}
控制器:
import com.song.springmvc.security.pojo.AuthencationRequest;
import com.song.springmvc.security.pojo.UserDto;
import com.song.springmvc.security.service.AuthenticaionService;
import org.springframework.ui.Model;
import org.springframework.web.bind.annotation.ControllerAdvice;
import org.springframework.web.bind.annotation.ExceptionHandler;
import org.springframework.web.bind.annotation.RequestMapping;
import org.springframework.web.bind.annotation.RestController;

import javax.annotation.Resource;
import javax.servlet.http.HttpSession;
import java.util.Objects;

@RestController
public class LoginController {
    @Resource
    private AuthenticaionService authenticaionService;

    @RequestMapping(value = "/login",produces = "text/plain;charset=UTF-8")
    public String login(AuthencationRequest request,HttpSession session){
        UserDto user= this.authenticaionService.authentication(request);
        if(!Objects.isNull(user)){
            //使用session进行存储
            session.setAttribute("logUser",user);
        }
        return  user.getUsername()+"登录成功!";
    }

    @RequestMapping(value = "/books",produces = "text/plain;charset=UTF-8")
    public String findBooks(HttpSession session){
        Object logUser = session.getAttribute("logUser");
        if(Objects.isNull(logUser)){
            return "对不起,您还没有登录";
        }else{
            if(logUser instanceof UserDto){
                  UserDto userDto = (UserDto) logUser;
                  return "欢迎"+userDto.getFullname()+"访问图书资源。";
            }
        }
        return "";
    }
    @RequestMapping(value = "/users",produces = "text/plain;charset=UTF-8")
    public String findUsers(HttpSession session){
        Object logUser = session.getAttribute("logUser");
        if(Objects.isNull(logUser)){
            return "对不起,您还没有登录";
        }else{
            if(logUser instanceof UserDto){
                UserDto userDto = (UserDto) logUser;
                return "欢迎"+userDto.getFullname()+"访问用户资源。";
            }
        }
        return "";
    }

    @RequestMapping(value = "/logout",produces = "text/plain;charset=UTF-8")
    public String logout(HttpSession session){
         session.invalidate();
         return "注销成功!";
    }

}
WebConfig添加如下代码,配置拦截器(规则)
  @Autowired
    private SimpleAuthorInterceptor simpleAuthorInterceptor;

    @Override
    public void addInterceptors(InterceptorRegistry registry) {
        registry.addInterceptor(this.simpleAuthorInterceptor)
                .addPathPatterns("/books/**","/users/**");
    }
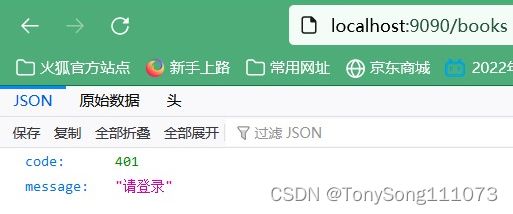
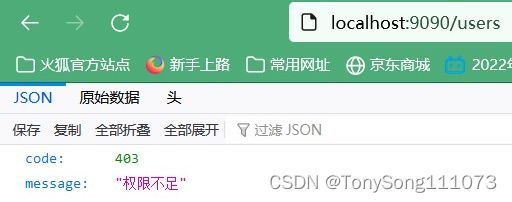
测试效果:没有登录访问图书或用户资源:
使用张三登录:


