i.MX6ULL移植NXP官方uboot2020.04_5.4.47_2.2.0
目录
- 开发环境
- 设置交叉编译工具链
- 下载nxp的uboot
- 移植uboot
-
- 编译uboot
- 烧写uboot镜像
- 建立自己的单板文件配置
- 解决适配问题
-
- 适配 lan8720a 网卡
-
- 查看公版原理图
- 查看百问网开发板原理图
- 查看LAN8720A芯片手册
- 修改uboot相关配置
-
- 修改并验证 uboot 源码第一部分
- 修改并验证 uboot 源码第二部分
- LCD屏幕参数适配
开发环境
- 系统:Ubuntu18.04
- 参考资料:百问网 IMX6ULL开发板(从零移植篇-预览版)-V0.1,正点原子驱动开发指南
- 开发板:100ask i.MX6ULL PRO
- uboot: imx_v2020.04_5.4.47_2.2.0 链接
设置交叉编译工具链
交叉编译工具链的下载就不写了
打开.bashrc文件。vi ~/.bashrc
在该文件最后面添加如下(根据自己的交叉编译工具链)
export ARCH=arm
export CROSS_COMPILE=arm-buildroot-linux-gnueabihf-
export PATH=$PATH:/home/book/100ask_imx6ull-sdk/ToolChain/arm-buildroot-linux-gnueabihf_sdk-buildroot/bin
下载nxp的uboot
先下载,下载巨慢。下载好后查看分支remotes/origin/imx_v2020.04_5.4.47_2.2.0
git clone https://source.codeaurora.org/external/imx/uboot-imx
cd uboot-imx
git branch -a
git checkout remotes/origin/imx_v2020.04_5.4.47_2.2.0

移植uboot
编译uboot
使用mx6ull_14x14_evk_emmc_defconfig配置文件。然后执行make all -j4。

可以看到生成了u-boot-dtb.imx,这个就是我们要烧写的uboot镜像。
烧写uboot镜像
使用百问网提供的烧写工具来烧写镜像,使用方法查询百问网。
烧写完后开发板设置为emmc启动,重启开发板。
U-Boot 2020.04-gd9540831 (Oct 30 2022 - 04:02:46 -0400)

CPU:   i.MX6ULL rev1.1 792 MHz (running at 396 MHz)
CPU:   Industrial temperature grade (-40C to 105C) at 37C
Reset cause: POR
Model: i.MX6 ULL 14x14 EVK Board
Board: MX6ULL 14x14 EVK
DRAM:  512 MiB
MMC:   FSL_SDHC: 0, FSL_SDHC: 1
Loading Environment from MMC... *** Warning - bad CRC, using default environment

[*]-Video Link 0 (480 x 272)
	[0] lcdif@21c8000, video
In:    serial
Out:   serial
Err:   serial
switch to partitions #0, OK
mmc1(part 0) is current device
flash target is MMC:1
Net:
Error: ethernet@20b4000 address not set.

Error: ethernet@20b4000 address not set.

Error: ethernet@20b4000 address not set.
FEC: can't find phy-handle

Error: ethernet@20b4000 address not set.
Could not get PHY for FEC0: addr 2

Error: ethernet@20b4000 address not set.
FEC: can't find phy-handle

Error: ethernet@20b4000 address not set.
Could not get PHY for FEC0: addr 2
No ethernet found.

Fastboot: Normal
Normal Boot
Hit any key to stop autoboot:  0
switch to partitions #0, OK
mmc1(part 0) is current device
switch to partitions #0, OK
mmc1(part 0) is current device
** Unrecognized filesystem type **
** Unrecognized filesystem type **
Booting from net ...

Error: ethernet@20b4000 address not set.

Error: ethernet@20b4000 address not set.

Error: ethernet@20b4000 address not set.

Error: ethernet@20b4000 address not set.
FEC: can't find phy-handle

Error: ethernet@20b4000 address not set.
Could not get PHY for FEC0: addr 2

Error: ethernet@20b4000 address not set.

Error: ethernet@20b4000 address not set.
No ethernet found.

Error: ethernet@20b4000 address not set.

Error: ethernet@20b4000 address not set.

Error: ethernet@20b4000 address not set.

Error: ethernet@20b4000 address not set.

Error: ethernet@20b4000 address not set.
FEC: can't find phy-handle

Error: ethernet@20b4000 address not set.
Could not get PHY for FEC0: addr 2

Error: ethernet@20b4000 address not set.

Error: ethernet@20b4000 address not set.
No ethernet found.

Error: ethernet@20b4000 address not set.
zimage: Bad magic!
=>
通过串口终端打印信息可以看出 uboot 在第一次启动时发生 未定义指令异常错误 导致 uboot 自动复位,在第二次启动后时可以正常进入 uboot 内,我们需要解决网卡导致 uboot 异常问题并使其可以在 uboot下使用 tftp 运行内核并进行 nfs 挂载文件系统进入文件系统。
下面来修改适配,我们可以先建立自己的板子相关配置,有点麻烦,当然也可以直接修改原文件。
建立自己的单板文件配置
先添加自己板子的配置文件和头文件,board文件夹和设备树之后再添加。
 cp configs/mx6ull_14x14_evk_emmc_defconfig configs/mx6ull_14x14_nice_emmc_defconfig
 cp include/configs/mx6ullevk.h include/configs/mx6ullnice.h
修改配置文件
vi configs/mx6ull_14x14_nice_emmc_defconfig
分别修改为
CONFIG_TARGET_MX6ULL_14X14_NICE=yCONFIG_SYS_EXTRA_OPTIONS="IMX_CONFIG=board/freescale/mx6ullnice/imximage.cfg"CONFIG_DEFAULT_DEVICE_TREE="imx6ull-14x14-nice-emmc"
修改头文件
vi include/configs/mx6ullnice.h
将开头宏改为
#ifndef __MX6ULLNICE_CONFIG_H
#define __MX6ULLNICE_CONFIG_H
修改查找设备树的命令

添加board文件夹
cp board/freescale/mx6ullevk board/freescale/mx6ullnice -r
看看该文件夹下有哪些文件

先修改mx6ullevk.c的名字
mv mx6ullevk.c mx6ullnice.c
修改imximage.cfg文件里面为board/freescale/mx6ullnice/plugin.bin 0x00907000
#ifdef CONFIG_USE_IMXIMG_PLUGIN
/*PLUGIN    plugin-binary-file    IRAM_FREE_START_ADDR*/
PLUGIN  board/freescale/mx6ullnice/plugin.bin 0x00907000
#else
修改Kconfig文件为如下,把所有evk换成nice就可。

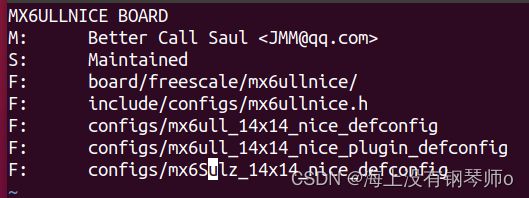
修改MAINTAINERS文件如下
修改Makefile文件obj-y := mx6ullnice.o
————————————————————
接下来增加我们的设备树文件
cp arch/arm/dts/imx6ull-14x14-evk-emmc.dts arch/arm/dts/imx6ull-14x14-nice-emmc.dts
cp arch/arm/dts/imx6ull-14x14-evk.dts arch/arm/dts/imx6ull-14x14-nice.dts
修改imx6ull-14x14-nice-emmc.dts文件里为#include "imx6ull-14x14-nice.dts"

修改imx6ull-14x14-nice.dts为

然后添加上面两个dtsi头文件,这两个文件改下名字就好了,内容不用改了。
cp arch/arm/dts/imx6ul-14x14-evk.dtsi arch/arm/dts/imx6ul-14x14-nice.dtsi
cp arch/arm/dts/imx6ul-14x14-evk-u-boot.dtsi arch/arm/dts/imx6ul-14x14-nice-u-boot.dtsi
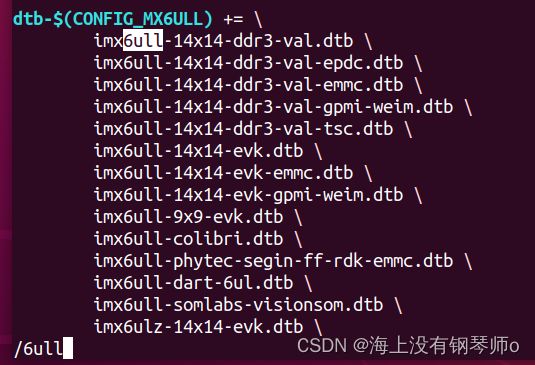
然后修改一下编译设备树的Makefile。
vi arch/arm/dts/Makefile
搜索一下6ull,在这里将我们的板子设备树添加进去。![]()
修改arch/arm/mach-imx/mx6/Kconfig文件,支持图形化配置。在EVK下面添加我们自己的板子
当执行make menuconfig时会出现内核的配置界面,所有配置工具都是通过读取arch/$(ARCH)Kconfig文件来生成配置界面,这个文件就是所有配置的总入口,它会包含其他目录的Kconfig。Kconfig的作用:Kconfig用来配置内核,它就是各种配置界面的源文件,内核的配置工具读取各个Kconfig文件,生成配置界面供开发人员配置内核,最后生成配置文件.config。

在该文件内找到source "board/freescale/mx6ullevk/Kconfig",在下面加入我们自己的Kconfig文件source "board/freescale/mx6ullnice/Kconfig"。
使用make menuconfig,我们的板子可以找到了。

我们自己的板子文件就添加好了!
解决适配问题
下述方法来自百问网的相关文档
适配 lan8720a 网卡
我们只需要关注引脚都有那些 是否一一对应上即可,一般情况下无需过多关注通信协议实现细节,厂商默认都已经做好适配。
查看公版原理图
查看 Imx6ullevk 公板原理图 SPF-29364_A1.pdf 文件 P7 页查看 imx6ull ENET 网卡 pin number。
继续查看核心板网卡引脚与那个 phy 器件进行链接,查看 SPF-28616_C2.pdf 文件阅读 p11 页 可以看到 ENET2 连接至 KSZ8081RNB 的 PHY 芯片上 官方使用的以太网 通信接口协议为 RMII 。

查看百问网开发板原理图
查看百问网 IMX6ULL PRO 开发板原理图,首先查看米尔核心板 ENET2 pin number 都有那些,打开资料光盘 MYC-Y6ULX1211.pdf 文件查看 P7 页 。
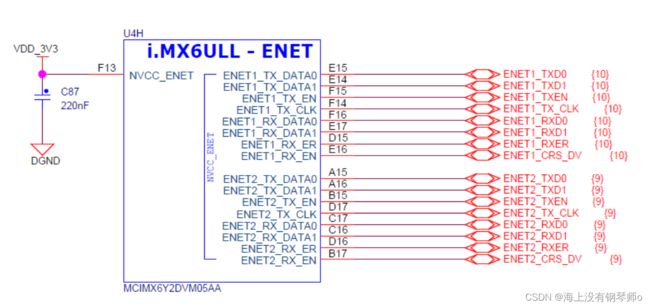
之后继续查看百问网 imx6ull pro 底板原理图 100ask_imx6ull_v1.1.pdf 文件 P6 页,来查看 CPU ENET2 引脚接到那个 PHY 芯片上。

通过和公板对比 我们发现网络通信接口都是使用的 RMII 接口 其中命令接口使用为 MDIO 接口,引脚pin number 一致,只有 ENET2 RST 引脚不同,此时我们只需要修改 ENET2 RST 引脚即可 由于网卡是通过PHY 地址来进行区分查找的 我们也要查看 PHY 芯片手册来知道如何确认 PHY 地址。
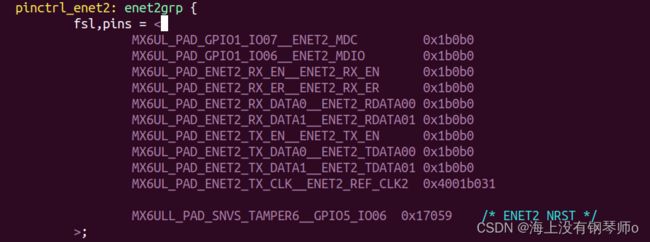
我们通过在底板原理图搜索 ENET2_nRST 引脚即可查到改引脚路由到 SNVS_TAMPER6 CPU pin number 引脚,在确认 pin number 后就可以使用 pin mux 来进行配置引脚复用来生成设备树信息。

I.MX6UL/ULL 内部有个以太网 MAC 外设,也就是 ENET,需要外接一个 PHY 芯片来实现网络通信功能,也就是内部 MAC+外部 PHY 芯片的方案。大家可能听过 DM9000 这个网络芯片,在一些没有内部 MAC 的 CPU 中,比如三星的 2440,4412 等,就会采用 DM9000 来实现联网功能。DM9000 提供了一个类似 SRAM 的访问接口,主控 CPU 通过这个接口即可与DM9000 进行通信,DM9000 就是一个 MAC+PHY 芯片。这个方案就相当于外部 MAC+外部PHY,那么 I.MX6U 这样的内部 MAC+PHY 芯片与 DM9000 方案比有什么优势吗?那优势大了去了!首先就是通信效率和速度,一般 SOC 内部的 MAC 是带有一个专用 DMA 的,专门用于处理网络数据包,采用 SRAM 来读写 DM9000 的速度是压根就没法和内部 MAC+外部 PHY 芯片的速度比。采用外部 DM9000 完全是无奈之举,谁让 2440,4412 这些芯片内部没有以太网
外设呢,现在又想用有线网络,没有办法只能找个 DM9000 的方案。从这里也可以看出,三星的 2440、4412 这些芯片设计之初就不是给工业产品用的,他们是给消费类电子使用的,比如手机、平板等,手机或平板要上网,可以通过 WIFI 或者 4G,我是没有见过哪个手机或者平板上网是要接根网线的。
I.MX6UL/ULL 有两个网络接口 ENET1 和 ENET2,百问网开发板使用 LAN8720A 作为 PHY 芯片,NXP 官方的I.MX6ULL EVK 开发板使用 KSZ8081 这颗 PHY 芯片,LAN8720A 相比 KSZ8081 具有体积小、外围器件少、价格便宜等优点。。(cpu ==> MAC外设) ===> PHY芯片
查看LAN8720A芯片手册
通过查看上面的硬件原理图可以看到 PHYAD0 接了一个上拉电阻,所以 ENET2 网卡 PHY 地址是 0x1。

之后继续查看 3.8.5 Resets 章节 P39 页 Reset 章节说明,我们需要在 PHY 内进行硬件复位和软件复位操作,请主要查看下图有红色底线所示文字,文章描述了复位需要有硬件复位和软件复位两个操作,其中硬件复位要保持 nRST 引脚持续拉低一段时间,软件复位要求向 Basic Control Register Soft Reset bit 位写入 1。
首先参考下图 LAN8720A.pdf 手册 P70 页说明,其中有红色底线所示 time 要求,nRST 时钟在外部电源已经存在情况下,tpurstv 为高电平最少 25ms,之后必要要有一个至少 25ms 的低电平转换,才可满足硬件复位时钟要求,所以我们要操作 ENET2 RESET 引脚。
之后我们需要在 PHY 操作函数中操作 Basic Control Register Soft Reset bit 位来进行复位操作,需要设置 bit15 位为 1。
修改uboot相关配置
这里可以看百问网的文档 “IMX6ULL开发板(从零移植篇-预览版)”,如果是使用100ask修改过的uboot来操作的,可以查看都修改了哪些地方
修改并验证 uboot 源码第一部分
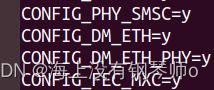
第一部分修改配置文件,修改 PHY 芯片支持 LAN8720a 其中需要增加 SMSC 配置项并移除默认的 MICREL配置项。这里是为了使能 uboot 中的 SMSC 公司中的 PHY 驱动。
find -name "*nice*defconfig"
vi configs/mx6ull_14x14_nice_emmc_defconfig
KSZ8081 这颗 PHY 芯片就是 Micrel 公司生产的,不过 Micrel 已经被Microchip 收购了。如果要使用 LAN8720A,那么就得将 CONFIG_PHY_MICREL 改为 CONFIG_PHY_SMSC,也就是使能 uboot 中的 SMSC 公司中的 PHY 驱动,因为 LAN8720A 就是 SMSC 公司生产的。
一般情况 uboot 内只需要初始化一个网卡接口即可,这里我们初始化 NET2 其中需要修改开发板 NET2对应的 phyid ,在设备树中体现为 reg 由于我们只初始化 NET2 则需要关闭 NET1 的初始化,同时需要配置phy-reset-gpios 引脚以及 phy-reset-duration 复位时间,这里可以通过上述原理图来获取到。
打开arch/arm/dts/imx6ul-14x14-nice.dtsi文件修改。修改enet1的status,enet2增加reset的gpio和duration。
添加pinctrl

修改完成后 执行 make all 来重新编译 uboot 镜像,编译成功后烧写至开发板启动,观察 log 信息。
U-Boot 2020.04-gd9540831-dirty (Oct 30 2022 - 08:19:35 -0400)

CPU:   i.MX6ULL rev1.1 792 MHz (running at 396 MHz)
CPU:   Industrial temperature grade (-40C to 105C) at 41C
Reset cause: POR
Model: i.MX6 ULL 14x14 EVK Board
Board: MX6ULL 14x14 EVK
DRAM:  512 MiB
MMC:   FSL_SDHC: 0, FSL_SDHC: 1
Loading Environment from MMC... *** Warning - bad CRC, using default environment

[*]-Video Link 0 (480 x 272)
	[0] lcdif@21c8000, video
In:    serial
Out:   serial
Err:   serial
switch to partitions #0, OK
mmc1(part 0) is current device
flash target is MMC:1
Net:
Error: ethernet@20b4000 address not set.

Error: ethernet@20b4000 address not set.
No ethernet found.

Fastboot: Normal
Normal Boot
Hit any key to stop autoboot:  0
switch to partitions #0, OK
mmc1(part 0) is current device
switch to partitions #0, OK
mmc1(part 0) is current device
** Unrecognized filesystem type **
** Unrecognized filesystem type **
Booting from net ...

Error: ethernet@20b4000 address not set.

Error: ethernet@20b4000 address not set.

Error: ethernet@20b4000 address not set.

Error: ethernet@20b4000 address not set.

Error: ethernet@20b4000 address not set.
No ethernet found.

Error: ethernet@20b4000 address not set.

Error: ethernet@20b4000 address not set.

Error: ethernet@20b4000 address not set.

Error: ethernet@20b4000 address not set.

Error: ethernet@20b4000 address not set.

Error: ethernet@20b4000 address not set.
No ethernet found.

Error: ethernet@20b4000 address not set.
zimage: Bad magic!
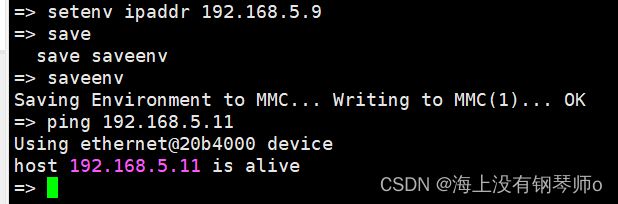
成功运行刚才编译好的 uboot 之后,会发现提示 NET2 网卡地址未设置,输入
setenv eth1addr 00:01:3f:2d:3e:4d
saveenv
reset
复位 uboot 后,串口终端打印 log 信息如下所示,发现没有再提示 Error: ethernet@20b4000 address not set 未设置 mac 地址问题。
设置ip。
修改并验证 uboot 源码第二部分
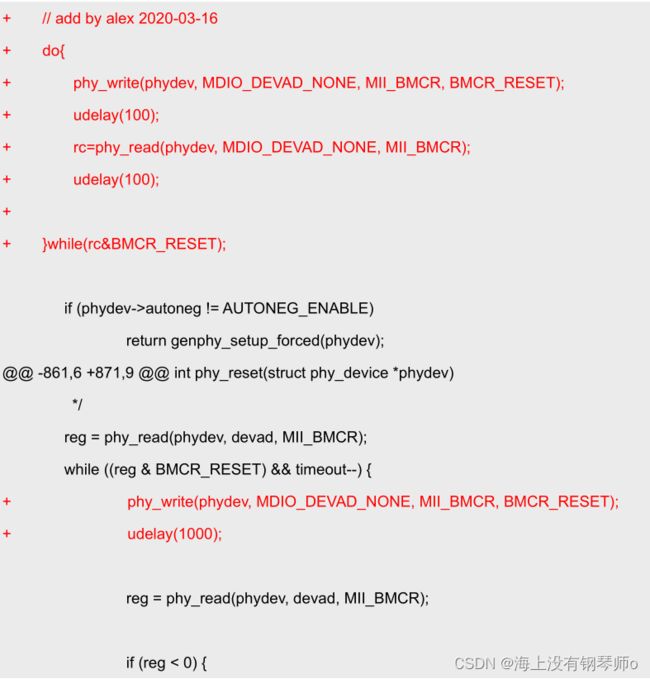
把网线连接至 NET2 接口,执行 DHCP 命令,会发现一直多次获取,直到最后提示 Abort 异常退出,并未能成功获取到 IP 地址,此时可以根据芯片手册或者逻辑分析仪来确认复位时序等操作是否符合芯片要求,这里由于之前调试过此芯片知道 需要进行多次芯片软复位才可以,参考下述修改来修改 phy 函数,发送复位命令到 lan8720a 芯片。
参考下述修改,在 phy.c 函数 genphy_restart_aneg (复位并重启自动协商)里进行复位启动自动网络速率协商功能,并在 reset 复位函数内再次发送复位指令操作。

修改后重新烧写启动,如果网线连接的路由器,应该可以dhcp自动获取ip。这是文档中的做法。但是我是网线连接的电脑。
百问网文档是用网线连接路由器,我这边连接电脑,需要设置环境变量ipaddr。设置的环境变量是保存在emmc中的,也就是说换一个uboot烧录启动,环境变量还是我们设置的值。
setenv ipaddr 192.168.5.9
setenv gatewayip 192.168.5.1
setenv netmask 255.255.255.0
setenv serverip 192.168.5.11
saveenv
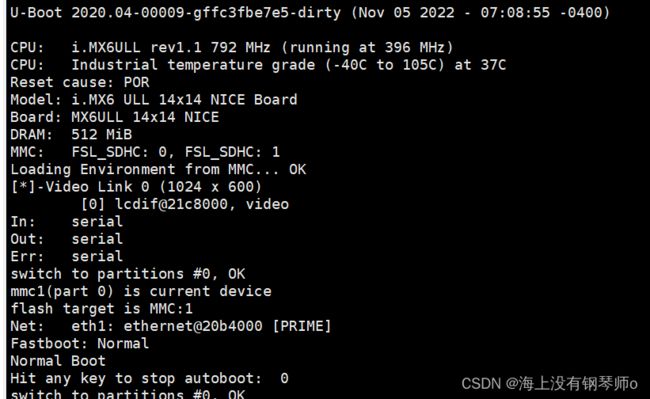
LCD屏幕参数适配
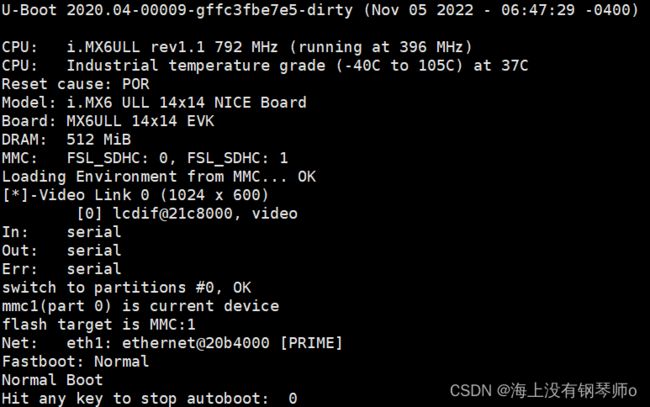
emmc启动后发现nxp的logo没有显示,我用的屏幕是1024x600分辨率。
打开设备树文件,搜索lcdif节点。
vi arch/arm/dts/imx6ul-14x14-nice.dtsi
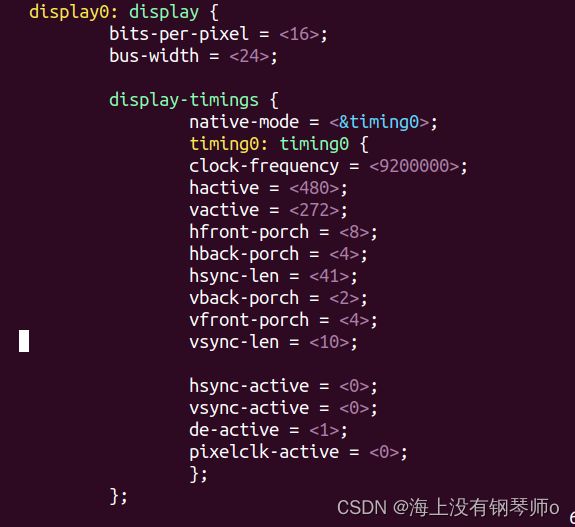
除了要修改hactive和vactive以外,边缘参数也要修改,启动后发现屏幕频率不够高,很明显的闪动,可以阅读lcd手册,看像素时钟需求(51.2Mhz)。这里直接对比百问网提供的修改后的uboot2017源码。
注意:百问网uboot2017并没有使用设备树,直接找在board文件夹里面找。如下:

修改后的参数如下:

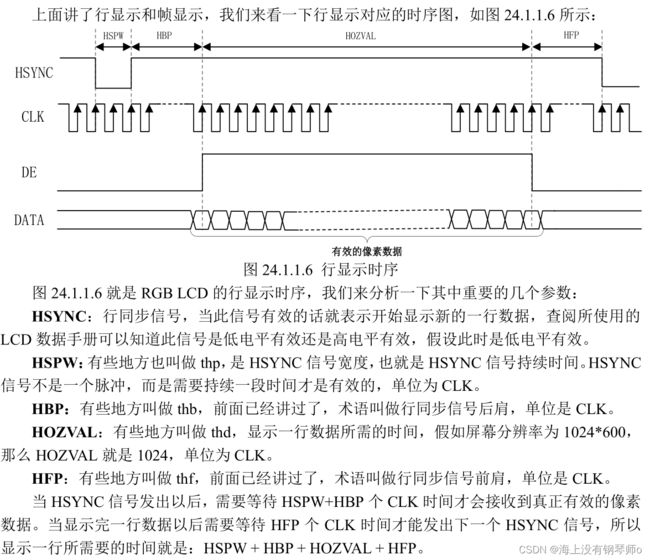
参数的意思为:
在这里插入图片描述
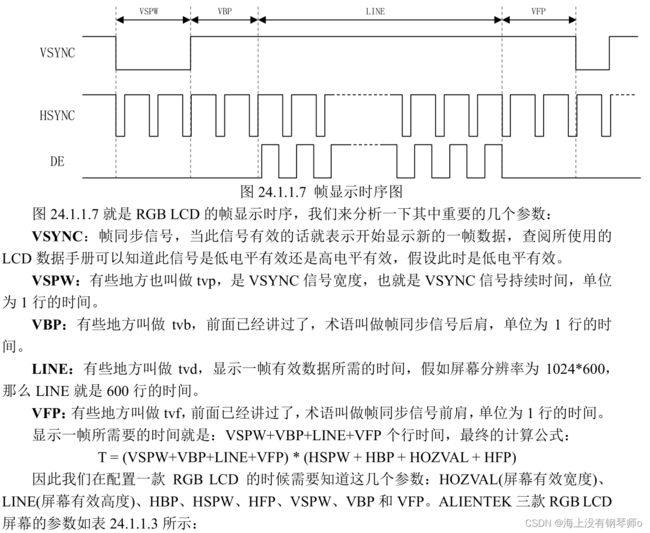
屏幕参数:

现在再次编译uboot,启动开发板,一切都舒服了。
咦?仔细一看居然还有EVK这三个字母!必须改掉。vi打开我们复制的board文件夹里的c文件搜索/EVK。
vi board/freescale/mx6ullnice/mx6ullnice.c
找到board_late_init函数

找到checkboard函数
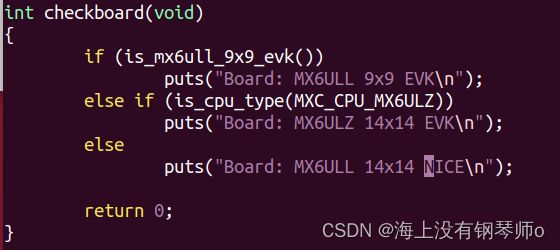
重新下载启动,舒服多了吧:
后续可以通过tftp下载内核镜像和设备树,用nfs挂载根文件系统。