【飞桨PaddleSpeech语音技术课程】— 语音识别-Deepspeech2
(以下内容搬运自飞桨PaddleSpeech语音技术课程,点击链接可直接运行源码)
语音识别——DeepSpeech2
0. 视频理解与字幕
# 下载demo视频
!test -f work/source/subtitle_demo1.mp4 || wget https://paddlespeech.bj.bcebos.com/demos/asr_demos/subtitle_demo1.mp4 -P work/source/
import IPython.display as dp
from IPython.display import HTML
html_str = '''
'''.format("work/source/subtitle_demo1.mp4 ")
dp.display(HTML(html_str))
print ("ASR结果为:当我说我可以把三十年的经验变成一个准确的算法他们说不可能当我说我们十个人就能实现对十九个城市变电站七乘二十四小时的实时监管他们说不可能")
Demo实现:https://github.com/PaddlePaddle/PaddleSpeech/blob/develop/demos/automatic_video_subtitiles/
1. 前言
1.1 背景知识
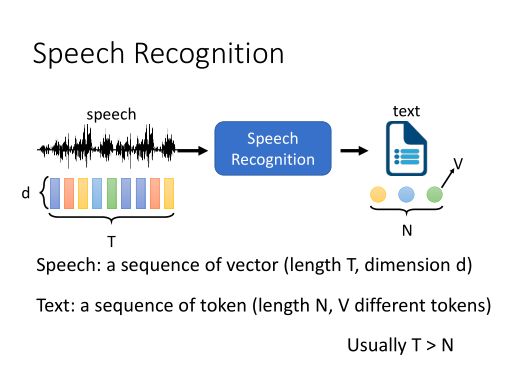
语音识别(Automatic Speech Recognition, ASR) 是一项从一段音频中提取出语言文字内容的任务。
目前该技术已经广泛应用于我们的工作和生活当中,包括生活中使用手机的语音转写,工作上使用的会议记录等等。
1.2 发展历史
- 早期,生成模型流行阶段:GMM-HMM (上世纪90年代)
- 深度学习爆发初期: DNN,CTC[1] (2006)
- RNN流行,Attention提出初期: RNN-T[2](2013), DeepSpeech[3] (2014), DeepSpeech2 [4] (2016), LAS[5](2016)
- Attetion is all you need提出开始[6]: Transformer[6](2017),Transformer-transducer[7](2020) Conformer[8] (2020
Deepspeech2模型包含了CNN,RNN,CTC等深度学习语音识别的基本技术,因此本教程采用了Deepspeech2作为讲解深度学习语音识别的开篇内容。
2. 实战:使用 DeepSpeech2 进行语音识别的流程
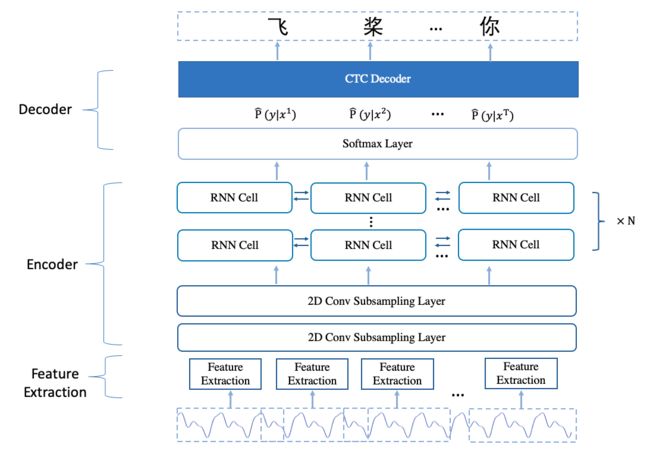
Deepspeech2 模型,其主要分为3个部分:
- 特征提取模块:此处使用 linear 特征,也就是将音频信息由时域转到频域后的信息。
- Encoder:多层神经网络,用于对特征进行编码。
- CTC Decoder: 采用了 CTC 损失函数训练;使用 CTC 解码得到结果。
2.1 Deepspeech2 模型结构
2.1.1 Encoder
Encoder 主要采用了 2 层降采样的 CNN(subsampling Convolution layer)和多层 RNN(Recurrent Neural Network)层组成。
其中降采样的 CNN 主要用途在提取局部特征,减少模型输入的帧数,降低计算量,并易于模型收敛。
2.1.1.1 CNN: Receptive field
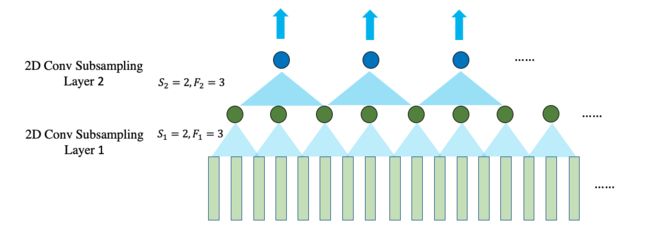
假如以 F j F_j Fj 代表 L j L_j Lj 的 cnn 滤波器大小, S i S_i Si 代表 L i L_i Li 的CNN滤波器跳跃长度,并设定 S 0 = 1 S_0 = 1 S0=1。那么 L k L_k Lk 的感受野大小可以由以下公式计算:
R k = 1 + ∑ j = 1 k [ ( F j − 1 ) ∏ i = 0 j − 1 S i ] \boxed{R_k = 1 + \sum_{j=1}^{k} [(F_j - 1) \prod_{i=0}^{j-1} S_i]} Rk=1+j=1∑k[(Fj−1)i=0∏j−1Si]
在下面的例子中, F 1 = F 2 = 3 F_1 = F_2 = 3 F1=F2=3 并且 S 1 = S 2 = 2 S_1 = S_2 = 2 S1=S2=2, 因此可以得到 R 2 = 1 + 2 ⋅ 1 + 2 ⋅ 2 = 7 R_2 = 1 + 2\cdot 1 + 2\cdot 2 = 7 R2=1+2⋅1+2⋅2=7
2.1.1.2 RNN
而多层 RNN 的作用在于获取语音的上下文信息,这样可以获得更加准确的信息,并一定程度上进行语义消歧。
Deepspeech2 的模型中 RNNCell 可以选用 GRU 或者 LSTM。
2.1.1.3 Softmax
而最后 softmax 层将特征向量映射到为一个字表长度的向量,向量中存储了当前 step 结果预测为字表中每个字的概率。
2.1.2 Decoder
Decoder 的作用主要是将 Encoder 输出的概率解码为最终的文字结果。
对于 CTC 的解码主要有3种方式:
-
CTC greedy search
-
CTC beam search
-
CTC Prefix beam search
2.1.2.1 CTC Greedy Search
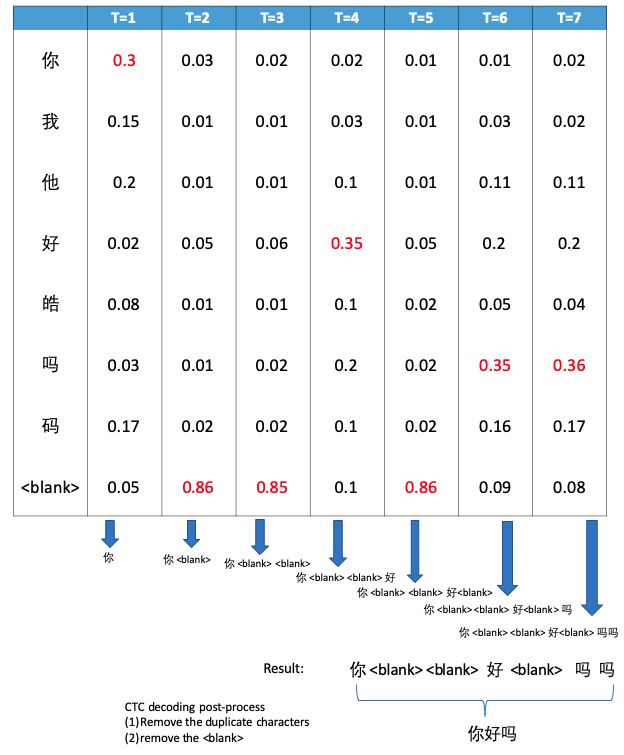
在每个时间点选择后验概率最大的 label 加入候选序列中,最后对候选序列进行后处理,就得到解码结果。
2.1.2.2 CTC Beam Search
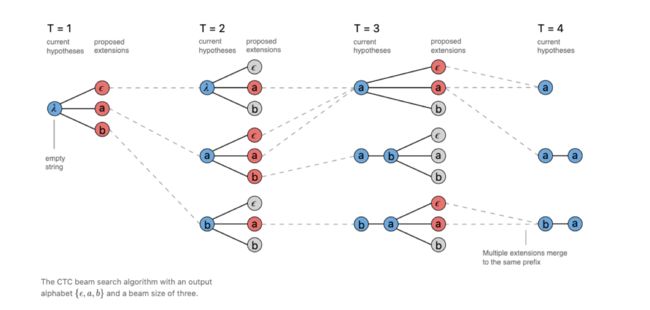
CTC Beam Search 的方式是有 beam size 个候选序列,并在每个时间点生成新的最好的 beam size 个候选序列。
最后在 beam size 个候选序列中选择概率最高的序列生成最终结果。
2.1.2.3 CTC Prefix Beam Search
CTC prefix beam search和 CTC beam search 的主要区别在于:
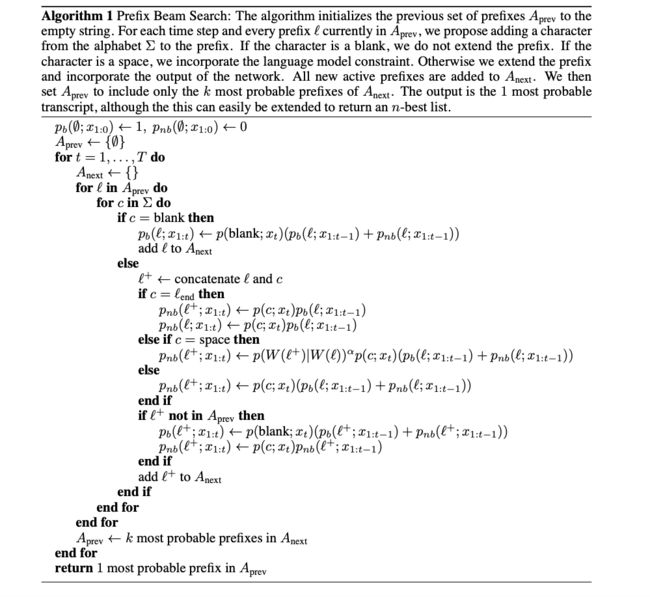
CTC beam search 在解码过程中产生的候选有可能产生重复项,而这些重复项在 CTC beam search 的计算过程中是各自独立的,占用了 beam 数,降低解码的多样性和鲁棒性。
而 CTC prefix beam search 在解码过程中合并了重复项的概率,提升解码的鲁棒性和多样性。
CTC prefix beam search 计算过程如下图所示:
CTCLoss 相关介绍参看 Topic 内容。
2.1.2.4 使用 N-gram 语言模型
对于解码的候选结果的打分,除了有声学模型的分数外,还会有额外的语言模型分以及长度惩罚分。
设定 W W W 为解码结果, X X X 为输入语音, α \alpha α 和 β \beta β 为设定的超参数。
则最终分数的计算公式为:
s c o r e = P a m ( W ∣ X ) ⋅ P l m ( W ) α ⋅ ∣ W ∣ β score = P_{am}(W \mid X) \cdot P_{lm}(W) ^ \alpha \cdot |W|^\beta score=Pam(W∣X)⋅Plm(W)α⋅∣W∣β
2.2 准备工作
2.2.1 安装 paddlespeech
!pip install paddlespeech==0.2.0
!pip install paddleaudio==1.0.1
2.2.2 准备工作目录
!mkdir -p ./work/workspace_asr_ds2
%cd ./work/workspace_asr_ds2
2.2.3 获取预训练模型和相关文件
!test -f ds2.model.tar.gz || wget -nc https://paddlespeech.bj.bcebos.com/s2t/aishell/asr0/ds2.model.tar.gz
!tar xzvf ds2.model.tar.gz
# 构建一个数据增强的配置文件,由于预测不需要数据增强,因此文件为空即可
!touch conf/augmentation.json
# 下载语言模型
!mkdir -p data/lm
!test -f ./data/lm/zh_giga.no_cna_cmn.prune01244.klm || wget -nc https://deepspeech.bj.bcebos.com/zh_lm/zh_giga.no_cna_cmn.prune01244.klm -P data/lm
# 获取用于预测的音频文件
!test -f ./data/demo_01_03.wav || wget -nc https://paddlespeech.bj.bcebos.com/datasets/single_wav/zh/demo_01_03.wav -P ./data/
import IPython
IPython.display.Audio('./data/demo_01_03.wav')
# 快速体验识别结果
!paddlespeech asr --input ./data/demo_01_03.wav
2.2.4 导入python包
import paddle
import warnings
warnings.filterwarnings('ignore')

from yacs.config import CfgNode

from paddlespeech.s2t.frontend.speech import SpeechSegment
from paddlespeech.s2t.frontend.normalizer import FeatureNormalizer
from paddlespeech.s2t.frontend.featurizer.audio_featurizer import AudioFeaturizer
from paddlespeech.s2t.frontend.featurizer.text_featurizer import TextFeaturizer

from paddlespeech.s2t.io.collator import SpeechCollator

from paddlespeech.s2t.models.ds2 import DeepSpeech2Model

from  matplotlib import pyplot as plt
%matplotlib inline
2.2.5 设置预训练模型的路径
config_path = "conf/deepspeech2.yaml"
checkpoint_path = "./exp/deepspeech2/checkpoints/avg_1.pdparams"
audio_file = "data/demo_01_03.wav"


# 读取 conf 文件并结构化
ds2_config = CfgNode(new_allowed=True)
ds2_config.merge_from_file(config_path)
print(ds2_config)
2.3 获取特征
2.3.1 语音特征介绍
2.3.1.1 语音特征提取整体流程图
由"莊永松、柯上優 DLHLP - HW1 End-to-end Speech Recognition PPT" 修改得
2.3.1.2 fbank 提取过程简化图
fbank 特征提取大致可以分为3个步骤:
-
语音时域信号经过增强,然后进行分帧。
-
每一帧数据加窗后经过离散傅立叶变换(DFT)得到频谱图。
-
将频谱图的特征经过 Mel 滤波器得到 logmel fbank 特征。
由"DLHLP 李宏毅 语音识别课程PPT" 修改得
2.3.1.3 CMVN 计算过程
对于所有获取的特征,模型在使用前会使用 CMVN 的方式进行归一化
2.3.2 构建音频特征提取对象
feat_config = ds2_config.collator
audio_featurizer = AudioFeaturizer(
    spectrum_type=feat_config.spectrum_type,
    feat_dim=feat_config.feat_dim,
    delta_delta=feat_config.delta_delta,
    stride_ms=feat_config.stride_ms,
    window_ms=feat_config.window_ms,
    n_fft=feat_config.n_fft,
    max_freq=feat_config.max_freq,
    target_sample_rate=feat_config.target_sample_rate,
    use_dB_normalization=feat_config.use_dB_normalization,
    target_dB=feat_config.target_dB,
    dither=feat_config.dither)
feature_normalizer = FeatureNormalizer(feat_config.mean_std_filepath) if feat_config.mean_std_filepath else None
2.3.3 提取音频的特征
# 'None' 只是一个占位符,因为预测的时候不需要reference
speech_segment = SpeechSegment.from_file(audio_file, "None")
audio_feature = audio_featurizer.featurize(speech_segment)
audio_feature_i = feature_normalizer.apply(audio_feature)

audio_len = audio_feature_i.shape[0]
audio_len = paddle.to_tensor(audio_len)
audio_feature = paddle.to_tensor(audio_feature_i, dtype='float32')
audio_feature = paddle.unsqueeze(audio_feature, axis=0)
print(f"shape: {audio_feature.shape}")

plt.figure()
plt.imshow(audio_feature_i.T, origin='lower')
plt.show()
2.4 使用模型获得结果
2.4.1 构建Deepspeech2模型
model_conf = ds2_config.model
# input dim is feature size
model_conf.input_dim = 161
# output_dim is vocab size
model_conf.output_dim = 4301
model = DeepSpeech2Model.from_config(model_conf)
2.4.2 加载预训练的模型
model_dict = paddle.load(checkpoint_path)
model.set_state_dict(model_dict)
2.4.3 进行预测
decoding_config = ds2_config.decoding
decode_batch_size = 1
print (decoding_config)
text_feature = TextFeaturizer(unit_type='char',
                            vocab=ds2_config.collator.vocab_filepath)
vocab_list = text_feature.vocab_list
model.decoder.init_decoder(
            decode_batch_size, vocab_list, decoding_config.decoding_method,
            decoding_config.lang_model_path, decoding_config.alpha, decoding_config.beta,
            decoding_config.beam_size, decoding_config.cutoff_prob,
            decoding_config.cutoff_top_n, decoding_config.num_proc_bsearch)
result_transcripts = model.decode(
        audio_feature,
        audio_len
 )
print ("预测结果为:")
print (result_transcripts[0])
P.S. 欢迎关注我们的 github repo PaddleSpeech, 是基于飞桨 PaddlePaddle 的语音方向的开源模型库,用于语音和音频中的各种关键任务的开发,包含大量基于深度学习前沿和有影响力的模型。
