single sign on 与 cas
single sign on 与 cas
cookie与session与token、普通登录、单点登录、三种常见实现方式、cas-server、cas-client
注:oauth2 是保护服务端资源,即受 oauth2 保护的资源能不能被客户端访问;cas 是保护用户信息,即该用户有没有权限访问 cas 客户端的资源。oauth2 已经停止维护,被 spring authorization server 代替。
1、cookie 与 session 与 token
1.1、cookie
- 首先,http 是一个无状态协议,也就是说服务端不知道当前访问者的身份信息,于是为了对服务端与客户端的会话进行追踪,就诞生了 cookie 和 session,所以 cookie 是有状态的。
- 其次,cookie 是维护在客户端的,一般用来存储服务端发送到客户端的一小部分数据,如 sessionId 等,再浏览器发起后续请求时会携带 cookie 发送到服务端。
- 最后,cookie 是无法跨域的,也就是每一个 cookie 都绑定了一个单一域名,无法在不同域名(父域名)之间使用,但是可以通过 domain 来在同一父域名下的子域名之间使用。
1.2、session
- session 是服务端创建的,用来存储信息并存储在服务端的,且其是基于 cookie 的。当用户第一次访问服务端时创建 session,用户离开网站时 session 销毁。
- 基于 session 的认证流程:当用户第一次访问服务端时,服务端会跟据用户信息创建 session,并将 session 对应的 sessionId 通过响应头中的 set-cookie 参数传给浏览器,浏览器在接收到之后将 sessionId 设置到 cookie 中,并将该 sessionId 所属的域(域名)也记录起来。用户在进行后续的请求时会判断该域下是否有 cookie 信息,若有则将 cookie 携带给服务端,服务端在接收到请求后会根据其携带的 sessionId 查找对应的 session,若没有则说明用户登录失效,若有责可进行后续操作。
1.3、token
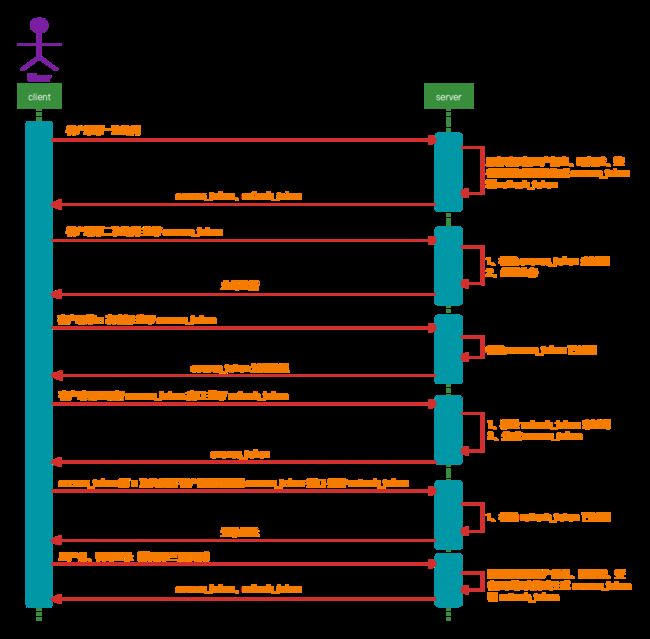
token 是由服务端通过用户唯一标识、时间戳、签名等信息再经过加密算法加密生成的字符串,其是存储在客户端的,也就是无状态的。一般分为 access_token 和 refresh_token。微信授权登录小程序、其它 app、网站等就是 token 最成熟的使用例子。
- access_token:用来作为用户访问资源的凭证。用户登录后生成 access_token,并将其返回给客户端,客户端在收到 access_token 后将其存储在 local storage 等存储介质中,在后续的请求中都携带 access_token,服务端在收到请求后会先对 access_token 进行校验(校验真实性、有效性等),校验通过后进行后但会数据。access_token 时效性短,容易过期。
- refresh_token:用来作为刷新 access_token 的凭证。若没有 refresh_token,则当 access_token 过期后用户只能通过再次登录(以登录界面的方式交互),来重新获取 access_token。若存在 refresh_token,则在用户发起请求后,服务器校验 access_token,若 access_token 校验未通过,则客户端携带 refresh_token 调用刷新 access_token,服务端收到请求后先校验 refresh_token。若校验通过,则刷新 access_token 并返回,这样就实现了隐式登录;若校验未通过,则返回登录提示,此时,用户需要显式登录。
1.4、session 与 token
- session 是一种记录客户端与服务端会话状态的机制,使服务端有状态化,存储一些用户、会话信息等。token 是一种令牌,是客户端访问服务端资源的凭证,使服务端无状态化,可以存储用户信息,不会存储会话信息。
- session 是基于 cookie 的,而 cookie 是不支持跨域的,这在一定程度上会成为应用扩展的限制。而 token 则不存在这种现象。且有些应用是不支持 cookie 的,如小程序等,则不能使用 cookie。
- 基于 session 的认证机制实际上是把用户信息存储到 session 中,向客户端发放 sessionId,鉴权时根据 sessionId 获取用户信息,然后进行校验。而基于 token 的机制实际上分为两部分,即 认证 和 授权,授权是指那个 app 可以访问用户信息,认证是指访问该 app 的是不是该用户。
- session 和 token 并不冲突,也就是说 session 和 token 可以同时存在于项目中。但在认证机制上,token 要优于 session。因为 token 无状态,不会因为服务端的问题(宕机、丢失信息)而导致认证失效或会话失效;且 token 由时间戳、签名生成,以及会被服务端校验,所以 token 在一定程度上阻止了网络攻击。因此,如果你的应用需要与其它应用共享用户数据,或者需要提供接口给第三方,那么 token 更适合你,若只是单一应用,则使用 token 或 session 都无伤大雅。
2、普通登录
普通登录一般分为两种,即基于 cookie 的和基于 token 的。
基于 cookie 的是指用户登录后,服务端会将用户信息存储到 session 中,然后将 sessionId 设置到响应头的 set-cookie 中,客户端每次请求时都携带 cookie,服务端接受到请求后根据其携带的 sessionId 获取对应用户信息进行权限校验等。spring security、shiro 等认证授权框架的默认实现就是基于 cookie 的。
基于 token 的是指用户登录后,服务端根据用户信息生成 token 同时将 token 返回给客户端,客户端将其存储,后续请求中都携带 token,服务端在收到请求后先校验 token,再做后续处理。
3、单点登录
单点登录(Single Sign On),简称 SSO,是比较流行的企业业务整合的解决方案之一,SSO 的定义是在多个应用系统中,用户只需要登录一次就可以访问所有相互信任的应用系统。(摘自百度百科)。
单点登录的本质是实现用户登录状态再多个应用间的共享。在普通登录中用户登录状态是存储在 session 或 token 中的,那么要实现单点登录就要实现 session 或 token 的共享。
4、sso 三种常见实现方式
单点登录最常用的三种实现方式是父域 cookie、认证中心、localstorage。
4.1、父域 cookie
父域 cookie 指的是将服务端返回的 sessionId 设置到父域名的 cookie 中,也就是将 domain 属性设置为父域名,将 path 属性设置为根路径,这样,该父域名下的所有字域名都可以访问该 cookie 。
4.2、认证中心
认证中心,顾名思义,就是专门进行认证的应用系统。
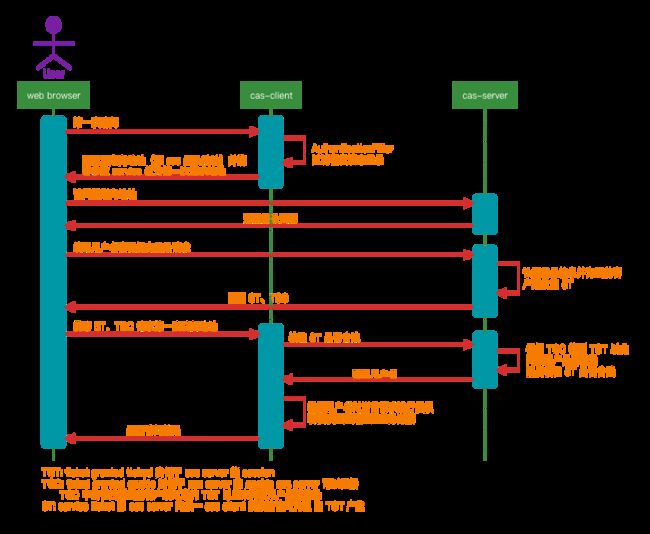
- 当用户访问某个应用系统时,应用系统通过检查 token 判断当前用户是否登录。
- 若未登录,则应用系统返回认证中心登录地址,用户浏览器根据认证中心登录地址重定向到认证中心(携带用户请求应用系统时的地址,以便认证通过后回到用户要访问的页面),认证中心收到请求后返回登录页面,用户填写用户名、密码提交登录请求,认证中心进行认证,认证通过后为当前用户客户端生成 token,并通过 set-cookie 设置到用户客户端(次 cookie 为认证中心的 cookie,即其域属于认证中心),用户客户端收到 token 后携带 token 访问应用系统(即第一次访问的资源),应用系统收到请求拿到 token,然后向认证中心校验 token 是否合法。
- 若不合法则认证中心返回登录页面。
- 若合法则返回用户名或唯一标识,应用系统收到用户名或唯一标识后对当前登录进行授权。
- 若授权未通过则返回相应提示。
- 若授权通过则返回业务数据。
- 若已登录,则应用中心拿到 token,向认证中心校验 token 是否合法,后续步骤同上。
- 若未登录,则应用系统返回认证中心登录地址,用户浏览器根据认证中心登录地址重定向到认证中心(携带用户请求应用系统时的地址,以便认证通过后回到用户要访问的页面),认证中心收到请求后返回登录页面,用户填写用户名、密码提交登录请求,认证中心进行认证,认证通过后为当前用户客户端生成 token,并通过 set-cookie 设置到用户客户端(次 cookie 为认证中心的 cookie,即其域属于认证中心),用户客户端收到 token 后携带 token 访问应用系统(即第一次访问的资源),应用系统收到请求拿到 token,然后向认证中心校验 token 是否合法。
- 嗯…
下图为常用认证中心 cas 的工作原理。
4.3、localstorage
localstorage 属于浏览器技术,用户成功后将 session 或 token 保存到浏览器的 localstorgae 中,然后通过前端技术 iframe + postMessage() 将 session 或 token 发送到其它需要相互信任的应用系统对应的域下的 localstorgae,这样就实现了登录信息的共享,每次请求时都从 localstorage 取到 session 或 token。然后进行授权等操作。
5、cas-server
简单说下 cas server 的搭建。
5.1、cas server 源码处理
为了便于开发者进行自定义开发及扩展,cas 提供了覆盖模版 cas-overlay-template,开发者可以通过覆盖文件及增加的方式对其进行自定义化和扩展。
github cas-overlay-template github 上有 cas 各个版本的 overlay-template,可按需进行下载。(cas 6.0 之前的版本基于 jdk8,采用 maven 管理依赖,cas 6.0 及之后的版本基于 jdk11,采用 gradle 管理依赖)。
得到源码之后有三种处理方式:
- 进入 cas-overlay-template-x.x.x 目录,用 mvn install、mvn package 对其进行安装依赖及打包,然后在 target 目录下生成 cas.war 包,此时可以直接将其部署到 tomcat 中启动即可。
- 进入 cas-overlay-template-x.x.x 目录,用 mvn install、mvn package 对其进行安装依赖及打包,然后可以直接用 idea 将其打开进行扩展。
- 进入 cas-overlay-template-x.x.x 目录,用 mvn install、mvn package 对其进行安装依赖及打包,会生成一个 overlays 目录,该目录下即为 cas 的源码及配置。此时,可以选择新建 maven 项目,将 overlays 目录引入新建的项目中,将 overlays 目录下的 org.apereo.cas.cas-server-webapp-tomcat-x.x.x 设置为 web resource,然后可以将 overlays/org.apereo.cas.cas-server-webapp-tomcat-x.x.x/WEB-INF/classes 目录下的一些配置文件复制到 我们自建项目的 resources 下进行修改,如 application.properties 等。
5.2、自定义及扩展
此时,我们可以对 cas server 进行自定义开发和扩展,如是否使用 https、配置数据库、自定义密码加密,自定义登录页面等。(以下示例基于 cas-5.3.16)
-
支持 http:
overlays/org.apereo.cas.cas-server-webapp-tomcat-x.x.x/WEB-INF/classes/services 目录下的 HTTPSandIMAPS-10000001.json 拷贝到 resources/services 目录下,增加 http 支持。同时,若需要使用 https,则需要生成 idk 证书,具体请请教度娘。
{ "@class" : "org.apereo.cas.services.RegexRegisteredService", "serviceId" : "^(https|http|imaps)://.*", // 修改这里 "name" : "HTTPS and IMAPS", "id" : 10000001, "description" : "This service definition authorizes all application urls that support HTTPS and IMAPS protocols.", "evaluationOrder" : 10000 } -
配置数据库:
pom.xml 文件中加入依赖 :
<dependency>
  <groupId>org.apereo.casgroupId>
  <artifactId>cas-server-support-jdbcartifactId>
  <version>${cas.version}version>
dependency>

<dependency>
  <groupId>org.apereo.casgroupId>
  <artifactId>cas-server-support-jdbc-driversartifactId>
  <version>${cas.version}version>
dependency>

<dependency>
  <groupId>mysqlgroupId>
  <artifactId>mysql-connector-javaartifactId>
  <version>8.0.16version>
dependency>
application.properties 文件中加入一下配置:
# authentication
cas.authn.jdbc.query[0].driverClass=com.mysql.cj.jdbc.Driver
cas.authn.jdbc.query[0].url=jdbc:mysql://ip:3306/database-name?useUnicode=true&characterEncoding=utf8&useSSL=false&&serverTimezone=UTC
cas.authn.jdbc.query[0].user=root
cas.authn.jdbc.query[0].password=******
cas.authn.jdbc.query[0].sql=select * from user where username = ?
cas.authn.jdbc.query[0].fieldPassword=password
总而言之,自定义就是将 overlays/org.apereo.cas.cas-server-webapp-tomcat-x.x.x/WEB-INF/classes 目录下的某个文件拷贝 到 resources 目录下,然后进行修改,这就是覆盖。大致项目结构如下:
5.3、application.properties & pom.xml
# cas server
server.context-path=/cas-sso-server
server.port=9625

# ssl
server.ssl.enabled=false
server.ssl.key-store=classpath:cas-jdk8
server.ssl.key-store-password=962464
server.ssl.key-password=962464

# authentication
cas.authn.jdbc.query[0].driverClass=com.mysql.cj.jdbc.Driver
cas.authn.jdbc.query[0].url=jdbc:mysql://ip:3306/database-demo?useUnicode=true&characterEncoding=utf8&useSSL=false&&serverTimezone=UTC
cas.authn.jdbc.query[0].user=root
cas.authn.jdbc.query[0].password=******
cas.authn.jdbc.query[0].sql=select * from user where username = ?
cas.authn.jdbc.query[0].fieldPassword=password

# services
cas.tgc.secure=false
cas.serviceRegistry.initFromJson=true

server.max-http-header-size=2097152
server.use-forward-headers=true
server.connection-timeout=20000
server.error.include-stacktrace=ALWAYS

server.compression.enabled=true
server.compression.mime-types=application/javascript,application/json,application/xml,text/html,text/xml,text/plain

server.tomcat.max-http-post-size=2097152
server.tomcat.basedir=build/tomcat
server.tomcat.accesslog.enabled=true
server.tomcat.accesslog.pattern=%t %a "%r" %s (%D ms)
server.tomcat.accesslog.suffix=.log
server.tomcat.min-spare-threads=10
server.tomcat.max-threads=200
server.tomcat.port-header=X-Forwarded-Port
server.tomcat.protocol-header=X-Forwarded-Proto
server.tomcat.protocol-header-https-value=https
server.tomcat.remote-ip-header=X-FORWARDED-FOR
server.tomcat.uri-encoding=UTF-8

spring.http.encoding.charset=UTF-8
spring.http.encoding.enabled=true
spring.http.encoding.force=true

##
# CAS Cloud Bus Configuration
#
spring.cloud.bus.enabled=false

# Indicates that systemPropertiesOverride can be used.
# Set to false to prevent users from changing the default accidentally. Default true.
spring.cloud.config.allow-override=true

# External properties should override system properties.
spring.cloud.config.override-system-properties=false

# When allowOverride is true, external properties should take lowest priority, and not override any
# existing property sources (including local config files).
spring.cloud.config.override-none=false

# spring.cloud.bus.refresh.enabled=true
# spring.cloud.bus.env.enabled=true
# spring.cloud.bus.destination=CasCloudBus
# spring.cloud.bus.ack.enabled=true

endpoints.enabled=false
endpoints.sensitive=true

endpoints.restart.enabled=false
endpoints.shutdown.enabled=false

# Control the security of the management/actuator endpoints
# The 'enabled' flag below here controls the rendering of details for the health endpoint amongst other things.
management.security.enabled=true
management.security.roles=ACTUATOR,ADMIN
management.security.sessions=if_required
management.context-path=/status
management.add-application-context-header=false

# Define a CAS-specific "WARN" status code and its order
management.health.status.order=WARN, DOWN, OUT_OF_SERVICE, UNKNOWN, UP

# Control the security of the management/actuator endpoints
# With basic authentication, assuming Spring Security and/or relevant modules are on the classpath.
security.basic.authorize-mode=role
security.basic.path=/cas/status/**
# security.basic.enabled=true
# security.user.name=casuser
# security.user.password=

##
# CAS Web Application Session Configuration
#
server.session.timeout=300
server.session.cookie.http-only=true
server.session.tracking-modes=COOKIE

##
# CAS Thymeleaf View Configuration
#
spring.thymeleaf.encoding=UTF-8
spring.thymeleaf.cache=true
spring.thymeleaf.mode=HTML
spring.thymeleaf.template-resolver-order=100
##
# CAS Log4j Configuration
#
# logging.config=file:/etc/cas/log4j2.xml
server.context-parameters.isLog4jAutoInitializationDisabled=true

##
# CAS AspectJ Configuration
#
spring.aop.auto=true
spring.aop.proxy-target-class=true

##
# CAS Authentication Credentials
#
#cas.authn.accept.users=casuser::Mellon
<project xmlns="http://maven.apache.org/POM/4.0.0" xmlns:xsi="http://www.w3.org/2001/XMLSchema-instance"
         xsi:schemaLocation="http://maven.apache.org/POM/4.0.0 http://maven.apache.org/xsd/maven-4.0.0.xsd">
    <modelVersion>4.0.0modelVersion>

    <groupId>org.xgllhzgroupId>
    <artifactId>cas-sso-serverartifactId>
    <packaging>warpackaging>
    <version>1.0version>
    <name>cas-sso-servername>

    <properties>
        <java.version>1.8java.version>
        <project.build.sourceEncoding>UTF-8project.build.sourceEncoding>
        <maven.compiler.source>1.8maven.compiler.source>
        <maven.compiler.target>1.8maven.compiler.target>

        <cas.version>5.3.16cas.version>
        <springboot.version>2.7.0springboot.version>

        <app.server>-tomcatapp.server>

        <mainClassName>org.springframework.boot.loader.WarLaunchermainClassName>
        <isExecutable>falseisExecutable>
        <manifestFileToUse>${project.build.directory}/war/work/org.apereo.cas/cas-server-webapp${app.server}/META-INF/MANIFEST.MFmanifestFileToUse>
    properties>

    <dependencies>

        <dependency>
            <groupId>org.apereo.casgroupId>
            <artifactId>cas-server-webapp${app.server}artifactId>
            <version>${cas.version}version>
            <type>wartype>
            <scope>runtimescope>
        dependency>

        <dependency>
            <groupId>org.apereo.casgroupId>
            <artifactId>cas-server-support-jdbcartifactId>
            <version>${cas.version}version>
        dependency>

        <dependency>
            <groupId>org.apereo.casgroupId>
            <artifactId>cas-server-support-jdbc-driversartifactId>
            <version>${cas.version}version>
        dependency>

        <dependency>
            <groupId>mysqlgroupId>
            <artifactId>mysql-connector-javaartifactId>
            <version>8.0.16version>
        dependency>

    dependencies>

    <build>
        <finalName>cas-sso-serverfinalName>
        <plugins>
            <plugin>
                <groupId>org.springframework.bootgroupId>
                <artifactId>spring-boot-maven-pluginartifactId>
                <version>${springboot.version}version>
                <configuration>
                    <mainClass>${mainClassName}mainClass>
                    <addResources>trueaddResources>
                    <executable>${isExecutable}executable>
                    <layout>WARlayout>
                configuration>
                <executions>
                    <execution>
                        <goals>
                            <goal>repackagegoal>
                        goals>
                    execution>
                executions>
            plugin>
            <plugin>
                <groupId>org.apache.maven.pluginsgroupId>
                <artifactId>maven-war-pluginartifactId>
                <version>2.6version>
                <configuration>
                    <warName>cas-sso-serverwarName>
                    <failOnMissingWebXml>falsefailOnMissingWebXml>
                    <recompressZippedFiles>falserecompressZippedFiles>
                    <archive>
                        <compress>falsecompress>
                        <manifestFile>${manifestFileToUse}manifestFile>
                    archive>
                    <overlays>
                        <overlay>
                            <groupId>org.apereo.casgroupId>
                            <artifactId>cas-server-webapp${app.server}artifactId>
                        overlay>
                    overlays>
                configuration>
            plugin>
            <plugin>
                <groupId>org.apache.maven.pluginsgroupId>
                <artifactId>maven-compiler-pluginartifactId>
                <version>3.3version>
            plugin>
        plugins>
    build>

project>
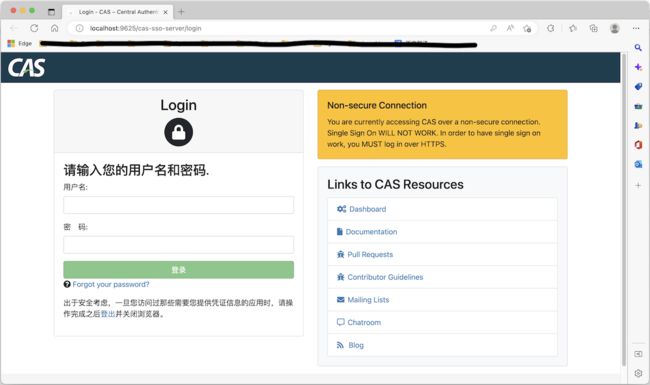
配置 tomcat 然后启动,就会出现登录页面:
6、cas-client
cas-client 即用户访问的应用系统,即需要相互信任的系统,这个就比较简单了,加入 cas 配置即可。
-
pom 文件加入 cas-client 依赖:
<dependency> <groupId>org.jasig.cas.clientgroupId> <artifactId>cas-client-coreartifactId> <version>3.6.4version> dependency> -
application.yml 文件加入 cas 配置:
################### spring 配置 ################### spring: application: name: cas-sso-client profiles: active: dev main: allow-bean-definition-overriding: true ################### tomcat 配置 ################### server: port: 9626 servlet: context-path: /cas-sso-client tomcat: uri-encoding: UTF-8 netty: connection-timeout: 50000 ssl: enabled: false key-store: classpath:cas-jdk8 key-store-password: 962464 key-password: 962464 ################### cas 配置 ################### cas: server: base-url: http://localhost:9625/cas-sso-server login-url: http://localhost:9625/cas-sso-server/login client: base-url: http://localhost:9626/ excluded-url: /static/* -
模仿一个用户要访问的资源(如一个 hello world 接口?):
// ? ? ? -
启动 cas-client,然后访问 hello world 接口,就会重定向到 cas-server 的登录页面,登录成功后就会跳转到 hello world 页面。
图片就不用贴了吧 O_O !
山茶花读不懂白玫瑰 人海遇见人海归


