pytest测试报告Allure - 动态生成标题生成功能、添加用例失败截图
一、动态生成标题
默认 allure 报告上的测试用例标题不设置就是用例名称,其可读性不高;当结合 @pytest.mark.parametrize 参数化完成数据驱动时,如标题写死,其可读性也不高。
那如果希望标题可以动态的生成,采取的方案是:
参数化 @pytest.mark.parametrize + @allure.title()
1.1、示例一:参数化无标题
1、创建
test_allure_title_parametrize.py文件
脚本代码:
#!/usr/bin/env python
# -*- coding: utf-8 -*-
"""
"""

import pytest
import allure

@pytest.fixture()
def login(request):
    """登录"""
    param = request.param
    print(f"用户名:{param['username']},密码:{param['password']}")
    # 返回
    return {"code": 0, "msg": "登陆成功"}

datas = [
    {"username": "name1", "password": "pwd1"},
    {"username": "name2", "password": "pwd2"},
    {"username": "name3", "password": "pwd3"}
]

@allure.story('登录功能')
@pytest.mark.parametrize('login', datas, indirect=True)
def test_login(login):
    """
    登录测试用例
    """
    assert login['code'] == 0
2、输入命令运行:
pytest test_allure_title_parametrize.py --alluredir=./allure
allure serve allure
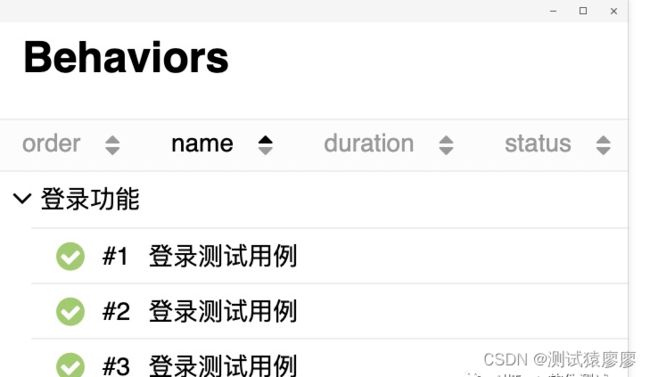
如图所示:用例标题就是函数名+参数化的数据
1.2、示例二:参数化有标题
1、创建
test_allure_title_parametrize2.py文件
脚本代码:
#!/usr/bin/env python
# -*- coding: utf-8 -*-
"""
"""

import pytest
import allure

@pytest.fixture()
def login(request):
    """登录"""
    param = request.param
    print(f"用户名:{param['username']},密码:{param['password']}")
    # 返回
    return {"code": 0, "msg": "登陆成功"}

datas = [
    {"username": "name1", "password": "pwd1"},
    {"username": "name2", "password": "pwd2"},
    {"username": "name3", "password": "pwd3"}
]

@allure.story('登录功能')
@allure.title('登录测试用例')
@pytest.mark.parametrize('login', datas, indirect=True)
def test_login(login):
    """
    登录测试用例
    """
    assert login['code'] == 0
2、输入命令运行:
pytest test_allure_title_parametrize2.py --alluredir=./allure
allure serve allure
1.3、示例三:参数化使用ids
1、创建
test_allure_title_parametrize3.py文件
脚本代码:
#!/usr/bin/env python
# -*- coding: utf-8 -*-
"""
"""

import pytest
import allure

@pytest.fixture()
def login(request):
    """登录"""
    param = request.param
    print(f"用户名:{param['username']},密码:{param['password']}")
    # 返回
    return {"code": 0, "msg": "登陆成功"}

datas = [
    {"username": "name1", "password": "pwd1"},
    {"username": "name2", "password": "pwd2"},
    {"username": "name3", "password": "pwd3"}
]

ids = [
    "name1,pwd1",
    "name2,pwd2",
    "name3,pwd3"
]

@allure.story('登录功能')
@pytest.mark.parametrize('login', datas, ids=ids, indirect=True)
def test_login(login):
    """
    登录测试用例
    """
    assert login['code'] == 0
2、输入命令运行:
pytest test_allure_title_parametrize3.py --alluredir=./allure
allure serve allure
如图所示:用例标题就是函数名+ids
1.4、示例四:参数化动态生成标题
1、创建
test_allure_title_parametrize4.py文件
脚本代码:
#!/usr/bin/env python
# -*- coding: utf-8 -*-
"""
"""

import pytest
import allure

@pytest.fixture()
def login(request):
    """登录"""
    param = request.param
    print(f"用户名:{param['username']},密码:{param['password']}")
    # 返回
    return {"code": 0, "msg": "登陆成功"}

data1 = [
    {"username": "name1", "password": "pwd1"},
    {"username": "name2", "password": "pwd2"},
    {"username": "name3", "password": "pwd3"}
]

data2 = [
    ("admin1", "123456"),
    ("admin2", "123456"),
    ("admin3", "123456")
]

@allure.story('字典参数化')
@allure.title('登录测试用例1-{dict}')
@pytest.mark.parametrize('dict', data1)
def test_login1(dict):
    """
    登录测试用例1
    """
    print(dict['username'], dict['password'])

@allure.story('传值进fixture')
@allure.title('登录测试用例2{login}')
@pytest.mark.parametrize('login', data1, indirect=True)
def test_login2(login):
    """
    登录测试用例2
    """
    assert login['code'] == 0

@allure.story('分别传值')
@allure.title('登录测试用例3-用户名:{username}-密码:{password}')
@pytest.mark.parametrize('username, password', data2)
def test_login3(username, password):
    """
    登录测试用例3
    """
    print(username, password)
2、输入命令运行:
pytest test_allure_title_parametrize4.py --alluredir=./allure
allure serve allure
如图所示:三种方式传入参数
1.5、示例五:参数化动态生成标题优化
1、创建
test_allure_title_parametrize5.py文件
脚本代码:
#!/usr/bin/env python
# -*- coding: utf-8 -*-
"""
"""

import pytest
import allure

data = [
    ("admin1", "123456", "admin1 登录成功"),
    ("admin2", "123456", "admin2 登录失败"),
    ("admin3", "123456", "admin3 登录成功")
]

@allure.story('分别传值')
@allure.title('登录测试用例-{title}')
@pytest.mark.parametrize('username, password, title', data)
def test_login(username, password, title):
    """
    登录测试用例
    """
    print(username, password)
2、输入命令运行:
如图所示:测试用例标题可读性比较好,易于维护
二、动态生成功能
@allure.title() 和 @allure.description() 都是装饰器,给测试用例提供标题和描述的,其实 allure 提供了在测试用例执行过程中动态指定标题和描述等标签的方法。如:allure.dynamic.title()、
allure.dynamic.description()
allure.dynamic 提供的方法:
2.1、示例一:allure.dynamic.title()
用例标题
1、创建test_allure_dynamic.py文件
脚本代码:
#!/usr/bin/env python
# -*- coding: utf-8 -*-
"""
"""

import allure

@allure.title("装饰器标题")
def test_case():
    print("AllTests软件测试")
    allure.dynamic.title("动态标题")
2、输入命令运行:
pytest test_allure_dynamic.py --alluredir=./allure
allure serve allure
2.2、示例二:
allure.dynamic.description()
用例描述
1、创建test_allure_dynamic2.py文件
脚本代码:2、输入命令运行:
#!/usr/bin/env python
# -*- coding: utf-8 -*-
"""
"""

import allure

@allure.title("装饰器标题")
def test_case():
    """
    动态设置描述
    """
    print("AllTests软件测试")
    allure.dynamic.description("动态描述")
    allure.dynamic.title("动态标题")
2、输入命令运行:
pytest test_allure_dynamic2.py --alluredir=./allure
allure serve allure
如图所示:
2.3、示例三:结合@pytest.mark.parametrize()
1、创建test_allure_dynamic3.py文件
脚本代码:
#!/usr/bin/env python
# -*- coding: utf-8 -*-
"""
"""

import pytest
import allure

data = [
    ("admin1", "123456", "admin1 登录成功"),
    ("admin2", "123456", "admin2 登录失败"),
    ("admin3", "123456", "admin3 登录成功")
]

@pytest.mark.parametrize('username, password, title', data)
def test_case(username, password, title):
    """
    测试用例
    """
    print(username, password)
    allure.dynamic.title(title)
2、输入命令运行:
pytest test_allure_dynamic3.py --alluredir=./allure
allure serve allure
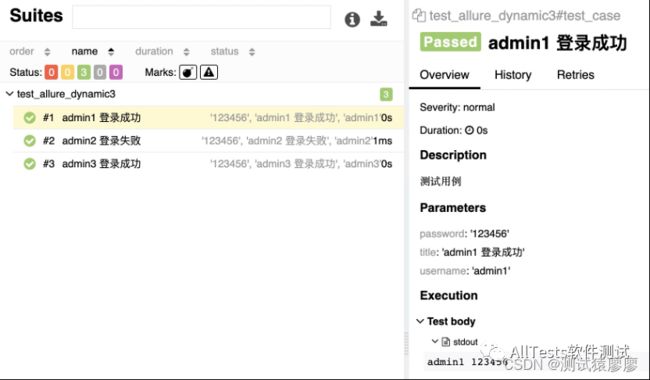
如图所示:
2.4、示例四:全部方法示例
1、创建test_allure_dynamic4.py文件
脚本代码:
#!/usr/bin/env python
# -*- coding: utf-8 -*-
"""
"""

import allure

def test_case1():
    """
    测试用例1
    """
    allure.dynamic.title("动态title")
    allure.dynamic.description_html("动态description_html")
    allure.dynamic.severity("blocker")
    allure.dynamic.feature("动态feature")
    allure.dynamic.story("动态story")
    allure.dynamic.tag("动态tag")
    allure.dynamic.link("https://www.baidu.com/?wd=1", "动态link")
    allure.dynamic.issue("https://www.baidu.com/?wd=2", "动态issue")
    allure.dynamic.testcase("https://www.baidu.com/?wd=3", "动态testcase")

def test_case2():
    """
    测试用例2
    """
    allure.dynamic.description("动态description")
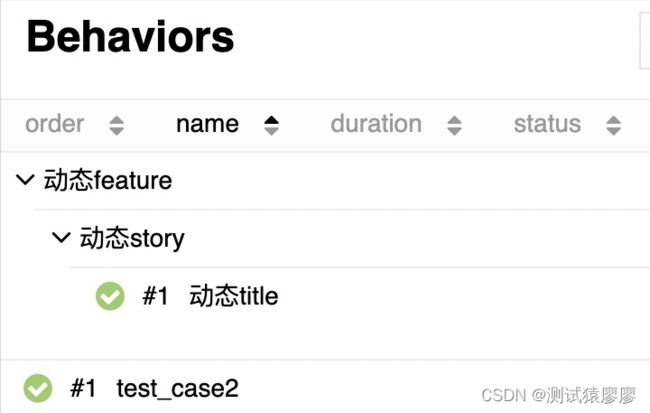
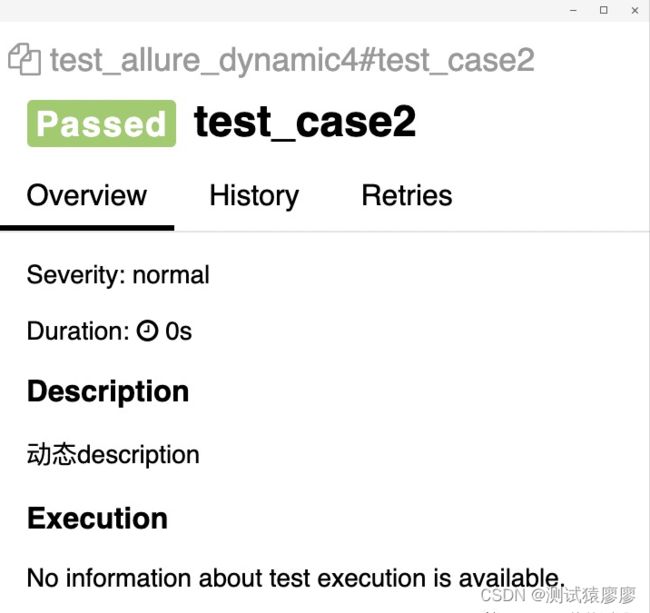
如图所示:
测试用例1
测试用例2
三、报告添加用例失败截图
在进行 UI 自动化的时候,执行测试用例失败时,想把用例失败的截图展现在 allure 报告里面。
可以使用 pytest 的钩子函数 pytest_runtest_makereport,用来获取用例的执行结果,当用例失败则进行截图操作。之后添加截图到allure报告里,可以使用 allure.attach 方法。
1、创建conftest.py文件
使用钩子函数pytest_runtest_makereport,并判断用例失败时截图操作。
脚本代码:
#!/usr/bin/env python
# -*- coding: utf-8 -*-
"""
"""

from selenium import webdriver
import pytest
import allure
import os

my_driver = None

@pytest.hookimpl(tryfirst=True, hookwrapper=True)
def pytest_runtest_makereport(item, call):
    """钩子函数:获取每个用例的状态"""
    # 获取钩子方法的调用结果
    my_results = yield
    rep = my_results.get_result()
    # 获取用例call,执行结果是失败的,不包含 setup/teardown
    if rep.when == "call" and rep.failed:
        mode = "a" if os.path.exists("failures") else "w"
        with open("failures", mode) as f:
            # let's also access a fixture for the fun of it
            if "tmpdir" in item.fixturenames:
                extra = " (%s)" % item.funcargs["tmpdir"]
            else:
                extra = ""
            f.write(rep.nodeid + extra + "\n")
        # 添加allure报告截图
        if hasattr(my_driver, "get_screenshot_as_png"):
            with allure.step("添加失败截图"):
                allure.attach(my_driver.get_screenshot_as_png(), "失败截图", allure.attachment_type.PNG)

@pytest.fixture(scope='session')
def browser():
    global my_driver
    if my_driver is None:
        my_driver = webdriver.Chrome()
    yield my_driver
    print("退出登陆")
    my_driver.quit()
2、创建test_allure_screenshot.py文件,为测试用例。
#!/usr/bin/env python
# -*- coding: utf-8 -*-
"""
"""

from selenium import webdriver
import pytest
import allure

def test_case(browser):
    with allure.step("打开首页"):
        browser.get("https://www.cnblogs.com/alltests/")
    # 断言-标题
    assert browser.title == "AllTests软件测试"
3、输入命令运行:
pytest test_allure_screenshot.py --alluredir=./allure
allure serve allure
如图所示:
用例失败时截图,并将截图展现在allure报告里。
截图文件在报告目录里。


