FinClip小程序+Rust(二):环境搭建
上文(《FinClip小程序+Rust(一)》介绍了“夹心饼架构”:应用场景用小程序实现、算法逻辑用 Rust,两方面都实现了跨终端跨平台、一次开发多处使用,中间一层为以操作系统原生技术实现的“宿主”,粘合、桥接了这两侧,宿主代码保持相对简单和稳定。
本篇以 iOS 为例介绍开发环境的准备。
从零到一:构建一个能运行小程序的App
我们先从FinClip官网下载最新的FinClip SDK,解压后应获得 FinApplet.framework、FinAppletExt.framework、FinAppletWebRTC.framework、FinAppletBLE.framework 等一系列库。
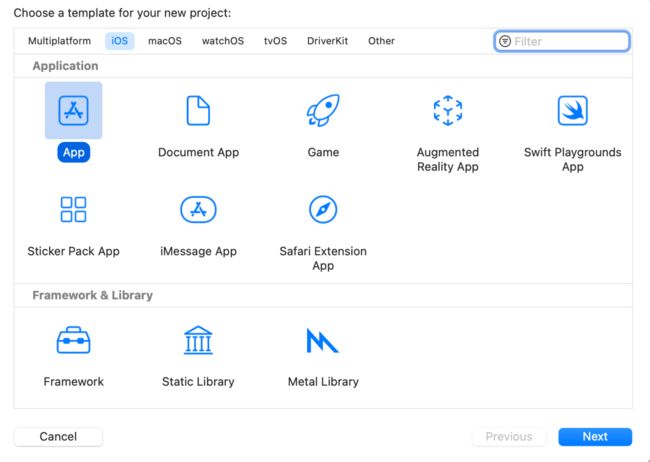
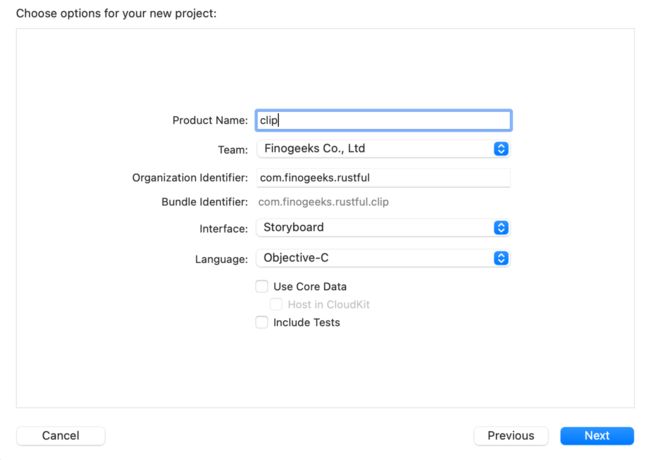
用 xcode 创建一个新项目,简单起见我们建一个基于 Objective-C 的 Storyboard。
此处注意,我们要小心命名这个 App 并记住它的 Bundle ID,如下图,我们这个App 的 Bundle ID 是 com.finogeeks.rustful.clip。
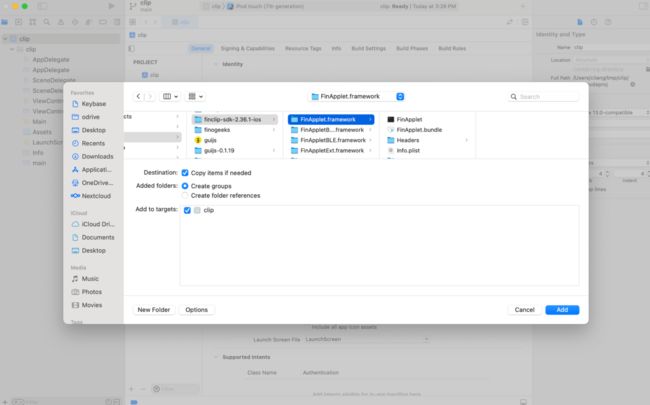
然后把 FinClip SDK 解压包里的 FinApplet.framework 添加至工程里,注意勾选“Copy items if needed”。
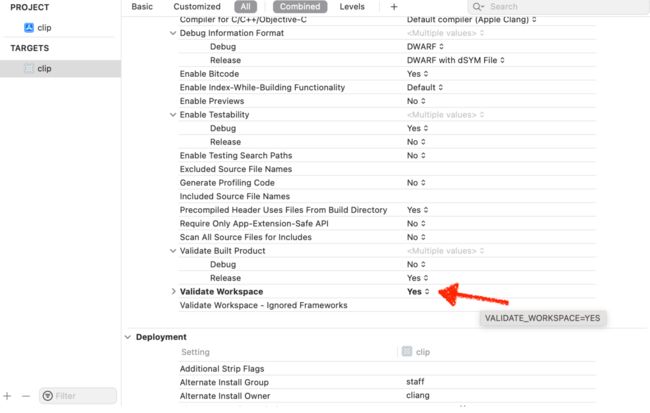
在macOS 11.1以上使用xcode较新的版本(笔者所用版本为13.0)编译上述项目,会出现报错无法继续,如果你有这个情况,可在项目Build Settings处作以下配置。
clip.xcodeproj Building for iOS Simulator, but the linked and embedded framework 'FinApplet.framework' was built for iOS + iOS Simulator报错信息
Apple 从 Xcode 12.3 开始推荐使用 xcframework 替代 Framework,本文所依赖的FinClip SDK 2.36.5 尚未提供 xcframework 版本,所以有上述问题,编译过程且有系列warning,但不影响运行。在未来版本应会被解决。
FinClip SDK 中包含 x86_64 架构,便于我们开发时用模拟器调试。本文主要目的是试验在 iOS 上 FinClip 小程序和 Rust 代码的集成,以能运行在 simulator 为要。但是x86_64 架构的 SDK,打包上传应用市场时会报错,如何打包时自动去除模拟器架构的脚本,可以让我们既可以用模拟器开发调试,又能正常提交应用市场,不在本文探讨范围,详情可参考官网iOS集成。
FinClip 安全沙箱的初始化
FinClip SDK 代码库成功编译构建至 App后,是时候进行代码集成。这里包括注册生成 SDK Key 和 SDK Secret,用最少至仅 4 行代码即可在 App 中把 FinClip SDK 初始化,准备好加载运行 FinClip 小程序。
获得 SDK Key 以及 SDK Secret 的两种方式
FinClip 技术分成端侧和云(服务器)侧两大部分,端侧即 FinClip SDK,云(服务器)侧则是 FinClip 小程序管理中心/小程序商店,用于实时、动态管理小程序的上下架以及小程序开发者的管理(正如你所熟悉的互联网小程序平台一样)。凡泰极客提供整套方案的两种部署使用方式:
- FinClip.com Managed Service 方式:即由凡泰极客运行云侧,开发者把小程序的上下架管理托管。从而降低自己在服务器端的运维成本
- On-Premise 方式:即由开发者或开发者所在的机构,自行部署运维FinClip服务器侧,自行管理自己的开发者,自行管控自己的小程序开发生态。普通开发者也可以自行免费体验和使用社区版(功能和企业版版无异),在一台个人电脑即可以运行完整环境。
取决于我们打算用谁的服务器端,则 SDK Key 和SDK Secret 需要在该服务器生成,因为最终 App 所嵌入的 SDK 需要被所连接的目标服务器作安全授权。
方式一:采用 FinClip.com 托管服务
这是最简单直接的方式,也就是说我们准备开发的小程序,将上架至 FinClip.com。(注意:本系列所描述内容的验证,需要使用自己部署安装的社区版。FinClip.com服务在此为了完整起见作简单介绍)。
首先,需到 FinClip.com 注册一个开发者账户。
其次,登录后在管理页面「应用管理-新增合作应用」,添加要集成 SDK 的目标应用。
具体操作详情见关联移动端应用
你将获得类似以下的 Key 和 Secret:
准备把它们粘贴、复制至初始化的代码中。
方式二:自行部署 FinClip 社区版
如果阁下按捺不止自己动手搭建一套 FinClip、拥有一个自己掌控的小程序商店,那么也可以轻而易举的在自己的开发环境部署个社区版(作为前置条件,注意先安装好 docker 相关工具):
mkdir my-finclip
cd my-finclip
sudo sh -c "$(curl -fsSL https://static.finogeeks.club/deploy/mop/release/install.sh)"
成功安装后,在上述目录下运行:
docker-compose up -d假如你用 MacOS 上的 Docker Desktop,打开 Dashboard 应能看到下图,其中每一个 container 都应该处于 running 状态(除了mop-init "EXITED(0)" 为正常)。
此时 FinClip 管理后台(分成面向开发者的“企业端”以及面向运营管理者的“运营端”)可通过以下 URL 访问:
- 企业端:“http://127.0.0.1:8000/mop/mechanism/#/login
- 运营端:http://127.0.0.1:8000/mop/operate/#/login
登录企业端与运营端的默认用户名为“[email protected]”,密码为“123Abc”。
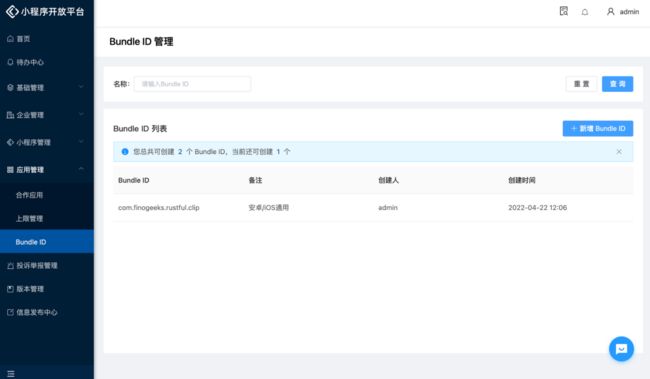
首先,我们自己扮演管理角色,在运营端登记自己准备开发移动端应用的 Bundle ID,Bundle ID 是你在 Apple App Store 或者某个 Android 应用商店准备发布的 App 的应用标识。
在这里作为例子,我们新增了一个 Bundle ID "com.finogeeks.rustful.clip"(记得之前在 Xcode 创建 App 的时候所定义的名字):
输入后在 FinClip 也关联了同样的 Bundle ID
其次,我们扮演开发者角色,到企业端中,添加一款合作应用,姑且称之为 rust-ios,并关联相应的 Bundle ID:
至此,我们把以下信息关联了起来:
- 我们要开发的 App 名称,在这个例子里,叫“rust-ios”
- 这个 App 的 Bundle ID 是:com.finogeeks.rustful.clip,它将适用于iOS和Android,虽然在本文我们只针对 iOS 作开发。我们首先是在xcode创建项目的时候采用了这个 ID,现在我们把它登记到 FinClip,目的是让平台知道一个小程序可以运行在什么 App 中;
- FinClip SDK 嵌入到这个 App 时,需要使用一对指定的 Key 以及 Secret 去对接服务器端
- 服务器端,取决于你用的是 FinClip.com的托管/SaaS 服务,还是用自己部署的社区版。前者的 API Server是api.finclip.com;后者的话,缺省是127.0.0.1:8000。
FinClip SDK 在 App 中的初始化
现在我们准备好在 Xcode 创建的 clip 项目中写初始化 SDK 的代码。在AppDelegate.m,加入以下代码:
//
//  AppDelegate.m
//  clip
//
#import "AppDelegate.h"
#import

@interface AppDelegate ()

@end

@implementation AppDelegate

- (BOOL)application:(UIApplication *)application didFinishLaunchingWithOptions:(NSDictionary *)launchOptions {

    NSString *appKey = @"22LyZEib0gLTQdU3MUauARgvo5OK1UkzIY2eR+LFy28NAKxKlxHnzqdyifD+rGyG";
    FATConfig *config = [FATConfig configWithAppSecret:@"8fe39ccd4c9862ae" appKey:appKey];
    config.apiServer = @"http://127.0.0.1:8000";
    [[FATClient sharedClient] initWithConfig:config error:nil];
    [[FATClient sharedClient] setEnableLog:YES];

    return YES;
}

#pragma mark - UISceneSession lifecycle

- (UISceneConfiguration *)application:(UIApplication *)application configurationForConnectingSceneSession:(UISceneSession *)connectingSceneSession options:(UISceneConnectionOptions *)options {
    // Called when a new scene session is being created.
    // Use this method to select a configuration to create the new scene with.
    return [[UISceneConfiguration alloc] initWithName:@"Default Configuration" sessionRole:connectingSceneSession.role];
}

- (void)application:(UIApplication *)application didDiscardSceneSessions:(NSSet *)sceneSessions {
    // Called when the user discards a scene session.
    // If any sessions were discarded while the application was not running, this will be called shortly after application:didFinishLaunchingWithOptions.
    // Use this method to release any resources that were specific to the discarded scenes, as they will not return.
}

@end
Rust 开发环境的准备
安装R ust 环境比较简单,例如在 Mac/Linux上,一行脚本即可:
curl --proto '=https' --tlsv1.2 -sSf https://sh.rustup.rs | sh其他相关内容可参考官网。
为了能把 Rust 代码编译成 iOS、Android 的组件库,我们需要安装一些平台架构的target:
# Android targets
rustup target add aarch64-linux-android armv7-linux-androideabi i686-linux-android x86_64-linux-android

# iOS targets
rustup target add aarch64-apple-ios armv7-apple-ios armv7s-apple-ios x86_64-apple-ios i386-apple-ios
此外,我们还需要安装两个工具,用于构建 iOS 的 universal library,以及从 Rust 代码生成 C/C++ 头文件,供 Objective-C/Swift 的项目在导入静态库时使用:
# 安装 Xcode build tools(如果已经安装,请忽略)
xcode-select --install
# 这个cargo subcommand用于构建iOS上的universal library
cargo install cargo-lipo
# 这个工具用于自动生成 C/C++11 头文件
cargo install cbindgen
# 在Android环境,请先安装Android Studio和NDK,但不在本文讨论范围
cargo install cargo-ndk
关于 cargo-lip 的介绍,可以看这里,关于 cbindgen,可以参考这里。但实际上你也可以以后有兴趣慢慢看,知其然不知其所然在这里没毛病,不影响使用。
Rust 代码编译成 iOS 静态库的验证
在开始正式的开发前,我们可以写一个简单的“Hello World”验证一下上述环境。首先用 cargo 创建一个新的 Rust 的 Library 工程类型的项目,原因是我们会把这个library 导入到 iOS 的项目中并把其中函数注册至 FinClip SDK 供小程序侧通过 JavaScript 接口调用。
cargo new --lib helloCargo 自动生成以下目录:
hello
   |--src
   |    |--lib.rs
   |--Cargo.toml
我们的 Cargo.toml 如下:
[package]
name = "rustylib"
version = "0.1.0"
authors = ["me "]
edition = "2021"

[lib]
name = "rustylib"

# 构建iOS和Android版本需要的两个crate
crate-type = ["staticlib", "lib"]

# 编译Android版时需要,本文不涉及,但列出在此供Android开发者参考
[target.'cfg(target_os = "android")'.dependencies]
jni = { version = "0.19.0", default-features = false }
现在我们修订一下 lib.rs。因为这个实验项目并不是为了简单跑一个 Rust 'Hello World',而是为了验证输出一个可以供异构语言调用的 C Library,所以在这里我们用了 Rust FFI(Foreign Function Interface)来写(看上去比“正常”的'Hello World'复杂):
// lib.rs

use std::ffi::{CStr, CString};
use std::os::raw::c_char;

#[cfg(target_os = "android")]
mod android;

#[no_mangle]
pub unsafe extern "C" fn hello(to: *const c_char) -> *mut c_char {
    let c_str = CStr::from_ptr(to);
    let recipient = match c_str.to_str() {
        Ok(s) => s,
        Err(_) => "you",
    };

    CString::new(format!("From Rust: {}", recipient))
        .unwrap()
        .into_raw()
}

#[no_mangle]
pub unsafe extern "C" fn hello_release(s: *mut c_char) {
    if s.is_null() {
        return;
    }
    drop(CString::from_raw(s));
}

#[no_mangle]
pub extern "C" fn hello_world() {
    println!("Hello, World");
}
Rust 编译器编译代码时,会修改我们定义的函数名称,增加一些用于其编译过程的额外信息。为了使 Rust 函数能在其它语言(例如Objective-C、Swift)中被调用,必须禁用 Rust 编译器的名称修改功能。所以我们使用了 no_mangle 的函数属性声明去指示编译这些准备注册到 FinClip SDK 的函数。
另外,我们还使用了 extern "C"的声明,以告知编译器这些被如此声明的函数是为了供 Rust 以外的其他语言代码调用,编译器需要保证按C语言的标准规范去编译输出。
其他更多关于 FFI(Foreign Function Interface)以及 unsafe 等 Rust 语言的能力,不是本文焦点,可参考 Rust 相关方面的内容。在本系列后面的章节也会继续涉及。
为了能验证一下上述函数能否运行,我们编写一个测试例子:
cd hello
mkdir examples
touch examples/test.rs
一个简单的测试如下:
// test.rs

use std::ffi::{CStr, CString};
use rustylib::{hello, hello_release};

fn main() {
    let input = CString::new("Hello, world!").unwrap();

    unsafe {
        let c_buf = hello(input.as_ptr());
        let slice = CStr::from_ptr(c_buf);
        println!("{}", slice.to_str().unwrap());
        hello_release(c_buf);
    }
}
在 hello 项目的根目录下,运行测试:
cargo run --example test应产生如下结果:
Blocking waiting for file lock on build directory
Compiling rustylib v0.1.0 (/Users/myself/projects/hello)
Finished dev [unoptimized + debuginfo] target(s) in 5.89s
Running `target/debug/examples/test`
From Rust: Hello, world!
现在可以尝试为 iOS 进行编译:
$ cargo lipo --release我们可以检查一下生成的静态库:
lipo -info target/aarch64-apple-ios/release/librustylib.a                         Non-fat file: target/aarch64-apple-ios/release/librustylib.a is architecture: arm64

ipo -info target/x86_64-apple-ios/release/librustylib.a
Non-fat file: target/x86_64-apple-ios/release/librustylib.a is architecture: x86_64
但我们用于开发的是一个合并了上述两个架构的通用库 Fat library,在以下目录中:
ls -l target/universal/release/librustylib.a要在 iOS 验证这部分代码,可以先生成一个 C 的头文件,在 hello 这个 Rust 项目的根:
cbindgen src/lib.rs -l c > rustylib.h然后把这个头文件添加至AppDelegate.m,再对其进行修订,把'hello'和'hello_release'直接按C的方式调用一下即可。代码非常简单,不在此赘述。但是在xcode中需要把上述生成的librustylib.a以及rustylib.h添加至项目中(如果不是iOS开发者不熟悉xcode,可以跳过本部分验证,继续阅读本系列后续篇章的详细介绍)。
至此,我们把iOS Native App、FinClip SDK和Rust library三个部分集成起来,接下来的内容,将是聚焦开发一个比“Hello World”复杂点的、确实适合用Rust实现的library,并让它通过FinClip小程序来展现人机交互的界面。开发过程所用到的工具有点多,你需要:
- xcode:用于编译构建“壳”应用,以及通过simulator测试你的应用
- FinClip IDE:用于开发调试小程序
- FinClip.com(或者运行在你本地电脑上的FinClip社区版)的企业端和运营端
- vscode以及一些有助于开发测试Rust代码的extension(当然,你也可以用其他vscode替代工具)
对于首次开发Rust的朋友,在vscode推荐安装以下extension:
- Better TOML,用于支持Cargo.toml文件的syntax highlight
- crates,用于支持Cargo.toml中crate的版本依赖关系管理
- rust-analyzer,似乎优于官方的rust extension
- CodeLLDB,能支持C++、Rust等编译语言的debugger
- Tabnine AI Auto-complete,一句话,智能好使
That's for now。
