Web服务搭建 - Apache
Web服务搭建 - Apache
- Web服务器搭建
-
- Web服务介绍
-
- 服务器与浏览器利用HTTP协议进行交互的过程
- 统一资源定位符URL
- Apache服务器
- 配置Apache服务
-
- 搭建基础web服务
- 建立虚拟目录
- 建立基于用户认证的虚拟目录
- 建立访问权限的虚拟目录
- 配置个人主页功能
- 配置基于不同端口的虚拟主机
- 配置基于IP地址的虚拟主机
Web服务器搭建
Web服务介绍
服务器与浏览器利用HTTP协议进行交互的过程
- 浏览器确定web页面的URL
- 浏览器请求域名服务器解析的IP地址
- 浏览器向主机的80端口请求一个TCP链接
- 服务器对连接请求进行确认,建立连接的过程完成
- 浏览器发出请求页面报文
- 服务器以index.html页面的具体内容响应浏览器
- WWW服务器关闭TCP连接
- 浏览器将页面index.html的文本信息显示在屏幕上
如果index.html页面包含图像等非文本信息,则浏览器需要为每个图像建立一个新的TCP连接,从服务器获得图像并显示
统一资源定位符URL
URL是对可以从因特网上得到的资源的位置和访问方法的一种简洁的表示。URL给资源的位置提供一种抽象的识别方法,并用这种方法给资源定位。即用户可以利用URL指明使用什么协议访问哪台服务器上的什么文件。
URL的格式如下:
<协议类型>://<主机>:<端口>/<路径>
协议类型:即URL的访问方式,常用的协议类型由超文本传输协议(HTTP)、文件传输协议(FTP)和新闻(NEWS)
端口和路径有时可以省略。当HTTP的端口是80,通常可以省略,如果使用非80端口,则需要指明端口号
例: http://www.fudan.edu.cn/student/index.html http://www.fudan.edu.cn:8080/student/index.html
Apache服务器
Apache来自"a patchy server"的读音,意思是充满补丁的服务器,经过多次修改,Apache已经成为世界上最流行的Web服务器软件之一
Apache的特点:简单、速度快、性能稳定,并可以作为代理服务器来使用
Apache的主要特征:
- 可以运行在所有的计算机平台
- 支持最新的HTTP协议
- 支持虚拟主机
- 简单而强有力的基于文件的配置
- 支持通用网关接口CGI
- 支持Java Servlets
- 集成Perl脚本编程语言
配置Apache服务
搭建基础web服务
安装Apache软件包
准备工作:配置IP地址、配置本地yum源
yum -y install httpd
rpm -qa | grep httpd   #查看Apache版本
启动服务并设置开机自启
systemctl enable --now httpd
在web浏览器中输入http://ip地址,出现测试网页

利用HTML语言编写网页index.html,并存放在路径/var/www/html下
<html>
<title>homepagetitle>
<body>
	<h2>This is my firse homepageh2>
body>
html>
重启httpd服务
systemctl restart httpd
使用域名访问网站
准备工作:配置DNS服务器,在DNS服务器中设置相应的记录,在此不再赘述。
# 修改DNS全局配置文件 named.conf
listen-on port 53 { any; };
allow-query     { any; };

# 主配置文件 named.rfc1912.zones
zone "hz.com" IN {
        type master;
        file "hz.com.zone";
        allow-update { none; };
};

# 创建正向解析区域文件 hz.com.zone
$TTL 1D
@       IN SOA  @ dns.lnjd.com. (
                                        0       ; serial
                                        1D      ; refresh
                                        1H      ; retry
                                        1W      ; expire
                                        3H )    ; minimum
        NS      @
        A       127.0.0.1
        AAAA    ::1
dns     IN      A       192.168.176.139
www     IN      A       192.168.176.139

# 修改配置文件 /etc/resolv.conf
nameserver 192.168.176.139
重启DNS服务
systemctl restart named
建立虚拟目录
虚拟目录是一个位于Apache服务器主目录之外的目录,它不包含在Apache服务器的主目录中,但从客户机看来,它与位于主目录的子目录是一样的。每个虚拟目录都有一个别名,客户端通过这个别名来访问虚拟目录
在Apache服务器的主配置文件httpd.conf中,通过Alias指令设置虚拟目录。默认情况下,该文件已经建立了/icons和/manual两个虚拟目录,它们对应的物理路径是/var/www/icons和/var/www/manual
创建物理目录和网页内容
mkdir -p /xuni
echo This is news site > /xuni/index.html
chmod 705 /xuni/index.html   # 使其它用户具有读和执行权限
配置主配置文件httpd.conf
# 添加语句 -- 在标签中添加,在任意位置添加也可以成功
# apache2.4版本配置
Alias /news "/xuni"
<Directory /xuni>
     Options All
     AllowOverride None
     Require all granted
</Directory>

# 如果是2.2版本
Alias /news "/xuni"
<Directory /xuni>
     Order allow,deny
     Allow from all
</Directory>
DirectoryIndex index.html index.php
表示只输入IP地址或域名,默认显示的页面,用空格间隔多个参数
重启httpd服务
systemctl restart httpd
在浏览器中输入http://www.hz.com/news访问虚拟目录

建立基于用户认证的虚拟目录
创建物理目录和网页内容
mkdir -p /authentication
echo This is authentication homepage > /authentication/index.html
配置主配置文件httpd.conf
# 添加虚拟目录
Alias /rz "/authentication"
<Directory "/authentication">
    Options Indexes
    AllowOverride Authconfig
    AuthType basic
    AuthName "Input user and password"
    AuthUserFile /var/www/html/htpasswd
    Require valid-user
</Directory>
- Options :设置特定目录中的服务器特性,参数Indexes表示允许目录浏览,当访问的目录中没有DirectoryIndex参数指定的网页文件时,会列出目录中的目录清单
- AllowOverride:设置如何使用访问控制文件.htpasswd,该文件是用来配置相应目录的访问方法,如果设置为None,表示禁止使用所有指令,即忽略.htpasswd,如果设置为Authconfig,则表示开启认证、授权以及安全的相关指令;
- AuthType :baisc为基本身份认证
- AuthName:表示当浏览器弹出认证对话框时出现的提示信息
- AuthUserFile:指定了用户密码文件
- Require:设置允许访问虚拟目录的用户,valid-user表示该密码文件中所有用户都可以访问,如果只允许user1用户访问,可以设置为 Require User user1
生成认证文件
[root@localhost conf]# htpasswd -c /var/www/html/htpasswd user1
New password:
Re-type new password:
Adding password for user user1
参数 -c 表示新创建一个密码文件,再添加用户时就不需要加该参数了
重启httpd服务
systemctl restart httpd
测试
在浏览器中输入http://www.hz.com/rz访问虚拟目录,需要输入用户名和密码

输入正确的用户和密码后,成功访问网页

建立访问权限的虚拟目录
创建物理目录和网页内容
mkdir -p /power
echo This is power homepage > /power/index.html
配置主配置文件
# Apache2.4配置
# 允许所有访问请求,但拒绝来自特定IP或IP网段的访问请求
Alias /qx "/power"
<Directory /power>
    Options Indexes
    AllowOverride None
    <RequireAll>
       Require all granted   # Require all denied 拒绝所有访问请求
       Require not ip 192.168.176.154
    </RequireAll>
</Directory>
# 只允许特定IP或IP端的访问请求
Alias /qx "/power"
<Directory /power>
    Options Indexes
    AllowOverride None
    Require ip 192.168.176.154 192.168.1
</Directory>


# Apache2.2配置
Alias /qx "/power"
<Directory /power>
    Options Indexes
    AllowOverride None
    Order deny,allow
    Deny from 192.168.176.154
</Directory>
Apache2.4中开始使用mod_authz_host这个新的模块来进行访问控制和其他的授权检查。原来在Apache2.2版本下用以实现网站访问控制的Order,Allow,Deny指令需要替换为新的Require访问控制指令。
使用require指令时,需要在指令外添加标签对,否则重启Apache2.4加载规则时将出现错误:" negative Require directive has no effect in directive "。
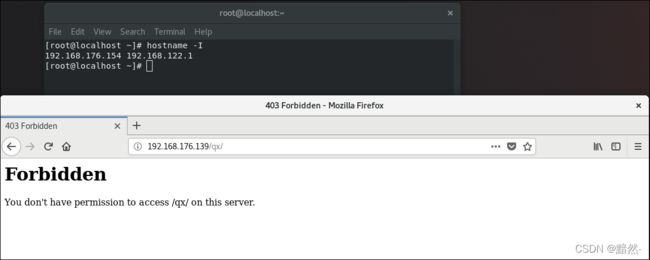
在ip地址为192.168.176.154主机上使用浏览器访问虚拟目录,拒绝访问
(因为没有配置DNS服务,所以使用了ip访问虚拟目录)

在apache服务器(ip为192.168.176.139)上访问虚拟目录,成功访问

配置个人主页功能
创建用户和家目录
useradd user1 # 默认自动创建用户家目录/home/user1
修改配置文件 /etc/httpd/conf.d/userdir.conf
#UserDir disabled     #注释该命令,表示开启个人主页功能
UserDir public_html   指定个人主页的主目录为public_html
创建目录和网页内容
mkdir /home/user1/public_html
echo This is user1 homepage > /home/user1/public_html/index.html
chmod 705 /home/user1   # 使其它用户具有读和执行权限
重启httpd服务
systemctl restart httpd
在apache服务器(ip为192.168.176.139)上访问user1个人目录,成功访问

配置基于不同端口的虚拟主机
基于端口号的虚拟主机技术可以在一个IP地址上建立多个站点,只需要服务器有一个IP地址即可,所有的虚拟主机共享同一个IP,各虚拟主机之间通过不同的端口号进行区分。
在设置基于端口号的虚拟主机的配置时,需要利用Listen语句设置所监听的接口。
虚拟主机概述
虚拟主机是在网络服务器上划分出一定的磁盘空间供用户放置站点,应用组件等,提供必要的站点功能、数据存放和传输功能。虚拟主机,也叫网站空间
使用虚拟主机技术架设多个站点有三种方法,分别是基于端口的虚拟主机技术、基于IP地址的虚拟主机技术和基于名称的虚拟主机技术
修改主配置文件 httpd.conf
Listen 8080
Listen 8000
<VirtualHost 192.168.176.139:8000>
  DocumentRoot /var/www/port8000
  DirectoryIndex index.html
  Serveradmin [email protected]
  ErrorLog logs/port8000-error_log
  CustomLog logs/port8000-access_log commom
</VirtualHost>
<VirtualHost 192.168.176.139:8080>
  DocumentRoot /var/www/port8080
  DirectoryIndex index.html
  Serveradmin [email protected]
  ErrorLog logs/port8080-error_log
  CustomLog logs/port8080-access_log commom
</VirtualHost>
也可以在 /etc/httpd/conf.d目录下创建以 .conf结尾的文件,添加相应内容
系统在读取httpd.conf主配置文件后,会继续读取conf.d目录中以 .conf结尾的文件
创建目录和网页内容
mkdir -p /var/www/port8000
mkdir -p /var/www/port8080
echo This is site of port 8000 > /var/www/port8000/index.html
echo This is site of port 8080 > /var/www/port8080/index.html
重启httpd服务
systemctl restart httpd
配置基于IP地址的虚拟主机
设置服务器的IP地址
方法一: 添加一张网卡
方法二: 使用ip addr add 192.168.176.140 dev ens160 临时添加一个IP地址
配置主配置文件 httpd.conf
Listen 80   # 如果配置在conf.d目录下,不要重复监听一个端口,否则报错
<VirtualHost 192.168.176.139>
  DocumentRoot /var/www/ip1
  DirectoryIndex index.html
  Serveradmin [email protected]
  ErrorLog logs/port8000-error_log
  CustomLog logs/port8000-access_log commom
</VirtualHost>
<VirtualHost 192.168.176.140>
  DocumentRoot /var/www/ip2
  DirectoryIndex index.html
  Serveradmin [email protected]
  ErrorLog logs/port8080-error_log
</VirtualHost>
~
创建目录和网页文件
mkdir -p /var/www/ip1
mkdir -p /var/www/ip2
echo This is site of ip1 > /var/www/ip1/index.html
echo This is site of ip2 > /var/www/ip2/index.html
重启httpd服务
systemctl restart httpd
访问站点
在浏览器中输入http://192.168.176.139访问站点

输入http://192.168.176.140访问站点

配置基于名称的虚拟主机
基于名称的虚拟主机技术可以在不同的域名上建立的多个站点,服务器只有一个IP地址即可,需要为服务器配置多个域名,各虚拟主机之间通过不同的域名进行区分
在DNS服务器中设置域名
$TTL 1D
@       IN SOA  @ dns.lnjd.com. (
                                        0       ; serial
                                        1D      ; refresh
                                        1H      ; retry
                                        1W      ; expire
                                        3H )    ; minimum
        NS      @
        A       127.0.0.1
        AAAA    ::1
dns     IN      A       192.168.176.139
www     IN      A       192.168.176.139
web1    IN      A       192.168.176.139
web2    IN      A       192.168.176.139
修改配置文件 /etc/resolv.conf
nameserver 192.168.176.139 #指定DNS服务器地址
配置主配置文件httpd.conf
NameVirtualHost 192.168.139:80
<VirtualHost 192.168.176.139>
  ServerName web1.hz.com
  DocumentRoot /var/www/web1
  DirectoryIndex index.html
  Serveradmin [email protected]
  ErrorLog logs/port8000-error_log
  CustomLog logs/port8000-access_log commom
</VirtualHost>
<VirtualHost 192.168.176.139>
  ServerName web2.hz.com
  DocumentRoot /var/www/web2
  DirectoryIndex index.html
  Serveradmin [email protected]
  ErrorLog logs/port8080-error_log
  CustomLog logs/port8080-access_log commom
</VirtualHost>
~
创建目录和网页内容
mkdir -p /var/www/web1
mkdir -p /var/www/web2
echo This is site of web1 > /var/www/web1/index.html
echo This is site of web2 > /var/www/web2/index.html
重启named服务和httpd服务
systemctl restart named
systemctl restart httpd
访问站点
在浏览器中输入http://web1.hz.com,访问第一个网站

输入http://web2.hz.com访问第二个网站


