springbooot搭建(详细分析)
springboot 可以快速的和其他任何框架结合
1.jar包
spring-boot-starter-web
web 有了这个就可从页面上接受数据和springmvc类似 关联引入所有的spring ,springmvc的功能
        <dependency>
            <groupId>org.springframework.bootgroupId>
            <artifactId>spring-boot-starter-webartifactId>
        dependency>
spring-boot-starter-parent
springboot父级jar包,只有有了这个 才能是一个springboot项目
    <parent>
        <groupId>org.springframework.bootgroupId>
        <artifactId>spring-boot-starter-parentartifactId>
        <version>2.2.1.RELEASEversion>
        <relativePath/>
    parent>
mybatis-spring-boot-starter
mybatis 相关jar包 关联引入mybatis mybatis-spring等等
        <dependency>
            <groupId>org.mybatis.spring.bootgroupId>
            <artifactId>mybatis-spring-boot-starterartifactId>
            <version>2.1.3version>
        dependency>
spring-boot-starter-thymeleaf
使用转发功能
        <dependency>
            <groupId>org.springframework.bootgroupId>
            <artifactId>spring-boot-starter-thymeleafartifactId>
        dependency>
spring-boot-devtools
热部署工具 自动重启应用
        <dependency>
            <groupId>org.springframework.bootgroupId>
            <artifactId>spring-boot-devtoolsartifactId>
            <scope>runtimescope>
            <optional>trueoptional>
        dependency>
ojdbc8
Oracle
        <dependency>
            <groupId>com.oracle.ojdbcgroupId>
            <artifactId>ojdbc8artifactId>
            <scope>runtimescope>
        dependency>
mysql-connector-java
MySQL
        <dependency>
            <groupId>mysqlgroupId>
            <artifactId>mysql-connector-javaartifactId>
            <scope>runtimescope>
        dependency>
lombok
Lombok插件 可以简化实体类的书写 可以通过对应的注解完成
     <dependency>
            <groupId>org.projectlombokgroupId>
            <artifactId>lombokartifactId>
            <optional>trueoptional>
        dependency>
spring-boot-starter-test
测试用的jar包
        <dependency>
            <groupId>org.springframework.bootgroupId>
            <artifactId>spring-boot-starter-testartifactId>
            <scope>testscope>
            <exclusions>
                <exclusion>
                    <groupId>org.junit.vintagegroupId>
                    <artifactId>junit-vintage-engineartifactId>
                exclusion>
            exclusions>
        dependency>
自带插件
 <build>
        <plugins>
            <plugin>
                <groupId>org.springframework.bootgroupId>
                <artifactId>spring-boot-maven-pluginartifactId>

                <configuration>
                    <fork>truefork>
                configuration>
            plugin>
        plugins>
    build>
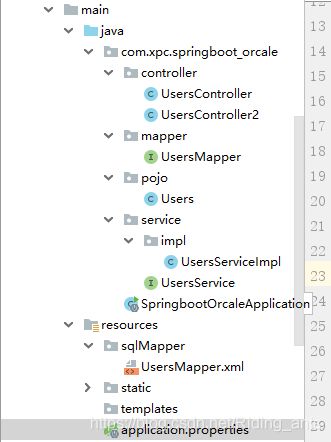
2.创建基本包结构
3.填充内容
pojo实体类
//注解是lombok插件提供的
@Getter
@Setter
@ToString
@EqualsAndHashCode
public class Users {
    private Integer id;
    private String name;
    private String imgpath;
}
mapper接口,持久层
@Component
@Mapper
public interface UsersService {
    public List<Users> findAll();
}
sqlMapper文件
<mapper namespace="com.xpc.springboot_orcale.mapper.UsersMapper">


   <select id="findAll" resultType="Users">
       select * from users
   select>
mapper>
servcie 业务逻辑层
//service接口
public interface UsersService {
    public List<Users> findAll();
}


//service实现类
@Service
public class UsersServiceImpl implements UsersService {
    @Autowired
    private UsersMapper usersMapper;

    @Override
    public List<Users> findAll() {
        return usersMapper.findAll();
    }
}
controller控制层
@RestController
@RequestMapping("/users")
@MultipartConfig
public class UsersController {
    @Autowired
    private UsersService usersService;
   /* public List findAll();*/
    @RequestMapping("/find")
    public List<Users> findAll(){
       return usersService.findAll();
    }
}
SpringbootOrcaleApplication配置
@SpringBootApplication
//扫描的包
@MapperScan(basePackages = {"com.xpc.springboot_orcale.mapper"})
public class SpringbootOrcaleApplication {

    public static void main(String[] args) {
        SpringApplication.run(SpringbootOrcaleApplication.class, args);
    }

}
application.properties文件配置
##springboot连接数据库   这里链接的是oracle数据库
spring.datasource.platform=oracle
spring.datasource.driver-class-name=oracle.jdbc.driver.OracleDriver
spring.datasource.url=jdbc:oracle:thin:@127.0.0.1:1521:orcl
spring.datasource.username=xpc
spring.datasource.password=123456
##springboot关联mybatis
##sqMapper映射文件位置
mybatis.mapper-locations=classpath:/sqlMapper/*Mapper.xml
##下划线到驼峰式命名法的映射
mybatis.configuration.map-underscore-to-camel-case=true
##类起别名
mybatis.type-aliases-package=com.xpc.springboot_orcale.pojo
##配置Tomcat相关内容
server.port=8080
server.tomcat.connection-timeout=1000
server.tomcat.uri-encoding=utf-8
##配置支持单个文件大于1MB的 文件上传
spring.servlet.multipart.max-file-size=100MB
##配置一次请求文件上传的最大值
spring.servlet.multipart.max-request-size=100MB

###Thymeleaf配置 转发形式页面模板
spring.thymeleaf.prefix=classpath:/static/
spring.thymeleaf.suffix=.html
spring.thymeleaf.cache=false
spring.thymeleaf.encoding=UTF-8
##2.1.3必须配置,不配置找不到html页面
spring.thymeleaf.mode=HTML5

###过滤中文乱码
spring.http.encoding.force=true
spring.http.encoding.charset=UTF-8
spring.http.encoding.enabled=true
