前端html小技巧(css篇)—表单美化详解
今天分享下”前端html小技巧(css篇)—表单美化详解“这篇文章,文中根据实例编码详细介绍,或许对大家的编程之路有着一定的参考空间与使用价值,需要的朋友接下来跟着云南仟龙Mark一起学习一下吧。
一、html submit与bottom按钮基本语法结构
1、html submit按钮
在input标签里设置type="submit"此表单控件可设置为按钮。
submit按钮代码:
代码如下:
<input name="" type="submit" value="提交" />
submit按钮效果截图

html submit按钮效果截图
2、html bottom按钮
在input标签里设置type="bottom"也是即可设置此表单控件为按钮。
bottom按钮代码:
复制代码代码如下:
bottom按钮截图:
html botton按钮效果截图
二、html submit与bottom按钮区别
type=button 就单纯是按钮功能
type=submit 是发送表单
但是对于从事WEB UI的人应该要注意到,使用submit来提高页面易用性:
使用submit后,页面支持键盘enter键操作,而很多WEB软件设计师,可能没有注意到submit统一.
用button后往往页面不支持enter键了。所以需要支持enter键,必须要设置个submit,默认enter键对页面第一个submit进行操作。
复制代码代码如下:
<input type="submit" name="b1" value="提交" onClick="bt_submit_onclick()">
执行完onClick,转到action。可以自动提交不需要onClick。所以说onclick这里可以不要。
复制代码代码如下:
<input type="button" name="b1" value="提交" onClick="bt_submit_onclick()">
执行完onClick,跳转文件在 js文件里控制。提交需要onClick。
比如:
1,οnclick=“form1.action=‘a.jsp’;form1.submit();” 这样就实现了submit的功能了。
2,button代码
复制代码代码如下:
<form name="form1" method="post" action="://www.css.com">http://www.css.com">

<input type="button" name="Button" value="按钮" onClick="submit()">

</form>
按钮截图
3,按钮HTML 代码
复制代码代码如下:
onClick=“javascript:windows.location.href=“你的url””>
三、html submit与bottom按钮美化css p布局
首先我们准备好按钮美化的按钮图片,并对input submit或bottom按钮控件内添加class样式即可,设置其按钮背景为美化图片,设置好边框为零,宽度和高度。
1、对html bottom按钮美化
1)、图片素材
可将图片另存为使用
美化图片按钮素材
2)、对应完整HTML源代码:
复制代码代码如下:
<!DOCTYPE html>

<html>

<head>

<title>button按钮美化在线演示-www.css.com</title>

<style>

html{width:100%;height:100%;}

body{background:#fff;font-size:18px;font-family:"Arial","Tahoma","微软雅黑","雅黑";

line-height:18px;padding:0px;margin:0px;text-align:center}

div{padding:18px}

img{border:0px;vertical-align:middle;padding:0;margin:0}

input,button{font-family:"Arial","Tahoma","微软雅黑","雅黑";border:0;

vertical-align:middle;margin:8px;line-height:18px;font-size:18px}

.btn{width:140px;height:36px;line-height:18px;font-size:18px;

background:url("bg26.jpg")no-repeatlefttop;color:#FFF;padding-bottom:4px}

/* http://www.qlyl1688.com/product_ycxsyw.html */

</style>

</head>

<body>

<p>

<formid="form1"name="form1"method=""action="://www.css.com/"target="_blank">http://www.css.com/"target="_blank">

<div>

<inputtype="button"class="btn"value="按钮"onmouseover="this.style.backgroundPosition='left-36px'"

onmouseout="this.style.backgroundPosition='lefttop'"/>

</div>

</form>

</p>

</body>

</html>

3)、bottom效果截图
bottom美化效果截图
2、对html submit按钮美化
1)、图片素材
可将图片另存为使用

按钮图片素材 鼠标右键另存为使用
2)、对应完整HTML源代码:
复制代码代码如下:
<!DOCTYPE html>

<html>

<head>

<title>submit按钮美化 在线演示-www.css.com</title>

<!-- <a href="http://www.css.com">www.css.com</a> -->

<style>

html { width:100%; height:100%; }

body { background:#fff; font-size:18px; font-family:"Arial", "Tahoma", "微软雅黑", "雅黑";

line-height:18px; padding:0; margin:0; text-align:center; }

div { padding:18px }

img { border:0px; vertical-align:middle; padding:0px; margin:0px; }

input, button { font-family:"Arial", "Tahoma", "微软雅黑", "雅黑"; border:0;

vertical-align:middle; margin:8px; line-height:18px; font-size:18px }

.btns { width:143px; height:40px; background:url("bg11.jpg") no-repeat left top; color:#FFF; }

</style>

</head>

<body>

<p>

<form id="form1" name="form1" method="" action="://www.css.com/">http://www.css.com/" target="_blank">

<div>

<input type="submit" class="btns" onmouseover="this.style.backgroundPosition='left -40px'"

onmouseout="this.style.backgroundPosition='left top'" value="提交" />

</div>

</form>

</p>

</body>

</html>
3)、submit按钮效果截图
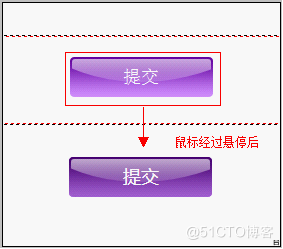
html submit美化后效果截图
以上是云南仟龙Mark给大家介绍的所有内容,希望对大家有所帮助,如果大家有任何疑问请在脚本之家留言,如果你觉得本文对你有帮助,欢迎转载,烦请注明出处,谢谢!