Java之juc旅途-AQS(二)
背景
通常情况下解决多线程共享资源逻辑一致性问题有两种方式:互斥锁、自旋锁。
互斥锁
当发现资源被占用的时候,会阻塞自己进行休眠,直到资源解除占用然后被唤醒获取资源。
其在linux为互斥量的实现,底层特性:
- 原子性:把一个互斥量锁定为一个原子操作,这意味着操作系统(或pthread函数库)保证了如果一个线程锁定了一个互斥量,没有其他线程在同一时间可以成功锁定这个互斥量;
- 唯一性:如果一个线程锁定了一个互斥量,在它解除锁定之前,没有其他线程可以锁定这个互斥量;
- 非繁忙等待:如果一个线程已经锁定了一个互斥量,第二个线程又试图去锁定这个互斥量,则第二个线程将被挂起(不占用任何cpu资源),直到第一个线程解除对这个互斥量的锁定为止,第二个线程则被唤醒并继续执行,同时锁定这个互斥量。
基于pthread函数库来实现互斥锁的,相应的函数pthread_mutex_xxx()。
自旋锁
自旋锁与互斥量功能一样,唯一一点不同的就是互斥量阻塞后休眠让出cpu,而自旋锁阻塞后不会让出cpu,会一直忙等待,直到得到锁。
如果锁的持有时间比较短,或者说小于2次上下文切换的时间的话,都会采用自旋锁效率更高。
一种实现方式是在底层实现,其函数和互斥量一样,只需要把pthread_mutex_xxx()中mutex换成spin,如:pthread_spin_init()。
而另一种实现方式是通过CAS原子操作:设置一个CAS原子共享变量,为该变量设置一个初始化的值;加锁时获取该变量的值和初始化值比较,若相等则加锁成功,让后把该值设置成另外一个值;若不相等,则进入循环(自旋过程),不停的比较该值,直到和初始化值相加锁成功。Java中就使用AtomicReference变量的CAS机制来实现自旋锁:
public class SpinLock {

  // 定义一个原子引用变量
  private AtomicReference<Thread> sign = new AtomicReference<>();

  public void lock(){
    Thread current = Thread.currentThread();
    // 加锁时:若sign为null,则设置为current;若sihn不为空,则进入循环,自旋等待;
    while(!sign.compareAndSet(null, current)){
      // 自旋:Do Nothing!!
    }
  }

  public void unlock (){
    Thread current = Thread.currentThread();
    // 解锁时:sign的值一定为current,所以直接把sign设置为null。
    // 这样其他线程就可以拿到锁了(跳出循环)。
    sign.compareAndSet(current, null);
  }
}
但使用自旋锁难免会产生一些额外的问题:
- 可能导致一些线程始终无法获取锁(争抢的时候必然是当前活跃线程获得锁的几率大),也就是饥饿现象;
- 因为自旋锁会依赖一个共享的锁标识,所以竞争激烈的时候,锁标识的同步也需要消耗大量的资源;
- 如果要用自旋锁实现公平锁(即先到先获取),此时就还需要额外的变量,也会比较麻烦;
解决这些问题其中的一种办法就是使用队列锁,简单来讲就是让这些线程排队获取;常用的两种队列锁,即 CLH 锁和 MCS 锁。
CLH 锁和 MCS 锁区别主要有两点(可辅助下2图参考):
- 链表结构的区别。
- 自旋对象的区别,CLH 是在前驱节点上自旋,而 MCS 是在自身节点上自旋;这里第二点才是最重要的,主要体现在 SMP(Symmetric Multi-Processor) 和 NUMA(Non-Uniform Memory Access) 不同的处理器架构上,这里大家可以自行 Google;
因为java的aqs用到CLH,所以这里只针对CLH锁进行展开说明。
CLH 是 Craig、Landin 和 Hagersten 三位作者的缩写,对应的论文《Building FIFO and Priority-Queuing Spin Locks from Atomic Swap》 有详细介绍,大家可以自行查看;
CLH 锁是对自旋锁的一种改进,有效的解决了以上的缺点。首先它将线程组织成一个队列,保证先请求的线程先获得锁,避免了饥饿问题。其次锁状态去中心化,让每个线程在不同的状态变量中自旋,这样当一个线程释放它的锁时,只能使其后续线程的高速缓存失效,缩小了影响范围,从而减少了 CPU 的开销。
CLH 锁数据结构很简单,类似一个链表队列,所有请求获取锁的线程会排列在链表队列中,自旋访问队列中前一个节点的状态。当一个节点释放锁时,只有它的后一个节点才可以得到锁。CLH 锁本身有一个队尾指针 Tail,它是一个原子变量,指向队列最末端的 CLH 节点。
每一个 CLH 节点有两个属性:所代表的线程和标识是否持有锁的状态变量。当一个线程要获取锁时,它会对 Tail 进行一个 getAndSet 的原子操作。该操作会返回 Tail 当前指向的节点,也就是当前队尾节点,然后使 Tail 指向这个线程对应的 CLH 节点,成为新的队尾节点。入队成功后,该线程会轮询上一个队尾节点的状态变量,当上一个节点释放锁后,它将得到这个锁。
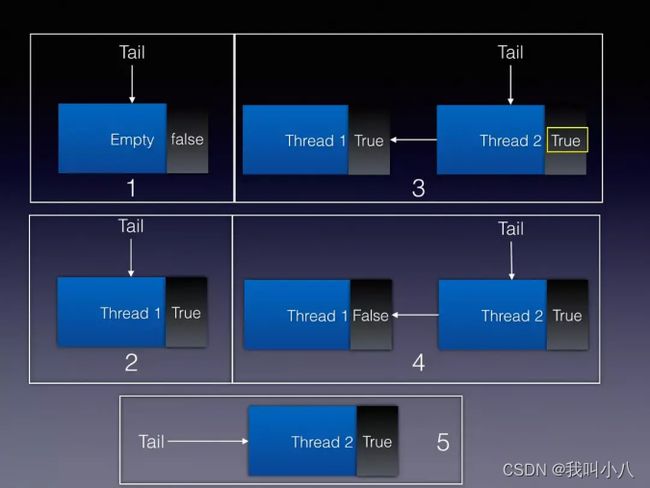
下面用图来展示 CLH 锁从获取到释放锁的全过程。

- CLH 锁初始化时会 Tail 会指向一个状态为 false 的空节点,如上图 1 所示。
- 当 Thread 1(下称 T1)请求获取锁时,Tail 节点指向 T1 对应的节点,同时返回空节点。T1 检查到上一个节点状态为 false,就成功获取到锁,可以执行相应的逻辑了,如上图 2 所示。
- 当 Thread 2(下称 T2)请求获取锁时,Tail 节点指向 T2 对应的节点,同时返回 T1 对应的节点。T2 检查到上一个节点状态为 True,无法获取到锁,于是开始轮询上一个节点的状态,如上图 3 所示。
- 当 T1 释放锁时,会将状态变量置为 False,如上图 4 所示。
- T2 轮询到检查到上一个节点状态变为 False,则获取锁成功,如上图 5 所示。
简单实现:
public class CLH implements Lock {
  private final ThreadLocal<Node> preNode = ThreadLocal.withInitial(() -> null);
  private final ThreadLocal<Node> node = ThreadLocal.withInitial(Node::new);
  private final AtomicReference<Node> tail = new AtomicReference<>(new Node());

  private static class Node {
    private volatile boolean locked;
  }

  @Override
  public void lock() {
    final Node node = this.node.get();
    node.locked = true;
    Node pre = this.tail.getAndSet(node);
    this.preNode.set(pre);
    while (pre.locked) ;
  }

  @Override
  public void unlock() {
    final Node node = this.node.get();
    node.locked = false;
    this.node.set(this.preNode.get());
  }
}
AQS 结构概述
在 JDK 中除 synchronized 内置锁外,其他的锁和同步组件,基本可以分为:
- 面向用户的逻辑部分(对于锁而言就是 Lock interface);
- 面向底层的线程调度部分;
而 AbstractQueuedSynchronizer 即同步队列则是 Doug Lea 大神为我们提供的底层线程调度的封装。
在AQS类文件的开头,作者添加了很长一段注释,向开发者解释CLH队列,以及AQS对CLH队列的使用。AQS里面的CLH队列是CLH同步锁的一种变形。其主要从两方面进行了改造:节点的结构与节点等待机制。在结构上,AQS类引入了头结点和尾节点,他们分别指向队列的头和尾,尝试获取锁、入队列、释放锁等实现都与头尾节点相关。
其中整体结构为:
public abstract class AbstractQueuedSynchronizer extends AbstractOwnableSynchronizer implements java.io.Serializable {
  protected AbstractQueuedSynchronizer() { }

  private transient volatile Node head;  // 懒加载,只有在发生竞争的时候才会初始化;
  private transient volatile Node tail;  // 同样懒加载;
  private volatile int state;  // 自定义的锁状态,可以用来表示锁的个数,以实现互斥锁和共享锁;
}
节点结构:
static final class Node {
  static final Node SHARED = new Node();  // 共享模式
  static final Node EXCLUSIVE = null;     // 互斥模式

  static final int CANCELLED =  1; // 表示线程取消获取锁
  static final int SIGNAL    = -1; // 表示后继节点需要被唤醒
  static final int CONDITION = -2; // 表示线程位于条件队列
  static final int PROPAGATE = -3; // 共享模式下节点的最终状态,确保在doReleaseShared的时候将共享状态继续传播下去

  /**
   * 节点状态(初始为0,使用CAS原则更新)
   * 互斥模式:0,SIGNAL,CANCELLED
   * 共享模式:0,SIGNAL,CANCELLED,PROPAGATE
   * 条件队列:CONDITION
   */
  volatile int waitStatus;

  volatile Node prev;     // 前继节点
  volatile Node next;     // 后继节点
  volatile Thread thread; // 取锁线程
  Node nextWaiter;        // 模式标识,取值:SHARED、EXCLUSIVE

  // Used by addWaiter,用于添加同队队列
  Node(Thread thread, Node mode) {
    this.nextWaiter = mode;
    this.thread = thread;
  }

  // Used by Condition,同于添加条件队列
  Node(Thread thread, int waitStatus) {
    this.waitStatus = waitStatus;
    this.thread = thread;
  }
}
根据上面的代码和注释已经可以看到 AQS 为我们提供了两种模式,独占模式和共享模式(彼此独立可以同时使用);其中:
- AbstractQueuedSynchronizer.state : 表示锁的资源状态,是我们上面所说的面向用户逻辑的部分;
- Node.waitStatus : 表示节点在队列中的状态,是面向底层线程调度的部分;
这两个变量一定要分清楚,在后面的代码中也很容易弄混;
AQS核心源码解析
运行逻辑
如果你熟悉 synchronized ,应该已经发现他们的运行逻辑其实是差不多的,都用同步队列和条件队列,值得注意的是这里的条件队列和 Condition 一一对应,可能有多个;根据上图可以将 AQS 提供的功能总结为:
- 同步状态的原子性管理;
- 线程的阻塞与解除阻塞;
- 队列的管理;
入队
因为独占模式和共享模式彼此独立可以同时使用,所以在入队的时候需要首先指定 Node 的类型,同时入队的时候有竞争的可能,所以需要** CAS 入队**;
private Node addWaiter(Node mode) {
  Node node = new Node(Thread.currentThread(), mode); // SHARED、EXCLUSIVE
  // Try the fast path of enq; backup to full enq on failure
  Node pred = tail;
  if (pred != null) {
    node.prev = pred;
    if (compareAndSetTail(pred, node)) {
      pred.next = node;
      return node;
    }
  }
  enq(node);
  return node;
}
代码中注释也说明了,此处快速尝试入队,是一种优化手段,因为就一般情况而言大多数时候是没有竞争的;失败后在循环入队;
private Node enq(final Node node) {
  for (;;) {
    Node t = tail;
    if (t == null) { // Must initialize
      if (compareAndSetHead(new Node())) // 此时head和tail才初始化
        tail = head;
    } else {
      node.prev = t;
      if (compareAndSetTail(t, node)) {
        t.next = node;
        return t;
      }
    }
  }
}
而对于出队则稍微复杂一点,独占模式下直接出队,因为没有竞争;共享模式下,则需要 CAS 设置头结点,因为可能对有多个节点同时出队,同时还需要向后传播状态,保证后面的线程可以及时获得锁;此外还可能发生中断或者异常出队,此时则需要考虑头尾的情况,保证不会影响队列的结构;具体内容将会在源码中一次讲解;
其中在入队后,他会使线程自旋阻塞,直到获取到锁。
final boolean acquireQueued(final Node node, int arg) {
       boolean failed = true;
       try {
           boolean interrupted = false;
           for (;;) {
               //1. 拿到当前节点的前置节点
               final Node p = node.predecessor();

               //2. 如果当前节点的前置节点是头节点的话,就再次尝试获取锁
               if (p == head && tryAcquire(arg)) {
                   //成功获取锁后,将节点设置为头节点
                   setHead(node);
                   p.next = null; // help GC
                   failed = false;
                   return interrupted;
               }
               /**
               更改当前节点前置节点的waitStatus,只有前置节点的waitStatus=Node.SIGNAL,当前节点才有可能被唤醒。如果前置节点的waitStatus>0(即取消),则跳过取更前面的节点。
               */
               if (shouldParkAfterFailedAcquire(p, node) &&
               //通过Unsafe.park来阻塞线程
                   parkAndCheckInterrupt())
                   interrupted = true;
           }
       } finally {
           if (failed)
               cancelAcquire(node);
       }
   }
 private final boolean parkAndCheckInterrupt() {
        //在此阻塞,收到unlock()方法的unPark()方法会被唤醒
        LockSupport.park(this);
        return Thread.interrupted();
    }
独立模式
先看看源码:
public class Mutex implements Lock {
  private final Sync sync = new Sync();
  private static final int lock = 1;
  private static final int unlock = 0;

  @Override
  public void lock() {
    sync.acquire(lock);
  }

  @Override
  public boolean tryLock() {
    return sync.tryAcquire(lock);
  }

  @Override
  public void unlock() {
    sync.release(unlock);
  }

  private static class Sync extends AbstractQueuedSynchronizer {
    @Override
    protected boolean isHeldExclusively() {
      return getState() == lock;
    }

    @Override
    public boolean tryAcquire(int acquires) {
      if (compareAndSetState(unlock, lock)) {
        setExclusiveOwnerThread(Thread.currentThread());
        return true;
      }
      return false;
    }

    @Override
    protected boolean tryRelease(int releases) {
      if (getState() == unlock)
        throw new IllegalMonitorStateException();
      setExclusiveOwnerThread(null);
      setState(unlock);
      return true;
    }
  }
}
注意代码中特意将** AbstractQueuedSynchronizer.state** 取值定为lock\unlock ,主要是便于理解 state 的含义,在互斥锁中可以任意取值,当然也可以是负数,但是一般情况下令其表示为锁的资源数量(也就是0、1)和共享模式对比,比较容易理解;
获取锁
对于独占模式取锁而言有一共有四中方式,
- tryAcquire: 快速尝试取锁,成功时返回true;这是独占模式必须要重写的方法,其他方式获取锁时,也会先尝试快速获取锁;同时 tryAcquire 也就决定了,这个锁时公平锁/非公平锁,可重入锁/不重冲入锁等;(比如上面的实例就是不可重入非公平锁,具体分析以后还会详细讲解)
- acquire: 不响应中断,阻塞获取锁;
- acquireInterruptibly: 响应中断,阻塞获取锁;
- tryAcquireNanos: 响应中断,超时阻塞获取锁;
acquire方法
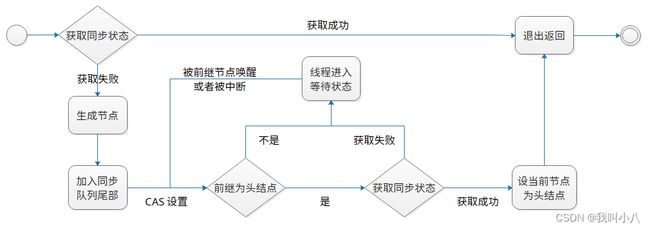
流程图:
public final void acquire(int arg) {
  if (!tryAcquire(arg) &&                             // 首先尝试快速获取锁
       acquireQueued(addWaiter(Node.EXCLUSIVE), arg)) // 失败后入队,然后阻塞获取
    selfInterrupt();                                  // 最后如果取锁的有中断,则重新设置中断
}
final boolean acquireQueued(final Node node, int arg) {
  boolean failed = true;
  try {
    boolean interrupted = false;           // 只要取锁过程中有一次中断,返回时都要重新设置中断
    for (;;) {
      final Node p = node.predecessor();   // 一直阻塞到前继节点为头结点
      if (p == head && tryAcquire(arg)) {  // 获取同步状态
        setHead(node);                     // 设置头结点,此时头部不存在竞争,直接设置
        // next 主要起优化作用,并且在入队的时候next不是CAS设置
        // 也就是通过next不一定可以准确取到后继节点,所以在唤醒的时候不能依赖next,需要反向遍历
        p.next = null; // help GC
        failed = false;
        return interrupted;
      }
      if (shouldParkAfterFailedAcquire(p, node) && // 判断并整理前继节点
        parkAndCheckInterrupt())                   // 当循环最多第二次的时候,必然阻塞
        interrupted = true;
    }
  } finally {
    if (failed)  // 异常时取消获取
      cancelAcquire(node);
  }
}
private static boolean shouldParkAfterFailedAcquire(Node pred, Node node) {
  int ws = pred.waitStatus;
  if (ws == Node.SIGNAL) return true;
  if (ws > 0) {  // 大于0说明,前继节点异常或者取消获取,直接跳过;
    do {
      node.prev = pred = pred.prev;  // 跳过pred并建立连接
    } while (pred.waitStatus > 0);
    pred.next = node;
  } else {
    compareAndSetWaitStatus(pred, ws, Node.SIGNAL);  // 标记后继节点需要唤醒
  }
  return false;
}
其中 node.prev = pred = pred.prev;
acquireInterruptibly 方法
public final void acquireInterruptibly(int arg) throws InterruptedException {
  if (Thread.interrupted()) throw new InterruptedException();  // 中断退出
  if (!tryAcquire(arg))           // 获取同步状态
    doAcquireInterruptibly(arg);  // 中断获取
}
private void doAcquireInterruptibly(int arg) throws InterruptedException {
  final Node node = addWaiter(Node.EXCLUSIVE);   // 加入队尾
  boolean failed = true;
  try {
    for (;;) {
      final Node p = node.predecessor();
      if (p == head && tryAcquire(arg)) {
        setHead(node);
        p.next = null; // help GC
        failed = false;
        return;
      }
      if (shouldParkAfterFailedAcquire(p, node) &&   // 判断并整理前继节点
        parkAndCheckInterrupt())                     // 等待
        throw new InterruptedException();
    }
  } finally {
    if (failed)
      cancelAcquire(node);
  }
}
tryAcquireNanos 方法
public final boolean tryAcquireNanos(int arg, long nanosTimeout) throws InterruptedException {
  if (Thread.interrupted()) throw new InterruptedException();
  return tryAcquire(arg) ||
    doAcquireNanos(arg, nanosTimeout);
}
private boolean doAcquireNanos(int arg, long nanosTimeout) throws InterruptedException {
  if (nanosTimeout <= 0L) return false;
  final long deadline = System.nanoTime() + nanosTimeout;
  final Node node = addWaiter(Node.EXCLUSIVE);
  boolean failed = true;
  try {
    for (;;) {
      final Node p = node.predecessor();
      if (p == head && tryAcquire(arg)) {
        setHead(node);
        p.next = null; // help GC
        failed = false;
        return true;
      }
      nanosTimeout = deadline - System.nanoTime();
      if (nanosTimeout <= 0L) return false;          // 超时退出
      if (shouldParkAfterFailedAcquire(p, node) &&
        nanosTimeout > spinForTimeoutThreshold)
        LockSupport.parkNanos(this, nanosTimeout);
      if (Thread.interrupted())
        throw new InterruptedException();
    }
  } finally {
    if (failed)
      cancelAcquire(node);
  }
}
释放锁
释放锁时,判断有后继节点需要唤醒,则唤醒后继节点,然后退出;有唤醒的后继节点重新设置头结点,并标记状态。
public final boolean release(int arg) {
  if (tryRelease(arg)) {   // 由用户重写,尝试释放
    Node h = head;
    if (h != null && h.waitStatus != 0)
      unparkSuccessor(h);  // 唤醒后继节点
    return true;
  }
  return false;
}
 private void unparkSuccessor(Node node) {

       int ws = node.waitStatus;
       //waitStatus不是取消状态,就设置成0
       if (ws < 0)
           compareAndSetWaitStatus(node, ws, 0);


       //获取下个waitStatus不为取消的Node
       Node s = node.next;
       if (s == null || s.waitStatus > 0) {
           s = null;
           for (Node t = tail; t != null && t != node; t = t.prev)
               if (t.waitStatus <= 0)
                   s = t;
       }
       //LockSupport.unpark是调用了Unsafe.unpark,唤醒线程。
       if (s != null)
           LockSupport.unpark(s.thread);
   }
共享模式
public class ShareLock implements Lock {
  private Syn sync;

  public ShareLock(int count) { this.sync = new Syn(count); }

  @Override
  public void lock() { sync.acquireShared(1); }

  @Override
  public void lockInterruptibly() throws InterruptedException {
    sync.acquireSharedInterruptibly(1);
  }

  @Override
  public boolean tryLock() { return sync.tryAcquireShared(1) >= 0; }

  @Override
  public boolean tryLock(long time, TimeUnit unit) throws InterruptedException {
    return sync.tryAcquireSharedNanos(1, unit.toNanos(time));
  }

  @Override
  public void unlock() { sync.releaseShared(1); }

  @Override
  public Condition newCondition() { throw new UnsupportedOperationException(); }

  private static final class Syn extends AbstractQueuedSynchronizer {
    private static final long serialVersionUID = 5854536238831876527L;
    Syn(int count) {
      if (count <= 0) {
        throw new IllegalArgumentException("count must large than zero.");
      }
      setState(count);
    }

    @Override
    public int tryAcquireShared(int reduceCount) {
      for (; ; ) {
        int current = getState();
        int newCount = current - reduceCount;
        //如果新的状态小于0 则返回值,则表示没有锁资源,直接返回
        if (newCount < 0 || compareAndSetState(current, newCount)) {
          return newCount;
        }
      }
    }

    @Override
    public boolean tryReleaseShared(int retrunCount) {
      for (; ; ) {
        int current = getState();
        int newCount = current + retrunCount;
        if (compareAndSetState(current, newCount)) {
          return true;
        }
      }
    }
  }
}
获取锁
同样对于共享模式取锁也有四中方式:
- tryAcquireShared: 快速尝试取锁,由用户重写
- acquireShared: 不响应中断,阻塞获取锁;
- acquireSharedInterruptibly: 响应中断,阻塞获取锁;
- tryAcquireSharedNanos: 响应中断,超时阻塞获取锁;
整体的思路和独占模式差不多,主要区别:
- 共享模式可以有多个锁
- 设置头结点的时候,同时还要将状态传播下去
释放锁
同样 tryReleaseShared 是由用户自己重写的,这里需要注意的是如果不能确保释放成功(因为共享模式释放锁的时候可能有竞争,所以可能失败),则在外层 Lock 接口使用的时候,就需要额外处理;
@Override
public boolean tryReleaseShared(int retrunCount) {
  for (; ; ) {
    int current = getState();
    int newCount = current + retrunCount;
    if (compareAndSetState(current, newCount)) {
      return true;
    }
  }
}
releaseShared 方法
public final boolean releaseShared(int arg) {
  if (tryReleaseShared(arg)) {  // 尝试取锁成功,此时锁资源已重新设置
    doReleaseShared();          // 唤醒后继节点
    return true;
  }
  return false;
}
doReleaseShared 方法必然执行两次,
- 第一次头结点释放锁,然后唤醒后继节点
- 第二次后继设置头结点
最终使得头结点的状态必然是 PROPAGATE;
private void doReleaseShared() {
  for (;;) {
    Node h = head;
    if (h != null && h != tail) {
      int ws = h.waitStatus;
      if (ws == Node.SIGNAL) {
        if (!compareAndSetWaitStatus(h, Node.SIGNAL, 0))
          continue;      // loop to recheck cases
        unparkSuccessor(h);
      }
      else if (ws == 0 &&
           !compareAndSetWaitStatus(h, 0, Node.PROPAGATE))
        continue;        // loop on failed CAS
    }
    if (h == head)       // loop if head changed
      break;
  }
}
条件队列
public class ConditionObject implements Condition, java.io.Serializable {
  private transient Node firstWaiter;
  private transient Node lastWaiter;
  ...
}
如代码所示条件队列是一个由 Node 组成的链表,注意这里的链表不同于同步队列,是通过 nextWaiter 连接的,在同步队列中 nextWaiter 用来表示独占和共享模式,所以区分条件队列的方法就有两个:
- Node.waitStatus = Node.CONDITION;
- Node.next = null & Node.prev= null;
其中核心的2个方法阻塞与释放:
public final void await() throws InterruptedException {
  if (Thread.interrupted()) throw new InterruptedException();
  Node node = addConditionWaiter();     // 添加节点到条件队列
  int savedState = fullyRelease(node);  // 确保释放锁,并唤醒后继节点
  int interruptMode = 0;
  while (!isOnSyncQueue(node)) {        // node 不在同步队列中
    LockSupport.park(this);             // 阻塞
    if ((interruptMode = checkInterruptWhileWaiting(node)) != 0)
      break;
  }
  if (acquireQueued(node, savedState) && interruptMode != THROW_IE)
    interruptMode = REINTERRUPT;
  if (node.nextWaiter != null) // clean up if cancelled
    unlinkCancelledWaiters();
  if (interruptMode != 0)
    reportInterruptAfterWait(interruptMode);
}
public final void signal() {
  if (!isHeldExclusively()) throw new IllegalMonitorStateException();
  Node first = firstWaiter;
  if (first != null)
    doSignal(first);  // 从头结点一次唤醒
}

private void doSignal(Node first) {
  do {
    if ( (firstWaiter = first.nextWaiter) == null)
      lastWaiter = null;
    first.nextWaiter = null;
  } while (!transferForSignal(first) &&  // 将节点移动到同步节点中
       (first = firstWaiter) != null);
}


