Linux进阶-网站架构部署(LNMP)
网站架构部署LNMP
- 1)网站架构组成介绍
- 2)网站架构工作原理
- 3)服务部署过程
- 4)PHP部署过程
- 5)需要将LNMP架构进行串联
- 6)企业动态资源发布过程
1)网站架构组成介绍
LNMP:
L:Linux  N:Nginx  M:MySQL  P:PHP

Nginx/Apache:需要重点阐述一下,它多用于网站用户访问,用HTML代码语言,在用户和网站中间起到起到桥梁的作用(网络服务搬运工),作为中间件发挥着不可提代的作用
Nginx/Apache通常可以直接识别静态资源文件(比如CSS(定义网页样式,排版),Js),也可以对动态资源文件(比如PHP,JAVA,Python,go)可以提供动态代码解析服务
2)网站架构工作原理
①用户发出网站服务请求
②服务端接收请求,并判断资源信息
	a.静态信息:由nginx静态网站服务进行处理,将站点目录中资源信息进行传输
	b.动态信息:nginx利用fastcgi接口转发给PHP服务
③PHP服务收到动态资源请求
	方式一:直接识别动态代码文件,进行翻译或者解析,转换成HTML代码信息
	方式二:和数据库建立连接,读取或存储数据信息,再将PHP代码转换成HTML代码进行响应
④nginx服务收到PHP响应HTML静态资源代码信息,再转发给浏览器
⑤客户端浏览器识别HTML信息,加载显示网站页面
3)服务部署过程
Linux中:
			/tmp/目录权限是1(t)777
			系统安全优化:yum优化
Nginx中:
			确定Nginx站点目录权限信息,属主权限设置好
			确认好Nginx配置信息,Nginx  -t
4)PHP部署过程
第一个历程:确认系统是否已经存在了PHP相关程序
rpm -qa|grep php*
yum remove -y php-xxx(直接从第二历程开始演示)

第二个历程:更新PHP软件下载源
rpm -Uvh https://dl.fedoraproject.org/pub/epel/epel-release-latest-7.noarch.rpm
rpm -Uvh https://mirror.webtatic.com/yum/el7/webtatic-release.rpm
[root@test-201 ~]# rpm -Uvh https://dl.fedoraproject.org/pub/epel/epel-release-latest-7.noarch.rpm
[root@test-201 ~]# yum install -y php71w php71w-cli php71w-common php71w-devel php71w-embedded  php71w-gd php71w-mcryp
第三个历程:PHP程序相关软件下载安装
yum install -y php71w php71w-cli php71w-common php71w-devel php71w-embedded  php71w-gd php71w-mcrypt php71w-mbstring php71w-pdo php71w-xml php71w-fpm php71w-mysqlnd php71w-opcache  php71w-pecl-memcached php71w-pecl-redis php71w-pecl-mongodb
[root@test-201 ~]# yum install -y php71w php71w-cli php71w-common php71w-devel php71w-embedded php71w-gd php71w-mcrypt php71w-mbstring php71w-pdo php71w-xml php71w-fpm php71w-mysqlnd php71w-opcache php71w-pecl-memcached php71w-pecl-redis php71w-pecl-mongodb
PS:PHP编译安装过程(由于我yum安装,编译安装忽略)
https://www.cnblogs.com/ksy-c/p/12785238.html

第四个历程:启动PHP程序服务
systemctl start php-fpm
确认服务是否启动:
1)查看服务进程信息  ps -ef|grep php
2)查看服务端口信息  netstat -lntup
[root@test-201 ~]# ps -ef|grep php
root      79315      1  0 10:04 ?        00:00:01 php-fpm: master process (/etc/php-fpm.conf)
apache    79316  79315  0 10:04 ?        00:00:00 php-fpm: pool www
apache    79317  79315  0 10:04 ?        00:00:00 php-fpm: pool www
apache    79318  79315  0 10:04 ?        00:00:00 php-fpm: pool www
apache    79319  79315  0 10:04 ?        00:00:00 php-fpm: pool www
apache    79320  79315  0 10:04 ?        00:00:00 php-fpm: pool www
root      79738  79697  0 16:23 pts/1    00:00:00 grep --color=auto php
[root@test-201 ~]# netstat -lntup
Active Internet connections (only servers)
Proto Recv-Q Send-Q Local Address           Foreign Address         State       PID/Program name
tcp        0      0 127.0.0.1:9000          0.0.0.0:*               LISTEN      79315/php-fpm: mast
tcp        0      0 0.0.0.0:3306            0.0.0.0:*               LISTEN      8400/mysqld
tcp        0      0 0.0.0.0:80              0.0.0.0:*               LISTEN      76968/nginx: master
tcp        0      0 0.0.0.0:22              0.0.0.0:*               LISTEN      7127/sshd
tcp        0      0 127.0.0.1:25            0.0.0.0:*               LISTEN      7207/master
tcp6       0      0 :::22                   :::*                    LISTEN      7127/sshd
tcp6       0      0 ::1:25                  :::*                    LISTEN      7207/master
udp        0      0 127.0.0.1:323           0.0.0.0:*                           6284/chronyd
udp6       0      0 ::1:323                 :::*                                6284/chronyd
   TCP:传输控制协议  面向连接网络协议(可以保证数据传输可靠性) 用途:HTTP访问网站页面  FTP  邮件服务
   UDP:用户报文协议  无连接网络协议  (可以保证数据传输效率)   用途:DNS解析  视频通讯 语言通讯
   -l   列表显示端口和服务进程信息
   -n   以数字方式显示信息
   -t   显示tcp信息的端口和服务进程信息
   -u   显示udp信息的端口和服务进程信息
   -p   显示服务进程信息

   MySQL部署安装:简单方便 -- mariadb

Mysql==mariadb
第一个历程:安装程序软件
yum install -y mariadb mariadb-server
[root@test-201 ~]#yum install -y mariadb mariadb-server
第二个历程:启动数据库程序并简单配置
systemctl start mariadb

mysqladmin -uroot password "oldboy123"  --- 设置密码信息
drop database test;                     --- 删除无用数据库
delete from user where user="";         --- 删除无用数据库用户信息
[root@test-201 ~]# systemctl start mariadb
[root@test-201 ~]# mysql
Welcome to the MariaDB monitor.  Commands end with ; or \g.
Your MariaDB connection id is 14
Server version: 5.5.65-MariaDB MariaDB Server

Copyright (c) 2000, 2018, Oracle, MariaDB Corporation Ab and others.

Type 'help;' or '\h' for help. Type '\c' to clear the current input statement.

MariaDB [(none)]> quit
Bye
[root@test-201 ~]# mysqladmin -uroot password "oldboy123"
[root@test-201 ~]# mysql -uroot -poldboy123
Welcome to the MariaDB monitor.  Commands end with ; or \g.
Your MariaDB connection id is 16
Server version: 5.5.65-MariaDB MariaDB Server

Copyright (c) 2000, 2018, Oracle, MariaDB Corporation Ab and others.

Type 'help;' or '\h' for help. Type '\c' to clear the current input statement.

MariaDB [(none)]> show databases
    -> ;
+--------------------+
| Database           |
+--------------------+
| information_schema |
| mysql              |
| performance_schema |
| test               |
+--------------------+
4 rows in set (0.04 sec)

MariaDB [(none)]> use test;
Reading table information for completion of table and column names
You can turn off this feature to get a quicker startup with -A

Database changed
MariaDB [test]> drop databse test;
ERROR 1064 (42000): You have an error in your SQL syntax; check the manual that corresponds to your MariaDB server version for the right syntax to use near 'databse test' at line 1
MariaDB [test]> drop database test;
Query OK, 4 rows affected (0.35 sec)

MariaDB [(none)]> select user,host from mysql.user;
+------+-----------+
| user | host      |
+------+-----------+
| root | 127.0.0.1 |
| root | ::1       |
|      | localhost |
| root | localhost |
|      | test-201  |
| root | test-201  |
+------+-----------+
6 rows in set (0.05 sec)

MariaDB [(none)]> use mysql;
Reading table information for completion of table and column names
You can turn off this feature to get a quicker startup with -A

Database changed
MariaDB [mysql]> delete from user where user="";
Query OK, 2 rows affected (0.18 sec)

MariaDB [mysql]> delete from user where host="::1";
Query OK, 1 row affected (0.27 sec)

MariaDB [mysql]> select user,host from mysql.user;
+------+-----------+
| user | host      |
+------+-----------+
| root | 127.0.0.1 |
| root | localhost |
| root | test-201  |
+------+-----------+
3 rows in set (0.00 sec)

MariaDB [mysql]> delete from user where host="test-201";
Query OK, 1 row affected (0.00 sec)
5)需要将LNMP架构进行串联
nginx 和 php进行串联
第一个历程:让nginx和php建立关系
server {
  listen       80 default_server;
  server_name  bbs.oldboy.com;
  root         /html/bbs;
  index        index.php index.html;
  location ~ \.php$ {                 --- 匹配客户端访问php动态资源信息
     fastcgi_pass  127.0.0.1:9000;    --- 将动态资源请求抛送给后端PHP程序
     root          /html/bbs;         --- 告知PHP程序,默认资源信息保存目录
     fastcgi_index index.php;         --- 在PHP收到Nginx发送消息后,没有特殊指定动态资源文件,默认处理index.php首页文件
     fastcgi_param SCRIPT_FILENAME $document_root$fastcgi_script_name;   --- 可以精准告知PHP需要处理文件路径信息
     include fastcgi_params;
  }
}

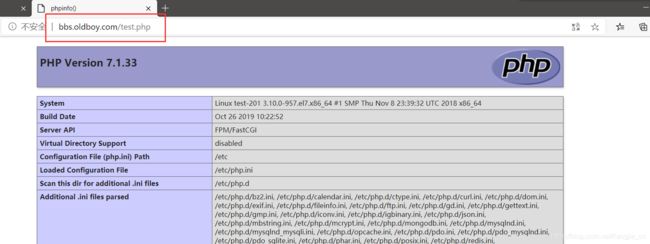
第二个历程:进行测试验证
在站点目录中,创建php动态代码文件
502  表示前段服务正常 nginx   但是后端服务不能接受前端服务请求

php 和 数据库进行串联 -- 利用php代码进行串联
演示:
[root@test-201 /etc/nginx/conf.d]# cd /html/bbs
[root@test-201 /html/bbs]# vim test.php
[root@test-201 /html/bbs]# vim test.php
[root@test-201 /html/bbs]# ll /tmp/ -d
drwxrwxrwt. 12 root root 4096 Sep 29 11:30 /tmp/
[root@test-201 /html/bbs]# nginx -t
nginx: [emerg] directive "location" has no opening "{" in /etc/nginx/conf.d/bbs.conf:7
nginx: configuration file /etc/nginx/nginx.conf test failed
[root@test-201 /html/bbs]# vi bbs.conf
[root@test-201 /html/bbs]# cd /etc/nginx/conf.d/
[root@test-201 /etc/nginx/conf.d]# vi bbs.conf
[root@test-201 /etc/nginx/conf.d]# nginx -t
nginx: the configuration file /etc/nginx/nginx.conf syntax is ok
nginx: configuration file /etc/nginx/nginx.conf test is successful
[root@test-201 /etc/nginx/conf.d]# systemctl restart nginx
[root@test-201 /etc/nginx/conf.d]# cd /html/bbs/
[root@test-201 /html/bbs]# ls
index.html  test.php
[root@test-201 /html/bbs]# cat test.php
();
?>
[root@test-201 /html/bbs]# systemctl start php-fpm
[root@test-201 /html/bbs]# cd /etc/nginx/conf.d/
[root@test-201 /etc/nginx/conf.d]# cat bbs.conf
 server {
      listen       80;           		        #指定服务监听端口信息 用于接收用户访问请求
      server_name  bbs.oldboy.com;              #指定网站域名信息
      root         /html/bbs;       		    #指定服务站点目录
      index        index.php index.html;        #指定首页文件信息 会进行默认加载
      location ~ \.php$ {                       #匹配客户端访问php动态资源信息
               fastcgi_pass    127.0.0.1:9000;  #将动态资源请求抛送给后端PHP程序
               root            /html/bbs;       #告知PHP程序,默认资源信息保存目录
               fastcgi_index   index.php;       #在PHP收到Nginx发送消息后,没有特殊指定动态资源文件,默认处理index.php首页文件
               fastcgi_param SCRIPT_FILENAME $document_root$fastcgi_script_name;   #可以精准告知PHP需要处理文件路径信息
               include fastcgi_params;
                       }
}
[root@test-201 /etc/nginx/conf.d]#
第二个历程:进行测试验证
在站点目录中,创建php动态代码文件
502  表示前段服务正常 nginx   但是后端服务不能接受前端服务请求

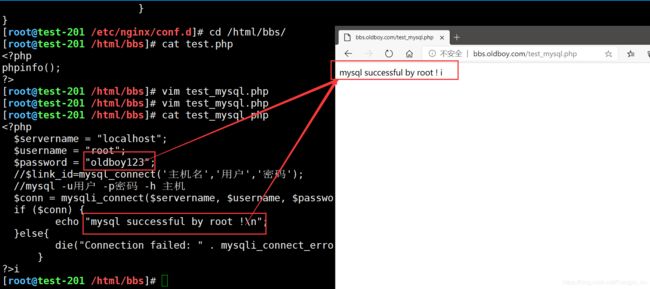
php 和 数据库进行串联 -- 利用php代码进行串联
演示:
[root@test-201 /etc/nginx/conf.d]# cd /html/bbs/
[root@test-201 /html/bbs]# cat test.php
[root@test-201 /html/bbs]# vim test_mysql.php
[root@test-201 /html/bbs]# cat test_mysql.php
$servername = "localhost";
  $username = "root";
  $password = "oldboy123";
  //$link_id=mysql_connect('主机名','用户','密码');
  //mysql -u用户 -p密码 -h 主机
  $conn = mysqli_connect($servername, $username, $password);
  if ($conn) {
         echo "mysql successful by root !\n";
  }else{
         die("Connection failed: " . mysqli_connect_error());
      }
?>i
6)企业动态资源发布过程
第一个历程:获取网站动态资源代码 上传解压
[root@test-201 /html/bbs]# unzip Discuz_X3.4_SC_UTF8【20200818】.zip
第二个历程:进行网站初始化过程 (开源)
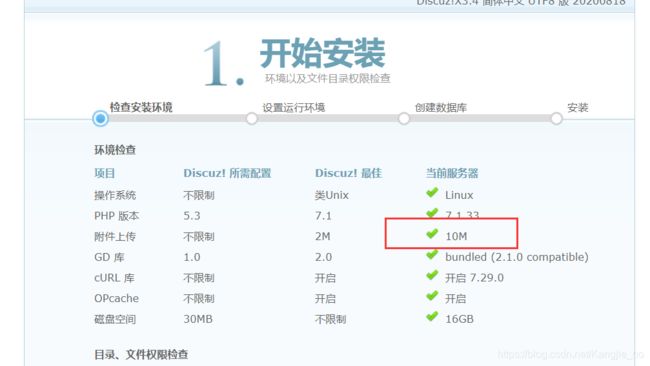
环境检查过程       需求进行指定目录授权   chown
创建库和用户过程    创库sql 授权sql
[root@test-201 /html/bbs]# cd upload/
[root@test-201 /html/bbs/upload]# vi /etc/nginx/conf.d/bbs.conf
[root@test-201 /html/bbs/upload]# cat /etc/nginx/conf.d/bbs.conf
 server {
      listen       80;           		#指定服务监听端口信息 用于接收用户访问请求
      server_name  bbs.oldboy.com;              #指定网站域名信息
      root         /html/bbs/upload;       		#指定服务站点目录
      index        index.php index.html;        #指定首页文件信息 会进行默认加载
      location ~ \.php$ {
               fastcgi_pass    127.0.0.1:9000;
               root            /html/bbs/upload;
               fastcgi_index   index.php;
               fastcgi_param SCRIPT_FILENAME $document_root$fastcgi_script_name;
               include fastcgi_params;
                       }
}
[root@test-201 /html/bbs/upload]# systemctl restart nginx
[root@test-201 /html/bbs/upload]# vi /etc/php.ini
[root@test-201 /html/bbs/upload]# systemctl restart php-fpm
[root@test-201 /html/bbs/upload]# ll config/ -d
drwxr-xr-x 2 root root 90 Aug 18 23:35 config/
[root@test-201 /html/bbs/upload]# chown -R apache.apache config/
[root@test-201 /html/bbs/upload]# ll config/
total 20
-rw-r--r-- 1 apache apache 10028 Aug 18 23:36 config_global_default.php
-rw-r--r-- 1 apache apache  1663 Aug 18 23:36 config_ucenter_default.php
-rw-r--r-- 1 apache apache     1 Aug 18 23:36 index.htm
[root@test-201 /html/bbs/upload]# vim /etc/nginx/nginx.conf
[root@test-201 /html/bbs/upload]# systemctl restart nginx
[root@test-201 /html/bbs/upload]# ps -ef|grep nginx
root      80326      1  0 20:03 ?        00:00:00 nginx: master process /usr/sbin/nginx
apache    80327  80326  0 20:03 ?        00:00:00 nginx: worker process
root      80329  78844  0 20:04 pts/0    00:00:00 grep --color=auto nginx
[root@test-201 /html/bbs/upload]# chown -R apache.apache data/
[root@test-201 /html/bbs/upload]# chown -R apache.apache uc_server/
[root@test-201 /html/bbs/upload]# chown -R apache.apache uc_client/
[root@test-201 /html/bbs/upload]#
其中 vim /etc/nginx/nginx.conf修改的内容为:
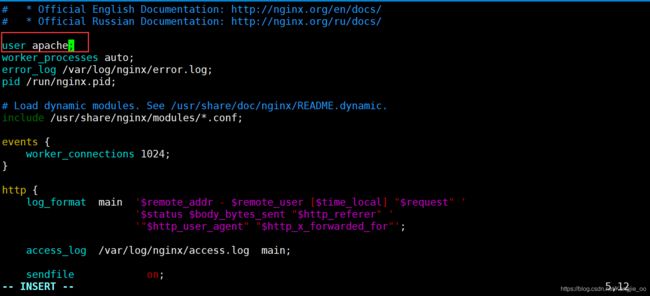

然后点击下一步
[root@test-201 /html/bbs/upload]# mysql -uroot -poldboy123
Welcome to the MariaDB monitor.  Commands end with ; or \g.
Your MariaDB connection id is 28
Server version: 5.5.65-MariaDB MariaDB Server

Copyright (c) 2000, 2018, Oracle, MariaDB Corporation Ab and others.

Type 'help;' or '\h' for help. Type '\c' to clear the current input statement.

MariaDB [(none)]> create database bbs;
Query OK, 1 row affected (0.00 sec)

MariaDB [(none)]> grant all on bbs.* to 'bbs'@'localhost' identified by 'oldboy123';
Query OK, 0 rows affected (0.10 sec)

MariaDB [(none)]> select user,host from mysql.user;
+------+-----------+
| user | host      |
+------+-----------+
| root | 127.0.0.1 |
| bbs  | localhost |
| root | localhost |
+------+-----------+
3 rows in set (0.00 sec)

MariaDB [(none)]> select user,host,password from mysql.user;
+------+-----------+-------------------------------------------+
| user | host      | password                                  |
+------+-----------+-------------------------------------------+
| root | localhost | *FE28814B4A8B3309DAC6ED7D3237ADED6DA1E515 |
| bbs  | localhost | *FE28814B4A8B3309DAC6ED7D3237ADED6DA1E515 |
| root | 127.0.0.1 |                                           |
+------+-----------+-------------------------------------------+
3 rows in set (0.00 sec)

MariaDB [(none)]> quit
Bye
[root@test-201 /html/bbs/upload]# mysql -ubbs -poldboy123;
Welcome to the MariaDB monitor.  Commands end with ; or \g.
Your MariaDB connection id is 29
Server version: 5.5.65-MariaDB MariaDB Server

Copyright (c) 2000, 2018, Oracle, MariaDB Corporation Ab and others.

Type 'help;' or '\h' for help. Type '\c' to clear the current input statement.

MariaDB [(none)]> show databases;
+--------------------+
| Database           |
+--------------------+
| information_schema |
| bbs                |
+--------------------+
2 rows in set (0.00 sec)

MariaDB [(none)]>
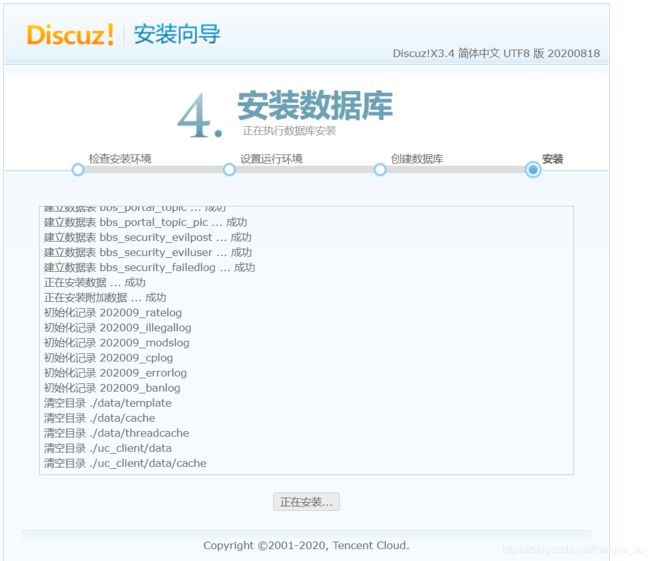
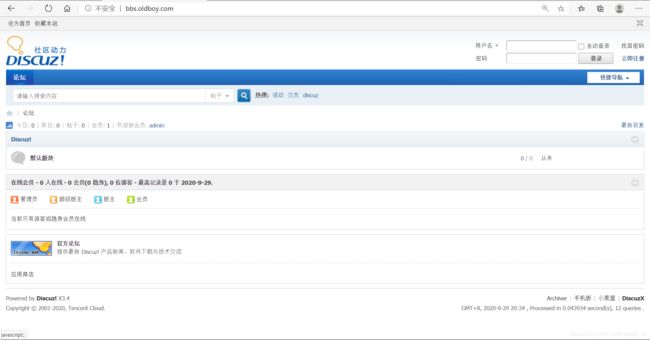
第三个历程:测试访问看看
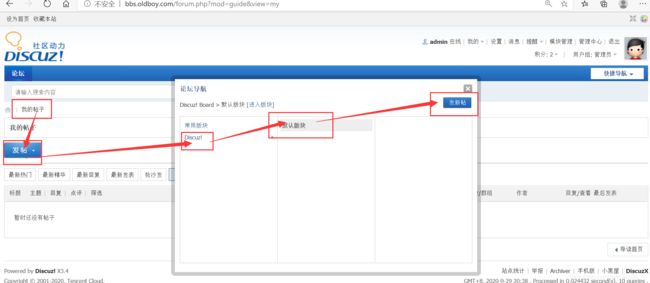
测试能不能发帖
