SpringSecurity(Web权限方案)
SpringSecurity
一、基本概要
1、认证和授权
1、认证:用户是否登录
2、授权:用户是否有权利去做别的东西
2、特点
- 全面的权限控制
- 为web开发设计
- 旧版本不能脱离Web环境
- 新版本对整个框架进行分层抽取,分层核心模块和web模块。单独引入核心模块就尅脱离Web环境
- 重量级 (依赖于很多组件和依赖)
3、和Shiro 相比
1、shiro更轻量、更灵活
2、SpringSecurity功能比Shiro更强大,可以做单点登录
二、入门案例
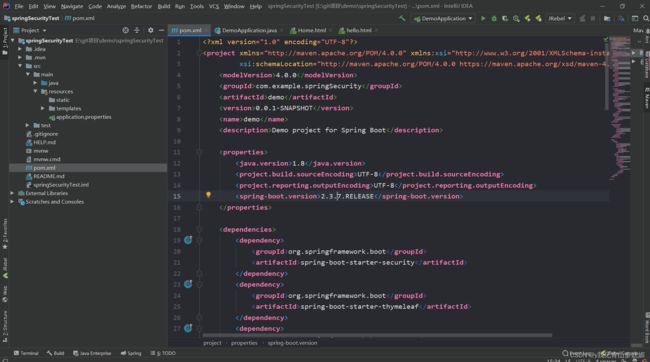
1、创建springboot工程
springboot版本:2.3.7
2、引入相关依赖
		<dependency>
            <groupId>org.springframework.securitygroupId>
            <artifactId>spring-security-testartifactId>
            <scope>testscope>
        dependency>
        <dependency>
            <groupId>org.springframework.bootgroupId>
            <artifactId>spring-boot-starter-securityartifactId>
        dependency>
3、编写一个简单的controller测试
//@RestController  = @RequestBody + @Controller  返回return内对应的值
@RestController
@RequestMapping("test")
public class TestController {
    @GetMapping("hello")
    public String hello(){
        return "hello,security";
    }
}
4、启动springboot工程
1、在页面打开对应的controller
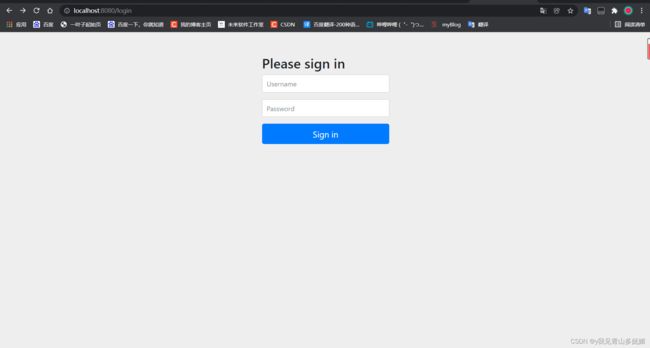
进入界面如下:
这就是springsecurity默认的登录页面,需要授权才能进入正的页面(注意导航栏的url地址最后**/login**)
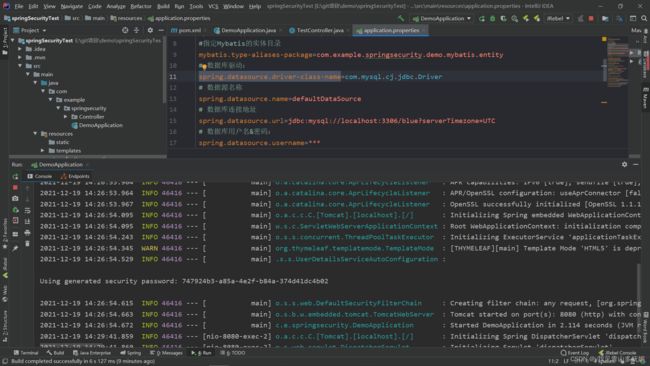
2、输入用户名和密码进入页面,默认用户名:user 密码为springboot项目启动之后控制台内随机生成的密码 :747924b3-a85a-4e2f-b84a-374d41dc4b02 (都是springsecurity内自带的)
3、在页面内登录,进入如下页面:(注意导航栏地址最后的为自己写的controller层接口**/hello**
三、底层代码流程:三个重点过滤器
四、使用自己的数据库密码,进行登录配置
1、继承UsernamePasswordAuthenticationFilter方法
1、新建类继承UsernamePasswordAuthenticationFilter方法,重写其中的attemptAuthentication方法,如果认证成功,再重写其中的successfulAuthentication方法,否则重写unsuccessfulAuthentication方法。
2、使用自己数据库内部数据进行比对
两个重要接口:UserDetailsService、PasswordEncoder
1、新建类实现UserDetailsService接口,里面写查询数据库用户名和密码的过程。
2、编写查询数据的过程,返回User对象,这个User对象是安全框架提供的User对象
3、PasswordEncoder用于返回对User对象内的密码进行加密,BCryptPasswordEncoder方法对密码进行加密,是Spring Security官方推荐的密码解析器 基于Hash算法实现单向加密,可以通过strength控制密码强度,默认10.
五、Web权限方案
1、认证(登录过程)
1、设置登录的用户名和密码
1、通过配置文件配置
在properties文件中配置
server.port=8080
spring.security.user.name=a123
spring.security.user.password=123456
2、通过配置类
1、新建config包
2、创建SecurityConfig配置类,继承WebSecurityConfigurerAdapter类
package com.example.springsecurity.config;

import org.springframework.context.annotation.Configuration;
import org.springframework.security.config.annotation.authentication.builders.AuthenticationManagerBuilder;
import org.springframework.security.config.annotation.web.configuration.WebSecurityConfigurerAdapter;
import org.springframework.security.crypto.bcrypt.BCryptPasswordEncoder;

/**
 * @Create on 2022/1/10 15:32
 */
@Configuration
public class SecurityConfig extends WebSecurityConfigurerAdapter {
    @Override
    protected void configure(AuthenticationManagerBuilder auth) throws Exception {
        //新建加密密码对象
        BCryptPasswordEncoder passwordEncoder = new BCryptPasswordEncoder();
        //对密码进行加密
        String encode = passwordEncoder.encode("123");
        //传入用户名,密码,角色
        auth.inMemoryAuthentication().withUser("lucy").password(encode).roles("admin");
    }
}
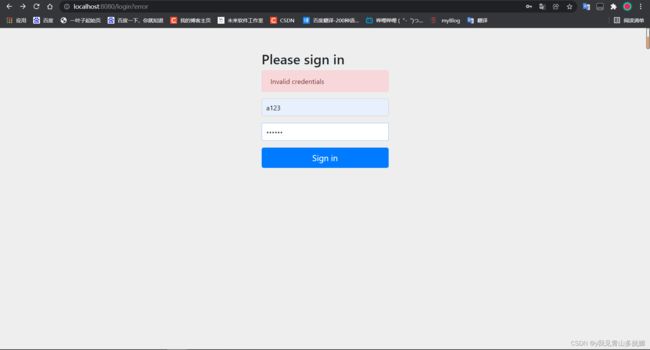
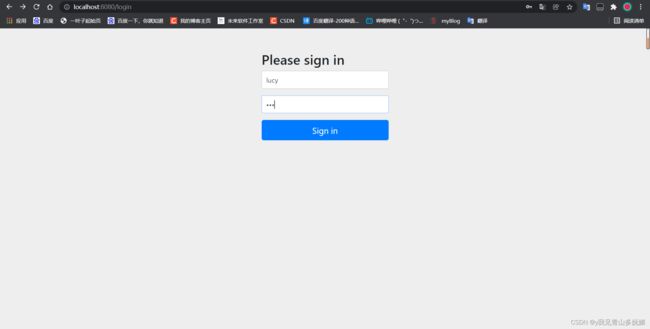
3、运行结果
3、自定义编写实现类(使用数据库内)
1、创建配置类,设置使用哪个userDeailsService实现类
package com.example.springsecurity.config;

import org.springframework.beans.factory.annotation.Autowired;
import org.springframework.context.annotation.Bean;
import org.springframework.context.annotation.Configuration;
import org.springframework.security.config.annotation.authentication.builders.AuthenticationManagerBuilder;
import org.springframework.security.config.annotation.web.configuration.WebSecurityConfigurerAdapter;
import org.springframework.security.core.userdetails.UserDetailsService;
import org.springframework.security.crypto.bcrypt.BCryptPasswordEncoder;
import org.springframework.security.crypto.password.PasswordEncoder;

/**
 * @Create on 2022/1/10 16:33
 */
@Configuration
public class SecurityConfigTest extends WebSecurityConfigurerAdapter {
    @Autowired
    private UserDetailsService userDetailsService;


    @Override
    protected void configure(AuthenticationManagerBuilder auth) throws Exception {
        auth.userDetailsService(userDetailsService).passwordEncoder(passwordEncoder());
    }

    @Bean
    PasswordEncoder passwordEncoder(){
        return new BCryptPasswordEncoder();
    }
}
2、编写接口实现类
package com.example.springsecurity.Service;

import org.springframework.security.core.GrantedAuthority;
import org.springframework.security.core.authority.AuthorityUtils;
import org.springframework.security.core.userdetails.User;
import org.springframework.security.core.userdetails.UserDetails;
import org.springframework.security.core.userdetails.UserDetailsService;
import org.springframework.security.core.userdetails.UsernameNotFoundException;
import org.springframework.security.crypto.bcrypt.BCryptPasswordEncoder;
import org.springframework.stereotype.Service;

import java.util.List;

/**
 * @Create on 2022/1/10 16:38
 */
//userDetailsService和 配置类中 @Autowired下注入的名称相同
@Service("userDetailsService")
public class MyUserDetailsService implements UserDetailsService {
    @Override
    public UserDetails loadUserByUsername(String s) throws UsernameNotFoundException {
        List<GrantedAuthority> role = AuthorityUtils.commaSeparatedStringToAuthorityList("role");
        return new User("mary",new BCryptPasswordEncoder().encode("123"),role);
    }
}
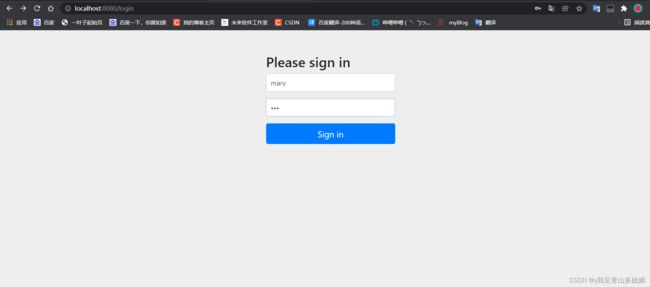
3、运行结果
4、查询数据库完成用户认证(整合MybatisPlus完成数据库操作)
①引入对应的依赖
		<dependency>
            <groupId>com.baomidougroupId>
            <artifactId>mybatis-plus-boot-starter artifactId>
            <version>3.0.5version>
        dependency>
        <dependency>
            <groupId>mysqlgroupId>
            <artifactId>mysql-connector-javaartifactId>
            <scope>runtimescope>
        dependency>
        <dependency>
            <groupId>org.projectlombokgroupId>
            <artifactId>lombokartifactId>
            <optional>trueoptional>
        dependency>
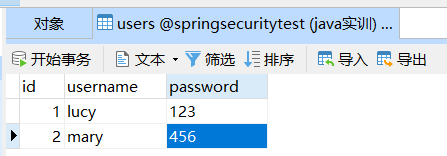
②新建数据库(SpringSecurityTest)和对应的表(users)
③新建实体类(JavaBean)
@Data
@NoArgsConstructor
@AllArgsConstructor
@ToString
public class Users {
    private Integer id;
    private String username;
    private String password;
}
④整合mp(mybaitsPlus)
package com.example.springsecurity.Mapper;

import com.baomidou.mybatisplus.core.mapper.BaseMapper;
import com.example.springsecurity.entity.Users;

/**
 * @Create on 2022/1/21 11:08
 */
@Repository
public interface UsersMapper extends BaseMapper<Users> {
}
⑤在MyDetailsService调用Mapper里面的方法查询数据库进行用户认证
package com.example.springsecurity.Service;

import com.baomidou.mybatisplus.core.conditions.query.QueryWrapper;
import com.example.springsecurity.Mapper.UsersMapper;
import com.example.springsecurity.entity.Users;
import org.springframework.beans.factory.annotation.Autowired;
import org.springframework.security.core.GrantedAuthority;
import org.springframework.security.core.authority.AuthorityUtils;
import org.springframework.security.core.userdetails.User;
import org.springframework.security.core.userdetails.UserDetails;
import org.springframework.security.core.userdetails.UserDetailsService;
import org.springframework.security.core.userdetails.UsernameNotFoundException;
import org.springframework.security.crypto.bcrypt.BCryptPasswordEncoder;
import org.springframework.stereotype.Service;

import java.util.*;

/**
 * @Create on 2022/1/10 16:38
 */
//userDetailsService和 配置类中 @Autowired下注入的名称相同
@Service("userDetailsService")
@SuppressWarnings({"all"})
public class MyUserDetailsService implements UserDetailsService {
//    1、注入对应的mapper
    @Autowired
    private UsersMapper usersMapper;

    @Override
    public UserDetails loadUserByUsername(String username) throws UsernameNotFoundException {
        //此处传入的username为获取到表单中的username(账号)
        //2、mp中的条件构造器,用于执行对应的sql操作
        QueryWrapper<Users> queryWrapper = new QueryWrapper<>();
        //3、根据username查询数据库里的username字段
        //where username = ?
        queryWrapper.eq("username",username);
        //4、执行sql语句,得到一条记录,防止用户名重复
        Users users = usersMapper.selectOne(queryWrapper);
        //5、认证操作
        if(users==null){//数据库没有该用户,认证失败,抛出异常
            throw new UsernameNotFoundException("用户名不存在");
        }
        //用户名存在
        List<GrantedAuthority> role =
                AuthorityUtils.commaSeparatedStringToAuthorityList("role");
        return new User(users.getUsername(),
                new BCryptPasswordEncoder().encode(users.getPassword()),
                role);
    }
}
⑥添加mapper扫描
在启动类上加入注解@MapperScan
@SpringBootApplication
@MapperScan("com.example.springsecurity.Mapper")
public class DemoApplication {
    public static void main(String[] args) {
        SpringApplication.run(DemoApplication.class, args);
    }
}
⑦配置数据源信息
yaml、或者properties文件中配置
# 数据库驱动:
spring.datasource.driver-class-name=com.mysql.cj.jdbc.Driver
# 数据库连接地址
spring.datasource.url=jdbc:mysql://localhost:3306/springsecuritytest?serverTimezone=GMT%2B8
# 数据库用户名&密码:
spring.datasource.username=root
spring.datasource.password=123456
⑧具体运行时详细信息
1、先进入MyUserDetailService中,调用loadUserByUsername方法,判断对应的用户
2、自定义登录页面
1、在SecurityConfigTest类中新增配置方法
@Configuration
public class SecurityConfigTest extends WebSecurityConfigurerAdapter {

    @Autowired
    private UserDetailsService userDetailsService;


    @Override
    protected void configure(AuthenticationManagerBuilder auth) throws Exception {
        HashSet hashSet = new HashSet();
        auth.userDetailsService(userDetailsService).passwordEncoder(passwordEncoder());
    }

    @Bean
    PasswordEncoder passwordEncoder(){
        return new BCryptPasswordEncoder();
    }

    //    1、新增配置方法
    @Override
    protected void configure(HttpSecurity http) throws Exception {
        http.formLogin() //自定义编写的登录页面
                .loginPage("/login.html")  //登录页面设置
                .loginProcessingUrl("/user/login")   //登录访问路径
                .defaultSuccessUrl("/test/index").permitAll()  //登录成功之后跳转到的路径
                .and().authorizeRequests()
                    .antMatchers("/","/test/hello","/user/login").permitAll() //表示访问这些路径时不需要认证
                .anyRequest().authenticated()
                .and().csrf().disable(); //关闭csrf防护
    }
}
2、编写html代码
DOCTYPE html>
<html lang="en">
<head>
    <meta charset="UTF-8">
    <title>Titletitle>
head>
<body>
    <form action="/user/login" method="post">
        用户名:<input type="text" name="username">
        <br/>
        密码:<input type="text" name="password">
        <input type="submit" value="登录">
    form>
body>
html>
值得注意的是 ,html的代码name值必须是username和password,这是由于springsecurity内置觉得的,因为他的底层使用的就是从前端代码上获取到username和password的值。
3、访问测试
访问被保护的页面时,会出现自定义的登录页面,如下图,如果访问没被保护的,那么就会直接访问
2、授权(给定权限过程)
1、hasAuthority方法
当前主题具有指定的权限,有的话返回true,否则返回false
1、在SecurityConfigTest配置类中设置当前访问地址有哪些权限
 @Override
    protected void configure(HttpSecurity http) throws Exception {
        http.formLogin() //自定义编写的登录页面
                .loginPage("/login.html")  //登录页面设置
                .loginProcessingUrl("/user/login")   //登录访问路径
                .defaultSuccessUrl("/test/index").permitAll()  //登录成功之后跳转到的路径
                .and().authorizeRequests()
                    .antMatchers("/","/test/hello","/user/login").permitAll() //表示访问这些路径时不需要认证
                //新增配置权限
                    .antMatchers("/test/index").hasAuthority("admins")
                .anyRequest().authenticated()
                .and().csrf().disable(); //关闭csrf防护
    }
2、在UserDetailsService中,把返回user对象设置权限
@Override
    public UserDetails loadUserByUsername(String username) throws UsernameNotFoundException {
        //此处传入的username为获取到表单中的username(账号)
        //2、mp中的条件构造器,用于执行对应的sql操作
        QueryWrapper<Users> queryWrapper = new QueryWrapper<>();
        //3、根据username查询数据库里的username字段
        //where username = ?
        queryWrapper.eq("username",username);
        //4、执行sql语句,得到一条记录,防止用户名重复
        Users users = usersMapper.selectOne(queryWrapper);
        //5、认证操作
        if(users==null){//数据库没有该用户,认证失败,抛出异常
            throw new UsernameNotFoundException("用户名不存在");
        }
        //用户名存在
        //赋予登录用户权限,该给的的权限可以与配置类中的相比较,以确定用户可以访问什么路径
        List<GrantedAuthority> role =
                AuthorityUtils.commaSeparatedStringToAuthorityList("admins");
        return new User(users.getUsername(),
                new BCryptPasswordEncoder().encode(users.getPassword()),
                role);
    }
2、hasAnyAuthority当权限较多时
当权限较多时,在SecurityConfigTest配置类中
 //    1、新增配置方法
    @Override
    protected void configure(HttpSecurity http) throws Exception {
        http.formLogin() //自定义编写的登录页面
                .loginPage("/login.html")  //登录页面设置
                .loginProcessingUrl("/user/login")   //登录访问路径
                .defaultSuccessUrl("/test/index").permitAll()  //登录成功之后跳转到的路径
                .and().authorizeRequests()
                    .antMatchers("/","/test/hello","/user/login").permitAll() //表示访问这些路径时不需要认证
                //1、hasAuthority方法
                    //.antMatchers("/test/index").hasAuthority("admins,manager")  //表示用户必须同时具有两个权限才可以访问该路径
                //2、hasAnyAuthority方法
                	.antMatchers("/test/index").hasAnyAuthority("admins,manager") //表示用户只要有其中一个权限即可访问该路径
                	.anyRequest().authenticated()
                .and().csrf().disable(); //关闭csrf防护
    }
3、hasRole方法
hasRole方法返回值为
return "hasRole('ROLE_" + role + "')";
所以在配置类中配置该资源路径时,需要加上"ROLE_"+role
//    1、新增配置方法
    @Override
    protected void configure(HttpSecurity http) throws Exception {
        http.formLogin() //自定义编写的登录页面
                .loginPage("/login.html")  //登录页面设置
                .loginProcessingUrl("/user/login")   //登录访问路径
                .defaultSuccessUrl("/test/index").permitAll()  //登录成功之后跳转到的路径
                .and().authorizeRequests()
                    .antMatchers("/","/test/hello","/user/login").permitAll() //表示访问这些路径时不需要认证
                //1、hasAuthority方法
                    //.antMatchers("/test/index").hasAuthority("admins,manager")  //表示用户必须同时具有两个权限才可以访问该路径
                //2、hasAnyAuthority方法
//                    .antMatchers("/test/index").hasAnyAuthority("admins,manager") //表示用户只要有其中一个权限即可访问该路径
                //3、hasRole方法  返回值为Role_+sole
                    .antMatchers("/test/index").hasRole("sale")
                    .anyRequest().authenticated()
                .and().csrf().disable(); //关闭csrf防护
    }
所以对应的在给登录的角色赋予权限时,要在权限之前加上
//表示用户有两个权限
List<GrantedAuthority> role =
                AuthorityUtils.commaSeparatedStringToAuthorityList("admins,Role_sale");
4、hasAnyRole
同hasAnyAuthority,区别是在赋予角色值时加上前缀即可
5、自定义403无权限访问页面
在SecurityConfigTest配置类中进行配置
	@Override
    protected void configure(HttpSecurity http) throws Exception {
        //此处的为unauth.html为自己定义的页面
		http.exceptionHandling().accessDeniedPage("/unauth.html");
    }
3、认证和授权过程中注解的使用
(*表示不常用)
1、@Secured
*用户具有某个角色,可以访问
①在启动类上开启注解功能(配置类上也可以)
@EnableGlobalMethodSecurity(securedEnabled = true)
@SpringBootApplication
@MapperScan("com.example.springsecurity.Mapper")
//开启注解
@EnableGlobalMethodSecurity(securedEnabled = true)
public class DemoApplication {
    public static void main(String[] args) {
        SpringApplication.run(DemoApplication.class, args);
    }
}
②配置controller层加上@Secured
	@GetMapping("update")
    @Secured({"Role_sale","Role_manager"}) //表示用于这两个权限中的其中一个或者同拥有才可以访问该路径,必须以"Role_"为前缀
    public String update(){
        return "hello update";
    }
③在userDetailsService中设置用户角色
 //设置权限
        List<GrantedAuthority> role =
                AuthorityUtils.commaSeparatedStringToAuthorityList("admin,Role_sale");
2、@PreAuthorize
①在启动类上开启注解功能
prePostEnabled = true
@EnableGlobalMethodSecurity(securedEnabled = true,prePostEnabled = true)
@SpringBootApplication
@MapperScan("com.example.springsecurity.Mapper")
@EnableGlobalMethodSecurity(securedEnabled = true,prePostEnabled = true)
public class DemoApplication {
    public static void main(String[] args) {
        SpringApplication.run(DemoApplication.class, args);
    }
}
②在controller方法上添加该注解
    @GetMapping("update")
//    @Secured({"Role_sale","Role_manager"})
    @PreAuthorize("hasAnyAuthority('admins')")//hasAnyAuthority、hasAuthority、hasRole、hasAnyRole都可以,表示在进入方法之前进行验证,方法内的操作不会被执行,如果有身份就进入,否则进入无权限页面
    public String update(){
        return "hello update";
    }
③在userDetailsService中设置用户角色
同上
*3、@PostAuthorize
①在启动类上开启注解功能
prePostEnabled = true
@EnableGlobalMethodSecurity(securedEnabled = true,prePostEnabled = true)
@SpringBootApplication
@MapperScan("com.example.springsecurity.Mapper")
@EnableGlobalMethodSecurity(securedEnabled = true,prePostEnabled = true)
public class DemoApplication {
    public static void main(String[] args) {
        SpringApplication.run(DemoApplication.class, args);
    }
}
②在controller方法上添加该注解
    @GetMapping("update")
//    @Secured({"Role_sale","Role_manager"})
//    @PreAuthorize("hasAnyAuthority('admins')")
    @PostAuthorize("hasAnyAuthority('admin')") //同@PreAuthorize注解,但是这个注解表示在方法执行之后才进行权限认证
    public String update(){
        System.out.println("update");
        return "hello update";
    }
执行之后,控制台会输出sout中的内容,但是当权限不足时,仍然跳转到无权限页面
③在userDetailsService中设置用户角色
*4、@PostFilter
方法返回数据进行过滤
①controller层
	@GetMapping("GetAll")
    @PostAuthorize("hasAnyAuthority('admins')")
    @PostFilter("filterObject.username=='admin2'")
    public List<Users> getAllUser(){
        ArrayList<Users> list = new ArrayList<>();
        list.add(new Users(1,"admin1","666"));
        list.add(new Users(2,"admin2","888"));
        System.out.println(list);
        return list;
    }
用户成功登录之后,只会返回 @PostFilter(“filterObject.username==‘admin2’”)需要的值,也就是list.add(new Users(2,“admin2”,“888”));
②网页返回结果如下
*5、@PreFilter
对方法传入值进行 过滤
①controller层
@GetMapping("getTest")
    @PostAuthorize("hasAnyAuthority('admins')")
    @PostFilter("filterObject.id%2==0")
    public List<Users> getTest(List<Users> list){
        for (Users users : list) {
            System.out.println(users.getId()+"\t"+ users.getUsername());
        }
        return list;
    }
对传入方法进行过滤
4、用户注销
①在配置类中添加退出映射地址
 	 //    1、新增配置方法
    @Override
    protected void configure(HttpSecurity http) throws Exception {
        //退出登录配置
        //第一个参数为退出的
        //第二个参数为退出成功之后跳转的接口
        http.logout().logoutUrl("/logout").
                logoutSuccessUrl("/test/hello").permitAll();
        //配置没有权限访问的页面
        http.exceptionHandling().accessDeniedPage("/unauth.html");
        http.formLogin() //自定义编写的登录页面
                .loginPage("/login.html")  //登录页面设置
                .loginProcessingUrl("/user/login")   //登录访问路径
                .defaultSuccessUrl("/success.html").permitAll()  //登录成功之后跳转到的路径
                .and().authorizeRequests()
                    .antMatchers("/","/test/hello","/user/login").permitAll() //表示访问这些路径时不需要认证
                //1、hasAuthority方法
                    //.antMatchers("/test/index").hasAuthority("admins,manager")  //表示用户必须同时具有两个权限才可以访问该路径
                //2、hasAnyAuthority方法
//                    .antMatchers("/test/index").hasAnyAuthority("admins,manager") //表示用户只要有其中一个权限即可访问该路径
                //3、hasRole方法  返回值为Role_+sole
                    .antMatchers("/test/index").hasRole("sale")
                    .anyRequest().authenticated()
                .and().csrf().disable(); //关闭csrf防护
    }
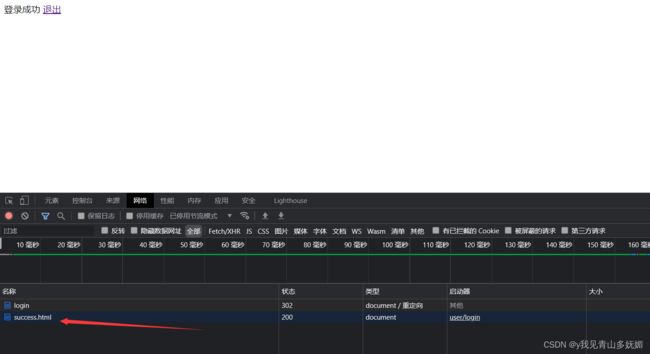
②对应的前端退出登录时内部的超链接
DOCTYPE html>
<html lang="en">
<head>
    <meta charset="UTF-8">
    <title>Titletitle>
head>
<body>
登录成功

<a href="/logout">退出a>
body>
html>
六、自动登录
使用springsecurity的安全框架实现自动登录(记住我)
1、在配置类中注入数据源
新建配置类也行,继续在SecurityConfigTest中写也行,以下在SecurityConfigTest中写
//注入数据源
    @Autowired
    private DataSource dataSource;
2、导入Bean类
	@Bean
    public PersistentTokenRepository repository() {
        JdbcTokenRepositoryImpl jdbcTokenRepository = new JdbcTokenRepositoryImpl();
        jdbcTokenRepository.setDataSource(dataSource);
        //自动创建表 无需手动创建 springsecurity内置的创建表,此处无需手动创建,值得注意的是,当第一次运行之后,需要把这段代码注释掉,因为第一次运行之后该表已经存在
        jdbcTokenRepository.setCreateTableOnStartup(true);
        return jdbcTokenRepository;
    }
jdbcTokenRepository.setCreateTableOnStartup(true);
自动创建的表如下(已经试验过,所以有数据,其中的数据就是自动登录时保存的用户信息,此表可以看出,username的值必须唯一,可以不唯一,最后会讲到为什么)
3、更新configure(HttpSecurity http)方法,加入remember-me操作
 @Override
    protected void configure(HttpSecurity http) throws Exception {
        //退出登录配置
        //第一个参数为退出的
        //第二个参数为退出成功之后跳转的接口
        http.logout().logoutUrl("/logout").
                logoutSuccessUrl("/test/hello").permitAll();
        //配置没有权限访问的页面
        http.exceptionHandling().accessDeniedPage("/unauth.html");
        http.formLogin() //自定义编写的登录页面
                .loginPage("/login.html")  //登录页面设置
                .loginProcessingUrl("/user/login")   //登录访问路径
                .defaultSuccessUrl("/success.html").permitAll()  //登录成功之后跳转到的路径
                .and().authorizeRequests()
                    .antMatchers("/","/test/hello","/user/login").permitAll() //表示访问这些路径时不需要认证
                //1、hasAuthority方法
                    //.antMatchers("/test/index").hasAuthority("admins,manager")  //表示用户必须同时具有两个权限才可以访问该路径
                //2、hasAnyAuthority方法
//                    .antMatchers("/test/index").hasAnyAuthority("admins,manager") //表示用户只要有其中一个权限即可访问该路径
                //3、hasRole方法  返回值为Role_+sole
                    .antMatchers("/test/index").hasRole("sale")
                    .anyRequest().authenticated()
                //自动登录
                    .and().rememberMe().tokenRepository(repository())
                //时间600s
                    .tokenValiditySeconds(600)
                    .userDetailsService(userDetailsService)
                .and().csrf().disable(); //关闭csrf防护
    }
4、在html页面上添加自动登录复选框
DOCTYPE html>
<html lang="en">
<head>
    <meta charset="UTF-8">
    <title>Titletitle>
head>
<body>
    <form action="/user/login" method="post">
        用户名:<input type="text" name="username">
        <br/>
        密码:<input type="text" name="password">
        <br/>

        <input type="checkbox" name="remember-me"> 自动登录
        <input type="submit" value="登录">
    form>
body>
html>
5、测试
登录后查看
登录之后可以查看到对应的表内容如下
最后值得注意的是,当我们使用两个不同的浏览器去登录同一个账号时,此时username相同,登录成功之后,该表内部为有两个相同的username字段,如下图所示
当在其中一个浏览器上点击退出登录时,会同时删除其中username相同的数据
七、CSRF(跨站请求伪造)
1、注释掉配置类中关闭的CSRF功能
csrf提供保护POST、PUT、DELETE请求
关闭之后表示开启
// .and().csrf().disable(); //关闭csrf防护
2、在登录的html页面中加入
<html xmlns="http://www.w3.org/1999/xhtml" xmlns:th="http://www.thymeleaf.org">
<input th:name="${_csrf.parameterName}" th:value="${_csrf.token}" type="hidden">
*必须注释掉第一步才可以写第二步,否则报错
结尾:以上内容为本人学习笔记,学习资源来自尚硅谷课程SpringSecurity
仅仅做为个人总结,各自努力,最高处见。




![[外链图片转存失败,源站可能有防盗链机制,建议将图片保存下来直接上传(img-x9sr2wIZ-1642910554981)(C:\Users\admin\AppData\Roaming\Typora\typora-user-images\image-20220123112748221.png)]](http://img.e-com-net.com/image/info8/6a8a8e07c3d9498690035592a14e546a.png)



![[外链图片转存失败,源站可能有防盗链机制,建议将图片保存下来直接上传(img-YJMGWQS3-1642910554986)(C:\Users\admin\AppData\Roaming\Typora\typora-user-images\image-20220123113522821.png)]](http://img.e-com-net.com/image/info8/e386fcb8b8fa4e5fb620dbb8474a62b8.png)