微服务-消息总线 SpringCloud Bus
1. why
上篇中的配置中心服务端可以实现从远程仓库拉取实时变更的配置, 但是客户端无法直接实现配置更新, 需要向客户端发送一个post请求刷新配置(/actuator/refresh), 客户端微服务少的时候还能接受, 一旦有成百上千个客户端微服务, 不可能让运维工程师向每个客户端发送一次post请求手动刷新配置. 那么, 可否通过一种广播技术大范围的自动刷新,实现一次通知, 处处生效呢? 那就是下面我要写的消息总线技术.
2. 什么是消息总线
在微服务架构的系统中,通常会使用轻量级的消息代理来构建一个共用的消息主题,并让系统中所有微服务实例都连接上来。由于该主题中产生的消息会被所有实例监听和消费,所以称它为消息总线。在总线上的各个实例,都可以方便地广播一些需要让其他连接在该主题上的实例都知道的消息。
消息代理又是什么?
消息代理是一个消息验证、传输、路由的架构模式,主要用来实现接收和分发消息,并根据设定好的消息处理流来转发给正确的应用。它在微服务之间起到通信调度作用,减少了服务之间的依赖。
Spring Cloud Bus 配合 Spring Cloud Config 使用可以实现配置的动态刷新。
基本原理
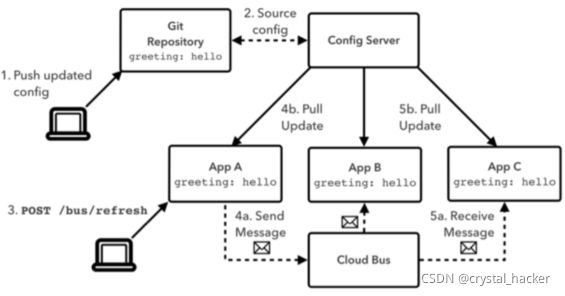
ConfigClient实例都监听MQ中同一个topic(默认是springCloudBus)。当一个服务刷新数据的时候,它会把这个信息放入到Topic中,这样其它监听同一Topic的服务就能得到通知,然后去更新自身的配置。
3. 什么是SpringCloud Bus
官方资料→SpringCloud Bus
Spring Cloud Bus 是 Spring Cloud 体系内的消息总线,用来连接分布式系统的所有节点。致力于解决将分布式系统的节点与轻量级消息系统连接问题的框架. 它整合了Java的事件处理机制和消息中间件的功能。
Spring Cloud Bus 将分布式的节点用轻量的消息代理(目前仅支持RibbitMQ、Kafka两种消息队列)连接起来。可以通过消息代理广播配置文件的更改,或服务之间的通讯,也可以用于监控。解决了微服务数据变更,及时同步的问题。
4. 环境规划
- RabbitMQ → RabbitMQ环境配置
atguigu-cloud-2020聚合工程:
版本: SpringBoot 2.2.2.RELEASE、Spring Cloud Hoxton.SR1
注册中心 eureka01:7001
注册中心 eureka02:7002
配置中心服务端 cloud-config-center-3344
配置中心客户端1 cloud-config-client-3355
配置中心客户端2 cloud-config-client-3366
5. 最佳实践
5.1 RabbitMQ安装
上面给出了Windows系统安装RabbitMQ的详细过程. 这里我不再详述, 我主要讲使用docker安装RabbitMQ的过程. 后面的案例也是使用Linux环境的RabbitMQ配置.
使用docker安装运行rabbmitMQ相关的命令
# 搜索rabbitMQ
docker search rabbitmq:management
# 下载rabbitMQ镜像
docker pull rabbitmq:management
# 运行rabbitMQ容器
docker run --name rabbitmq -p 5671:5671 -p 5672:5672 -p 15671:15671 -p 15672:15672 -p 4369:4369 -p 25672:25672 rabbitmq:management
# 查看运行的容器
docker ps -a
# 停止rabbitMQ容器
docker stop rabbitmq
# 启动rabbitMq容器
docker start rabbitmq
# 移除rabbitMQ容器
docker rm rabbitmq
# 启动docker
systemctl start docker
# 停止docker
systemctl stop docker
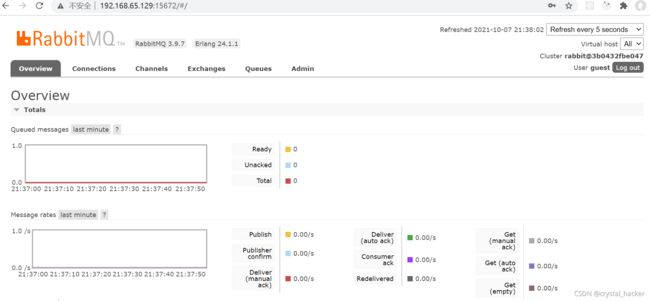
启动rabbitMQ成功后, 访问http://192.168.65.129:15672/查看控制台.

输入默认用户密码 guest/guest, 进入rabbitmq控制台.
5.2 创建父工程
创建父工程[atguigu-cloud-2020] , 父工程的依赖进行SpringBoot, SpringCloud和常用组件的版本管理.
<project xmlns="http://maven.apache.org/POM/4.0.0"
         xmlns:xsi="http://www.w3.org/2001/XMLSchema-instance"
         xsi:schemaLocation="http://maven.apache.org/POM/4.0.0 http://maven.apache.org/xsd/maven-4.0.0.xsd">
    <modelVersion>4.0.0modelVersion>

    <groupId>com.atguigu.springcloudgroupId>
    <artifactId>atguigu-cloud-2020artifactId>
    <version>1.0-SNAPSHOTversion>
    <modules>
        <module>cloud-eureka-server-7001module>
        <module>cloud-eureka-server-7002module>
        <module>cloud-config-center-3344module>
        <module>cloud-config-client-3355module>
        <module>cloud-config-client-3366module>
    modules>
    <packaging>pompackaging>


    <properties>
        <project.build.sourceEncoding>UTF-8project.build.sourceEncoding>
        <maven.compiler.source>1.8maven.compiler.source>
        <maven.compiler.target>1.8maven.compiler.target>
        <junit.version>4.12junit.version>
        <log4j.version>1.2.17log4j.version>
        <lombok.version>1.16.18lombok.version>
        <mysql.version>5.1.47mysql.version>
        <druid.version>1.1.16druid.version>
        <mybatis.spring.boot.version>1.3.0mybatis.spring.boot.version>
    properties>


    <dependencyManagement>
        <dependencies>

            <dependency>
                <groupId>org.springframework.bootgroupId>
                <artifactId>spring-boot-dependenciesartifactId>
                <version>2.2.2.RELEASEversion>
                <type>pomtype>
                <scope>importscope>
            dependency>

            <dependency>
                <groupId>org.springframework.cloudgroupId>
                <artifactId>spring-cloud-dependenciesartifactId>
                <version>Hoxton.SR1version>
                <type>pomtype>
                <scope>importscope>
            dependency>

            <dependency>
                <groupId>com.alibaba.cloudgroupId>
                <artifactId>spring-cloud-alibaba-dependenciesartifactId>
                <version>2.1.0.RELEASEversion>
                <type>pomtype>
                <scope>importscope>
            dependency>
            <dependency>
                <groupId>mysqlgroupId>
                <artifactId>mysql-connector-javaartifactId>
                <version>${mysql.version}version>
            dependency>
            <dependency>
                <groupId>com.alibabagroupId>
                <artifactId>druidartifactId>
                <version>${druid.version}version>
            dependency>
            <dependency>
                <groupId>org.mybatis.spring.bootgroupId>
                <artifactId>mybatis-spring-boot-starterartifactId>
                <version>${mybatis.spring.boot.version}version>
            dependency>
            <dependency>
                <groupId>junitgroupId>
                <artifactId>junitartifactId>
                <version>${junit.version}version>
            dependency>
            <dependency>
                <groupId>log4jgroupId>
                <artifactId>log4jartifactId>
                <version>${log4j.version}version>
            dependency>
            <dependency>
                <groupId>org.projectlombokgroupId>
                <artifactId>lombokartifactId>
                <version>${lombok.version}version>
                <optional>trueoptional>
            dependency>
        dependencies>
    dependencyManagement>

    <build>
        <plugins>
            <plugin>
                <groupId>org.springframework.bootgroupId>
                <artifactId>spring-boot-maven-pluginartifactId>
                <configuration>
                    <fork>truefork>
                    <addResources>trueaddResources>
                configuration>
            plugin>
        plugins>
    build>
project>
5.3 搭建注册中心
创建注册中心eureka01:7001, eureka02:7002集群. 具体步骤不展开了.
可以查看博客→Eureka集群搭建.
5.4 创建配置中心服务端
新增配置中心服务端[cloud-config-center-3344]
5.4.1 pom依赖
<project xmlns="http://maven.apache.org/POM/4.0.0"
         xmlns:xsi="http://www.w3.org/2001/XMLSchema-instance"
         xsi:schemaLocation="http://maven.apache.org/POM/4.0.0 http://maven.apache.org/xsd/maven-4.0.0.xsd">
    <parent>
        <artifactId>atguigu-cloud-2020artifactId>
        <groupId>com.atguigu.springcloudgroupId>
        <version>1.0-SNAPSHOTversion>
    parent>
    <modelVersion>4.0.0modelVersion>

    <artifactId>cloud-config-center-3344artifactId>

    <dependencies>

        <dependency>
            <groupId>org.springframework.cloudgroupId>
            <artifactId>spring-cloud-starter-bus-amqpartifactId>
        dependency>

        <dependency>
            <groupId>org.springframework.cloudgroupId>
            <artifactId>spring-cloud-config-serverartifactId>
        dependency>
        <dependency>
            <groupId>org.springframework.cloudgroupId>
            <artifactId>spring-cloud-starter-netflix-eureka-clientartifactId>
        dependency>
        <dependency>
            <groupId>org.springframework.bootgroupId>
            <artifactId>spring-boot-starter-webartifactId>
        dependency>
        <dependency>
            <groupId>org.springframework.bootgroupId>
            <artifactId>spring-boot-starter-actuatorartifactId>
        dependency>
        <dependency>
            <groupId>org.springframework.bootgroupId>
            <artifactId>spring-boot-devtoolsartifactId>
            <scope>runtimescope>
            <optional>trueoptional>
        dependency>
        <dependency>
            <groupId>org.projectlombokgroupId>
            <artifactId>lombokartifactId>
            <optional>trueoptional>
        dependency>
        <dependency>
            <groupId>org.springframework.bootgroupId>
            <artifactId>spring-boot-starter-testartifactId>
            <scope>testscope>
        dependency>
    dependencies>
project>
5.4.2 编写配置
application.yml 或 bootstrap.yml 文件编写配置
server:
  port: 3344
spring:
  application:
    name: cloud-config-center
  cloud:
    config:
      server:
        git:
          uri: https://gitee.com/wang-qz/springcloud-config.git
          search-paths: springcloud-config #搜索目录
          default-label: master # 读取分支
  rabbitmq:
    host: 192.168.65.129
    port: 5672
    username: guest
    password: guest
# eureka配置
eureka:
  instance:
    hostname: localhost
    instance-id: cloud-config-center-3344
    prefer-ip-address: true
  client:
    register-with-eureka: true
    fetch-registry: true
    service-url:
      defaultZone: http://www.eureka01.com:7001/eureka,http://www.eureka02.com:7002/eureka
##rabbitmq相关配置,暴露bus刷新配置的端点
management:
  endpoints:
    web:
      exposure:
        include: 'bus-refresh'
5.4.3 编写启动类
com.atguigu.springcloud.ConfigCenterApplication
package com.atguigu.springcloud;

import org.springframework.boot.SpringApplication;
import org.springframework.boot.autoconfigure.SpringBootApplication;
import org.springframework.cloud.config.server.EnableConfigServer;

/**
 * 类描述:配置中心服务端启动类
 * @Author wang_qz
 * @Date 2021/11/21 21:49
 * @Version 1.0
 */
@SpringBootApplication
@EnableConfigServer
public class ConfigCenterApplication {
    public static void main(String[] args) {
        SpringApplication.run(ConfigCenterApplication.class);
    }
}
5.4.4 远程仓库配置
可以在GitHub或Gitee上添加远程配置仓库, 我是在gitee上面创建的远程配置仓库[springcloud-config].
并在仓库中添加了一份远程配置 config-dev.yml

远程仓库的配置读取方式, 可以查看官网资料→Spring Cloud Config
5.4.5 验证配置中心服务端
启动配置中心服务端微服务后, 访问 http://localhost:3344/config-dev.yml , 成功读取到远程仓库的配置.

5.5 创建配置中心客户端
新增配置中心客户端cloud-config-client-3355 , cloud-config-client-3366 . 两台客户端是为了后面测试定点通知, 两台配置基本一样.
5.5.1 pom依赖
<project xmlns="http://maven.apache.org/POM/4.0.0"
         xmlns:xsi="http://www.w3.org/2001/XMLSchema-instance"
         xsi:schemaLocation="http://maven.apache.org/POM/4.0.0 http://maven.apache.org/xsd/maven-4.0.0.xsd">
    <parent>
        <artifactId>atguigu-cloud-2020artifactId>
        <groupId>com.atguigu.springcloudgroupId>
        <version>1.0-SNAPSHOTversion>
    parent>
    <modelVersion>4.0.0modelVersion>

    <artifactId>cloud-config-client-3355artifactId>

    <dependencies>

        <dependency>
            <groupId>org.springframework.cloudgroupId>
            <artifactId>spring-cloud-starter-bus-amqpartifactId>
        dependency>

        <dependency>
            <groupId>org.springframework.cloudgroupId>
            <artifactId>spring-cloud-starter-configartifactId>
        dependency>
        <dependency>
            <groupId>org.springframework.cloudgroupId>
            <artifactId>spring-cloud-starter-netflix-eureka-clientartifactId>
        dependency>
        <dependency>
            <groupId>org.springframework.bootgroupId>
            <artifactId>spring-boot-starter-webartifactId>
        dependency>
        <dependency>
            <groupId>org.springframework.bootgroupId>
            <artifactId>spring-boot-starter-actuatorartifactId>
        dependency>

        <dependency>
            <groupId>org.springframework.bootgroupId>
            <artifactId>spring-boot-devtoolsartifactId>
            <scope>runtimescope>
            <optional>trueoptional>
        dependency>
        <dependency>
            <groupId>org.projectlombokgroupId>
            <artifactId>lombokartifactId>
            <optional>trueoptional>
        dependency>
        <dependency>
            <groupId>org.springframework.bootgroupId>
            <artifactId>spring-boot-starter-testartifactId>
            <scope>testscope>
        dependency>
    dependencies>
project>
5.5.2 编写配置
application.yml 或 bootstrap.yml文件添加配置
server:
  port: 3355
spring:
  application:
    name: config-client
  cloud:
    #Config客户端配置
    config:
      uri: http://localhost:3344 #配置中心地址
      label: master #分支名称
      name: config #配置文件名称
      profile: dev #读取后缀名称
      # 上述3个综合:master分支上config-dev.yml的配置文件被读取http://localhost:3344/master/config-dev.yml
  rabbitmq:
    host: 192.168.65.129
    port: 5672
    username: guest
    password: guest

#eureka配置
eureka:
  instance:
    hostname: localhost
    instance-id: config-client-3355
    prefer-ip-address: true
  client:
    register-with-eureka: true
    fetch-registry: true
    service-url:
      defaultZone: http://www.eureka01.com:7001/eureka,http://www.eureka02.com:7002/eureka
# 暴露监控端点
management:
  endpoints:
    web:
      exposure:
        include: "*"
5.5.3 编写启动类
com.atguigu.springcloud.ConfigClientApplication
package com.atguigu.springcloud;

import org.springframework.boot.SpringApplication;
import org.springframework.boot.autoconfigure.SpringBootApplication;
import org.springframework.cloud.netflix.eureka.EnableEurekaClient;

/**
 * 类描述:配置中心客户端启动类
 * @Author wang_qz
 * @Date 2021/11/21 22:08
 * @Version 1.0
 */
@SpringBootApplication
@EnableEurekaClient
public class ConfigClientApplication {
    public static void main(String[] args) {
        SpringApplication.run(ConfigClientApplication.class);
    }
}
5.5.4 编写controller
com.atguigu.springcloud.controller.ConfigClientController
package com.atguigu.springcloud.controller;

import org.springframework.beans.factory.annotation.Value;
import org.springframework.cloud.context.config.annotation.RefreshScope;
import org.springframework.web.bind.annotation.GetMapping;
import org.springframework.web.bind.annotation.RestController;

/**
 * 类描述:
 * @Author wang_qz
 * @Date 2021/11/21 22:15
 * @Version 1.0
 */
@RestController
@RefreshScope
public class ConfigClientController {
    @Value("${config.info}")
    private String configInfo;

    @GetMapping("/configInfo")
    public String getConfigInfo() {
        return configInfo;
    }
}
5.5.5 验证客户端读取配置
启动配置中心客户端微服务, 注册到eureka

访问 http://localhost:3355/configInfo 和 http://localhost:3366/configInfo , 成功读取到远程仓库的配置.


至此, 所有环境已经准备完成, 基本的验证也已经通过, 上篇配置中心 Spring Cloud Config中详细介绍了通过post请求
/acuator/refresh刷新客户端配置.
本文开篇也讲了通过请求客户端刷新配置的弊端. 下面详细讲如何使用SpringCloud Bus广播通知刷新客户端配置.
6. 全局广播动态刷新配置
消息总线(Bus) 有两种通知场景. 一个是向客户端发起通知进而扩展到全局, 一个是向服务端发起通知进而扩展到全局.
6.1 客户端发送通知
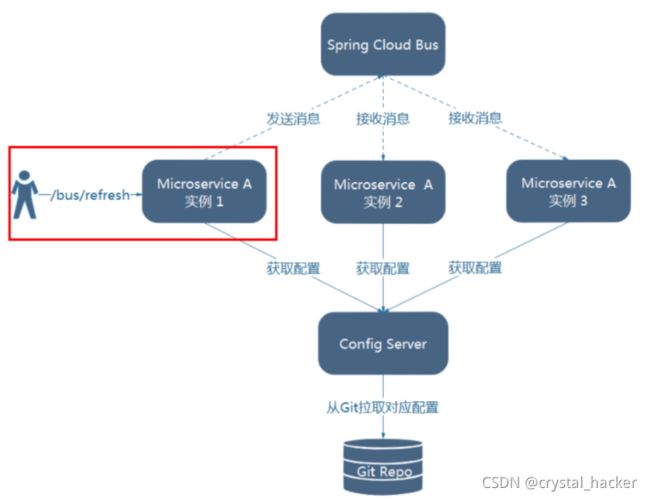
借助 Spring Cloud Bus 的广播功能,让 ConfigClient 都订阅配置更新事件,当配置更新时,触发其中一个订阅客户端的更新事件,Spring Cloud Bus 就把此事件广播到其他订阅客户端,以此来达到批量更新。
简单理解就是, 利用消息总线触发一个客户端/bus/refresh,而刷新所有客户端的配置.
6.1.1 原理
- Webhook 监听被触发,给 ConfigClient A 发送 bus-refresh 请求刷新配置
- ConfigClient A 读取 ConfigServer 中的配置,并且发送消息给 Bus
- Bus 接收消息后广播通知其他 ConfigClient
- 其他 ConfigClient 收到消息重新读取最新配置
6.1.2 Bus相关依赖
服务端和客户端都需要添加的依赖
<!--添加消息总线RabbitMQ支持-->
>
>org.springframework.cloud >
>spring-cloud-starter-bus-amqp >
>
>
>org.springframework.boot >
>spring-boot-starter-actuator >
>
6.1.3 Bus相关配置
服务端需要添加的关于Bus相关的配置
spring:
  application:
    name: cloud-config-center
  cloud:
    config:
      server:
        git:
          uri: https://gitee.com/wang-qz/springcloud-config.git
          search-paths: springcloud-config #搜索目录
          default-label: master # 读取分支
  rabbitmq:
    host: 192.168.65.129
    port: 5672
    username: guest
    password: guest
##rabbitmq相关配置,暴露bus刷新配置的端点
management:
  endpoints:
    web:
      exposure:
        include: 'bus-refresh'
客户端需要添加的关于Bus相关的配置
spring:
  application:
    name: config-client
  cloud:
    #Config客户端配置
    config:
      uri: http://localhost:3344 #配置中心地址
      label: master #分支名称
      name: config #配置文件名称
      profile: dev #读取后缀名称
      # 上述3个综合:master分支上config-dev.yml的配置文件被读取http://localhost:3344/master/config-dev.yml
  rabbitmq:
    host: 192.168.65.129
    port: 5672
    username: guest
    password: guest
# 暴露监控端点 /actuator/refres
management:
  endpoints:
    web:
      exposure:
        include: "*"
6.1.4 测试
首先, 查看客户端暴露端点 /actuator/bus-refresh

先通过配置中心服务端读取远程配置 http://localhost:3344/config-dev.yml , 版本号为 1.

再通过客户端读取远程配置 http://localhost:3355/configInfo , 版本号为1.

客户端 http://localhost:3366/configInfo , 版本号为1.

修改远程仓库配置的版本号为 2.

配置中心服务端读取远程配置 http://localhost:3344/config-dev.yml , 版本号已经更新为 2.

向客户端3355发送post请求curl -X POST http://localhost:3355/actuator/bus-refresh通知客户端重新读取配置.

客户端3355, http://localhost:3355/configInfo , 成功读取到新的版本 2.

客户端3366, http://localhost:3366/configInfo, 成功通过客户端3355发送更新通知到Bus, Bus再通知到3366客户端读取到新的版本 2.

查看RabbitMQ控制台, Exchanges交换机有一个消息主题SpringCloudBus
.
进入消息主题SpringCloudBus, 可以看到有监控到该主题的活跃曲线.

交换机SpringCloudBus绑定了3个应用, 服务端3344, 客户端3355 , 客户端3366

客户端发起通知的弊端 :
- 打破了微服务的职责单一性。微服务本身是业务模块,它本不应该承担配置刷新的职责。
- 破坏了微服务各节点的对等性。
- 存在一定的局限性。例如,微服务在迁移时,它的网络地址常常会发生变化,此时如果想要做到自动刷新,就不得不修改Webhook 的配置。
6.2 服务端发送通知
为了解决客户端发起通知缺陷,我们改用服务端发起通知。
6.2.1 原理
简单理解就是 , 利用消息总线触发一个服务端ConfigServer的/bus/refresh端点,而刷新所有客户端的配置
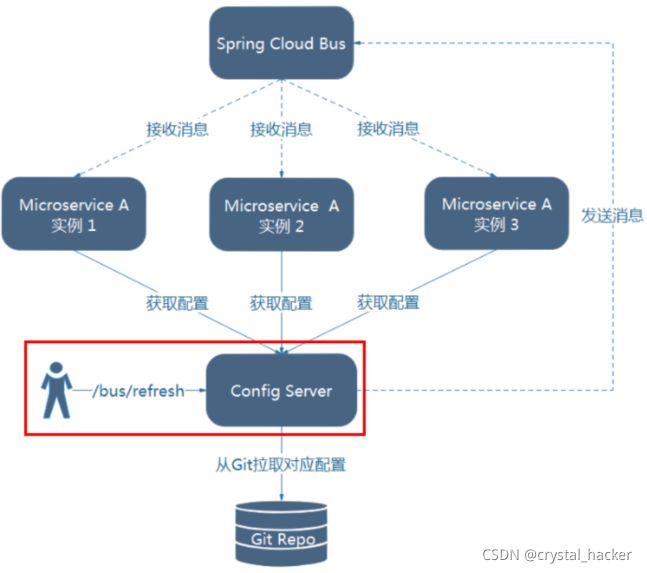
分解图
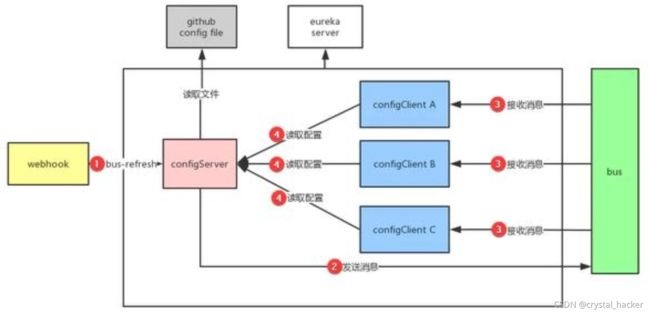
- Webhook监听被触发,给 ConfigServer 发送 bus-refresh 请求刷新配置
- ConfigServer 发送消息给 Bus
- Bus 接收消息后广播通知所有 ConfigClient
- 各 ConfigClient 收到消息重新读取最新配置
6.2.2 Bus相关的依赖和配置
服务端, 客户端需要添加的Bus相关依赖
<dependency>
    <groupId>org.springframework.cloudgroupId>
    <artifactId>spring-cloud-starter-bus-amqpartifactId>
dependency>
<dependency>
    <groupId>org.springframework.bootgroupId>
    <artifactId>spring-boot-starter-actuatorartifactId>
dependency>
服务端, 客户端需要添加的Bus相关的配置, 与上面bus相关配置一样.
6.2.3 测试
目前, 远程仓库的配置的版本号是 2.
现在, 将远程仓库的配置的版本号改为 3 .

服务端3344读取配置 http://localhost:3344/config-dev.yml

没有刷新配置之前, 客户端3355, 客户端3366读取的配置版本还是 2.
http://localhost:3355/configInfo

http://localhost:3366/configInfo

现在, 向服务端3344发送post请求, curl -X POST http://localhost:3344/actuator/bus-refresh

客户端3355再次读取配置, 版本号已经更新到 3.
http://localhost:3355/configInfo

客户端3366再次读取配置, 版本号已经更新到 3.
http://localhost:3366/configInfo

上面的测试结果, 可以发现, 服务端3344成功将通知发给Bus, 然后Bus再通知到各个客户端.
6.3 局部刷新
6.3.1 局部刷新单个实例
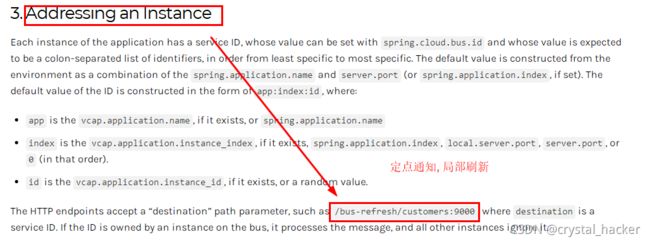
假设有这样一种场景,我们开发了一个新的功能,此时需要对该功能进行测试。我们只希望其中一个微服务的配置被更新,等功能测试完毕,正式部署线上时再更新至整个集群。但是由于所有微服务都受 Spring Cloud Bus 的控制,我们更新了其中一个微服务的配置,就会导致其他服务也被通知去更新配置。这时候定点通知(局部刷新)的作用就体现出来了。→官网
将远程仓库的配置的版本修改为 4.

服务端3344读取配置, http://localhost:3344/config-dev.yml , 已经更新.

没有刷新配置之前, 客户端3355, 客户端3366读取的配置版本还是 3.
我现在使用定点通知, 只通知客户端3355, 不通知客户端3366.
指定单个客户端实例, 发送post请求. curl -X POST http://localhost:3344/actuator/bus-refresh/config-client:3355

客户端3355读取配置, http://localhost:3355/configInfo 已经更新到版本 4.

但是, 客户端3366没有更新, 还是版本 3. http://localhost:3366/configInfo

6.3.2 局部刷新集群
→官网

上面客户端3366还没有更新到最新版本4, 现在我来使用局部刷新集群的方式测试一下.
发送post请求 curl -X POST http://localhost:3344/actuator/bus-refresh/config-client:** , 更新config-client服务的所有实例配置.

再查看客户端3366读取的配置, 版本已经更新到 4.

- 单独刷新客户端配置, 不扩展到全局
curl -X POST http://localhost:3355/actuator/refresh- 客户端配置发送通知, 通知到全局
curl -X POST http://localhost:3355/actuator/bus-refresh- 服务端发送通知, 通知到全局
curl -X POST http://localhost:3344/actuator/bus-refresh- 服务端发送通知, 通知到指定服务单实例
curl -X POST http://localhost:3344/actuator/bus-refresh/config-client:3355- 服务端发送通知, 通知到指定服务集群
curl -X POST http://localhost:3344/actuator/bus-refresh/config-client:**
7. WebHooks使用
结合WebHooks全自动刷新配置.
在仓库中设置WebHooks,在远程仓库的配置内容发生变更时 , WebHooks会自动发送POST请求触发动态刷新配置.
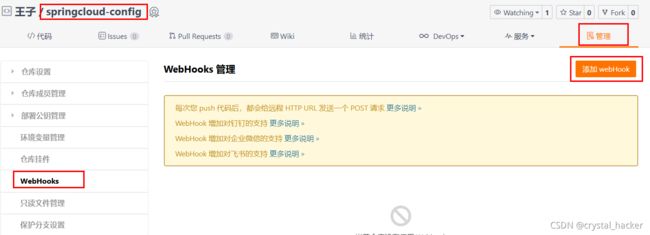
下面的URL应设置为能被外部访问的配置中心(服务端)的主机地址,不能为 localhost.

个人博客
欢迎访问个人博客: https://www.crystalblog.xyz/
备用地址: https://wang-qz.gitee.io/crystal-blog/

