SpringAMQP的使用
目录
- 一、什么是SpringAMQP
- 二、基本消息队列
-
- 消息发送
- 消息接收
- 三、WorkQueue队列
- 四、发布订阅模型
-
- FanoutExchange
- DirectExchange
- TopicExchange
- 五、消息转换器
一、什么是SpringAMQP
它可以大大的简化我们的开发,不用我们再自己创建连接写一堆代码,具有便捷的发送,便捷的接收,便捷的绑定。它可以实现自动化的声明队列,交换和绑定。
SpringAMQP是基于AMQP协议定义的一套API规范,提供了模板来发送和接收消息。包含两部分,其中spring-amqp是基础抽象,spring-rabbit是底层的默认实现。
二、基本消息队列
消息发送
1.第一步:引入AMQP依赖
在父工程中引入依赖
<dependency>
     <groupId>org.springframework.bootgroupId>
     <artifactId>spring-boot-starter-amqpartifactId>
dependency>
2.第二步:在publisher中编写测试方法
2.1在publisher的application.yml,添加mq连接信息:
spring:
  rabbitmq:
    host: 192.168.19.20 #rabbitMQ的ip地址
    port: 5672 #端口
    username: lxwork
    password: 123456
    virtual-host: / #虚拟主机目录
2.2编写测试方法
@RunWith(SpringRunner.class)
@SpringBootTest
public class SpringAmqpTest {
    @Autowired
    private RabbitTemplate rabbitTemplate;
    @Test
    public void testSendSimpleQueue(){
        String queueName = "simple.queue";
        String message = "hello SimpleQueue SpringAMQP";
        rabbitTemplate.convertAndSend(queueName,message);
    }
}
消息接收
1.在consumer的application.yml,添加mq连接信息:
spring:
  rabbitmq:
    host: 192.168.19.20 #rabbitMQ的ip地址
    port: 5672 #端口
    username: lxwork
    password: 123456
    virtual-host: / #虚拟主机目录
2.在consumer中编写消费逻辑:
@Component //声明成一个bean
public class SpringRabbitListener {
    @RabbitListener(queues = "simple.queue")
    public void listenSimpleQueue(String msg){
        System.out.println("消费者接收到simple.queue的消息:"+msg);
    }
}
三、WorkQueue队列
工作队列可以提高消息处理速度,避免队列消息堆积

我们让publisher发送每隔0.2秒发送50条消息
代码:
@RunWith(SpringRunner.class)
@SpringBootTest
public class SpringAmqpTest {
    @Autowired
    private RabbitTemplate rabbitTemplate;
    @Test
    public void testSendWorkQueue() throws InterruptedException {
        String queueName = "simple.queue";
        String message = "hello workQueue SpringAMQP-->";
        for (int i = 0; i < 51; i++) {
            rabbitTemplate.convertAndSend(queueName,message+i);
            Thread.sleep(20);
        }
        }
}
然后在定义两个消费者都监听simple.queue队列
这里有一个消息预取机制,意思就是消费者会提前拿队列中的消息,可以配置preFetch控制消息的上限
配置consumer的yml文件
spring:
  rabbitmq:
    host: 192.168.19.20 #rabbitMQ的ip地址
    port: 5672 #端口
    username: lxwork
    password: 123321
    virtual-host: / #虚拟主机
    listener:
      simple:
        prefetch: 1 # 消息预取机制:每次只能获取一条消息,处理完成才能获取下一条消息
@Component
public class SpringRabbitListener {
    @RabbitListener(queues = "simple.queue")
    public void listenWorkQueue1(String msg) throws InterruptedException {
        System.out.println("消费者1接收到的消息:"+msg+ "---"+LocalDateTime.now());
        Thread.sleep(20);
    }
    @RabbitListener(queues = "simple.queue")
    public void listenWorkQueue2(String msg) throws InterruptedException{
        System.err.println("消费者2接收到的消息:"+msg+ "---"+ LocalDateTime.now());
        Thread.sleep(200);
    }
}
四、发布订阅模型
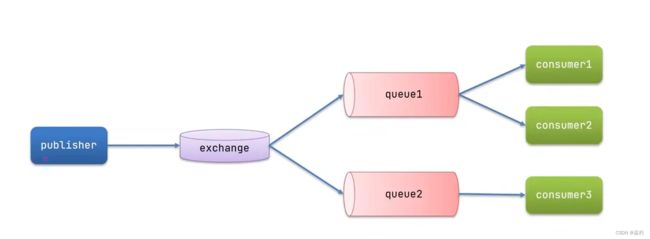
首先我们先来看看发布订阅的模型介绍:发布订阅模式与之前案例的区别就是允许将同一消息发送给多个消费者。实现方式是加入了exchange (交换机)。
常见的exchange类型为:
FanoutExchange:广播
DirectExchange:路由
TopicExchange:话题
FanoutExchange
-
Fanout Exchange会将接收到的消息路由到每一个跟其绑定的queue
-
配置交换机有两种方式,一个是通过配置类,一个是用@RabbitListener注解。我们先使用配置类的形式来创建FanoutExchange交换机。

在消费者中创建一个FanoutConfig配置类,声明队列也可以通过配置类的形式也可以通过@RabbitListener注解声明。以下是配置类的形式声明。
1.声明一个交换机和两个队列。
java代码:
//声明成配置类,让spring可以识别到它
@Configuration
public class FanoutConfig {
    //itcast.fanout,声明交换机  会将接收到的消息路由到每一个跟其绑定的queue
    @Bean
    public FanoutExchange fanoutExchange(){
        return new FanoutExchange("lxwork.fanout");
    }
    //fanout.queue1,声明队列
    @Bean
    public Queue fanoutQueue1(){
        return new Queue("fanout.queue1");
    }
    //当定队列1到交换机
    @Bean
    public Binding fanoutBinding1(Queue fanoutQueue1,FanoutExchange fanoutExchange){
        return BindingBuilder.bind(fanoutQueue1).to(fanoutExchange);
    }
    //fanout.queue2
    @Bean
    public Queue fanoutQueue2(){
        return new Queue("fanout.queue2");
    }
    //当定队列2到交换机
    @Bean
    public Binding fanoutBinding2(Queue fanoutQueue2,FanoutExchange fanoutExchange){
        return BindingBuilder.bind(fanoutQueue2).to(fanoutExchange);
    }
}
然后在消费者的监听类中监听fanout.queue1和fanout.queue2这两个队列。
代码:
@Component
public class SpringRabbitListener {
    @RabbitListener(queues = "fanout.queue1")
    public void listenFanoutQueue1(String msg){
        System.out.println("消费者接收到fanout.queue1的消息:"+msg);
    }
    @RabbitListener(queues = "fanout.queue2")
    public void listenFanoutQueue2(String msg){
        System.out.println("消费者接收到fanout.queue2的消息:"+msg);
    }
}
2.在发布者的测试类中去定义发送消息的代码
代码:
@RunWith(SpringRunner.class)
@SpringBootTest
public class SpringAmqpTest {
    @Autowired
    private RabbitTemplate rabbitTemplate;
    @Test
    public void testSendFanoutExchange(){
        //交换机名称
        String exchangeName = "lxwork.fanout";
        //消息
        String message = "hello everyone";
        //发送
        rabbitTemplate.convertAndSend(exchangeName,"",message);
    }
}
接着启动消费者和发布者,即可看到效果。
DirectExchange
DirectExchange会将接收到的消息根据规则路由到指定的Queue,因此称为路由模式(routes) 。

我们通过@RabbitListener注解的形式类声明队列,交换机,规则。
1.在消费者中的监听类中定义交换机
下面我们声明一个交换机两个队列
代码:
@Component
public class SpringRabbitListener {
    //使用RabbitListener注解声明队列和交换机,也可以用配置的形式声明
    /*
        * 描述下Direct交换机与Fanout交换机的差异?
        Fanout交换机将消息路由给每一一个与之绑定的队列
        Direct交换机根据RoutingKey判断路由给哪个队列
        如果多个队列具有相同的RoutingKey,则与Fanout功能类似
        基于@RabbitListener注解声明队列和交换机有哪些常见注解?
        @Queue:声明队列
        @Exchange:声明交换机
    * */
    @RabbitListener(bindings = @QueueBinding(
            value = @Queue("direct.queue1"),
            exchange = @Exchange(value = "lxwork.direct",type = ExchangeTypes.DIRECT),
            key = {"red","blue"}
    ))
    public void listenDirectQueue1(String msg){
        System.out.println("消费者接收到direct.queue1的消息:"+msg);
    }
    @RabbitListener(bindings = @QueueBinding(
            value = @Queue("direct.queue2"),
            exchange = @Exchange(value = "itcast.direct",type = ExchangeTypes.DIRECT),
            key = {"red","yellow"}
    ))
    public void listenDirectQueue2(String msg){
        System.out.println("消费者接收到direct.queue2的消息:"+msg);
    }
}
可以看到相比配置类的形式,通过注解声明要方便许多,直接都写在监听类中即可,不用单独创建一个配置类。
2.在发布者测试类中定义发送消息的代码
代码:
@RunWith(SpringRunner.class)
@SpringBootTest
public class SpringAmqpTest {
    @Autowired
    private RabbitTemplate rabbitTemplate;
    @Test
    public void testSendDirectExchange(){
        //交换机名称
        String exchangeName = "lxwork.direct";
        //消息
        String message = "hello direct";
        //发送
        rabbitTemplate.convertAndSend(exchangeName,"red",message);
    }
}
TopicExchange
TopicExchange与DirectExchange类似,区别在于routingKey必须是多个单词的列表,并且以
.分割。
Queue与Exchange指定BindingKey时可以使用通配符:
#:代指0个或多个单词
*: 代指一个单词

1.在消费者中的监听类中配置交换机,声明队列,定义规则
代码:
@Component
public class SpringRabbitListener {
    @RabbitListener(bindings = @QueueBinding(
            value = @Queue("topic.queue1"),
            exchange = @Exchange(value = "lxwork.topic",type=ExchangeTypes.TOPIC),
            key = {"china.#"}
    ))//#代表0个或多个,*代表一个单词
    public void listenTopicQueue1(String msg){
        System.out.println("消费者接收到topic.queu1的消息:"+msg);
    }
    @RabbitListener(bindings = @QueueBinding(
            value = @Queue("topic.queue2"),
            exchange = @Exchange(value = "lxwork.topic",type=ExchangeTypes.TOPIC),
            key = {"#.news"}
    ))
    public void listenTopicQueue2(String msg){
        System.out.println("消费者接收到topic.queu2的消息:"+msg);
    }
}
2.在发布者中的测试类中定义发送消息的代码
代码:
@RunWith(SpringRunner.class)
@SpringBootTest
public class SpringAmqpTest {
    @Autowired
    private RabbitTemplate rabbitTemplate;
    @Test
    public void testSendTopicExchange(){
        //交换机名称
        String exchangeName = "lxwork.topic";
        //消息
        String message = "hello topic";
        //发送
        rabbitTemplate.convertAndSend(exchangeName,"china.weather",message);
    }
}
五、消息转换器
- 在SpringAMQP的发送方法中,接收消息的类型是Object,也就是说我们可以发送任意对象类型
的消息,SpringAMQP会 帮我们序列化为字节后发送。 - Spring的对消息对象的处理是由org.springframework.amqp.support.converter.MessageConverter来处理的。而默认实现是SimpleMessageConverter,基于JDK的ObjectOutputStream完成序列化。
如果要修改只需要定义一个MessageConverter类型的Bean即可。推荐用JSON方式序列化,步骤如下:
1.导入依赖
<dependency>
      <groupId>com.fasterxml.jackson.coregroupId>
      <artifactId>jackson-databindartifactId>
dependency>
2.编写配置类
在发布者和消费者中的启动类中定义:
代码:
发布者
@SpringBootApplication
public class PublisherApplication {
    public static void main(String[] args) {
        SpringApplication.run(PublisherApplication.class);
    }
    //消息转换器,覆盖spring默认的转换器,spring默认是把数据序列化之后进行传输,效率低不安全
    @Bean
    public MessageConverter messageConverter(){
        return new Jackson2JsonMessageConverter();
    }
}
消费者:
@SpringBootApplication
public class ConsumerApplication {
    public static void main(String[] args) {
        SpringApplication.run(ConsumerApplication.class, args);
    }
    //消息转换器,覆盖spring默认的转换器,spring默认是把数据序列化之后进行传输,效率低不安全
    @Bean
    public MessageConverter messageConverter(){
        return new Jackson2JsonMessageConverter();
    }
}
