MMClassification Python 教程(二)
若纠结查看格式可以移步:
学习笔记https://study.chenkequan.cn/#/%E6%B7%B1%E5%BA%A6%E5%AD%A6%E4%B9%A0%E6%A1%86%E6%9E%B6/openLab%E7%B3%BB%E5%88%97/MMClassificationPython%E6%95%99%E7%A8%8B1/MMClassificationPython%E6%95%99%E7%A8%8B1 https://study.chenkequan.cn/#/%E6%B7%B1%E5%BA%A6%E5%AD%A6%E4%B9%A0%E6%A1%86%E6%9E%B6/openLab%E7%B3%BB%E5%88%97/MMClassificationPython%E6%95%99%E7%A8%8B1/MMClassificationPython%E6%95%99%E7%A8%8B1
GitHubhttps://github.com/swimmant/ipynbDB/tree/master/mmclassificationhttps://github.com/swimmant/ipynbDB/tree/master/mmclassification
本教程包含以下内容:
1、如何安装mmcls
2、使用原始模型进行推理
3、基于预训练模型进行微调
1、安装MMClassification
使用之前,配置必须环境,如下:
    1、安装python,CUDA,C/C++ compiler 和 git
    2、安装Pytorch(Cuda版本)
    3、安装mmcv
    4、下载mmcls代码并安装
#官方文档
#  https://mmclassification.readthedocs.io/zh_CN/latest/
#创建新环境
# %conda create -n mmcls python==3.8 -y
#激活环境,该步骤在jupyter中先配置,然后手动切换
#source activate mmcls    #激活创建的环境
#pip install ipykernel    #安装ipykernel
#/home/snnu/miniconda3/envs/mmcls/bin/python -m ipykernel install --user --name mmcls   #ipykernel中注册新环境
#重启jupyter服务,选择创建好的mmcls环境
#检查环境
%ls
•[0m•[01;34mmmclassification•[0m/
MMClassification Python 教程1.ipynb
mobilenet_v2_batch256_imagenet_20200708-3b2dc3af.pth
pythonApiTest.ipynb
#查看nvcc版本
! nvcc -V           #nvcc当前是10.2
nvcc: NVIDIA (R) Cuda compiler driver
Copyright (c) 2005-2019 NVIDIA Corporation
Built on Wed_Oct_23_19:24:38_PDT_2019
Cuda compilation tools, release 10.2, V10.2.89
!which python
/home/snnu/miniconda3/envs/mmcls/bin/python
#安装torch1.8
# !pip install torchvision==0.9
#该步骤查看官网安装,需要版本匹配     https://pytorch.org/get-started/previous-versions/
Collecting torchvision==0.9
  Downloading torchvision-0.9.0-cp38-cp38-manylinux1_x86_64.whl (17.3 MB)
•[K     |████████████████████████████████| 17.3 MB 6.1 MB/s eta 0:00:01
•[?25hCollecting numpy
  Downloading numpy-1.21.4-cp38-cp38-manylinux_2_12_x86_64.manylinux2010_x86_64.whl (15.7 MB)
•[K     |████████████████████████████████| 15.7 MB 1.4 MB/s eta 0:00:01
•[?25hCollecting torch==1.8.0
  Downloading torch-1.8.0-cp38-cp38-manylinux1_x86_64.whl (735.5 MB)
•[K     |████████████████████████████████| 735.5 MB 31 kB/s  eta 0:00:01
•[?25hCollecting pillow>=4.1.1
  Using cached Pillow-8.4.0-cp38-cp38-manylinux_2_17_x86_64.manylinux2014_x86_64.whl (3.1 MB)
Collecting typing-extensions
  Using cached typing_extensions-3.10.0.2-py3-none-any.whl (26 kB)
Installing collected packages: typing-extensions, numpy, torch, pillow, torchvision
Successfully installed numpy-1.21.4 pillow-8.4.0 torch-1.8.0 torchvision-0.9.0 typing-extensions-3.10.0.2
#检查GCC版本
!gcc --version
gcc (Ubuntu 5.5.0-12ubuntu1~16.04) 5.5.0 20171010
Copyright (C) 2015 Free Software Foundation, Inc.
This is free software; see the source for copying conditions.  There is NO
warranty; not even for MERCHANTABILITY or FITNESS FOR A PARTICULAR PURPOSE.
#检查torch
import torch, torchvision
print(torch.__version__)
torch.cuda.is_available()
1.8.1+cu102
True
2、安装mmcv
MMCV是OpenMMLab系列代码的基础库。Linux环境安装的whl包又打包好的,相对较容易,可以直接下载安装
 特别注意需要和Pytorch 和 CUDA版本对应,才能确保安装,安装过程出现ERROR的红色字样均需要卸载重新安装
 当前机器版本为Torch 1.8.0 CUDA 10.2 ,安装相应的版本
# 安装mmcv
#使用简单功能使用下命令
#!pip install mmcv -f https://download.openmmlab.com/mmcv/dist/cu102/torch1.8.0/index.html
#安装完全版本
#!pip install mmcv-full -f https://download.openmmlab.com/mmcv/dist/cu102/torch1.8.1/index.html

#安装只需要修改cuda版本和torch版本即可,当前安装的是mmcv-full
#克隆mmcls项目代码并安装MMCLS
# !git clone https://github.com/open-mmlab/mmclassification.git
#国内网不好时又两种解决方式
#方法一: 先使用本地浏览器或pycharm下载,下载不了时开
#方法二: 使用码云,远程clone至码云后再clone
正克隆到 'mmclassification'...
%cd mmclassification/
/home/snnu/chenkequan/notebooke/mmcls/mmclassification
%ls
•[0m•[01;34mcheckpoints•[0m/  •[01;34mdocs•[0m/        •[01;34mmmcls.egg-info•[0m/  requirements.txt  •[01;34mtools•[0m/
CITATION.cff  •[01;34mdocs_zh-CN•[0m/  model-index.yml  •[01;34mresources•[0m/
•[01;34mconfigs•[0m/      LICENSE      README.md        setup.cfg
•[01;34mdemo•[0m/         MANIFEST.in  README_zh-CN.md  setup.py
•[01;34mdocker•[0m/       •[01;34mmmcls•[0m/       •[01;34mrequirements•[0m/    •[01;34mtests•[0m/
3、介绍下目录功能
configs :存放众多配置文件
mmcls : 分类模块化构建代码
requirements: 依赖
tests : 测试推理
tools:工具类
demo : 样例
resources:图像资料
#安装依赖
#!pip install -e .
Obtaining file:///home/snnu/chenkequan/notebooke/mmcls/mmclassification
Collecting matplotlib
  Using cached matplotlib-3.4.3-cp38-cp38-manylinux1_x86_64.whl (10.3 MB)
Requirement already satisfied: numpy in /home/snnu/miniconda3/envs/mmcls/lib/python3.8/site-packages (from mmcls==0.17.0) (1.21.4)
Requirement already satisfied: packaging in /home/snnu/miniconda3/envs/mmcls/lib/python3.8/site-packages (from mmcls==0.17.0) (21.0)
Collecting kiwisolver>=1.0.1
  Using cached kiwisolver-1.3.2-cp38-cp38-manylinux_2_5_x86_64.manylinux1_x86_64.whl (1.2 MB)
Requirement already satisfied: pillow>=6.2.0 in /home/snnu/miniconda3/envs/mmcls/lib/python3.8/site-packages (from matplotlib->mmcls==0.17.0) (8.4.0)
Requirement already satisfied: pyparsing>=2.2.1 in /home/snnu/miniconda3/envs/mmcls/lib/python3.8/site-packages (from matplotlib->mmcls==0.17.0) (3.0.4)
Collecting cycler>=0.10
  Using cached cycler-0.11.0-py3-none-any.whl (6.4 kB)
Requirement already satisfied: python-dateutil>=2.7 in /home/snnu/miniconda3/envs/mmcls/lib/python3.8/site-packages (from matplotlib->mmcls==0.17.0) (2.8.2)
Requirement already satisfied: six>=1.5 in /home/snnu/miniconda3/envs/mmcls/lib/python3.8/site-packages (from python-dateutil>=2.7->matplotlib->mmcls==0.17.0) (1.16.0)
Installing collected packages: kiwisolver, cycler, matplotlib, mmcls
  Running setup.py develop for mmcls
Successfully installed cycler-0.11.0 kiwisolver-1.3.2 matplotlib-3.4.3 mmcls-0.17.0
#检查安装是否成功
import mmcls
mmcls.__version__
'0.17.0'
4、使用MMCls预训练模型实现推理
MMCls 提供很多预训练模型, 模型库 这些预训练模型已经有 state-of-the-art 的结果,可以直接推理.
-
使用需要做以下准备工作:
-
准备模型
-
准备config配置文件
-
准备预训练权重参数文件
-
-
构建模型
-
进行推理
-
# 下载一张图片
#!wget 'tupian.qqw21.com/article/UploadPic/2020-8/202082221484445299.jpg'
%ls demo/ # %rm demo/cat.jpg %ls %mv 202082221484445299.jpg demo/
demo.JPEG  image_demo.py
•[0m•[01;35m202082221484445299.jpg•[0m  •[01;34mdocs•[0m/        •[01;34mmmcls.egg-info•[0m/  requirements.txt  •[01;34mtools•[0m/
CITATION.cff            •[01;34mdocs_zh-CN•[0m/  model-index.yml  •[01;34mresources•[0m/
•[01;34mconfigs•[0m/                LICENSE      README.md        setup.cfg
•[01;34mdemo•[0m/                   MANIFEST.in  README_zh-CN.md  setup.py
•[01;34mdocker•[0m/                 •[01;34mmmcls•[0m/       •[01;34mrequirements•[0m/    •[01;34mtests•[0m/
%ls demo/
•[0m•[01;35m202082221484445299.jpg•[0m demo.JPEG image_demo.py
from PIL import Image
Image.open('demo/202082221484445299.jpg')

%cat configs/mobilenet_v2/mobilenet_v2_b32x8_imagenet.py
# 使用mobilnet进行推理,上面配置文件为 python列表,引用了其他文件的配置
# !wget -h
# 下载预训练模型
!mkdir checkpoints
!wget https://download.openmmlab.com/mmclassification/v0/mobilenet_v2/mobilenet_v2_batch256_imagenet_20200708-3b2dc3af.pth -P checkpoints/
mkdir: 无法创建目录"checkpoints": 文件已存在 --2021-11-10 11:06:36-- https://download.openmmlab.com/mmclassification/v0/mobilenet_v2/mobilenet_v2_batch256_imagenet_20200708-3b2dc3af.pth 正在解析主机 download.openmmlab.com (download.openmmlab.com)... 47.108.5.70 正在连接 download.openmmlab.com (download.openmmlab.com)|47.108.5.70|:443... 已连接。 已发出 HTTP 请求,正在等待回应... 200 OK 长度: 14206911 (14M) [application/octet-stream] 正在保存至: “checkpoints/mobilenet_v2_batch256_imagenet_20200708-3b2dc3af.pth” mobilenet_v2_batch2 100%[===================>] 13.55M 9.95MB/s in 1.4s 2021-11-10 11:06:37 (9.95 MB/s) - 已保存 “checkpoints/mobilenet_v2_batch256_imagenet_20200708-3b2dc3af.pth” [14206911/14206911])
%ls checkpoints/
mobilenet_v2_batch256_imagenet_20200708-3b2dc3af.pth
5、图像分类
MMCls使用提供的python API 进行推理计算
首先,构建模型
#获取当前设备cuda信息
import torch
print(torch.cuda.current_device())
print(torch.cuda.device_count())
print(torch.cuda.get_device_capability('cuda:0'))
print( torch.cuda.get_device_name('cuda:0'))
print( torch.cuda.get_device_name('cuda:1'))
0
2
(7, 5)
GeForce RTX 2080 Ti
TITAN Xp
from mmcls.apis import inference_model , init_model,show_result_pyplot #指明配置文件和权重参数文件的路劲 configs_files = 'configs/mobilenet_v2/mobilenet_v2_b32x8_imagenet.py' checkpoint_file = 'checkpoints/mobilenet_v2_batch256_imagenet_20200708-3b2dc3af.pth' #指明使用的设备,如果没有gpu可以使用cpu,可以指定gpu哪一张卡 #通过配置文件和权重参数文件构建模型 model = init_model(configs_files, checkpoint_file,device='cuda:0') # model.cuda()
/home/snnu/miniconda3/envs/mmcls/lib/python3.8/site-packages/mmcv/cnn/bricks/transformer.py:28: UserWarning: Fail to import ``MultiScaleDeformableAttention`` from ``mmcv.ops.multi_scale_deform_attn``, You should install ``mmcv-full`` if you need this module.
  warnings.warn('Fail to import ``MultiScaleDeformableAttention`` from '
Use load_from_local loader
/home/snnu/chenkequan/notebooke/mmcls/mmclassification/mmcls/apis/inference.py:44: UserWarning: Class names are not saved in the checkpoint's meta data, use imagenet by default.
  warnings.warn('Class names are not saved in the checkpoint\'s '
model.__class__.__mro__
(mmcls.models.classifiers.image.ImageClassifier,
 mmcls.models.classifiers.base.BaseClassifier,
 mmcv.runner.base_module.BaseModule,
 torch.nn.modules.module.Module,
 object)
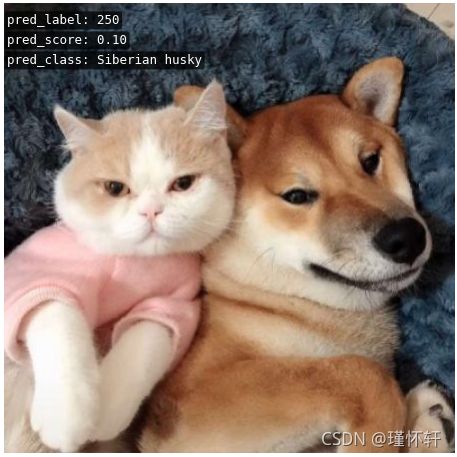
#推理并展示结果
img = 'demo/202082221484445299.jpg'
result = inference_model(model,img)
result
{'pred_label': 250,
 'pred_score': 0.10423319041728973,
 'pred_class': 'Siberian husky'}
#展示结果
img = 'demo/202082221484445299.jpg'
import mmcv
img_array = mmcv.imread(img)
result = inference_model(model,img_array)
result
{'pred_label': 250,
 'pred_score': 0.10423319041728973,
 'pred_class': 'Siberian husky'}
show_result_pyplot(model,img,result)