OpenMV初体验
Openmv初体验
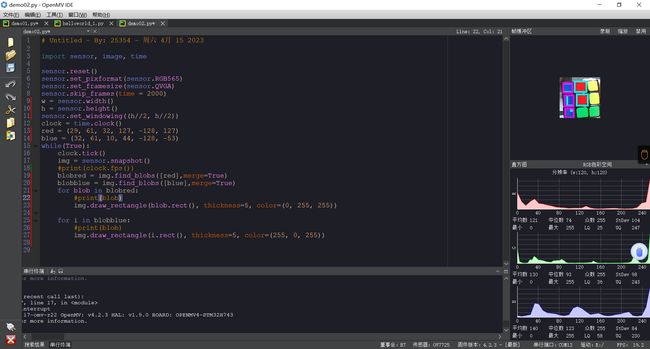
OpenMV IDE
OPENMV4-STM32H743
import sensor, image, time
sensor.reset()
sensor.set_pixformat(sensor.RGB565) # 图像彩色/灰白
sensor.set_framesize(sensor.QVGA) # 图像大小
sensor.skip_frames(time = 2000) # 几秒后开始或跳过几帧
cnt = 0
#sensor.set_windowing((120, 120)) # 设置中间窗口区域
# 翻转
sensor.set_hmirror(True)
#sensor.set_vflip(True)
print(sensor.width(), sensor.height(), sep=" ")
print(sensor.get_pixformat())
ROI = [60, 50, 60, 60]
Red = (255, 0, 0)
Green = (0, 255, 0)
Blue = (0, 0, 255)
White = (255, 255, 255)
while True:
    cnt += 1
    img = sensor.snapshot() # 获取图像
    static = img.get_statistics(roi = ROI)
    #time.sleep(1.0)
    #print(type(img))
    #print(img.get_pixel(160, 120))
    #img.set_pixel(160, 120, (255, 255, 0))
    #img.invert() # 二值化图像
    if cnt == 20:
        cnt = 0
        #print(img.width(), img.height(), img.format(), img.size(), sep=" ")
        color_l = static.l_mode()
        color_a = static.a_mode()
        color_b = static.b_mode()
        print(color_l, color_a, color_b, sep=" ")
    # 绘图
    img.draw_rectangle(ROI, color=Red, thickness=5) # (x, y, w, h)
    #img.draw_line((10, 10, 100, 200), color=Green) # x0, y0, x1, y1
    img.draw_circle(160, 120, 50, color=Blue, fill=True) # x, y, r
    img.draw_cross(10, 20, size=10, color=White)
    img.draw_string(100, 150, "OpenMV", color=Red)

颜色识别
import sensor, image, time

sensor.reset()
sensor.set_pixformat(sensor.RGB565)
sensor.set_framesize(sensor.QVGA)
sensor.skip_frames(time = 2000)
w = sensor.width()
h = sensor.height()
sensor.set_windowing((h//2, h//2))
clock = time.clock()
red = (29, 61, 32, 127, -128, 127) # 阈值
blue = (32, 61, 10, 44, -128, -53)
while(True):
    clock.tick()
    img = sensor.snapshot()
    #print(clock.fps())
    blobred = img.find_blobs([red],merge=True)
    blobblue = img.find_blobs([blue],merge=True)
    for blob in blobred:
        #print(blob)
        img.draw_rectangle(blob.rect(), thickness=5, color=(0, 255, 255))

    for i in blobblue:
        #print(blob)
        img.draw_rectangle(i.rect(), thickness=5, color=(255, 0, 255))
{"x":12, "y":16, "w":28, "h":24, "pixels":584, "cx":25, "cy":28, "rotation":3.102839, "code":1, "count":1, "perimeter":142, "roundness":0.815352}
blob有多个方法:
-
blob.rect() 返回这个色块的外框——矩形元组(x, y, w, h),可以直接在image.draw_rectangle中使用。
-
blob.x() 返回色块的外框的x坐标(int),也可以通过blob[0]来获取。
-
blob.y() 返回色块的外框的y坐标(int),也可以通过blob[1]来获取。
-
blob.w() 返回色块的外框的宽度w(int),也可以通过blob[2]来获取。
-
blob.h() 返回色块的外框的高度h(int),也可以通过blob[3]来获取。
-
blob.pixels() 返回色块的像素数量(int),也可以通过blob[4]来获取。
-
blob.cx() 返回色块的外框的中心x坐标(int),也可以通过blob[5]来获取。
-
blob.cy() 返回色块的外框的中心y坐标(int),也可以通过blob[6]来获取。
-
blob.rotation() 返回色块的旋转角度(单位为弧度)(float)。如果色块类似一个铅笔,那么这个值为0180°。如果色块是一个圆,那么这个值是无用的。如果色块完全没有对称性,那么你会得到0360°,也可以通过blob[7]来获取。
-
blob.code() 返回一个16bit数字,每一个bit会对应每一个阈值。举个例子:
blobs = img.find_blobs([red, blue, yellow], merge=True)
如果这个色块是红色,那么它的code就是0001,如果是蓝色,那么它的code就是0010。注意:一个blob可能是合并的,如果是红色和蓝色的blob,那么这个blob就是0011。这个功能可以用于查找颜色代码。也可以通过blob[8]来获取。
- blob.count() 如果merge=True,那么就会有多个blob被合并到一个blob,这个函数返回的就是这个的数量。如果merge=False,那么返回值总是1。也可以通过blob[9]来获取。
- blob.area() 返回色块的外框的面积。应该等于(w * h)
- blob.density() 返回色块的密度。这等于色块的像素数除以外框的区域。如果密度较低,那么说明目标锁定的不是很好。
比如,识别一个红色的圆,返回的blob.pixels()是目标圆的像素点数,blob.area()是圆的外接正方形的面积。
颜色识别亮灯:
import sensor, image, time, pyb

#将蓝灯赋值给变量led
led = pyb.LED(3) # Red LED = 1, Green LED = 2, Blue LED = 3, IR LEDs = 4.
usb = pyb.USB_VCP() # This is a serial port object that allows you to
# communciate with your computer. While it is not open the code below runs.

sensor.reset()
sensor.set_pixformat(sensor.RGB565)
sensor.set_framesize(sensor.QVGA)
sensor.skip_frames(time = 2000)
w = sensor.width()
h = sensor.height()
sensor.set_windowing((h//2, h//2))
clock = time.clock()
red = (29, 61, 32, 127, -128, 127)
blue = (32, 61, 10, 44, -128, -53)
clock = time.clock()
while(usb.isconnected()):
    img = sensor.snapshot()
    blobblue = img.find_blobs([blue],merge=True)
    if len(blobblue) != 0:
        led.on()
    else:
        led.off()
    for i in blobblue:
        img.draw_rectangle(i.rect(), thickness=5, color=(255, 0, 255))