学习 sentry 源码架构,打造属于自己的前端异常监控平台
点击上方“IT平头哥联盟”,选择“置顶或者星标”
你的关注意义重大!
前言
这是学习源码整体架构第四篇。整体架构这词语好像有点大,姑且就算是源码整体结构吧,主要就是学习是代码整体结构,不深究其他不是主线的具体函数的实现。文章学习的是打包整合后的代码,不是实际仓库中的拆分的代码。
其余三篇分别是:
1.学习 jQuery 源码整体架构,打造属于自己的 js 类库
2.学习underscore源码整体架构,打造属于自己的函数式编程类库
3.学习 lodash 源码整体架构,打造属于自己的函数式编程类库
感兴趣的读者可以点击阅读。
导读
本文通过梳理前端错误监控知识、介绍 sentry错误监控原理、 sentry初始化、 Ajax上报、 window.onerror、window.onunhandledrejection几个方面来学习 sentry的源码。
开发微信小程序,想着搭建小程序错误监控方案。最近用了丁香园 开源的 Sentry 小程序 SDKsentry-miniapp。顺便研究下 sentry-javascript仓库 的源码整体架构,于是有了这篇文章。
本文分析的是打包后未压缩的源码,源码总行数五千余行,链接地址是:https://browser.sentry-cdn.com/5.7.1/bundle.js, 版本是 v5.7.1。
本文示例等源代码在这我的 github博客中github blog sentry,需要的读者可以点击查看,如果觉得不错,可以顺便 star一下。
看源码前先来梳理下前端错误监控的知识。
前端错误监控知识
摘抄自 慕课网视频教程:前端跳槽面试必备技巧
别人做的笔记:前端跳槽面试必备技巧-4-4 错误监控类
前端错误的分类
1.即时运行错误:代码错误
try...catch
window.onerror (也可以用 DOM2事件监听)
2.资源加载错误
object.onerror: dom对象的 onerror事件
performance.getEntries()
Error事件捕获
3.使用
performance.getEntries()获取网页图片加载错误
varallImgs=document.getElementsByTagName('image')
varloadedImgs=performance.getEntries().filter(i=>i.initiatorType==='img')
最后 allIms和 loadedImgs对比即可找出图片资源未加载项目
Error事件捕获代码示例
window.addEventListener('error', function(e) {
  console.log('捕获', e)
}, true) // 这里只有捕获才能触发事件,冒泡是不能触发
上报错误的基本原理
1.采用 Ajax通信的方式上报
2.利用 Image对象上报 (主流方式)
Image上报错误方式:(newImage()).src='https://lxchuan12.cn/error?name=若川'
Sentry 前端异常监控基本原理
1.重写
window.onerror方法、重写window.onunhandledrejection方法
如果不了解 onerror和onunhandledrejection方法的读者,可以看相关的 MDN文档。这里简要介绍一下:
MDN GlobalEventHandlers.onerror
window.onerror = function(message, source, lineno, colno, error) {
    console.log('message, source, lineno, colno, error', message, source, lineno, colno, error);
}
参数:
message:错误信息(字符串)。可用于HTML onerror=""处理程序中的event。source:发生错误的脚本URL(字符串)lineno:发生错误的行号(数字)colno:发生错误的列号(数字)error:Error对象(对象)
MDN unhandledrejection
当
Promise被reject且没有reject处理器的时候,会触发unhandledrejection事件;这可能发生在window下,但也可能发生在Worker中。这对于调试回退错误处理非常有用。
Sentry 源码可以搜索 global.onerror 定位到具体位置
GlobalHandlers.prototype._installGlobalOnErrorHandler = function() {
// 代码有删减
// 这里的 this._global 在浏览器中就是 window
this._oldOnErrorHandler = this._global.onerror;
this._global.onerror = function(msg, url, line, column, error) {}
// code ...
}
同样,可以搜索 global.onunhandledrejection 定位到具体位置
GlobalHandlers.prototype._installGlobalOnUnhandledRejectionHandler = function() {
// 代码有删减
this._oldOnUnhandledRejectionHandler = this._global.onunhandledrejection;
this._global.onunhandledrejection = function(e) {}
}
2.采用
Ajax上传
支持 fetch 使用 fetch,否则使用 XHR。
BrowserBackend.prototype._setupTransport = function() {
// 代码有删减
if(supportsFetch()) {
returnnewFetchTransport(transportOptions);
}
returnnewXHRTransport(transportOptions);
};
2.1
fetch
FetchTransport.prototype.sendEvent = function(event) {
var defaultOptions = {
        body: JSON.stringify(event),
        method: 'POST',
        referrerPolicy: (supportsReferrerPolicy() ? 'origin': ''),
};
returnthis._buffer.add(global$2.fetch(this.url, defaultOptions).then(function(response) { return({
        status: exports.Status.fromHttpCode(response.status),
}); }));
};
2.2
XMLHttpRequest
XHRTransport.prototype.sendEvent = function(event) {
var _this = this;
returnthis._buffer.add(newSyncPromise(function(resolve, reject) {
// 熟悉的 XMLHttpRequest
var request = newXMLHttpRequest();
        request.onreadystatechange = function() {
if(request.readyState !== 4) {
return;
}
if(request.status === 200) {
                resolve({
                    status: exports.Status.fromHttpCode(request.status),
});
}
            reject(request);
};
        request.open('POST', _this.url);
        request.send(JSON.stringify(event));
}));
}
接下来主要通过Sentry初始化、如何 Ajax上报和 window.onerror、window.onunhandledrejection三条主线来学习源码。
如果看到这里,暂时不想关注后面的源码细节,直接看后文小结1和2的两张图。或者可以点赞或收藏这篇文章,后续想看了再看。
Sentry 源码入口和出口
varSentry= (function(exports){
// code ...
var SDK_NAME = 'sentry.javascript.browser';
var SDK_VERSION = '5.7.1';
// code ...
// 省略了导出的Sentry的若干个方法和属性
// 只列出了如下几个
    exports.SDK_NAME = SDK_NAME;
    exports.SDK_VERSION = SDK_VERSION;
// 重点关注 captureMessage
    exports.captureMessage = captureMessage;
// 重点关注 init
    exports.init = init;
return exports;
}({}));
Sentry.init 初始化 之 init 函数
初始化
// 这里的dsn,是sentry.io网站会生成的。
Sentry.init({ dsn: 'xxx'});
// options 是 {dsn: '...'}
function init(options) {
// 如果options 是undefined,则赋值为 空对象
if(options === void0) { options = {}; }
// 如果没传 defaultIntegrations 则赋值默认的
if(options.defaultIntegrations === undefined) {
        options.defaultIntegrations = defaultIntegrations;
}
// 初始化语句
if(options.release === undefined) {
var window_1 = getGlobalObject();
// 这是给  sentry-webpack-plugin 插件提供的,webpack插件注入的变量。这里没用这个插件,所以这里不深究。
// This supports the variable that sentry-webpack-plugin injects
if(window_1.SENTRY_RELEASE && window_1.SENTRY_RELEASE.id) {
            options.release = window_1.SENTRY_RELEASE.id;
}
}
// 初始化并且绑定
    initAndBind(BrowserClient, options);
}
getGlobalObject、inNodeEnv 函数
很多地方用到这个函数 getGlobalObject。其实做的事情也比较简单,就是获取全局对象。浏览器中是 window。
/**
 * 判断是否是node环境
 * Checks whether we're in the Node.js or Browser environment
 *
 * @returns Answer to given question
 */
function isNodeEnv() {
// tslint:disable:strict-type-predicates
returnObject.prototype.toString.call(typeof process !== 'undefined'? process : 0) === '[object process]';
}
var fallbackGlobalObject = {};
/**
 * Safely get global scope object
 *
 * @returns Global scope object
 */
function getGlobalObject() {
return(isNodeEnv()
// 是 node 环境 赋值给 global
? global
: typeof window !== 'undefined'
? window
// 不是 window self 不是undefined 说明是 Web Worker 环境
: typeof self !== 'undefined'
? self
// 都不是,赋值给空对象。
: fallbackGlobalObject);
继续看 initAndBind 函数
initAndBind 函数之 new BrowserClient(options)
function initAndBind(clientClass, options) {
// 这里没有开启debug模式,logger.enable() 这句不会执行
if(options.debug === true) {
        logger.enable();
}
    getCurrentHub().bindClient(new clientClass(options));
}
可以看出 initAndBind(),第一个参数是 BrowserClient 构造函数,第二个参数是初始化后的 options。接着先看 构造函数 BrowserClient。另一条线 getCurrentHub().bindClient() 先不看。
BrowserClient 构造函数
varBrowserClient= /** @class */(function(_super) {
// `BrowserClient` 继承自`BaseClient`
    __extends(BrowserClient, _super);
/**
     * Creates a new Browser SDK instance.
     *
     * @param options Configuration options for this SDK.
     */
functionBrowserClient(options) {
if(options === void0) { options = {}; }
// 把`BrowserBackend`,`options`传参给`BaseClient`调用。
return _super.call(this, BrowserBackend, options) || this;
}
returnBrowserClient;
}(BaseClient));
从代码中可以看出:BrowserClient 继承自 BaseClient,并且把 BrowserBackend, options传参给 BaseClient调用。
先看 BrowserBackend,这里的 BaseClient,暂时不看。
看 BrowserBackend之前,先提一下继承、继承静态属性和方法。
__extends、extendStatics 打包代码实现的继承
未打包的源码是使用 ES6extends实现的。这是打包后的对 ES6的 extends的一种实现。
如果对继承还不是很熟悉的读者,可以参考我之前写的文章。面试官问:JS的继承
// 继承静态方法和属性var extendStatics = function(d, b) {// 如果支持 Object.setPrototypeOf 这个函数,直接使用// 不支持,则使用原型__proto__ 属性,// 如何还不支持(但有可能__proto__也不支持,毕竟是浏览器特有的方法。)// 则使用for in 遍历原型链上的属性,从而达到继承的目的。extendStatics = Object.setPrototypeOf ||({ __proto__: [] } instanceofArray&& function(d, b) { d.__proto__ = b; }) ||function(d, b) { for(var p in b) if(b.hasOwnProperty(p)) d[p] = b[p]; };return extendStatics(d, b);};function __extends(d, b) {extendStatics(d, b);// 申明构造函数__ 并且把 d 赋值给 constructorfunction __() { this.constructor = d; }// (__.prototype = b.prototype, new __()) 这种逗号形式的代码,最终返回是后者,也就是 new __()// 比如 (typeof null, 1) 返回的是1// 如果 b === null 用Object.create(b) 创建 ,也就是一个不含原型链等信息的空对象 {}// 否则使用 new __() 返回d.prototype = b === null? Object.create(b) : (__.prototype = b.prototype, new __());}
不得不说这打包后的代码十分严谨,上面说的我的文章 面试官问:JS的继承 中没有提到不支持 __proto__的情况。看来这文章可以进一步严谨修正了。让我想起 Vue源码中对数组检测代理判断是否支持 __proto__的判断。
// vuejs 源码:https://github.com/vuejs/vue/blob/dev/dist/vue.js#L526-L527
// can we use __proto__?
var hasProto = '__proto__' in {};
看完打包代码实现的继承,继续看 BrowserBackend 构造函数
BrowserBackend 构造函数 (浏览器后端)
varBrowserBackend= /** @class */(function(_super) {
    __extends(BrowserBackend, _super);
functionBrowserBackend() {
return _super !== null&& _super.apply(this, arguments) || this;
}
/**
     * 设置请求
     */
BrowserBackend.prototype._setupTransport = function() {
if(!this._options.dsn) {
// We return the noop transport here in case there is no Dsn.
// 没有设置dsn,调用BaseBackend.prototype._setupTransport 返回空函数
return _super.prototype._setupTransport.call(this);
}
var transportOptions = __assign({}, this._options.transportOptions, { dsn: this._options.dsn });
if(this._options.transport) {
returnnewthis._options.transport(transportOptions);
}
// 支持Fetch则返回 FetchTransport 实例,否则返回 XHRTransport实例,
// 这两个构造函数具体代码在开头已有提到。
if(supportsFetch()) {
returnnewFetchTransport(transportOptions);
}
returnnewXHRTransport(transportOptions);
};
// code ...
returnBrowserBackend;
}(BaseBackend));
BrowserBackend 又继承自 BaseBackend。
BaseBackend 构造函数 (基础后端)
/**
 * This is the base implemention of a Backend.
 * @hidden
 */
varBaseBackend= /** @class */(function() {
/** Creates a new backend instance. */
functionBaseBackend(options) {
this._options = options;
if(!this._options.dsn) {
            logger.warn('No DSN provided, backend will not do anything.');
}
// 调用设置请求函数
this._transport = this._setupTransport();
}
/**
     * Sets up the transport so it can be used later to send requests.
     * 设置发送请求空函数
     */
BaseBackend.prototype._setupTransport = function() {
returnnewNoopTransport();
};
// code ...
BaseBackend.prototype.sendEvent = function(event) {
this._transport.sendEvent(event).then(null, function(reason) {
            logger.error("Error while sending event: "+ reason);
});
};
BaseBackend.prototype.getTransport = function() {
returnthis._transport;
};
returnBaseBackend;
}());
通过一系列的继承后,回过头来看 BaseClient 构造函数。
BaseClient 构造函数(基础客户端)
varBaseClient= /** @class */(function() {
/**
     * Initializes this client instance.
     *
     * @param backendClass A constructor function to create the backend.
     * @param options Options for the client.
     */
functionBaseClient(backendClass, options) {
/** Array of used integrations. */
this._integrations = {};
/** Is the client still processing a call? */
this._processing = false;
this._backend = new backendClass(options);
this._options = options;
if(options.dsn) {
this._dsn = newDsn(options.dsn);
}
if(this._isEnabled()) {
this._integrations = setupIntegrations(this._options);
}
}
// code ...
returnBaseClient;
}());
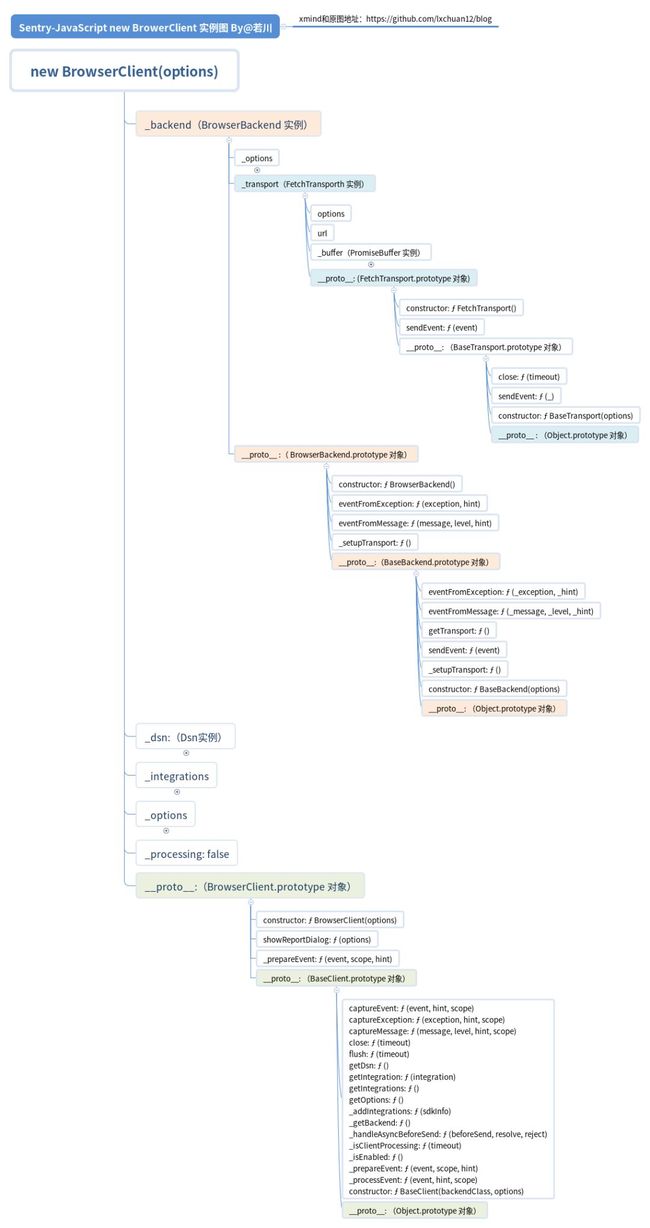
小结1. new BrowerClient 经过一系列的继承和初始化
可以输出下具体 newclientClass(options)之后的结果:
function initAndBind(clientClass, options) {
if(options.debug === true) {
        logger.enable();
}
var client = new clientClass(options);
    console.log('new clientClass(options)', client);
    getCurrentHub().bindClient(client);
// 原来的代码
// getCurrentHub().bindClient(new clientClass(options));
}
最终输出得到这样的数据。我画了一张图表示。重点关注的原型链用颜色标注了,其他部分收缩了。
initAndBind 函数之 getCurrentHub().bindClient()
继续看 initAndBind 的另一条线。
function initAndBind(clientClass, options) {
if(options.debug === true) {
        logger.enable();
}
    getCurrentHub().bindClient(new clientClass(options));
}
获取当前的控制中心 Hub,再把 newBrowserClient() 的实例对象绑定在 Hub上。
getCurrentHub 函数
// 获取当前Hub 控制中心
function getCurrentHub() {
// Get main carrier (global for every environment)
var registry = getMainCarrier();
// 如果没有控制中心在载体上,或者它的版本是老版本,就设置新的。
// If there's no hub, or its an old API, assign a new one
if(!hasHubOnCarrier(registry) || getHubFromCarrier(registry).isOlderThan(API_VERSION)) {
        setHubOnCarrier(registry, newHub());
}
// node 才执行
// Prefer domains over global if they are there (applicable only to Node environment)
if(isNodeEnv()) {
return getHubFromActiveDomain(registry);
}
// 返回当前控制中心来自载体上。
// Return hub that lives on a global object
return getHubFromCarrier(registry);
}
衍生的函数 getMainCarrier、getHubFromCarrier
function getMainCarrier() {
// 载体 这里是window
// 通过一系列new BrowerClient() 一系列的初始化
// 挂载在  carrier.__SENTRY__ 已经有了三个属性,globalEventProcessors, hub, logger
var carrier = getGlobalObject();
    carrier.__SENTRY__ = carrier.__SENTRY__ || {
        hub: undefined,
};
return carrier;
}
// 获取控制中心 hub 从载体上
function getHubFromCarrier(carrier) {
// 已经有了则返回,没有则new Hub
if(carrier && carrier.__SENTRY__ && carrier.__SENTRY__.hub) {
return carrier.__SENTRY__.hub;
}
    carrier.__SENTRY__ = carrier.__SENTRY__ || {};
    carrier.__SENTRY__.hub = newHub();
return carrier.__SENTRY__.hub;
}
bindClient 绑定客户端在当前控制中心上
Hub.prototype.bindClient = function(client) {
// 获取最后一个
var top = this.getStackTop();
// 把 new BrowerClient() 实例 绑定到top上
    top.client = client;
};
Hub.prototype.getStackTop = function() {
// 获取最后一个
returnthis._stack[this._stack.length - 1];
};
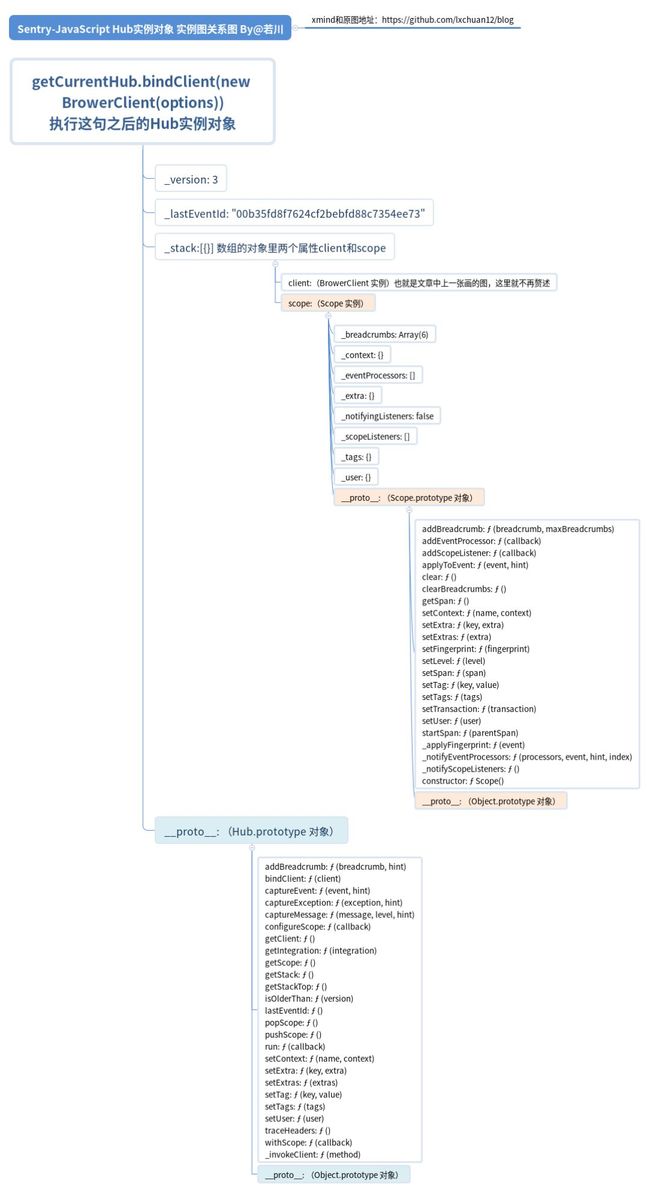
小结2. 经过一系列的继承和初始化
再回过头来看 initAndBind函数
function initAndBind(clientClass, options) {
if(options.debug === true) {
        logger.enable();
}
var client = new clientClass(options);
    console.log(client, options, 'client, options');
var currentHub = getCurrentHub();
    currentHub.bindClient(client);
    console.log('currentHub', currentHub);
// 源代码
// getCurrentHub().bindClient(new clientClass(options));
}
最终会得到这样的 Hub实例对象。笔者画了一张图表示,便于查看理解。
初始化完成后,再来看具体例子。具体 captureMessage 函数的实现。
Sentry.captureMessage('Hello, 若川!');
captureMessage 函数
通过之前的阅读代码,知道会最终会调用 Fetch接口,所以直接断点调试即可,得出如下调用栈。接下来描述调用栈的主要流程。
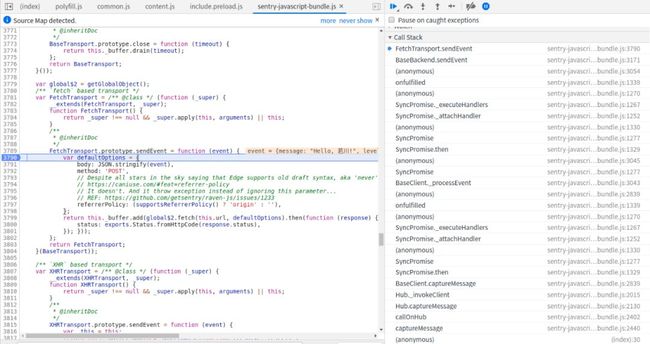
调用栈主要流程:
captureMessage
function captureMessage(message, level) {
var syntheticException;
try{
thrownewError(message);
}
catch(exception) {
        syntheticException = exception;
}
// 调用 callOnHub 方法
return callOnHub('captureMessage', message, level, {
        originalException: message,
        syntheticException: syntheticException,
});
}
=> callOnHub
/**
 * This calls a function on the current hub.
 * @param method function to call on hub.
 * @param args to pass to function.
 */
function callOnHub(method) {
// 这里method 传进来的是 'captureMessage'
// 把method除外的其他参数放到args数组中
var args = [];
for(var _i = 1; _i < arguments.length; _i++) {
        args[_i - 1] = arguments[_i];
}
// 获取当前控制中心 hub
var hub = getCurrentHub();
// 有这个方法 把args 数组展开,传递给 hub[method] 执行
if(hub && hub[method]) {
// tslint:disable-next-line:no-unsafe-any
return hub[method].apply(hub, __spread(args));
}
thrownewError("No hub defined or "+ method + " was not found on the hub, please open a bug report.");
}
=> Hub.prototype.captureMessage
接着看 Hub.prototype 上定义的 captureMessage 方法
Hub.prototype.captureMessage = function(message, level, hint) {
var eventId = (this._lastEventId = uuid4());
var finalHint = hint;
// 代码有删减
this._invokeClient('captureMessage', message, level, __assign({}, finalHint, { event_id: eventId }));
return eventId;
};
=> Hub.prototype._invokeClient
/**
 * Internal helper function to call a method on the top client if it exists.
 *
 * @param method The method to call on the client.
 * @param args Arguments to pass to the client function.
 */
Hub.prototype._invokeClient = function(method) {
// 同样:这里method 传进来的是 'captureMessage'
// 把method除外的其他参数放到args数组中
var _a;
var args = [];
for(var _i = 1; _i < arguments.length; _i++) {
        args[_i - 1] = arguments[_i];
}
var top = this.getStackTop();
// 获取控制中心的 hub,调用客户端也就是new BrowerClient () 实例中继承自 BaseClient 的 captureMessage 方法
// 有这个方法 把args 数组展开,传递给 hub[method] 执行
if(top && top.client && top.client[method]) {
(_a = top.client)[method].apply(_a, __spread(args, [top.scope]));
}
};
=> BaseClient.prototype.captureMessage
BaseClient.prototype.captureMessage = function(message, level, hint, scope) {
var _this = this;
var eventId = hint && hint.event_id;
this._processing = true;
var promisedEvent = isPrimitive(message)
? this._getBackend().eventFromMessage(""+ message, level, hint)
: this._getBackend().eventFromException(message, hint);
// 代码有删减
    promisedEvent
.then(function(event) { return _this._processEvent(event, hint, scope); })
// 代码有删减
return eventId;
};
最后会调用 _processEvent 也就是
=> BaseClient.prototype._processEvent
这个函数最终会调用
_this._getBackend().sendEvent(finalEvent);
也就是
=> BaseBackend.prototype.sendEvent
BaseBackend.prototype.sendEvent = function(event) {
this._transport.sendEvent(event).then(null, function(reason) {
        logger.error("Error while sending event: "+ reason);
});
};
=> FetchTransport.prototype.sendEvent 最终发送了请求
FetchTransport.prototype.sendEvent
FetchTransport.prototype.sendEvent = function(event) {
var defaultOptions = {
        body: JSON.stringify(event),
        method: 'POST',
// Despite all stars in the sky saying that Edge supports old draft syntax, aka 'never', 'always', 'origin' and 'default
// https://caniuse.com/#feat=referrer-policy
// It doesn't. And it throw exception instead of ignoring this parameter...
// REF: https://github.com/getsentry/raven-js/issues/1233
        referrerPolicy: (supportsReferrerPolicy() ? 'origin': ''),
};
// global$2.fetch(this.url, defaultOptions) 使用fetch发送请求
returnthis._buffer.add(global$2.fetch(this.url, defaultOptions).then(function(response) { return({
        status: exports.Status.fromHttpCode(response.status),
}); }));
};
看完 Ajax上报 主线,再看本文的另外一条主线 window.onerror 捕获。
window.onerror 和 window.onunhandledrejection 捕获 错误
例子:调用一个未申明的变量。
func();
Promise 不捕获错误
newPromise(() => {
    fun();
})
.then(res => {
    console.log('then');
})
captureEvent
调用栈主要流程:
window.onerror
GlobalHandlers.prototype._installGlobalOnErrorHandler = function() {
if(this._onErrorHandlerInstalled) {
return;
}
var self = this; // tslint:disable-line:no-this-assignment
// 浏览器中这里的 this._global.  就是window
this._oldOnErrorHandler = this._global.onerror;
this._global.onerror = function(msg, url, line, column, error) {
var currentHub = getCurrentHub();
// 代码有删减
        currentHub.captureEvent(event, {
            originalException: error,
});
if(self._oldOnErrorHandler) {
return self._oldOnErrorHandler.apply(this, arguments);
}
returnfalse;
};
this._onErrorHandlerInstalled = true;
};
window.onunhandledrejection
GlobalHandlers.prototype._installGlobalOnUnhandledRejectionHandler = function() {
if(this._onUnhandledRejectionHandlerInstalled) {
return;
}
var self = this; // tslint:disable-line:no-this-assignment
this._oldOnUnhandledRejectionHandler = this._global.onunhandledrejection;
this._global.onunhandledrejection = function(e) {
// 代码有删减
var currentHub = getCurrentHub();
        currentHub.captureEvent(event, {
            originalException: error,
});
if(self._oldOnUnhandledRejectionHandler) {
return self._oldOnUnhandledRejectionHandler.apply(this, arguments);
}
returnfalse;
};
this._onUnhandledRejectionHandlerInstalled = true;
};
共同点:都会调用 currentHub.captureEvent
currentHub.captureEvent(event, {
    originalException: error,
});
=> Hub.prototype.captureEvent
最终又是调用 _invokeClient ,调用流程跟 captureMessage 类似,这里就不再赘述。
this._invokeClient('captureEvent')
=> Hub.prototype._invokeClient
=> BaseClient.prototype.captureEvent
=> BaseClient.prototype._processEvent
=> BaseBackend.prototype.sendEvent
=> FetchTransport.prototype.sendEvent
最终同样是调用了这个函数发送了请求。
可谓是殊途同归,行文至此就基本已经结束,最后总结一下。
总结
Sentry-JavaScript源码高效利用了 JS的原型链机制。可谓是惊艳,值得学习。
本文通过梳理前端错误监控知识、介绍 sentry错误监控原理、 sentry初始化、 Ajax上报、 window.onerror、window.onunhandledrejection几个方面来学习 sentry的源码。还有很多细节和构造函数没有分析。
总共的构造函数(类)有25个,提到的主要有9个,分别是:Hub、BaseClient、BaseBackend、BaseTransport、FetchTransport、XHRTransport、BrowserBackend、BrowserClient、GlobalHandlers。
其他没有提到的分别是 SentryError、Logger、Memo、SyncPromise、PromiseBuffer、Span、Scope、Dsn、API、NoopTransport、FunctionToString、InboundFilters、TryCatch、Breadcrumbs、LinkedErrors、UserAgent。
这些构造函数(类)中还有很多值得学习,比如同步的 Promise(SyncPromise)。有兴趣的读者,可以看这一块官方仓库中采用 typescript写的源码SyncPromise,也可以看打包后出来未压缩的代码。
读源码比较耗费时间,写文章记录下来更加费时间(比如写这篇文章跨度十几天...),但收获一般都比较大。
如果读者发现有不妥或可改善之处,再或者哪里没写明白的地方,欢迎评论指出。另外觉得写得不错,对您有些许帮助,可以点赞、评论、转发分享,也是对笔者的一种支持。万分感谢。
推荐阅读
知乎滴滴云:超详细!搭建一个前端错误监控系统
掘金BlackHole1:JavaScript集成Sentry
丁香园 开源的 Sentry 小程序 SDKsentry-miniappsentry官网sentry-javascript仓库
![]()
❤️ 看完两件事
如果你觉得这篇内容对你有所帮助,我想邀请你帮我两个小忙:
点个「
在看」,让更多的人也能看到这篇内容(喜欢不点在看,都是耍流氓 -_-)关注公众号「IT平头哥联盟」,一起进步,一起成长!

推荐阅读:
Chrome 80发布,新特性将对用户产生深远影响
金三银四?这20道高频面试题值得了解下
浅谈让前端头疼的性能监控~
来自腾讯CDC团队的前端异常监控解决方案~
基于 React 的可视化编辑平台实践
页面可视化配置搭建工具技术要点