安卓加壳与脱壳学习笔记
#grep -Ril "IBM" /tmp
递归列出/tmp目录下包含文本字符串"IBM"的文件
有时要修复dex文件的前八个字节。
ClassLoader和动态加载
类加载器
Android的虚拟机ART和davilk都是JVM的一种实现,使用寄存器来实现。
JVM的类加载器包括3种:
- Bootstrap ClassLoader(引导类加载器)
C/C++代码实现的加载器,用于加载指定的JDK的核心类库,比如java.lang.、java.uti.等这些系统类。Java虚拟机的启动就是通过Bootstrap ,该Classloader在java里无法获取,负责加载/lib下的类。 - Extensions ClassLoader(拓展类加载器)
Java中的实现类为ExtClassLoader,提供了除了系统类之外的额外功能,可以在java里获取,负责加载/lib/ext下的类。 - Application ClassLoader(应用程序类加载器)
Java中的实现类为AppClassLoader,是与我们接触对多的类加载器,开发人员写的代码默认就是由它来加载,ClassLoader.getSystemClassLoader返回的就是它。
双亲委派
双亲委派模式的工作原理的是;如果一个类加载器收到了类加载请求,它并不会自己先去加载,而是把这个请求委托给父类的加载器去执行,如果父类加载器还存在其父类加载器,则进一步向上委托,依次递归,请求最终将到达顶层的启动类加载器,如果父类加载器可以完成类加载任务,就成功返回,倘若父类加载器无法完成此加载任务,子加载器才会尝试自己去加载,这就是双亲委派模式,即每个儿子都不愿意干活,每次有活就丢给父亲去干,直到父亲说这件事我也干不了时,儿子自己想办法去完成,这个就是双亲委派。
为什么要有双亲委派?
- 避免重复加载,如果已经加载过一次Class,可以直接读取已经加载的Class。
- 更加安全,无法自定义类来替代系统的类,可以防止核心API库被随意篡改。
类加载的时机:
隐式加载:
- 创建类的实例
- 访问类的静态变量,或者为静态变量赋值
- 调用类的静态方法
- 使用反射方式来强制创建某个类或接口对应的java.lang.Class对象
- 初始化某个类的子类
显式加载:两者又有所区别
- 使用LoadClass()加载
- 使用forName()加载
- 通过源码分析Android下类加载的流程
类加载
- 装载:查找和导入Class文件
- 链接:其中解析步骤是可以选择的
(a)检查:检查载入的class文件数据的正确性
(b)准备:给类的静态变量分配存储空间
(c)解析:将符号引用转成直接引用 - 初始化:即调用函数,对静态变量,静态代码块执行初始化工作
Android类加载器
ClassLoader的继承关系,其中,InMemoryDexClassLoader为Android8.0新引入的ClassLoader.
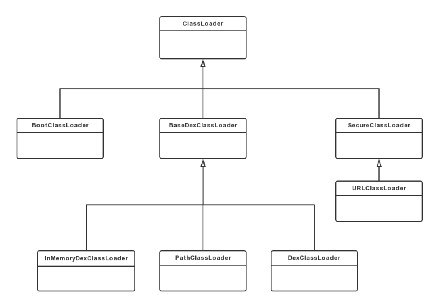
Android系统中与ClassLoader相关的一共有8个:
ClassLoader为抽象类;
BootClassLoader预加载常用类,单例模式。与Java中的BootClassLoader不同,它并不是由C/C++代码实现,而是由Java实现的;
BaseDexClassLoader是PathClassLoader、DexClassLoader、InMemoryDexClassLoader的父类,类加载的主要逻辑都是在BaseDexClassLoader完成的。
SecureClassLoader继承了抽象类ClassLoader,拓展了ClassLoader类加入了权限方面的功能,加强了安全性,其子类URLClassLoader是用URL路径从jar文件中加载类和资源。
其中重点关注的是PathClassLoader和DexClassLoader。
PathClassLoader是Android默认使用的类加载器,一个apk中的Activity等类便是在其中加载。
DexClassLoader可以加载任意目录下的dex/jar/apk/zip文件,比PathClassLoader更灵活,是实现插件化、热修复以及dex加壳的重点。
Android8.0新引入InMemoryDexClassLoader,从名字便可看出是用于直接从内存中加载dex。
ClassLoader:
实例
写一个加载SD卡dex的app,原dex的源文件如下:

加载app如下:
首先要添加SD卡权限。
package com.yrq.loaddex;

import androidx.appcompat.app.AppCompatActivity;

import android.content.Context;
import android.os.Bundle;

import java.io.File;
import java.lang.reflect.InvocationTargetException;
import java.lang.reflect.Method;

import dalvik.system.DexClassLoader;

public class MainActivity extends AppCompatActivity {

    @Override
    protected void onCreate(Bundle savedInstanceState) {
        super.onCreate(savedInstanceState);
        setContentView(R.layout.activity_main);
        Context appContext=this.getApplicationContext();
        testDexClassLoader(appContext,"/sdcard/3.dex");
    }
    //context用于获取APP私有目录
    public void testDexClassLoader(Context context,String dexFilePath){
        File opfile=context.getDir("opt_dex",0);//存放提出的dex文件
        File libfile=context.getDir("Lib_dex",0);//存放依赖的so文件

        DexClassLoader dexClassLoader=new DexClassLoader(dexFilePath,opfile.getAbsolutePath(),libfile.getAbsolutePath(),context.getClassLoader());
        //package com.yrq.test02;
        Class clazz=null;
        try {
            clazz=(Class)dexClassLoader.loadClass("com.yrq.test02.TestClass");
        } catch (ClassNotFoundException e) {
            e.printStackTrace();
        }
        if(clazz!=null){
            try {
                Method testFun=clazz.getDeclaredMethod("testFun");
                try {
                    Object obj=clazz.newInstance();
                    try {
                        testFun.invoke(obj);
                    } catch (InvocationTargetException e) {
                        e.printStackTrace();
                    }
                } catch (IllegalAccessException e) {
                    e.printStackTrace();
                } catch (InstantiationException e) {
                    e.printStackTrace();
                }


            } catch (NoSuchMethodException e) {
                e.printStackTrace();
            }
        }
    }


}
结果
01-15 03:30:47.306 26185-26185/com.yrq.loaddex I/YRQ: i am from com.yrq.test02.TestClass.testFUnc
加壳APP运行流程和ClassLoader修正
App进程的创建流程:
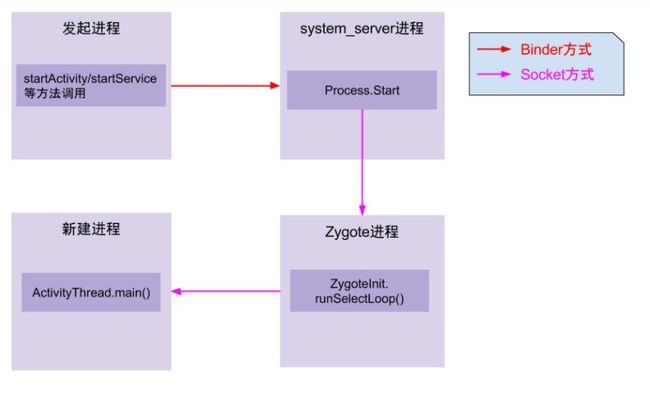
其中这个函数ActivityThread为单例模式。
这个类中有一个静态函数currentActivityThread,可以通过其获取ActivityThread实例。
其中有个ArrayMap的loadedApk变量中就有加载App的mClassloader即pathclassloader。
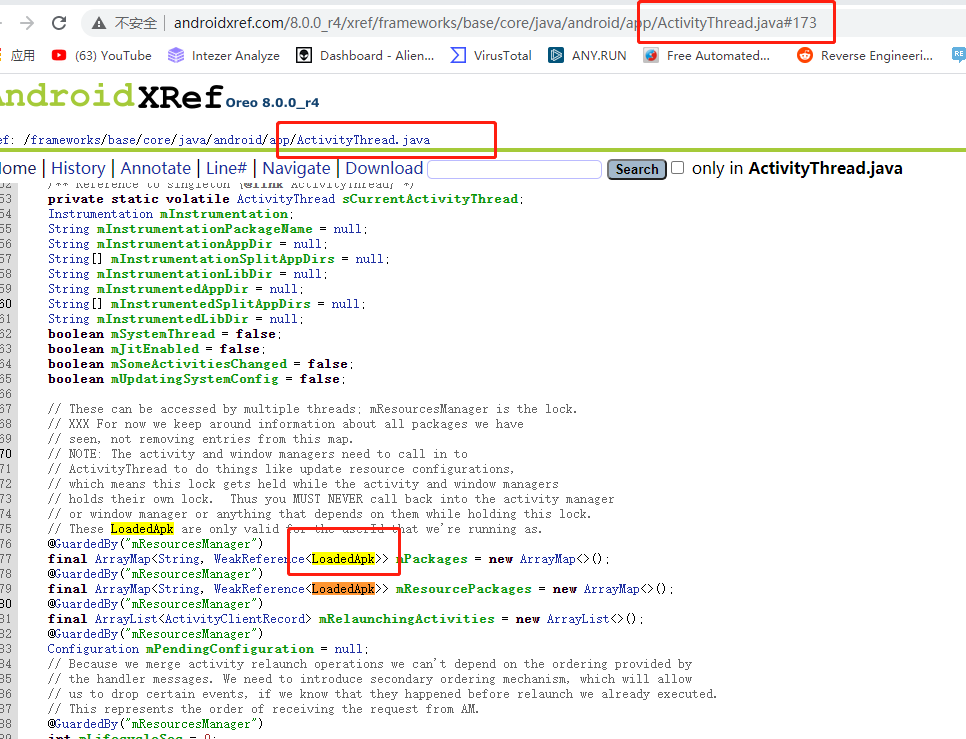
关于app的执行。直到handlebindapplication函数里的makeApplication,才开始执行App的代码。
private void handleBindApplication(AppBindData data) {
    //step 1: 创建LoadedApk对象
    data.info = getPackageInfoNoCheck(data.appInfo, data.compatInfo);
    ...
    //step 2: 创建ContextImpl对象;
    final ContextImpl appContext = ContextImpl.createAppContext(this, data.info);

    //step 3: 创建Instrumentation
    mInstrumentation = new Instrumentation();

    //step 4: 创建Application对象;在makeApplication函数中调用了newApplication,在该函数中又调用了app.attach(context),在attach函数中调用了Application.attachBaseContext函数
    Application app = data.info.makeApplication(data.restrictedBackupMode, null);
    mInitialApplication = app;

    //step 5: 安装providers
    List providers = data.providers;
    installContentProviders(app, providers);

    //step 6: 执行Application.Create回调
    mInstrumentation.callApplicationOnCreate(app);
APP运行流程
- BootClassLoader加载系统核心库
- PathClassLoader加载APP自身dex
- 进入APP自身组件开始执行
- 调用声明Application的attachBaseContext
- 调用声明Application的onCreate
加壳应用的运行流程
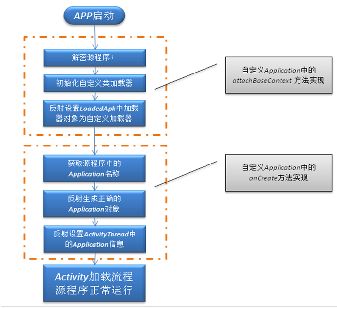
在加壳程序中,不能直接跟加载插件一样使用DexClassLoader,因为系统的PathClassLoader要加载一些组件,这些组件都无法找到。就引出了一个问题:怎么解决动态加载dex中类的声明周期,怎么加载插件dex中的activity。
生命周期类处理
DexClassLoader加载的类是没有组件生命周期的,也就是说即使DexClassLoader通过对APK的动态加载完成了对组件类的加载,当系统启动该组件时,依然会出现加载类失败的异常。为什么组件类被动态加载入虚拟机,但系统却出现加载类失败呢?
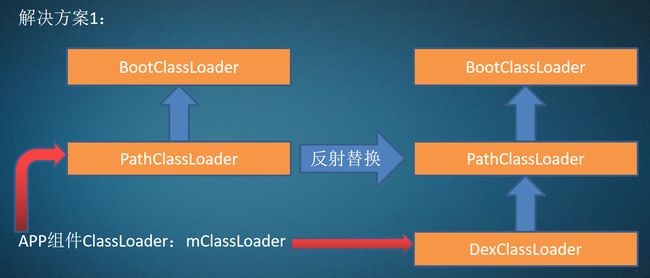
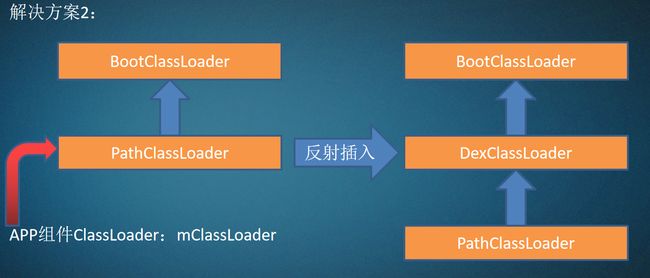
两种解决方案:
1、替换系统组件类加载器为我们的DexClassLoader,同时设置DexClassLoader的parent为系统组件类加载器;
2、打破原有的双亲关系,在系统组件类加载器和BootClassLoader的中间插入我们自己的DexClassLoader即可;
package com.yrq.loaddex;

import androidx.appcompat.app.AppCompatActivity;

import android.app.Activity;
import android.content.Context;
import android.content.Intent;
import android.os.Bundle;
import android.util.ArrayMap;

import java.io.File;
import java.lang.ref.WeakReference;
import java.lang.reflect.Field;
import java.lang.reflect.InvocationTargetException;
import java.lang.reflect.Method;

import dalvik.system.DexClassLoader;

public class MainActivity extends AppCompatActivity {

    @Override
    protected void onCreate(Bundle savedInstanceState) {
        super.onCreate(savedInstanceState);
        setContentView(R.layout.activity_main);
        Context appContext=this.getApplicationContext();
        //testDexClassLoader(appContext,"/sdcard/3.dex");
        startTestActivity(this,"/sdcard/4.dex");
    }


  //第一种解决方案,自己实现的DexClassLoader替换APP组件ClassLoader:mClassLoader
    第一步是找到mclassloader
    public void replaceClassloader(ClassLoader classloader){
        //首先获得ActivityThread实例
        try {
            Class ActivityThreadClazz=classloader.loadClass("android.app.ActivityThread");

            Method CurrentActivityThreadMethod=ActivityThreadClazz.getDeclaredMethod("currentActivityThread");
            CurrentActivityThreadMethod.setAccessible(true);

            Object activityThreadObj=CurrentActivityThreadMethod.invoke(null);

            //final ArrayMap> mPackages = new ArrayMap<>();获取arrayMap
            //Class是对类的抽象,Field是对类的属性的抽象,可以通过Class获取到Field
            Field mPackageField=ActivityThreadClazz.getDeclaredField("mPackages");
            mPackageField.setAccessible(true);
            ArrayMap mPackagesObj= (ArrayMap) mPackageField.get(activityThreadObj);
            第一个参数是String类型,就是我们当前的包名
            WeakReference wr= (WeakReference) mPackagesObj.get(this.getPackageName());
            Object loadedApkObj=wr.get();

            //从loadedApk中取出mClassLoader
            Class LoaderApkClazz=classloader.loadClass("android.app.LoadedApk");
            Field mClassLoader=LoaderApkClazz.getDeclaredField("mClassLoader");
            mClassLoader.setAccessible(true);
            mClassLoader.set(loadedApkObj,classloader);


        } catch (ClassNotFoundException e) {
            e.printStackTrace();
        } catch (NoSuchMethodException e) {
            e.printStackTrace();
        } catch (IllegalAccessException e) {
            e.printStackTrace();
        } catch (InvocationTargetException e) {
            e.printStackTrace();
        } catch (NoSuchFieldException e) {
            e.printStackTrace();
        }


    }

    //编写函数,加载插件中dex的activity
    public void startTestActivity(Context context,String dexFilePath){
        File opfile=context.getDir("opt_dex",0);//存放提出出的dex文件
        File libfile=context.getDir("Lib_dex",0);//存放依赖的so文件


        DexClassLoader dexClassLoader=new DexClassLoader(dexFilePath,opfile.getAbsolutePath(),libfile.getAbsolutePath(),context.getClassLoader());

        replaceClassloader(dexClassLoader);

        //package com.yrq.test02;
        Class clazz=null;
        try {
            clazz=(Class)dexClassLoader.loadClass("com.yrq.test02.TestActivity");
        } catch (ClassNotFoundException e) {
            e.printStackTrace();
        }

        context.startActivity(new Intent(context,clazz));
    }

}
结果如下:
01-15 19:17:32.768 29796-29796/com.yrq.loaddex I/YRQ: i am from TestActivity.onCreate
package com.yrq.loaddex;

import androidx.appcompat.app.AppCompatActivity;

import android.app.Activity;
import android.content.Context;
import android.content.Intent;
import android.os.Bundle;
import android.util.ArrayMap;
import android.util.Log;

import java.io.File;
import java.lang.ref.WeakReference;
import java.lang.reflect.Field;
import java.lang.reflect.InvocationTargetException;
import java.lang.reflect.Method;

import dalvik.system.DexClassLoader;

public class MainActivity extends Activity {

    @Override
    protected void onCreate(Bundle savedInstanceState) {
        super.onCreate(savedInstanceState);
        setContentView(R.layout.activity_main);
        Context appContext=this.getApplicationContext();
        //testDexClassLoader(appContext,"/sdcard/3.dex");
        //startTestActivityFirstMethod(this,"/sdcard/4.dex");
        startTestActivitySecondMethod(this,"/sdcard/6.dex");
    }
    //context用于获取APP私有目录


    public void startTestActivitySecondMethod(Context context,String dexFilePath){
        File opfile=context.getDir("opt_dex",0);//存放提出出的dex文件
        File libfile=context.getDir("lib_dex",0);//存放依赖的so文件

        ClassLoader pathClassloader=MainActivity.class.getClassLoader();
        ClassLoader bootClassLoader=MainActivity.class.getClassLoader().getParent();

        //父节点设置成bootClassloader

        //1:dexPath,指目标类所在的APK或jar文件的路径.类装载器将从该路径中寻找指定的目标类,该类必须是APK或jar的全路径.如果要包含多个路径,路径之间必须使用特定的分割符分隔,特定的分割符可以使用System.getProperty(“path.separtor”)获得.
        //2:dexOutputDir,由于dex文件被包含在APK或者Jar文件中,因此在装载目标类之前需要先从APK或Jar文件中解压出dex文件,该参数就是制定解压出的dex 文件存放的路径.在Android系统中,一个应用程序一般对应一个Linux用户id,应用程序仅对属于自己的数据目录路径有写的权限,因此,该参数可以使用该程序的数据路径.
        //3:libPath,指目标类中所使用的C/C++库存放的路径
        //4:最后一个参数是指该装载器的父装载器,一般为当前执行类的装载器


        DexClassLoader dexClassLoader=new DexClassLoader(dexFilePath,opfile.getAbsolutePath(),libfile.getAbsolutePath(),bootClassLoader);

        //dexClassLoader子节点设置成app的PathClassloader
        try {
            Field parentField=ClassLoader.class.getDeclaredField("parent");
            parentField.setAccessible(true);

            parentField.set(pathClassloader,dexClassLoader);

        } catch (NoSuchFieldException e) {
            e.printStackTrace();
        } catch (IllegalAccessException e) {
            e.printStackTrace();
        }


        ClassLoader tmpClassloader=pathClassloader;
        ClassLoader parentClassloader=pathClassloader.getParent();
        while(parentClassloader!=null){
            Log.i("YRQ","this:"+tmpClassloader+"--parent:"+parentClassloader);
            tmpClassloader=parentClassloader;
            parentClassloader=parentClassloader.getParent();
        }
        Log.i("YRQ","root:"+tmpClassloader);

        //package com.yrq.test02;
        Class clazz=null;
        try {
            clazz=(Class)dexClassLoader.loadClass("com.yrq.test02.TestActivity");
        } catch (ClassNotFoundException e) {
            e.printStackTrace();
        }

        context.startActivity(new Intent(context,clazz));
    }


}
一二三代壳和加壳技术分类识别
| 壳类型 | 介绍 |
|---|---|
| 第一代 | Dex字符串加密资源加密对抗反编译反调试自定义DexClassLoader,整体保护dex |
| 第二代 | 对抗第一代常见的脱壳办法Dex Method代码抽取到外部,Dex动态加载So加密 |
| 第三代 | Dex Method代码解密So代码膨胀混淆对抗之前的所有脱壳法 |
| 第四代 | VMP |
Dalvik下一代壳通用解决方案
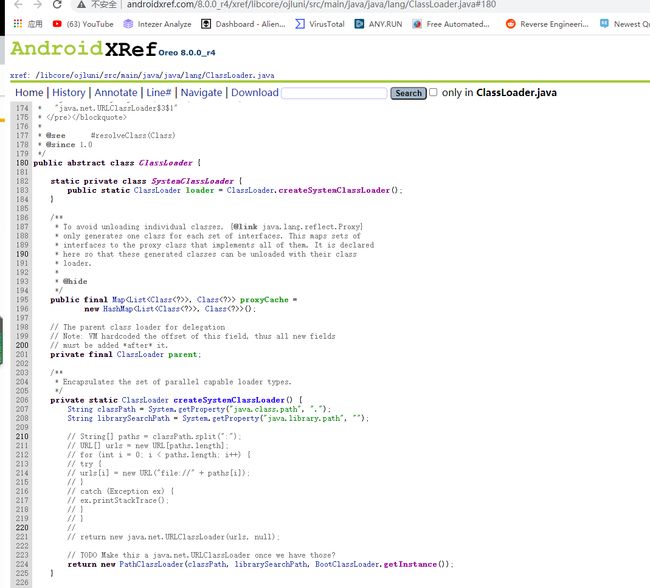
因为Dalvik是4.4之前的版本,所有我们可以查看DexClassLoader 4.4的版本。
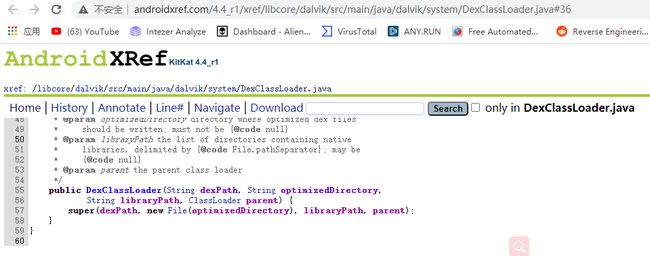
public DexClassLoader(String dexPath, //dex的路径
                        String optimizedDirectory,//odex存放路径
            String libraryPath, //涉及的so路径
            ClassLoader parent  //双亲父节点
            ) {
        super(dexPath, new File(optimizedDirectory), libraryPath, parent);
    }
可以看到父类是BaseDexClassLoader
public class BaseDexClassLoader extends ClassLoader {
    private final DexPathList pathList;
可以看到是BaseDexClassLoader父类ClassLoader
可以看到4.4有art和davlik,我们要查看的是davlik
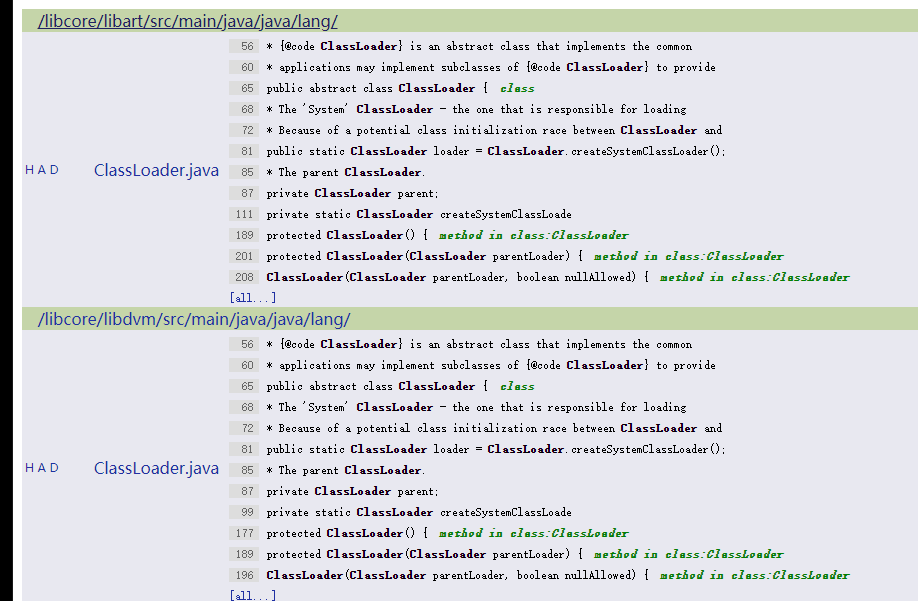
可以看到只是设置父节点
ClassLoader(ClassLoader parentLoader, boolean nullAllowed) {
        if (parentLoader == null && !nullAllowed) {
            throw new NullPointerException("parentLoader == null && !nullAllowed");
        }
        parent = parentLoader;
    }
所以回到BaseDexClassLoader
可以看到初始化DexPathList实例
public class BaseDexClassLoader extends ClassLoader {
    private final DexPathList pathList;

    /**
     * Constructs an instance.
     *
     * @param dexPath the list of jar/apk files containing classes and
     * resources, delimited by {@code File.pathSeparator}, which
     * defaults to {@code ":"} on Android
     * @param optimizedDirectory directory where optimized dex files
     * should be written; may be {@code null}
     * @param libraryPath the list of directories containing native
     * libraries, delimited by {@code File.pathSeparator}; may be
     * {@code null}
     * @param parent the parent class loader
     */
    public BaseDexClassLoader(String dexPath, File optimizedDirectory,
            String libraryPath, ClassLoader parent) {
        super(parent);
        this.pathList = new DexPathList(this, dexPath, libraryPath, optimizedDirectory);
    }
可以看到第二个参数是我们关心的dexPath,要加载的dex文件
public DexPathList(ClassLoader definingContext, String dexPath,
           String libraryPath, File optimizedDirectory) {
       if (definingContext == null) {
           throw new NullPointerException("definingContext == null");
       }

       if (dexPath == null) {
           throw new NullPointerException("dexPath == null");
       }

       if (optimizedDirectory != null) {
           if (!optimizedDirectory.exists())  {
               throw new IllegalArgumentException(
                       "optimizedDirectory doesn't exist: "
                       + optimizedDirectory);
            }

            if (!(optimizedDirectory.canRead()
                            && optimizedDirectory.canWrite())) {
                throw new IllegalArgumentException(
                        "optimizedDirectory not readable/writable: "
                        + optimizedDirectory);
            }
        }

        this.definingContext = definingContext;
        ArrayList suppressedExceptions = new ArrayList();
        this.dexElements = makeDexElements(splitDexPath(dexPath), optimizedDirectory,
                                           suppressedExceptions);
        if (suppressedExceptions.size() > 0) {
            this.dexElementsSuppressedExceptions =
                suppressedExceptions.toArray(new IOException[suppressedExceptions.size()]);
        } else {
            dexElementsSuppressedExceptions = null;
        }
        this.nativeLibraryDirectories = splitLibraryPath(libraryPath);
    }
重要函数为makeDexElements,进入此函数查看
private static Element[] makeDexElements(ArrayList files, File optimizedDirectory,
                                             ArrayList suppressedExceptions) {
       ArrayList elements = new ArrayList();
返回了一个Element[]数组,这个在DexPathList也有定义
 /**
     * Element of the dex/resource file path
     */
    /*package*/ static class Element {
        private final File file;
        private final boolean isDirectory;
        private final File zip;
        private final DexFile dexFile;

        private ZipFile zipFile;
        private boolean initialized;

        public Element(File file, boolean isDirectory, File zip, DexFile dexFile) {
            this.file = file;
            this.isDirectory = isDirectory;
            this.zip = zip;
            this.dexFile = dexFile;
        }
可以看到就是loadDexFile,然后添加进Element[]数组
 private static Element[] makeDexElements(ArrayList files, File optimizedDirectory,
                                             ArrayList suppressedExceptions) {
        ArrayList elements = new ArrayList();
        /*
         * Open all files and load the (direct or contained) dex files
         * up front.
         */
        for (File file : files) {
            File zip = null;
            DexFile dex = null;
            String name = file.getName();

            if (name.endsWith(DEX_SUFFIX)) {
                // Raw dex file (not inside a zip/jar).
                try {
                    dex = loadDexFile(file, optimizedDirectory);
                } catch (IOException ex) {
                    System.logE("Unable to load dex file: " + file, ex);
                }
            } else if (name.endsWith(APK_SUFFIX) || name.endsWith(JAR_SUFFIX)
                    || name.endsWith(ZIP_SUFFIX)) {
                zip = file;

                try {
                    dex = loadDexFile(file, optimizedDirectory);
                } catch (IOException suppressed) {
                    /*
                     * IOException might get thrown "legitimately" by the DexFile constructor if the
                     * zip file turns out to be resource-only (that is, no classes.dex file in it).
                     * Let dex == null and hang on to the exception to add to the tea-leaves for
                     * when findClass returns null.
                     */
                    suppressedExceptions.add(suppressed);
                }
            } else if (file.isDirectory()) {
                // We support directories for looking up resources.
                // This is only useful for running libcore tests.
                elements.add(new Element(file, true, null, null));
            } else {
                System.logW("Unknown file type for: " + file);
            }

            if ((zip != null) || (dex != null)) {
                elements.add(new Element(file, false, zip, dex));
            }
        }

        return elements.toArray(new Element[elements.size()]);
查看loadDexFile,第一个参数是dex文件,可以看到再次调用loadDex
private static DexFile loadDexFile(File file, File optimizedDirectory)
            throws IOException {
        if (optimizedDirectory == null) {
            return new DexFile(file);
        } else {
            String optimizedPath = optimizedPathFor(file, optimizedDirectory);
            return DexFile.loadDex(file.getPath(), optimizedPath, 0);
        }
    }
可以看到loadDex第一个参数是dex路径,返回是新建DexFile对象
static public DexFile loadDex(String sourcePathName, String outputPathName,
        int flags) throws IOException {

        /*
         * TODO: we may want to cache previously-opened DexFile objects.
         * The cache would be synchronized with close().  This would help
         * us avoid mapping the same DEX more than once when an app
         * decided to open it multiple times.  In practice this may not
         * be a real issue.
         */
        return new DexFile(sourcePathName, outputPathName, flags);
    }
DexFile对象中,调用了openDexFile,返回mCookie
private DexFile(String sourceName, String outputName, int flags) throws IOException {
       if (outputName != null) {
           try {
                String parent = new File(outputName).getParent();
                if (Libcore.os.getuid() != Libcore.os.stat(parent).st_uid) {
                    throw new IllegalArgumentException("Optimized data directory " + parent
                            + " is not owned by the current user. Shared storage cannot protect"
                            + " your application from code injection attacks.");
                }
            } catch (ErrnoException ignored) {
                // assume we'll fail with a more contextual error later
            }
        }

        mCookie = openDexFile(sourceName, outputName, flags);
        mFileName = sourceName;
        guard.open("close");
        //System.out.println("DEX FILE cookie is " + mCookie);
    }
可以看到此函数又调用了openDexFileNative。
private static int openDexFile(String sourceName, String outputName,
        int flags) throws IOException {
        return openDexFileNative(new File(sourceName).getCanonicalPath(),
                                 (outputName == null) ? null : new File(outputName).getCanonicalPath(),
                                 flags);
    }
在android中每个JNI实现有规律就是类名/改成_
dalvik/system/DexFile变成dalvik_system_DexFile
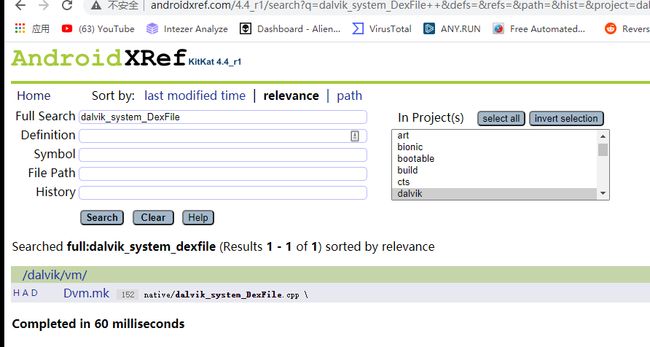
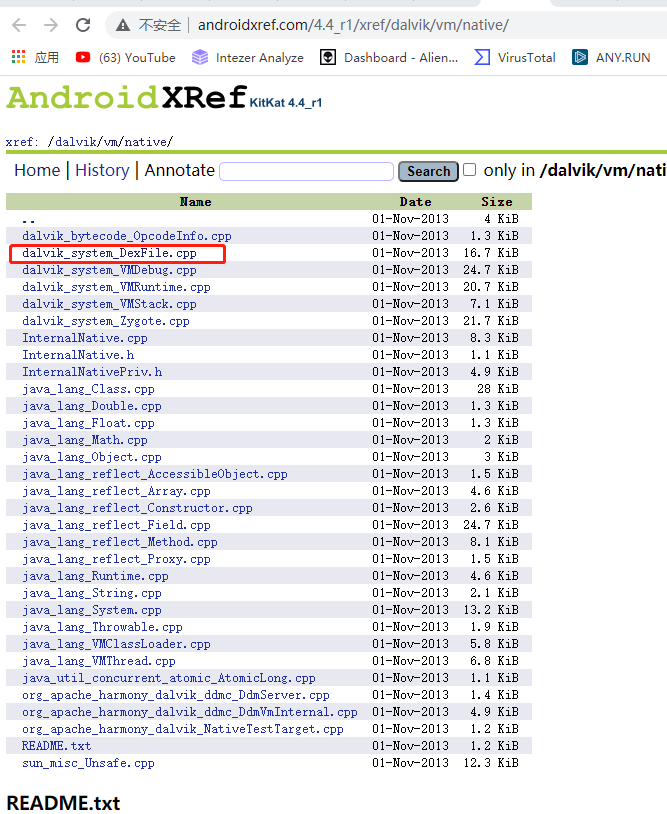
如下就是native层次函数代码
static void Dalvik_dalvik_system_DexFile_openDexFileNative(const u4* args,
    JValue* pResult)
{
    StringObject* sourceNameObj = (StringObject*) args[0];
    StringObject* outputNameObj = (StringObject*) args[1];
    DexOrJar* pDexOrJar = NULL;
    JarFile* pJarFile;
    RawDexFile* pRawDexFile;
    char* sourceName;
    char* outputName;

    if (sourceNameObj == NULL) {
        dvmThrowNullPointerException("sourceName == null");
        RETURN_VOID();
    }

    。。。。
    //后缀校验
    if (hasDexExtension(sourceName)
            && dvmRawDexFileOpen(sourceName, outputName, &pRawDexFile, false) == 0) {
        ALOGV("Opening DEX file '%s' (DEX)", sourceName);
之后就是各种读文件,优化OPT
通用脱壳点
编译源码,对dexFileParse、dvmDexFileOpenPartial脱壳点的验证。第一个参数是地址,第二个参数一般是长度。
分别添加如下代码
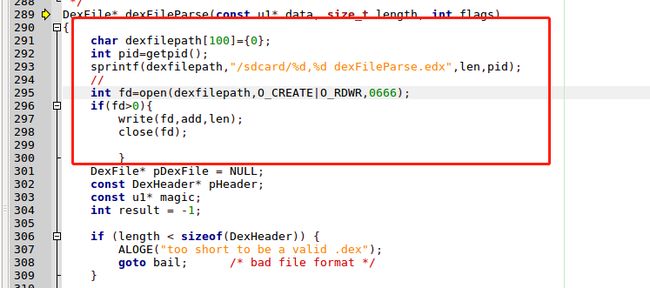
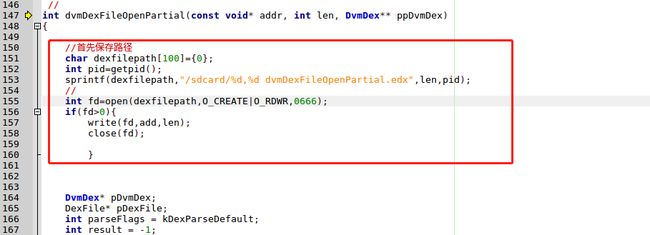
添加头文件
#include
#include
#include
下面就是编译 -j就是多线程
source build/envsetup.sh
tom@ubuntu:~/SourceCode/android-4.4.4_r1$ lunch

You're building on Linux

Lunch menu... pick a combo:
     1. aosp_arm-eng
     2. aosp_x86-eng
     3. aosp_mips-eng
     4. vbox_x86-eng
     5. aosp_manta-userdebug
     6. aosp_mako-userdebug
     7. aosp_hammerhead-userdebug
     8. aosp_flo-userdebug
     9. aosp_tilapia-userdebug
     10. aosp_grouper-userdebug
     11. aosp_deb-userdebug
     12. mini_x86-userdebug
     13. mini_armv7a_neon-userdebug
     14. mini_mips-userdebug

Which would you like? [aosp_arm-eng] 7


============================================
PLATFORM_VERSION_CODENAME=REL
PLATFORM_VERSION=4.4.4
TARGET_PRODUCT=aosp_hammerhead
TARGET_BUILD_VARIANT=userdebug
TARGET_BUILD_TYPE=release
TARGET_BUILD_APPS=
TARGET_ARCH=arm
TARGET_ARCH_VARIANT=armv7-a-neon
TARGET_CPU_VARIANT=krait
HOST_ARCH=x86
HOST_OS=linux
HOST_OS_EXTRA=Linux-4.15.0-88-generic-x86_64-with-Ubuntu-16.04-xenial
HOST_BUILD_TYPE=release
BUILD_ID=KTU84P
OUT_DIR=out
============================================

tom@ubuntu:~/SourceCode/android-4.4.4_r1$ time make -j4
============================================
编译完成
+ OUTPUT_FILE=out/target/product/hammerhead/obj/PACKAGING/systemimage_intermediates/system.img
+ EXT_VARIANT=ext4
+ MOUNT_POINT=system
+ SIZE=1073741824
+ FC=out/target/product/hammerhead/root/file_contexts
+ case $EXT_VARIANT in
+ '[' -z system ']'
+ '[' -z 1073741824 ']'
+ '[' -n out/target/product/hammerhead/root/file_contexts ']'
+ FCOPT='-S out/target/product/hammerhead/root/file_contexts'
+ MAKE_EXT4FS_CMD='make_ext4fs -s -S out/target/product/hammerhead/root/file_contexts -l 1073741824 -a system out/target/product/hammerhead/obj/PACKAGING/systemimage_intermediates/system.img out/target/product/hammerhead/system'
+ echo make_ext4fs -s -S out/target/product/hammerhead/root/file_contexts -l 1073741824 -a system out/target/product/hammerhead/obj/PACKAGING/systemimage_intermediates/system.img out/target/product/hammerhead/system
make_ext4fs -s -S out/target/product/hammerhead/root/file_contexts -l 1073741824 -a system out/target/product/hammerhead/obj/PACKAGING/systemimage_intermediates/system.img out/target/product/hammerhead/system
+ make_ext4fs -s -S out/target/product/hammerhead/root/file_contexts -l 1073741824 -a system out/target/product/hammerhead/obj/PACKAGING/systemimage_intermediates/system.img out/target/product/hammerhead/system
Creating filesystem with parameters:
    Size: 1073741824
    Block size: 4096
    Blocks per group: 32768
    Inodes per group: 8192
    Inode size: 256
    Journal blocks: 4096
    Label:
    Blocks: 262144
    Block groups: 8
    Reserved block group size: 63
Created filesystem with 1429/65536 inodes and 76583/262144 blocks
+ '[' 0 -ne 0 ']'
Install system fs image: out/target/product/hammerhead/system.img
out/target/product/hammerhead/system.img+out/target/product/hammerhead/obj/PACKAGING/recovery_patch_intermediates/recovery_from_boot.p maxsize=1096212480 blocksize=135168 total=298434830 reserve=11083776

real	2m9.789s
user	1m50.879s
sys	0m16.426s
将编译好的文件拷出
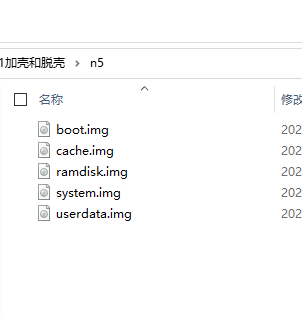
然后就可以脱壳操作了。加载apk时,会再如代码缩写,sdcard生成dex
ART下一代壳通用解决方案
8.0之后引入InMemoryClassLoader。
可以看到InMemoryClassLoader调用了BaseDexClassloader。
又调用了DexPathlist,调用makeInMemoryDexElements
然后遍历dexFiles对象,创建element的数组保存DexFile。
DexFile中openInMemoryDexFile被调用。
这个函数中create函数,调用了CreateSingleDexfileCookie
此函数里创建了dex_file
里面CreateDexFiles
这些很多函数都涉及了起始地址与长度,所以可以在这些点脱壳。
这些函数有
1.static jobject CreateSingleDexFileCookie(JNIEnv* env, std::unique_ptr data)
2、static const DexFile* CreateDexFile(JNIEnv* env, std::unique_ptr dex_mem_map)
3、DexFile::Open(location,
4、OpenCommon(map->Begin()
5、DexFile::DexFile(const uint8_t* base,
art下函数抽取的方案思路就是阻断dex2oat流程。
阻断之后,就会进入加载dex文件流程,可以在以下函数点进行脱壳(就是有dex路径作为参数的函数)
1、OpenAndReadMagic(filename, &magic, error_msg); 2、DexFile::OpenCommon(const uint8_t* base, 3、DexFile::DexFile(const uint8_t* base,
FART
脱壳组件
apk安装时进行的dex2oat编译流程
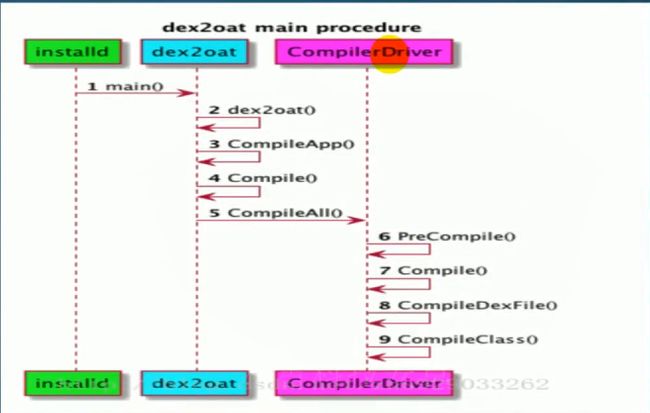
DexClassLoader再最后回调用dex2oat进行编译,dex2oat是一个二进制文件,在dex2oat中按函数粒度编译,不编译类的初始化函数,类的初始化函数运行在解释interpreter模式下,所以如果禁用dex2oat,所有函数都运行在解释模式下。

关于解释器实现可以看到2种,switch和汇编

我们在脱壳时,比如初始化函数也对应着可以通过ArtMethod对象,ArtMethod对象提供了一个函数GetDexFile(),用来获取所属的DexFile。DexFile中提供了Begin()和Size()函数,获取dexfile的开始和大小,就可以得到dex文件进行dump。
FART的脱壳点是在解释器下的Execute()。 路径为art中runtime目录
//首先获取当前执行Artmethod
ArtMethod* artmethod=shadow_frame.GetMethod();
	//防止多次dump引起卡顿,只在初始化函数dump
	if(strstr(artmethod->PrettyMethod().c_str(),""))
	{


		//inline const DexFile* ArtMethod::GetDexFile()
		const DexFile* dexfile=artmethod->GetDexFile();
		/*  const uint8_t* Begin() const {
	1050      return begin_;
	1051    }
	1052
	1053    size_t Size() const {
	1054      return size_;
	1055    }*/
		const uint8_t* begin=dexfile->Begin();
		size_t size=dexfile->Size();
		//拼接存储路径
		char dexfilepath[100]={0};
		sprintf(dexfilepath,"/sdcard/%d_%d_Execute.dex",(int)size,getpid());
		int fd=open(dexfilepath,O_CREAT|O_RDWR,0666);
		if(fd>0)
		{
			int number=write(fd,begin,size);
			if(number>0){
				}
			close(fd);

			}

		}
记得如下头文件
#include
#include
#include
主动调用组件
相关概念

关于dex,如果没有异常处理,长度即头部长度加指令长度,有异常处理还要加异常处理部分。

FART脱壳结束得到的文件列表。
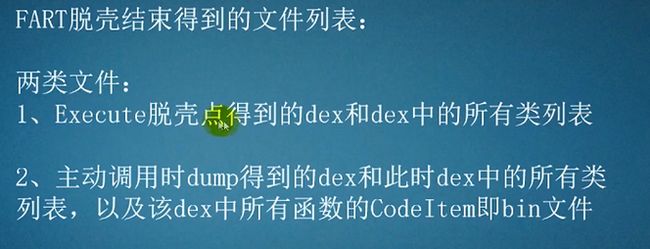
手动修复教程
首先安装fart镜像,安装运行APK,将Sdcard卡目录下dump文件夹保存脱下来

打开GDA观察,函数都被抽空。
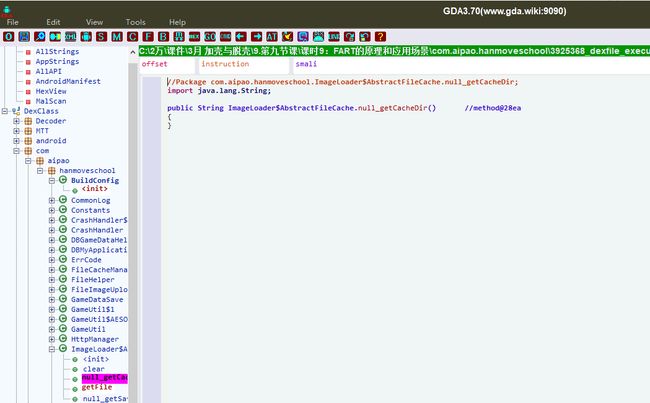
然后就用dump下了的codeItem进行修复
使用脚本fart.py脚本,格式为
-d xxx.dex -i xxx.bin >> result
结果如下:
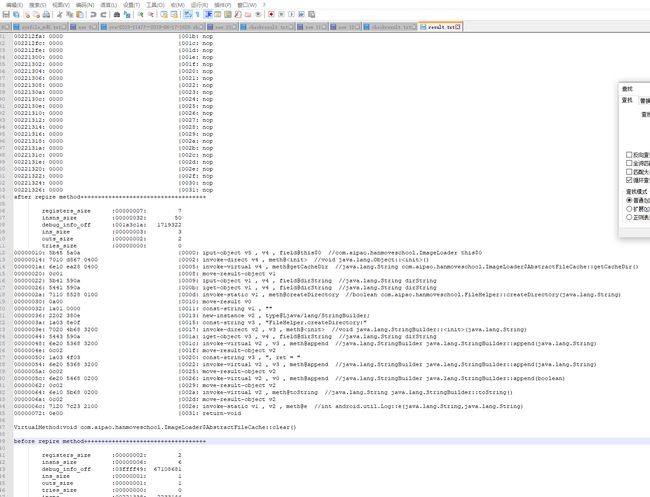
参考资料
看雪视频
