配置 AEM CQ6 (author + publish + apache dispatcher + ubuntu )
AEM CQ系列是Adobe下的企业内容管理系统,现在已知的一些企业比如 Deloitte,Ford Racing,这里就不多做基本的介绍了,明白的看!
今天在Docker配置一下author instance, publish instance, apache dispatcher
文件构架
Author
-cq-author-4505.jar
-license.properties
Publish
-cq-author-4503.jar
-license.properties
Author Instance
FROM ubuntu:14.04

RUN mkdir /opt/aem/
RUN apt-get install -y software-properties-common
RUN add-apt-repository ppa:webupd8team/java
RUN apt-get update

# automatically accept oracle license
RUN echo oracle-java7-installer shared/accepted-oracle-license-v1-1 select true | /usr/bin/debconf-set-selections
# and install java 7 oracle jdk
RUN apt-get -y install oracle-java7-installer && apt-get clean
RUN update-alternatives --display java
ENV JAVA_HOME /usr/lib/jvm/java-7-oracle
WORKDIR /opt/aem/
ADD cq-author-4505.jar /opt/aem/cq-author-4505.jar
ADD license.properties /opt/aem/license.properties

RUN java -jar cq-author-4505.jar -unpack -v
运行author instance
docker run -i –t –d -p 4505:4505 <yourName>/aem-auth:6.0 /bin/bash
我们手动的启动AEM instance
java -jar cq-author-4505.jar
运行 http://192.168.59.103:4505 之后呢,我们来手动升级一下Service Pack (之后我们会修改Docker让他自动升级Service Pack)
Publish Instance
这里设置publish instance跟author instance非常相似,只是运行
docker run -i –t –d -p 4503:4503 <yourName>/aem-pub:6.0 /bin/bash
和
java -jar cq-author-4503.jar
运行 http://192.168.59.103:4503 同样,我们要升级Service Pack
Dispatcher
这里面我们使用ubuntu:14.04的镜像,在这里我们开一个端口8888来映射内部的80端口
docker run -i -t –d -p 8888:80 --name aem-dispatcher ubuntu:14.04
进入到Dispatcher的instance
docker exec -i -t aem-dispatcher /bin/bash
安装apache2
apt-get update
apt-get install -y apache2
这里apache默认的root文件夹是/var/www
第1步 (步骤有点多,分开写)
- 下载AEM Dispatcher的config,下载并解压缩 wget https://www.adobeaemcloud.com/content/companies/public/adobe/dispatcher/dispatcher/_jcr_content/top/download_6/file.res/dispatcher-apache2.4-linux-x86-64-4.1.8.tar.gz
下载后如图
- 在/etc/apache2的目录下创建一个conf的文件夹,并把刚才解压缩后的dispatcher.any文件拷贝过去 cp dispatcher.any /etc/apache2/conf
- 拷贝dispatcher-apache2.4-4.1.8.so 到/usr/lib/apache2/modules (这里名字就不做修改了,如果是production,建议修改成apache标准的命名例如mod_aem.so)
第2步 (修改/etc/apache2/apache2.conf 文件)
粘贴下面的到这个 apache2.conf 最下面,请保证红色注释的文件名可以在系统内存在
LoadModule dispatcher_module /usr/lib/apache2/modules/dispatcher-apache2.4-4.1.8.so

<IfModule disp_apache2.c>
# location of the configuration file. eg: 'conf/dispatcher.any'
DispatcherConfig  /etc/apache2/conf/dispatcher.any
# location of the dispatcher log file. eg: 'logs/dispatcher.log'
DispatcherLog /var/log/apache2/dispatcher.log

# log level for the dispatcher log
# 0 Errors
# 1 Warnings
# 2 Infos
# 3 Debug
DispatcherLogLevel 3

# if turned to 1, the dispatcher looks like a normal module
DispatcherNoServerHeader 0

# if turned to 1, request to / are not handled by the dispatcher
# use the mod_alias then for the correct mapping
DispatcherDeclineRoot 0

# if turned to 1, the dispatcher uses the URL already processed
# by handlers preceeding the dispatcher (i.e. mod_rewrite)
# instead of the original one passed to the web server.
DispatcherUseProcessedURL 0


# if turned to 1, the dispatcher does not spool an error
# response to the client (where the status code is greater
# or equal than 400), but passes the status code to
# Apache, which e.g. allows an ErrorDocument directive
# to process such a status code.

DispatcherPassError 0
</IfModule>

<Directory />

<IfModule disp_apache2.c>
# enable dispatcher for ALL request. if this is too restrictive,
# move it to another location
SetHandler dispatcher-handler
</IfModule>

Options FollowSymLinks
AllowOverride None

</Directory>
第3步 (修改/etc/apache2/conf/dispatcher.any 文件/renders { /rend01 { /hostname "192.168.59.103" [2]--> /port "4503" } }和/cache { # The docroot must be equal to the document root of the webserver. The # dispatcher will store files relative to this directory and subsequent # requests may be "declined" by the dispatcher, allowing the webserver # to deliver them just like static files. /docroot "/var/www"
和
/allowAuthorized "1"
第4步,开始apache2 服务
这就没什么说的了 ,如果有错,请仔细检查
service apache2 start
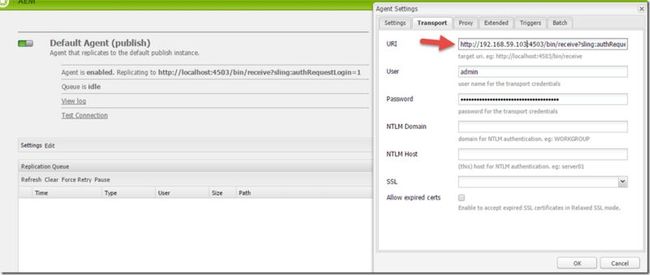
配置Author里面的publisher的指向
在Author上配置publisher,
http://192.168.59.103:4505/etc/replication/agents.author/publish.html
默认其实是不用修改的,但是我使用的是windows下的docker,所以需要修改一下IP,
好了,基本上大功告成了,现在就是测试我们是否配置正确了。我们就用geometrixx来做个例子。
在author的instance上,加入我们有这个Page http://192.168.59.103:4505/cf#/content/geometrixx/en.html,当发布后,
在publisher的instance上,我们来检查这个Page http://192.168.59.103:4503/content/geometrixx/en.html
然后我们来检查dispatcher是不是工作,http://192.168.59.103:8888/content/geometrixx/en.html
好了,最后一件事,我们要检查一下dispatcher是不是已经cache住这些页面了吗?我们要去/var/www去看,内容并没有被cache住,这是为什么呢?
我们要检查一下apache的LOG, Log写的很清楚,因为没有权限写入/var/www,好吧,我们来给他加个权限
chown -R www-data:www-data /var/www
在检查/var/www
大功告成。有机会的话会向大家介绍AEM开发。
Best Regards
Rui


