OpenCV在ARM上的移植
与X86 Linux类似,请参考: Linux 下编译安装OpenCV 本文在此基础上进行进一步操作。
网络上很多移植编译的方法比较老,多数针对OpenCV 1.0,而且方法很麻烦,不仔细操作很容易出错,我的方法是尽可能的利用现成的工具,尽量图形化界面配置操作,方便编译配置。
软硬件环境
宿主机:Ubuntu 12.04 32bit
开发板:OK6410
OpenCV: 2.4.3
其他:
arm-linux-g++ 4.3.2 / arm-linux-gcc 4.3.2
CMake-gui 2.8.10
Cmake的安装
OpenCV 2.2以后版本需要使用Cmake生成makefile文件,因此需要先安装cmake。
ubuntu下安装cmake比较简单,
apt-get install cmake
如果觉得自带的版本不符合要求,可以下载安装包。
下载最新版的安装包:
http://www.cmake.org/cmake/resources/software.html
这里下载已经编译好的,这样只需要解压至需要的目录下即可使用:
tar zxvf cmake-2.8.10.2-Linux-i386.tar.gz –C /usr/local/
设置环境变量:
sudo gedit /home/emouse/.bashrc
在打开的文件后添加:
export PATH=$PATH:/usr/local/cmake-2.8.10.2-Linux-i386/bin
查看版本,测试是否安装成功:
root@emouse:/home# cmake --version
cmake version 2.8.10.2
转载注明:http://emouse.cnblogs.com/
OpenCV 的交叉编译
解压OpenCV压缩文件,得到文件夹。
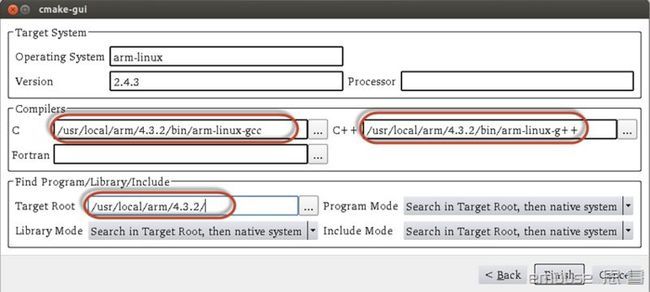
#cmake-gui 打开cmake的gui界面,开始进行配置,配置过程如下图所示:
1、选定解压后的源文件和将要编译的文件目录,这个自己之前先建好。
2、点击Configure 选择工程类型,选择交叉编译,点击下一步。
3、在下图的界面中选择交叉编译工具链以及库文件相关信息,按照图中的进行填写,其中红框部分为交叉编译工具链的实际路径,根据宿主机实际安装路径填写。
4、点击Finsh完成初步配置。
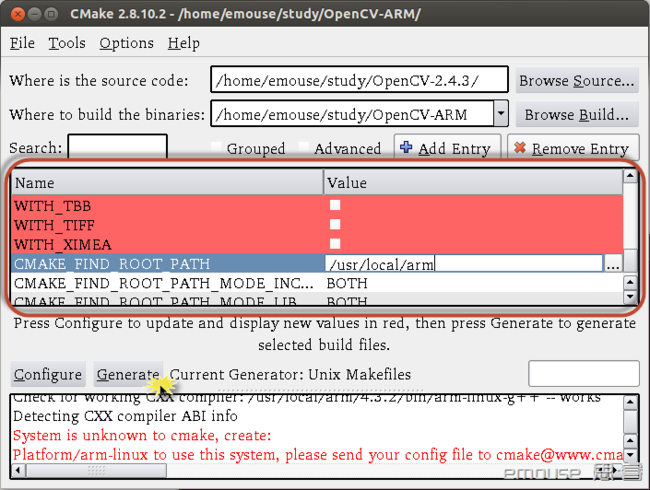
5、此时主界面如下图所示,这时Cmake会读取程序的一些配置信息,可以再下图红框中对每一个编译选项进行修改,这里去掉WITH_TIFF支持并修改安装路径,其他配置可以根据需求选择。
通过终端进入OpenCV-ARM目录,make编译,编译过程中出错如下:
Linking CXX executable ../../bin/opencv_perf_core
../../lib/libopencv_highgui.so: undefined reference to `_TIFFmemcpy'
../../lib/libopencv_core.so: undefined reference to `pthread_spin_init'
../../lib/libopencv_core.so: undefined reference to `pthread_spin_unlock'
../../lib/libopencv_highgui.so: undefined reference to `_TIFFmemset'
../../lib/libopencv_highgui.so: undefined reference to `_TIFFwarningHandler'
../../lib/libopencv_core.so: undefined reference to `pthread_key_create'
../../lib/libopencv_highgui.so: undefined reference to `_TIFFmemcmp'
../../lib/libopencv_core.so: undefined reference to `pthread_getspecific'
../../lib/libopencv_highgui.so: undefined reference to `_TIFFfree'
../../lib/libopencv_ts.so: undefined reference to `pthread_key_delete'
../../lib/libopencv_core.so: undefined reference to `pthread_spin_lock'
../../lib/libopencv_highgui.so: undefined reference to `_TIFFmalloc'
../../lib/libopencv_highgui.so: undefined reference to `TIFFOpen'
../../lib/libopencv_core.so: undefined reference to `pthread_spin_destroy'
../../lib/libopencv_core.so: undefined reference to `pthread_once'
../../lib/libopencv_highgui.so: undefined reference to `_TIFFrealloc'
../../lib/libopencv_core.so: undefined reference to `clock_gettime'
../../lib/libopencv_core.so: undefined reference to `pthread_spin_trylock'
../../lib/libopencv_highgui.so: undefined reference to `_TIFFerrorHandler'
../../lib/libopencv_core.so: undefined reference to `pthread_setspecific'
collect2: ld returned 1 exit status
make[2]: *** [bin/opencv_perf_core] 错误 1
make[1]: *** [modules/core/CMakeFiles/opencv_perf_core.dir/all] 错误 2
make: *** [all] 错误 2
关于TIFF的报错,是因为一开始我勾选了TIFF的支持,而这个支持是需要宿主机中安装相应的程序的,所以报错,可以打开cmake 去掉勾选。 其他报错经过查找找到以下解释:
编译时发现如下错误:
Linking CXX executable ../../bin/opencv_createsamples
../../lib/libcxcore.so: undefined reference to `clock_gettime'
../../lib/libcxcore.so: undefined reference to `pthread_key_create'
../../lib/libcxcore.so: undefined reference to `pthread_getspecific'
../../lib/libcxcore.so: undefined reference to `pthread_setspecific'原因是cmake不认识我定义的arm-linux系统标记,没有加上库pthread和rt的链接选项
此时需要修改CMakeCache.txt,CMAKE_EXE_LINKER_FLAGS原来为空,加上-lpthread -lrt
按照此方法更改对应文件,如下图所示:
此处在CMakeCache.txt 的173行,添加-lpthread -lrt,然后继续编译。编译过程十来分钟左右,编译成功结果如下:
运行make install进行安装,在我的安装目录中就会多出以下几个文件夹:
lib文件夹即生成的库文件,拷贝到开发板对应目录即可。


