【Linux驱动】字符设备驱动相关宏 / 函数介绍(module_init、register_chrdev)
驱动运行有两种方式:
- 方式一:直接编译到内核,Linux内核启动时自动运行驱动程序
- 方式二:编译成模块,使用 insmod 命令加载驱动模块
我们在调试的时候,采用第二种方式是最合适的,每次修改驱动只需要编译一下驱动代码,然后使用 insmod 命令加载驱动模块( .ko 文件 ),不需要编译整个 Linux 代码。
下面以第二种方式为例,来了解一下编写字符驱动模块需要用到哪些宏或者函数。
目录
一、驱动模块的加载 / 卸载 —— module_init / module_exit
二、字符设备的注册 / 注销 —— register_chrdev
三、添加实现设备的具体操作函数
四、添加 LICENSE 和作者信息 —— MODULE_LICENSE
五、动态分配 / 释放设备号 —— alloc_chrdev_region
六、总结:字符驱动模板
一、驱动模块的加载 / 卸载 —— module_init / module_exit
驱动模块被加载,可能需要有一些初始化,但是我们要如何让内核去调用我们写的初始化函数呢,这就需要内核提供的宏: module_init 、module_exit
module_init(xxx_init);     //注册模块加载函数
module_exit(xxx_exit);     //注册模块卸载函数
module_init
当前模块被加载到内核时,会自动调用 xxx_init 函数,这里的 module_init 就有点像是在给内核传递 xxx_init 函数的函数指针。
module_exit
同理,当我们想卸载模块时,可能会有一些收尾工作要做,比如关闭某个引脚。当前模块被卸载的时候,会自动调用 xxx_exit 函数。
// 使用 __init 修饰
static int __init chrdevbase_init(void)
{
    /* 驱动入口实现 */
	return 0;
}

// 使用 __exit 修饰
static void __exit chrdevbase_exit(void)
{
    /* 驱动出口实现 */
}
module_init(chrdevbase_init);     //注册模块加载函数
module_exit(chrdevbase_exit);     //注册模块卸载函数
二、字符设备的注册 / 注销 —— register_chrdev
注册字符设备的目的是在你的驱动被加载到内核时,会在 /dev/ 目录下生成你的字符设备文件,应用程序读写这个字符设备文件时,就会自动调用驱动中的 read / write 函数。
这样就建立起了应用程序和驱动之间的基本联系。同理,注销时,/dev/ 下对应文件会被删除。register_chrdev、unregister_chrdev 是早期注册字符设备的函数,函数声明如下:
// 字符设备注册
static inline int register_chrdev(unsigned int major, const char *name,
				  const struct file_operations *fops);
// 字符设备注销
static inline void unregister_chrdev(unsigned int major, const char *name);
register_chrdev 参数解析
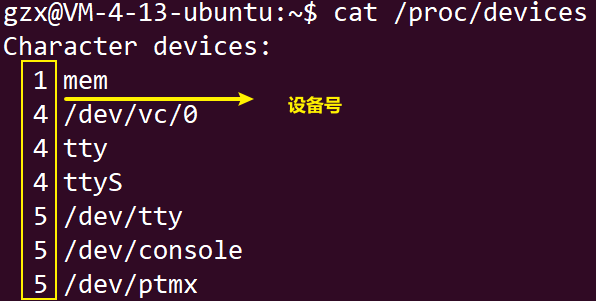
major:主设备号,Linux 下每个设备都有一个设备号,可以使用cat /proc/devices 查看已经使用的设备号。静态分配时注意不要和已有设备号重复;如果要动态分配,可以参考第六部分《动态分配设备号》
name:设备名称,当驱动注册成功以后,在 /dev/ 下显示的名称
fops:当前驱动的操作函数集合,函数声明放在file_operations结构体中,这里要传入的就是file_operations结构体指针。
unregister_chrdev 参数解析
major:要注销的设备对应的主设备号。
name:要注销的设备对应的设备名。
三、添加实现设备的具体操作函数
上面注册字符设备的第三个参数是 fops ,这里要传入的就是你要为当前设备注册哪些操作函数,比如定义了下面的结构体,结构体对象为 chrdevbase_fops,同时要为该结构体注册 open、read、write 、close 函数:
- open 函数:chrdevbase_open
- read 函数:chrdevbase_read
- write 函数:chrdevbase_write
- close 函数:chrdevbase_release
/*
 * 设备操作函数结构体
 */
static struct file_operations chrdevbase_fops = {
	.owner = THIS_MODULE,     // 注册当前结构体的指针对象
	.open = chrdevbase_open,
	.read = chrdevbase_read,
	.write = chrdevbase_write,
	.release = chrdevbase_release,
};
既然这里已经注册了 open、read、write 、close 函数,那么你需要自己去实现这些操作函数,关于这些函数的声明,可以在 include/linux/fs.h 的第 1588 行找到。
/* 打开设备 */
static int chrdevbase_open(struct inode *, struct file *)
{
    /* 用户实现具体功能 */
    return 0;
}

/* 读取设备 */
static ssize_t chrdevbase_read(struct file *, char __user *, size_t, loff_t *);
{
    /* 用户实现具体功能 */
    return 0;
}

/* 向设备写数据 */
static ssize_t chrdevbase_write(struct file *, const char __user *, size_t, loff_t *)
{
    /* 用户实现具体功能 */
    return 0;
}

/* 关闭设备 */
static int chrdevbase_release (struct inode *, struct file *)
{
    /* 用户实现具体功能 */
    return 0;
}
四、添加 LICENSE 和作者信息 —— MODULE_LICENSE
驱动模块中必须添加 LICENSE 信息,不然编译会报错,作者信息可有可无。LICENSE 和作者信息的添加使用 如下两个函数:
MODULE_LICENSE("GPL");       //添加模块 LICENSE 信息
MODULE_AUTHOR("作者名");     //添加模块作者信息
五、动态分配 / 释放设备号 —— alloc_chrdev_region
动态分配设备号 —— alloc_chrdev_region
函数声明如下:
int alloc_chrdev_region(dev_t *dev, \
                        unsigned baseminor, \
                        unsigned count, \
const char *name);dev:输出型参数。保存申请到的设备号
baseminor:次设备号起始地址。alloc_chrdev_region 可以申请一段连续的多个设备号,这 些设备号的主设备号一样,但是次设备号不同,次设备号以 baseminor 为起始地址地址开始递 增。一般 baseminor 为 0,也就是说次设备号从 0 开始。
count:要申请的设备号数量
name:设备名字
动态释放设备号 —— unregister_chrdev_region
注销字符设备之后要释放掉设备号。函数声明如下:
void unregister_chrdev_region(dev_t from, unsigned count);
from:要释放的设备号。(这里指的是主设备号,并非上面次设备号的起始地址)
count:表示从 from 开始,要释放的设备号数量。
六、总结:字符驱动模板
#include
#include
#include
#include
#include
#include

#define CHRDEVBASE_MAJOR 200 /* 主设备号 */
#define CHRDEVBASE_NAME "chrdevbase" /* 设备名 */

/* 打开设备 */
static int chrdevbase_open(struct inode *, struct file *)
{
    /* 用户实现具体功能 */
    return 0;
}

/* 读取设备 */
static ssize_t chrdevbase_read(struct file *, char __user *, size_t, loff_t *);
{
    /* 用户实现具体功能 */
    return 0;
}

/* 向设备写数据 */
static ssize_t chrdevbase_write(struct file *, const char __user *, size_t, loff_t *)
{
    /* 用户实现具体功能 */
    return 0;
}

/* 关闭设备 */
static int chrdevbase_release (struct inode *, struct file *)
{
    /* 用户实现具体功能 */
    return 0;
}

/*
 * 设备操作函数结构体
 */
static struct file_operations chrdevbase_fops = {
	.owner = THIS_MODULE,
	.open = chrdevbase_open,
	.read = chrdevbase_read,
	.write = chrdevbase_write,
	.release = chrdevbase_release,
};

/*
 * @description	: 驱动入口函数
 * @param 		: 无
 * @return 		: 0 成功;其他 失败
 */
static int __init chrdevbase_init(void)
{
	int retvalue = 0;

	/* 注册字符设备驱动 */
	retvalue = register_chrdev(CHRDEVBASE_MAJOR, CHRDEVBASE_NAME, &chrdevbase_fops);
	if(retvalue < 0){
		printk("chrdevbase driver register failed\r\n");
	}
	printk("chrdevbase init!\r\n");
	return 0;
}

/*
 * @description	: 驱动出口函数
 * @param 		: 无
 * @return 		: 无
 */
static void __exit chrdevbase_exit(void)
{
	/* 注销字符设备驱动 */
	unregister_chrdev(CHRDEVBASE_MAJOR, CHRDEVBASE_NAME);
	printk("chrdevbase exit!\r\n");
}

/*
 * 将上面两个函数指定为驱动的入口和出口函数
 */
module_init(chrdevbase_init);
module_exit(chrdevbase_exit);

/*
 * LICENSE和作者信息
 */
MODULE_LICENSE("GPL");
MODULE_AUTHOR("author_name");