【前端面试专题】【4】Vue2 原理
组件化
组件化基础
组件化的概念在很早之前就已经有了
- asp jsp php 中已经存在组件化
- nodejs 中也有类似的组件化
数据驱动视图(MVVM,setState(React))
- 传统组件,只是静态渲染,更新还要依赖于操作 DOM(jQuery)
- 数据驱动视图 - Vue MVVM
- 数据驱动视图 - React setState
Vue MVVM
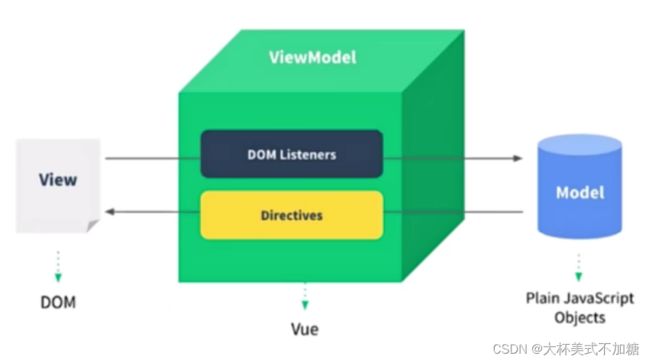
MVVM = Model + View + ViewModel,即通过改变 Model 数据就可以更新 View 视图。
响应式原理
组件 data 的数据一旦变化,立刻触发视图的更新,这是什么原理?
- 核心 API - Object.defineProperty
- Object.defineProperty 的一些缺点(Vue3 启用 Proxy)
Object.defineProperty 基本用法
<script>
  let data = {}
  let name = 'Jae'
  Object.defineProperty(data, 'name', {
    get: function() {
      console.log('get')
      return name
    },
    set: function(newVal) {
      console.log('set')
      name = newVal
    }
  })

  console.log(data.name)
  data.name = 'Jack'
script>
输出为:
get
Jae
set
Object.defineProperty 实现响应式
- 监听对象,监听数组
- 复杂对象,深度监听
- 几个缺点
监听对象,代码示例:
// 触发更新视图
function updateView() {
  console.log('视图更新') // 只做一个入口的展示
}

// 重新定义属性,监听起来
function defineReactive(target, key, value) {
  // 核心 API
  Object.defineProperty(target, key, {
    get() {
      return value
    },
    set(newVal) {
      if (newVal !== value) {
        // 设置新值
        // 注意,value 一直在闭包中,此处设置完之后,再 get 时也是会获取最新的值
        value = newVal
        // 触发更新视图
        updateView()
      }
    }
  })
}

// 监听对象属性
function observer(target) {
  if (typeof target !== 'object' || target === null) {
    // 不是对象或数组
    return target
  }
  // 重新定义各个属性
  for (let key in target) {
    defineReactive(target, key, target[key])
  }
}

// 准备数据
let data = {
  name: 'Jae',
  age: 20,
  info: {
    address: '某某地址' // 深度监听
  }
}

// 监听数据
observer(data)

// 测试
data.name = 'Jack'
data.age = 22
data.info.address = '北京' // 深度监听
打开控制台,可以看到输出为:
视图更新
视图更新
也就是说对于 address 的深度监听没有生效,需要改造一下 defineReactive 函数:
function defineReactive(target, key, value) {
  observer(value) // 深度监听
  // 核心 API
  Object.defineProperty(target, key, {
    get() {
      return value
    },
    set(newVal) {
      if (newVal !== value) {
        observer(newVal) // 深度监听
        // 设置新值
        // 注意,value 一直在闭包中,此处设置完之后,再 get 时也是会获取最新的值
        value = newVal
        // 触发更新视图
        updateView()
      }
    }
  })
}
利用递归来解决,此时可以引出 Object.defineProperty 的一个缺点:深度监听,需要递归到底,一次性计算量大
在测试的时候,加上两个测试例子:
data.x = '100' // 新增属性,监听不到 —— 所以需要 Vue.set
delete data.name // 删除属性,监听不到 —— 所以需要 Vue.delete
到控制台看一下会发现加上这两个例子后并没有多出两次触发更新,这也就是 Object.defineProperty 的第二个缺点:无法监听新增属性/删除属性
监听数组,上面的测试样例换一下:
// 准备数据
let data = {
  nums: [1, 2, 3]
}

// 监听数据
observer(data)

// 测试
data.nums.push(4)
打开控制台发现并没有输出“视图更新”,因为 Object.defineProperty 是不具备监听数组的能力的,需要专门处理一下数组:
// 重新定义数组原型
const oldArrayPrpperty = Array.prototype
// 创建新对象,原型指向 oldArrayPrpperty,再扩展新的方法不会影响原型
const arrProto = Object.create(oldArrayPrpperty);
['push', 'pop', 'shift', 'unshift', 'splice'].forEach(ele => { // 举例几个常用的数组方法
  arrProto[ele] = function() {
    updateView() // 触发视图更新
    oldArrayPrpperty[ele].call(this, ... arguments) // 相当于 Array.prototype.push.call(this, ...arguments)
  }
})

// 监听对象属性
function observer(target) {
  if (typeof target !== 'object' || target === null) {
    // 不是对象或数组
    return target
  }
  // 如果是数组
  if (Array.isArray(target)) {
    target.__proto__ = arrProto
  }
  // 重新定义各个属性
  for (let key in target) {
    defineReactive(target, key, target[key])
  }
}
注意: 有些同学可能有疑问,为什么不能在 Array.prototype.push 上新增 updateView() 方法呢?这样会污染全局的 Array 原型,在进行框架设计的时候不要这么做
总结,Object.defineProperty 缺点:
- 深度监听,需要递归到底,一次性计算量大
- 无法监听新增属性/删除属性
- 无法原生监听数组,需要特殊处理
虚拟 DOM(Virtual DOM) 和 diff
- DOM 操作非常耗费性能
- 使用 jQuery,可以自行控制 DOM 操作的时机,手动调整
- Vue 和 React 都是数据驱动视图,如何有效控制 DOM 操作?
解决方案 - vdom: 用 JS 模拟 DOM 结构,计算出最小的变更,操作 DOM,因为 JS 执行速度快
那么如何用 JS 模拟 DOM 结构?举个例子:
<div id="div1" class="container">
  <p>段落文字p>
  <ul style="font-size:20px;">
    <li>1li>
    <li>2li>
  ul>
div>
{
  tag: 'div',
  props: {
    className: 'container',
    id: 'div1'
  },
  children: [
    {
      tag: 'p',
      children: 'vdom'
    },
    {
      tag: 'ul',
      props: { style: 'font-size:20px' },
      children: [
        {
          tag: 'li',
          children: '1'
        },
        {
          tag: 'li',
          children: '2'
        }
      ]
    }
  ]
}
通过 snabbdom 学习 vdom
- 简洁强大的 vdom 库,易学易用
- Vue 参考它实现的 vdom 和 diff
- 官方地址
官方用法示例:
import {
  init,
  classModule,
  propsModule,
  styleModule,
  eventListenersModule,
  h,
} from "snabbdom";

const patch = init([
  // 通过传入模块初始化 patch 函数
  classModule, // 开启 classes 功能
  propsModule, // 支持传入 props
  styleModule, // 支持内联样式同时支持动画
  eventListenersModule, // 添加事件监听
]);

const container = document.getElementById("container");

const vnode = h("div#container.two.classes", { on: { click: someFn } }, [
  h("span", { style: { fontWeight: "bold" } }, "This is bold"),
  " and this is just normal text",
  h("a", { props: { href: "/foo" } }, "I'll take you places!"),
]);
// 传入一个空的元素节点 - 将产生副作用(修改该节点)
patch(container, vnode);

const newVnode = h(
  "div#container.two.classes",
  { on: { click: anotherEventHandler } },
  [
    h(
      "span",
      { style: { fontWeight: "normal", fontStyle: "italic" } },
      "This is now italic type"
    ),
    " and this is still just normal text",
    h("a", { props: { href: "/bar" } }, "I'll take you places!"),
  ]
);
// 再次调用 patch
patch(vnode, newVnode); // 将旧节点更新为新节点
本地代码调试:
DOCTYPE html>
<html lang="en">
<head>
  <meta charset="UTF-8">
  <meta http-equiv="X-UA-Compatible" content="IE=edge">
  <meta name="viewport" content="width=device-width, initial-scale=1.0">
  <title>Documenttitle>
head>
<body>
  <div id="container">div>
  <button id="btn-change">changebutton>

  <script src="https://cdn.bootcss.com/snabbdom/0.7.3/snabbdom.js">script>
  <script src="https://cdn.bootcss.com/snabbdom/0.7.3/snabbdom-class.js">script>
  <script src="https://cdn.bootcss.com/snabbdom/0.7.3/snabbdom-props.js">script>
  <script src="https://cdn.bootcss.com/snabbdom/0.7.3/snabbdom-style.js">script>
  <script src="https://cdn.bootcss.com/snabbdom/0.7.3/snabbdom-eventlisteners.js">script>
  <script src="https://cdn.bootcss.com/snabbdom/0.7.3/h.js">script>
body>
html>

<script>
  const snabbdom = window.snabbdom

  // 定义 patch
  const patch = snabbdom.init([
    snabbdom_class,
    snabbdom_props,
    snabbdom_style,
    snabbdom_eventlisteners
  ])

  // 定义 h
  const h = snabbdom.h

  const container = document.getElementById('container')

  // 生成 vnode
  const vnode = h('ul#list', {}, [
    h('li.item', {}, 'item 1'),
    h('li.item', {}, 'item 2')
  ])
  patch(container, vnode)

  document.getElementById('btn-change').addEventListener('click', () => {
    // 生成 newVnode
    const newVnode = h('ul#list', {}, [
      h('li.item', {}, 'item 1'),
      h('li.item', {}, 'item B'),
      h('li.item', {}, 'item 3')
    ])
    patch(vnode, newVnode)
  })
script>
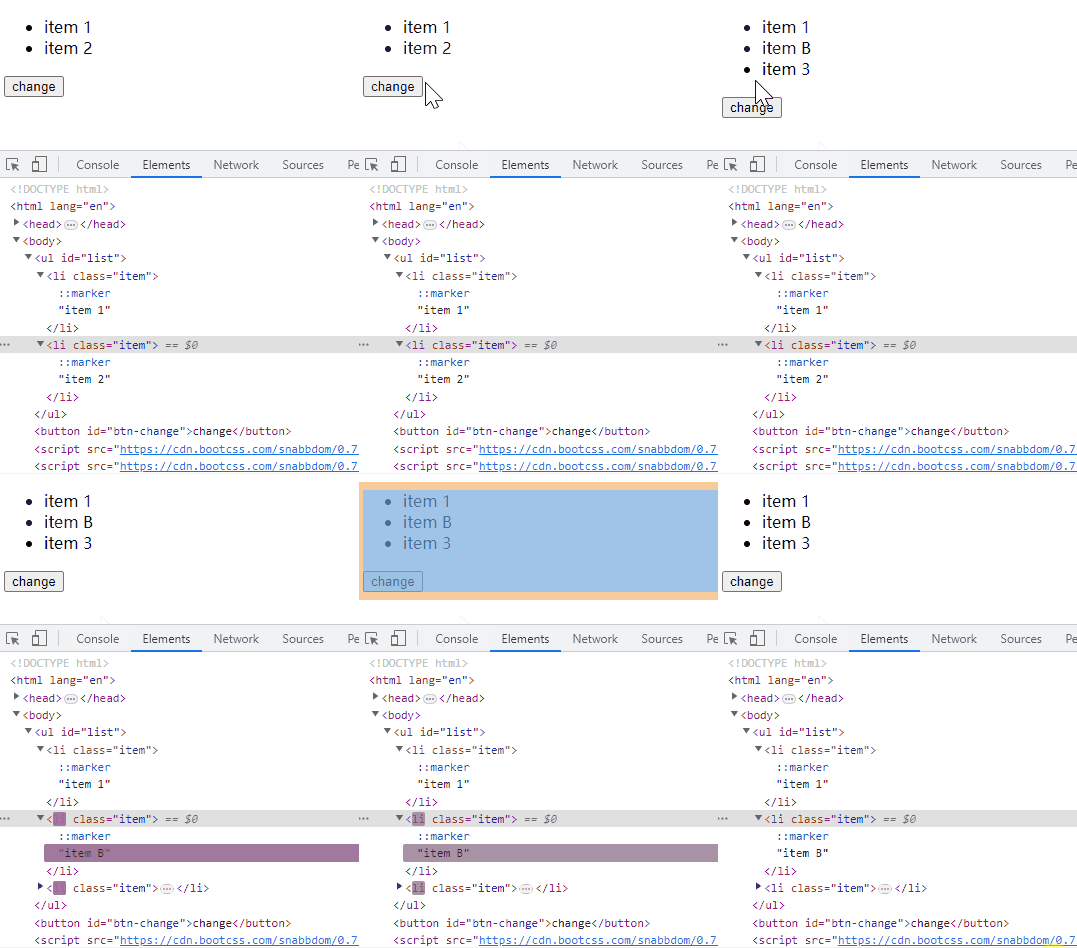
可以看到,item1 并没有变化,只是第二项从 item2 变成了 itemB,然后新增了第三项的 item3。也就是说 vdom 找出了需要变化的 dom 进行更新,而不是所有的 dom 都进行更新。
vdom 总结:
- 用 JS 模拟 DOM 结构(vnode)
- 新旧 vnode 对比,得出最小的更新范围,最后更新 DOM
- 数据驱动视图的模式下,有效控制 DOM 操作
diff 算法
- diff 即对比,是一个广泛的概念,如 linux diff 命令,git diff 等
- 两个 js 对象可以做 diff
- 两棵树可以做 diff,如 vdom diff
- 第一,遍历 tree1;第二,遍历 tree2
- 第三,排序
- 时间复杂度为O(n^3),如果有1000个节点,要计算10亿次
从上述分析来看,时间复杂度为 O(n^3) 的树 diff 算法肯定是不可用的,有没有办法能优化时间复杂度呢?
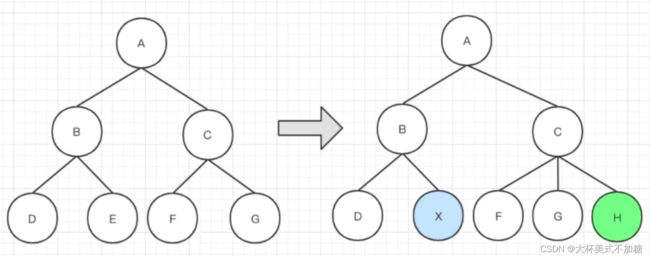
- 只比较同一层级,不跨级比较
- tag 不相同,则直接删掉重建,不再深度比较
- tag 和 key 两者都相同,则认为是相同节点,不再深度比较
推荐去学习一下 snabbdom 的源码,有几个重点的函数实现方式可以注意下,这里就不多演示:
- patchVnode
- addVnodes removeVnodes
- updateChildren
这样时间复杂度就被优化到了 O(n)
模板编译
前置知识:JS 的 with 语法
- 改变 {} 内自由变量的查找方式,当作 obj 的属性来查找
- 如果找不到匹配的 obj 属性,就会报错
- with 要慎用,因为它打破了作用域规则,易读性变差
const obj = { a: 1, b: 2 }
with(obj) {
  console.log(a) // 1
  console.log(b) // 2
  consolg.log(c) // Uncaught ReferenceError: c is not defined
}
编译模板
- 模板不是 html,有指令、插值、JS 表达式。能实现判断、循环
- html 是标签语言,是静态的,只有 JS 才能实现判断、循环
- 模板一定是转换为某种 JS 代码,即编译模板
接下来我们学习一下 vue-template-compiler 如何将模板编译成 JS,先通过 npm init -y 与 npm i vue-template-compiler 初始化项目,然后进行学习:
const compiler = require('vue-template-compiler')
// 插值
const template = `{{message}}
`
// 编译
const res = compiler.compile(template)
console.log(res.render) // with(this){return _c('p',[_v(_s(message))])}
这个 _c 、_v 、_s 可以通过翻阅 Vue 源码找到缩写函数得含义:
function installRenderHelpers(target) {
  target._v = createTextVNode;
  target._s = toString;
  target._l = renderList;
}
// _c = createElement,相当于前面章节提到的 h 函数
也就是说 return _c('p',[_v(_s(message))]) 可以转换成比较看得懂的 return createElement('p', [createTextVNode(toString(message))])
再来看看其他的模板语法:
// 表达式
const template = `{{flag ? message : 'no message'}}
`
const res = compiler.compile(template)
console.log(res.render) // with(this){return _c('p',[_v(_s(flag ? message : 'no message'))])}
// 属性和动态属性
const template = `
![]() `
const res = compiler.compile(template)
console.log(res.render) // with(this){return _c('div',{staticClass:"container",attrs:{"id":"div1"}},[_c('img',{attrs:{"src":imgUrl}})])}
// 条件
const template = `
`
const res = compiler.compile(template)
console.log(res.render) // with(this){return _c('div',{staticClass:"container",attrs:{"id":"div1"}},[_c('img',{attrs:{"src":imgUrl}})])}
// 条件
const template = `
A
B
`
const res = compiler.compile(template)
console.log(res.render) // with(this){return _c('div',[(flag === 'a')?_c('p',[_v("A")]):_c('p',[_v("B")])])}
// 循环
const template = `
- {{item.title}}
`
const res = compiler.compile(template)
console.log(res.render) // with(this){return _c('ul',_l((list),function(item){return _c('li',{key:item.id},[_v(_s(item.title))])}),0)}
// 事件
const template = `
`
const res = compiler.compile(template)
console.log(res.render) // with(this){return _c('button',{on:{"click":handleClickSubmit}},[_v("提交")])}
// v-model
const template = ``
const res = compiler.compile(template)
console.log(res.render) // with(this){return _c('input',{directives:[{name:"model",rawName:"v-model",value:(name),expression:"name"}],attrs:{"type":"text"},domProps:{"value":(name)},on:{"input":function($event){if($event.target.composing)return;name=$event.target.value}}})}
总结:
- 模板编译为 render 函数,执行 render 函数返回 vnode
- 基于 vnode 再执行 patch 和 diff
- 使用 webpack vue-loader,会在开发环境下编译模板(性能提升方式之一)
vue 组件中使用 render 代替 template
Vue.component('heading', {
  // template: `xxxx`
  render: function(createElement) {
    return createElement(
      'h' + this.level,
      [
        createElement('a', {
		  attrs: {
  		    name: 'headerId',
  		    href: '#' + 'headerId'
          }
        }, 'this is a tag')
      ]
    )
  }
})
组件渲染/更新过程
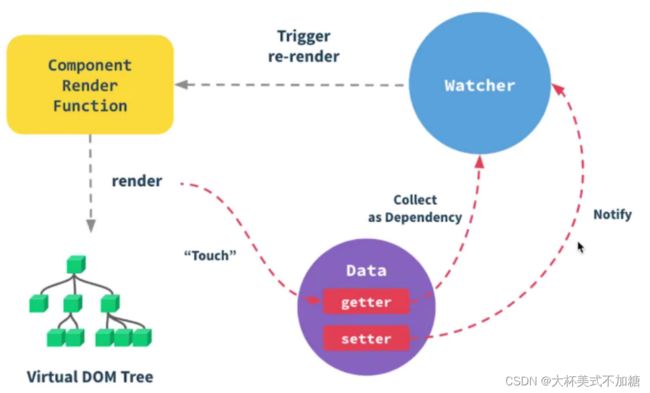
初次渲染过程
- 解析模板为 render 函数(或已在开发环境完成,vue–loader)
- 触发响应式,监听 data 属性 getter setter
- 执行 render 函数,生成 vnode(会触发模板中的 getter)
更新过程
- 修改 data,触发 setter(此前在 getter 中已被监听)
- 重新执行 render 函数,生成 newVnode
- patch(vnode, newVnode)
异步渲染
目的:减少 DOM 操作次数,提高性能
前端路由原理
网页 url 组成部分
// http://127.0.0.1:8001/01-hash.html?a=1&b=2/#/aaa/bbb
location.protocol // 'http:'
location.hostname // '127.0.0.1'
location.host // '127.0.0.1:8001'
location.port // '8001'
location.pathname // '01-hash.html'
location.search // '?a=1&b=2'
location.hash // '#/aaa/bbb'
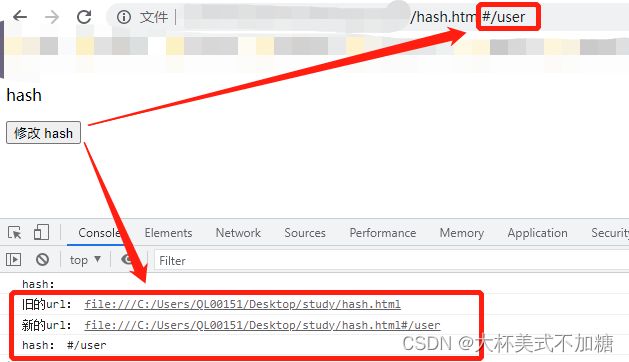
hash 的特点
- hash 变化会触发网页跳转,即浏览器的前进与后退
- hash 变化不会刷新页面,这是 SPA 必须的特点
- hash 永远不会提交到 server 端
代码演示:
DOCTYPE html>
<html lang="en">
<head>
  <meta charset="UTF-8">
  <meta http-equiv="X-UA-Compatible" content="IE=edge">
  <meta name="viewport" content="width=device-width, initial-scale=1.0">
  <title>hashtitle>
head>
<body>
  <p>hashp>
  <button id="btn">修改 hashbutton>
body>
html>

<script>
  // hash 变化,包括:
  // 1.JS 修改 url
  // 2.手动修改 url 的 hash
  // 3.浏览器前进或后退
  window.onhashchange = event => {
    console.log('旧的url:', event.oldURL)
    console.log('新的url:', event.newURL)
    console.log('hash:', location.hash)
  }

  // 页面初次加载,获取 hash
  document.addEventListener('DOMContentLoaded', () => {
    console.log('hash:', location.hash)
  })

  // JS 修改 url
  document.getElementById('btn').addEventListener('click', () => {
    location.href = '#/user'
  })
script>
H5 history
- 用 url 规范的路由,但跳转时不刷新页面
- history.pushState
- window.onpopstate
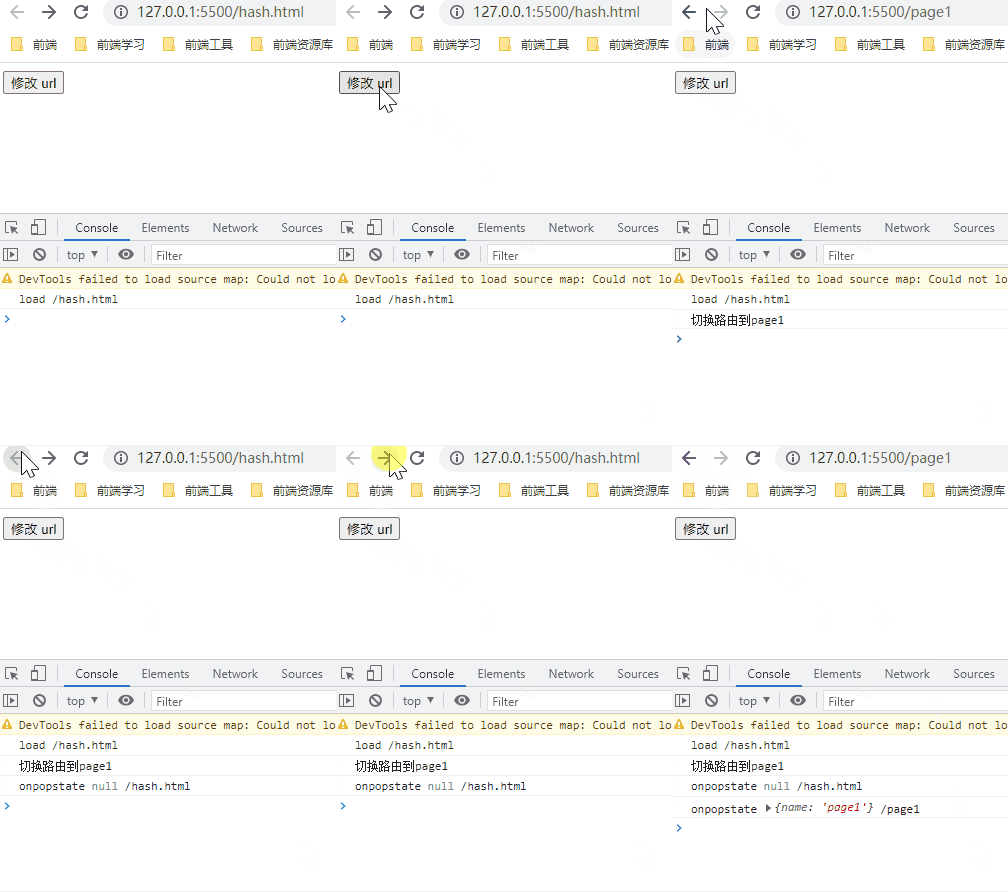
代码示例:
DOCTYPE html>
<html lang="en">
<head>
 <meta charset="UTF-8">
 <meta http-equiv="X-UA-Compatible" content="IE=edge">
 <meta name="viewport" content="width=device-width, initial-scale=1.0">
 <title>historytitle>
head>
<body>
 <button id="btn">修改 urlbutton>
body>
html>

<script>
 // 页面初次加载,获取 path
 document.addEventListener('DOMContentLoaded', () => {
   console.log('load', location.pathname)
 })

 // 打开一个新的路由
 // 【注意】用 pushState 方式,浏览器不会刷新页面
 document.getElementById('btn').addEventListener('click', () => {
   const state = { name: 'page1' }
   console.log('切换路由到page1')
   history.pushState(state, '', 'page1')
 })

 // 监听浏览器前进、后退
 window.onpopstate = event => {
   console.log('onpopstate', event.state, location.pathname)
 }
script>
总结
- hash - window.onhashchange
- H5 history - history.pushState 和 window.onpopstate
- H5 history 需要后端配合(统一返回 index.html)
两者选择
- to B 的系统推荐用 hash,简单易用,对 url 规范不敏感
- to C 的系统,可以考虑用 H5 history
