dlib人脸识别安装及使用教程
文章目录
-
- 一 dlib本地安装与编译
-
- 1.1 dlib源码下载
- 1.2 dlib C++编译示例程序
-
- 1.2.1 dlib库编译
- 1.2.2 C++示例程序配置、运行
- 1.3 dlib python API编译
- 二 dlib库的主要功能及准确率评估
-
- 2.1 代码功能简介
- 2.2 人脸检测和人脸关键点
-
- 2.2.1 数据集、代码准备
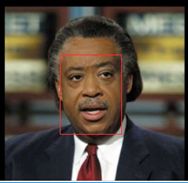
- 2.2.2 测试效果图
- 2.2.3 准确率
- 2.3 人脸识别
-
- 2.3.1 数据集、代码准备
- 2.3.2 人脸识别步骤
- 2.3.3 准确率
- 2.4 视频中的人脸检测、人脸识别
-
- 2.4.1 摄像头读入检测时间测试
- 2.4.2 mp4文件读入检测时间测试
- 2.4.3 视频中的人脸识别
- 2.4.4 优化部分
- 三 python训练自己的模型
-
- 3.1 数据集标注
-
- 3.1.1 imglab简介
- 3.1.2 imglab使用方法
- 3.2 训练自己的人脸关键点检测器
-
- 3.2.1 数据集
- 3.2.2 训练部分
- 3.2.3 测试部分
- 3.2.4 优化部分
- 3.3 训练自己的人脸检测器
-
- 3.3.1 数据集
- 3.3.2 训练部分
- 3.3.3 测试部分
- 3.3.4 优化部分
- 3.4 总结
- 四 C++训练自己的模型
-
- 4.1 训练自己的人脸关键点检测器
-
- 4.1.1 数据集
- 4.1.2 训练部分
- 4.1.3 测试
- 4.1.4 优化部分
- 4.2 训练自己的人脸检测器
-
- 4.2.1 数据集
- 4.2.2 训练部分
- 4.2.3 测试
- 4.2.4 优化部分
一 dlib本地安装与编译
1.1 dlib源码下载
下载地址:https://github.com/davisking/dlib (当前最新版dlib 19.15)

为了区分版本,将下载目录命名为dlib-19-15,如上图所示。
1.2 dlib C++编译示例程序
1.2.1 dlib库编译
编译需要安装VS,在此安装的是最新版Visual Studio 15 2017版本。
进入dlib-master/dlib-19-15目录,运行:
# mkdir build
# cd build
# cmake ..
# cmake --build .
指定运行环境及模式:
# cmake .. -G "Visual Studio 15 2017 Win64" -T host=x64

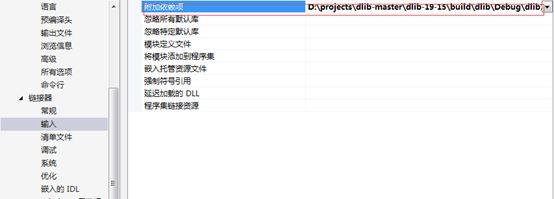
在上图的目录下能看到生成的.lib依赖项,则代表dllib库成功编译。
1.2.2 C++示例程序配置、运行
以examples/train_shape_predictor_ex.cpp为例,其他示例代码操作相同。
1、创建ConsoleApplication1.cpp和source.cpp来源
首先,打开VS新建一个C++控制台工程,将train_shape_predictor_ex.cpp的代码复制到ConsoleApplication1.cpp,以添加现有项的方式加入source.cpp文件,source.cpp文件在dlib-master/dlib-19-15/dlib/all目录下。

2、修改stadfx属性
进入项目-属性进行以下修改,避免预编译头带来的error。

3、 加入目录

4、 加入生成的依赖项.lib的路径

5、图形处理类配置
加入DLIB_JPG_SUPPORT、DLIB_JPEG_ SUPPORT、DLIB_JPEG_STATIC

项目配置完成后,点击生成-生成解决方案,工程目录下将会生成ConsoleApplication1.exe文件。以命令行的方式运行ConsoleApplication1.exe文件,或者在VS上点击调试-开始执行即可。有参数输入的需要输入命令行参数。
1.3 dlib python API编译
方法一:
进入目录,运行:
# python setup.py install
之后进入python_examples便可运行python示例程序。
方法二:
# pip3 install dlib
这种方法目前本地dlib19.15版本不能成功安装,只能安装低版本的dlib,这样python示例中的某些函数调用可能不能正常运行。
二 dlib库的主要功能及准确率评估
dlib库中的主要功能包括人脸检测、人脸关键点检测、人脸识别三部分。此处研究python_examples示例代码部分,C++程序示例类似。这里的评估实现主要是参考2.1节中示例代码的二次开发代码。
2.1 代码功能简介
主要代码在dlib库的python_examples目录下,其中需要用到的模型文件下载地址为http://dlib.net/files:
- face_detector.py
人脸正面检测器,主要使用dlib.get_frontal_face_detector()。 - cnn_face_detector.py
人脸检测器,主要使用dlib.cnn_face_detection_model_v1 (‘mmod_human_face_detector.dat’),官方指出比dlib.get_frontal_face_detector()准确率高。 - face_landmark.py
人脸关键点检测,主要使用dlib.get_frontal_face_detector()和dlib.shape_predictor(‘shape_predictor_68_face_landmarks.dat’)。 - face_recognition.py
人脸识别,主要使用dlib.get_frontal_face_detector()和dlib.shape_predictor(‘shape_predictor_5_face_landmarks.dat’)和dlib.face_recognition_model_v1(‘dlib_face_recognition_resnet_model_v1.dat’)。 - opencv_webcam_face_detection.py
人脸检测的视频使用,主要使用dlib.get_frontal_face_detector()和cv2.VideoCapture()。 - train_object_detector.py
人脸正面检测器的训练部分,训练生成detector.svm文件。 - train_shape_predictor.py
人脸关键点检测器的训练部分,训练生成predictor.dat文件。
2.2 人脸检测和人脸关键点
2.2.1 数据集、代码准备
使用参考代码:examples/face_landmark_detection.py,为了进行人脸准确率统计,将其改写并命名为face_landmark.py,目前只能统计图片中含单个人脸的准确率(每张图片含多个人脸难以统计总的准确率)。
需要的模型文件:shape_predictor_68_face_landmarks.dat是训练好的人脸关键点检测器。
待测图像数据集:LFW数据集。
face_landmark.py代码如下:
import os
import dlib
from skimage import io

# 待测人脸数据集
faces_folder_path = "lfwdata"

# 第一步,人脸检测器和人脸关键点检测器加载
# 人脸检测器
detector = dlib.get_frontal_face_detector()
# 人脸关键点检测器
predictor = dlib.shape_predictor("../shape_predictor_68_face_landmarks.dat")

# 第二步,遍历图片,使用人脸检测器和人脸关键点检测器,并显示
# 窗口
win = dlib.image_window()
# 统计检测正确数
tol = ans = 0
# 遍历文件夹中的jpg图片
for (path, dirnames, filenames) in os.walk(faces_folder_path):
    for filename in filenames:
        if filename.endswith('.jpg') or filename.endswith('.png'):
            tol += 1
            img_path = path + '/' + filename
            print("Processing file: {}".format(img_path))
            # 读取图片
            img = io.imread(img_path)

            win.clear_overlay()
            win.set_image(img)

            # 人脸检测器的使用
            dets = detector(img, 1)
            # 统计每张图片人脸个数>0判断是否检测成功
            face_num = len(dets)
            print("Number of faces detected: {}".format(len(dets)))
            if face_num > 0:
                ans += 1
            else:
                print("fail")
            for k, d in enumerate(dets):
                print("Detection {}: Left: {} Top: {} Right: {} Bottom: {}".format(
                    k, d.left(), d.top(), d.right(), d.bottom()))
                # 人脸关键点检测器的使用
                shape = predictor(img, d)
                print("Part 0: {}, Part 1: {} ...".format(shape.part(0), shape.part(1)))

                win.add_overlay(shape)

            win.add_overlay(dets)
            # 鼠标控制下一张
            # dlib.hit_enter_to_continue()

# 第三步,计算准确率
# 打印准确率
print("correct:{},total{}".format(ans, tol))
print("correct:{}".format(ans/tol))
2.2.2 测试效果图
2.2.3 准确率
检测总共13234张图片,检测到有人脸的有13172张照片,准确率为:99.53%。
测试失败的图像中,人像多为半脸、侧脸、曝光或有遮挡。这与代码中使用的是正脸检测器dlib.get_frontal_face_detector()有很大关系,检测失败的部分图片如下:


2.3 人脸识别
2.3.1 数据集、代码准备
使用参考代码:face_recognition.py,为了进行准确率统计,将其改写并命名为face_recog.py。
需要的模型文件:shape_predictor_68_face_landmarks.dat是训练好的人脸关键点检测器。dlib_face_recognition_resnet_model_v1.dat是训练好的ResNet人脸识别模型。
数据集:lfw数据集挑选候选人脸398张正脸(每人一张图片),待测人脸525张正脸(每个人可能含有多张图片)。
face_recog.py代码如下:
import os
import dlib
import glob
import numpy
from skimage import io

# 训练人脸文件夹
faces_folder_path = "recog_train"
# 待测人脸文件夹
img_folder_path = "recog_test"


# 第二步,生成训练人脸标签和描述子,供人脸识别使用
# 对文件夹下的每一个人脸进行:
# 1.人脸检测
# 2.关键点检测
# 3.描述子提取
# 训练人脸标签和描述子list
def train(faces_folder_path):
    trainlabel = []
    train_descriptors = []
    for file in glob.glob(os.path.join(faces_folder_path, "*.jpg")):
        labelName = file.split('_0')[0].split('\\')[1]
        trainlabel.append(labelName)
        # print("Processing file: {}".format(labelName))

        face = io.imread(file)
        # 1.人脸检测
        dets = detector(face, 1)
        # print("Number of faces detected: {}".format(len(dets)))

        for k, d in enumerate(dets):
            # 2.关键点检测
            shape = predictor(face, d)

            # 3.描述子提取,128D向量
            face_descriptor = facerec.compute_face_descriptor(face, shape)
            # 转换为numpy array
            face_vector = numpy.array(face_descriptor)
            train_descriptors.append(face_vector)
    return trainlabel, train_descriptors

# 第三步,识别待测人脸是哪个人
def recognition(trainlabel, train_descriptors):
    ans_right = 0
    ans_wrong = 0
    # 对需识别人脸进行同样处理
    for file in glob.glob(os.path.join(img_folder_path, "*.jpg")):
        img = io.imread(file)
        # 人脸检测
        dets = detector(img, 1)

        # 待测人脸与所有训练人脸的距离
        dists = []
        for k, d in enumerate(dets):
            # 关键点检测
            shape = predictor(img, d)
            # 提取描述子
            test_descriptor = facerec.compute_face_descriptor(img, shape)
            d_test = numpy.array(test_descriptor)

            # 计算欧式距离
            for d_train in train_descriptors:
                dist = numpy.linalg.norm(d_train-d_test)
                dists.append(dist)
        # 待测人脸和所有训练人脸的标签、距离组成一个dict
        c_d = dict(zip(trainlabel, dists))
        cd_sorted = sorted(c_d.items(), key=lambda d:d[1])

        nametest = file.split('_0')[0].split('\\')[1]
        print(cd_sorted[0][1])
        # 设置阈值判断是哪个人
        if cd_sorted[0][1] < 0.6:
            namepredict = cd_sorted[0][0]
        else:
            namepredict = "Unknown"
        print(nametest, namepredict)

        # 判断识别是否正确识别
        if(namepredict == nametest) or (namepredict == "Unknown" and nametest not in trainlabel):
           print("right")
           ans_right += 1
        else:
            print("wrong")
            ans_wrong += 1
        # dlib.hit_enter_to_continue()
    print("total:", ans_right + ans_wrong, "\nright:", ans_right, "\nwrong:", ans_wrong)

if  __name__ == '__main__':
    # 第一步,三种检测器的加载
    # 1.加载正脸检测器
    detector = dlib.get_frontal_face_detector()
    # 2.加载人脸关键点检测器
    predictor = dlib.shape_predictor("../shape_predictor_68_face_landmarks.dat")
    # 3. 加载人脸识别模型
    facerec = dlib.face_recognition_model_v1("../dlib_face_recognition_resnet_model_v1.dat")

    # 第二步,生成训练人脸标签和描述子,供人脸识别使用
    trainlabel, train_descriptors = train(faces_folder_path)

    # 第三步,识别待测人脸是哪个人并统计正确率
    recognition(trainlabel, train_descriptors)
2.3.2 人脸识别步骤
首先,先将候选人脸文件夹中的人脸进行:
1.人脸检测
2.关键点检测,画出人脸区域和和关键点
3.描述子提取,128D向量,转换为numpy array
4.将候选人图像的文件名提取出来,作为候选人名单
然后,对待测人脸进行同样的处理:
1.人脸检测,关键点检测,描述子提取
2.计算待测人脸描述子和候选人脸描述子之间的欧氏距离
3.将所有候选人与待测人脸描述子的距离组成一个dict
4.排序
5.距离最小者且阈值小于0.6,判定为同一个人
2.3.3 准确率
检测的525张图片中,有503张检测成功,准确率为:503/525=95.81%。
2.4 视频中的人脸检测、人脸识别
2.4.1 摄像头读入检测时间测试
代码命名为face_detector_video.py。代码如下:
import cv2
import dlib
import time

# 初始化dlib人脸检测器
detector = dlib.get_frontal_face_detector()

# 初始化显示窗口
win = dlib.image_window()
# opencv加载视频文件
# cap = cv2.VideoCapture(r'../test.mp4')
cap = cv2.VideoCapture(0) #加载摄像头

while True:
    start = time.time()
    ret, cv_img = cap.read()
    if cv_img is None:
        break

    # 缩小图像至1/4
    cv_img = cv2.resize(cv_img, (0, 0), fx=0.25, fy=0.25)

    # OpenCV默认是读取为RGB图像,而dlib需要的是BGR图像,因此这一步转换不能少
    img = cv2.cvtColor(cv_img, cv2.COLOR_RGB2BGR)

    # 检测人脸
    dets = detector(img, 1)
    print("Number of faces detected: {}".format(len(dets)))

    for i, d in enumerate(dets):
        print("Detection {}: Left: {} Top: {} Right: {} Bottom: {}".format(
            i, d.left(), d.top(), d.right(), d.bottom()))

    print(time.time() - start)
    win.clear_overlay()
    win.set_image(img)
    win.add_overlay(dets)

cap.release()
dlib的人脸检测精度比OpenCV自带的高很多,因此本文采用dlib的人脸检测器。从摄像头读入数据,结合OpenCV将视频流截成图像帧,使用正脸检测器dlib.get_frontal_face_detector()进行检测。
测试效果图:
2.4.2 mp4文件读入检测时间测试
将2.4.1节的代码中加载摄像头语句更改为加载mp4文件。然后同样将视频截成图像,使用正脸检测器dlib.get_frontal_face_detector()进行检测。
测试效果图:

注意:视频文件中的人脸检测的速度跟文件的大小(帧高、帧宽)有很大关系。
2.4.3 视频中的人脸识别
分别使用dlib中的人脸识别功能,代码命名为face_recogn_video.py;和dlib二次开发包face_recognition中的人脸识别功能,代码命名为face_recognition_video.py。
face_recogn_video.py代码如下:
import dlib
import numpy as np
import cv2
import json
import os
import glob

# 候选人数据集
faces_folder_path = r'../train_person'
video_path = r'../test.mp4'

# 获取训练集标签和人脸识别描述子
def train(faces_folder_path):
    trainlabel = []
    train_descriptors = []
    for file in glob.glob(os.path.join(faces_folder_path, "*.jpg")):
        labelName = file.split('.jpg')[0].split('\\')[1]
        trainlabel.append(labelName)
        print("Processing file: {}".format(labelName))

        face = cv2.imread(file)
        # 1.人脸检测
        dets = detector(face, 1)
        # print("Number of faces detected: {}".format(len(dets)))

        for k, d in enumerate(dets):
            # 2.关键点检测
            shape = predictor(face, d)

            # 3.描述子提取,128D向量
            face_descriptor = facerec.compute_face_descriptor(face, shape)
            # 转换为numpy array
            face_vector = np.array(face_descriptor)
            train_descriptors.append(face_vector)
    return trainlabel, train_descriptors

# 识别确定哪个人
def findNearestClassForImage(face_descriptor, trainlabel, train_descriptors):
    train_descriptors = np.array(train_descriptors)
    dist = np.linalg.norm(face_descriptor - train_descriptors, axis=1, keepdims=True)
    min_distance = dist.min()
    print('distance: ', min_distance)
    if min_distance > threshold:
        return 'Unknown'
    index = np.argmin(dist)
    return trainlabel[index]

# 人脸识别
def recognition(img, trainlabel, train_descriptors):
    # 人脸检测
    dets = detector(img, 1)
    for k, d in enumerate(dets):
        print("Detection {}: Left: {} Top: {} Right: {} Bottom: {}".format(
            k, d.left(), d.top(), d.right(), d.bottom()))
        # 人脸关键点检测器
        shape = predictor(img, d)
        # 人脸识别描述子
        face_descriptor = facerec.compute_face_descriptor(img, shape)

        # 识别确定哪个人
        class_pre = findNearestClassForImage(face_descriptor, trainlabel, train_descriptors)
        print(class_pre)
        cv2.rectangle(img, (d.left(), d.top() + 10), (d.right(), d.bottom()), (0, 255, 0), 2)
        cv2.putText(img, class_pre, (d.left(), d.top()), cv2.FONT_HERSHEY_SIMPLEX, 0.7, (0, 255, 0), 2, cv2.LINE_AA)

    cv2.imshow('image', img)

if  __name__ == '__main__':
    # 加载网络模型
    detector = dlib.get_frontal_face_detector()
    predictor = dlib.shape_predictor('../shape_predictor_68_face_landmarks.dat')
    facerec = dlib.face_recognition_model_v1('../dlib_face_recognition_resnet_model_v1.dat')
    # 设置识别阈值
    threshold = 0.6

    # 训练标签及人脸识别描述子
    trainlabel, train_descriptors = train(faces_folder_path)
    # cap = cv2.VideoCapture(0)
    cap = cv2.VideoCapture(video_path)
    # 保存视频
    # fps = 10
    # size = (640, 480)
    # fourcc = cv2.VideoWriter_fourcc(*'XVID')
    # videoWriter = cv2.VideoWriter('video.MP4', fourcc, fps, size)

    while (1):
        ret, frame = cap.read()
        # 缩小图像至1/4
        frame = cv2.resize(frame, (0,0), fx=0.25, fy=0.25)

        # 人脸识别
        recognition(frame, trainlabel, train_descriptors)
        # videoWriter.write(frame)
        if cv2.waitKey(1) & 0xFF == ord('q'):
            break

    cap.release()
    videoWriter.release()
cv2.destroyAllWindows()

	face_recognition_video.py代码如下:
import face_recognition
import cv2
import os
import glob

# 视频路径和已知人脸文件夹
video_path = r'../test.mp4'
faces_folder_path = '../train_person'


# 读取训练集人脸姓名和人脸识别编码
def train(faces_folder_path):
    known_face_names = []
    known_face_encodings = []
    for file in glob.glob(os.path.join(faces_folder_path, "*.jpg")):
        labelName = file.split('.jpg')[0].split('\\')[1]
        known_face_names.append(labelName)

        image = face_recognition.load_image_file(file)
        face_encoding = face_recognition.face_encodings(image)[0]
        known_face_encodings.append(face_encoding)
    return known_face_names, known_face_encodings

def recognition(rgb_small_frame, known_face_names, known_face_encodings):
    # 根据encoding来判断是不是同一个人,是就输出true,不是为flase
    face_locations = face_recognition.face_locations(rgb_small_frame)
    face_encodings = face_recognition.face_encodings(rgb_small_frame, face_locations)

    face_names = []
    for face_encoding in face_encodings:
        # 默认为unknown
        matches = face_recognition.compare_faces(known_face_encodings, face_encoding)
        name = "Unknown"

        if True in matches:
            first_match_index = matches.index(True)
            name = known_face_names[first_match_index]
        face_names.append(name)
    return face_locations, face_names

def main():
    face_locations = []
    face_names = []

    # 设置显示窗口
    wnd = 'OpenCV Video'
    cv2.namedWindow(wnd, flags=0)
    cv2.resizeWindow(wnd, 1920, 1080)

    known_face_names, known_face_encodings = train(faces_folder_path)

    # 读取视频
    # video_capture = cv2.VideoCapture(0)
    video_capture = cv2.VideoCapture(video_path)
    # 隔几帧显示
    process_this_frame = 0
    while True:
        # 读取摄像头画面
        ret, frame = video_capture.read()
        # 改变摄像头图像的大小,图像小,所做的计算就少
        small_frame = cv2.resize(frame, (0, 0), fx=0.25, fy=0.25)
        # opencv的图像是BGR格式的,而我们需要是的RGB格式的,因此需要进行一个转换。
        rgb_small_frame = small_frame[:, :, ::-1]

        process_this_frame += 1
        if process_this_frame % 5 == 0:
            # 位置,姓名
            face_locations, face_names = recognition(rgb_small_frame, known_face_names, known_face_encodings)

        # 将捕捉到的人脸显示出来
        for (top, right, bottom, left), name in zip(face_locations, face_names):
            # 放大至真实值
            top *= 4
            right *= 4
            bottom *= 4
            left *= 4

            # 矩形框
            cv2.rectangle(frame, (left, top), (right, bottom), (0, 0, 255), 2)

            #加上标签
            cv2.rectangle(frame, (left, bottom - 35), (right, bottom), (0, 0, 255), cv2.FILLED)
            font = cv2.FONT_HERSHEY_DUPLEX
            cv2.putText(frame, name, (left + 6, bottom - 6), font, 1.0, (255, 255, 255), 1)

        # 显示
        cv2.imshow(wnd, frame)

        # 按Q退出
        if cv2.waitKey(1) & 0xFF == ord('q'):
            break

    video_capture.release()
    cv2.destroyAllWindows()

if  __name__ == '__main__':
main()
测试效果图:
测试结果:
face_recognition中的人脸识别功能比dlib中的人脸识别功能识别速度较快。
2.4.4 优化部分
在face_recognition中的人脸识别功能代码中,加入了两点优化:
1、识别时缩小图像至1/4,显示时扩大至图像原大小;
2、每5帧进行一次人脸识别。
最后达到的人脸识别速度接近实时识别(即接近达到正常播放视频的速度)。
三 python训练自己的模型
用python_examples的示例代码训练自己的模型较简单,为了加快训练,将在linux服务器上运行python_examples的示例代码。关于linux服务器dlib库的安装参考1.3节。此处采用的方法是pip3 install dib。
3.1 数据集标注
3.1.1 imglab简介
imglab是dlib提供用来制作数据集的工具,通过给图片打标签,最后会生成一个xml文件。
3.1.2 imglab使用方法
在dlib官方源码中提供了这个工具,文件路径为:tools/imglab。
使用前要先安装好cmake。
- 使用步骤:
- 打开cmd
- 进入tools/imglab目录
- 新建一个build文件夹,进入build
- 输入:cmake …
- 输入:cmake --build . --config Release
- 进入Release
- 新建一个image文件夹,将训练集所有图片复制进去
- 在Release目录下,输入:imglab -c mydataset.xml image,将会创建一个mydataset.xml文件
- 输入:imglab mydataset.xml
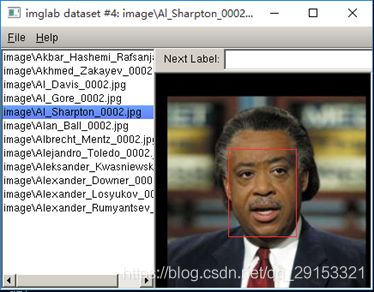
- 标注方法如下:
- 按Shift+左键进行画框。先松开左键,框就画上去了;先松开Shift键,则取消画人脸框。
- 对框双击左键,按delete键可删除。
- 对框双击左键,按i键可将物体标注为ignore,即是不明物体,进行忽略。
- 按e键,会曝光图片,效果如下。


- 按Ctrl键加滚轮,可以缩放图片加标签。
- 双击选中框后,按shift+左键可画关键点。

- 画完人脸框和关键点之后,点filesave保存,然后exit退出,就可以在mydataset.xml文件中看到人脸检测的数据集了。

3.2 训练自己的人脸关键点检测器
3.2.1 数据集
使用imglab工具,给训练的图片和测试的图片标注人脸框和关键点(5个关键点:眼睛、鼻子、嘴巴),训练图片7张,测试图片5张。生成标注文件train_landmarks.xml和test_landmarks.xml。目录如下,train、test文件夹中存放训练、测试图片。

3.2.2 训练部分
训练代码参考python_examples/train_shape_predictor.py,如下:
import os
import sys
import glob
import dlib

options = dlib.shape_predictor_training_options()
# Now make the object responsible for training the model.
# This algorithm has a bunch of parameters you can mess with.  The
# documentation for the shape_predictor_trainer explains all of them.
# You should also read Kazemi's paper which explains all the parameters
# in great detail.  However, here I'm just setting three of them
# differently than their default values.  I'm doing this because we
# have a very small dataset.  In particular, setting the oversampling
# to a high amount (300) effectively boosts the training set size, so
# that helps this example.
options.oversampling_amount = 300
# I'm also reducing the capacity of the model by explicitly increasing
# the regularization (making nu smaller) and by using trees with
# smaller depths.
options.nu = 0.05
options.tree_depth = 2
options.be_verbose = True

# dlib.train_shape_predictor() does the actual training.  It will save the
# final predictor to predictor.dat.  The input is an XML file that lists the
# images in the training dataset and also contains the positions of the face
# parts.
training_xml_path = ' /home/users/chenzhuo/program/dlib-19-15/python_test/mytest/train_landmarks.xml '
dlib.train_shape_predictor(training_xml_path, "predictor.dat", options)

# Now that we have a model we can test it.  dlib.test_shape_predictor()
# measures the average distance between a face landmark output by the
# shape_predictor and where it should be according to the truth data.
print("\nTraining accuracy: {}".format(
    dlib.test_shape_predictor(training_xml_path, "predictor.dat")))
# The real test is to see how well it does on data it wasn't trained on.  We
# trained it on a very small dataset so the accuracy is not extremely high, but
# it's still doing quite good.  Moreover, if you train it on one of the large
# face landmarking datasets you will obtain state-of-the-art results, as shown
# in the Kazemi paper.
testing_xml_path = ‘/home/users/chenzhuo/program/dlib-19-15/python_test/mytest/test_landmarks.xml’
print("Testing accuracy: {}".format(
dlib.test_shape_predictor(testing_xml_path, "predictor.dat")))
将上述代码命名为shape_predictor_train.py,将代码中training_xml_path改为自己的数据集xml文件路径,进入.py文件所在目录,执行
# python3 shape_predictor_train.py
3.2.3 测试部分
测试代码训练代码参考python_examples/shape_predictor_test.py,如下:
import os
import sys
import glob
import cv2
import dlib

if len(sys.argv) != 2:
    print(
        "Give the path to the examples/faces directory as the argument to this "
        "program. For example, if you are in the python_examples folder then "
        "execute this program by running:\n"
        "    ./train_shape_predictor.py ../examples/faces")
    exit()
faces_folder = sys.argv[1]

# Now let's use it as you would in a normal application.  First we will load it
# from disk. We also need to load a face detector to provide the initial
# estimate of the facial location.
predictor = dlib.shape_predictor("predictor.dat")
detector = dlib.get_frontal_face_detector()

# Now let's run the detector and shape_predictor over the images in the faces
# folder and display the results.
print("Showing detections and predictions on the images in the faces folder...")
win = dlib.image_window()
for f in glob.glob(os.path.join(faces_folder, "*.jpg")):
    print("Processing file: {}".format(f))
    # img = dlib.load_rgb_image(f)
    img = cv2.imread(f)

    win.clear_overlay()
    win.set_image(img)

    # Ask the detector to find the bounding boxes of each face. The 1 in the
    # second argument indicates that we should upsample the image 1 time. This
    # will make everything bigger and allow us to detect more faces.
    dets = detector(img, 1)
    print("Number of faces detected: {}".format(len(dets)))
    for k, d in enumerate(dets):
        print("Detection {}: Left: {} Top: {} Right: {} Bottom: {}".format(
            k, d.left(), d.top(), d.right(), d.bottom()))
        # Get the landmarks/parts for the face in box d.
        shape = predictor(img, d)
        print("Part 0: {}, Part 1: {} ...".format(shape.part(0),
                                                  shape.part(1)))
        # Draw the face landmarks on the screen.
        win.add_overlay(shape)

    win.add_overlay(dets)
    dlib.hit_enter_to_continue()
将上述代码命名为shape_predictor_test.py,打开VNC客户端,进入.py文件所在目录,执行
# python3 shape_predictor_test.py /home/users/chenzhuo/program/dlib-19-15/examples/faces
3.2.4 优化部分
训练时可以用多姿态的训练数据,比如正脸、左侧脸、右侧脸的标注数据集进行训练。
3.3 训练自己的人脸检测器
3.3.1 数据集
# wget http://dlib.net/files/data/dlib_face_detector_training_data.tar.gz
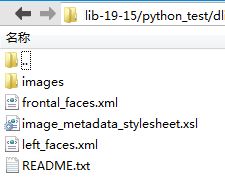
这是dlib训练使用的数据集,里面有数千张人脸的标注数据集,此处仅使用frontal_faces.xml,如下图。

3.3.2 训练部分
训练代码参考python_examples/train_object_detection.py,如下:
import os
import sys
import glob
import dlib

# Now let's do the training.  The train_simple_object_detector() function has a
# bunch of options, all of which come with reasonable default values.  The next
# few lines goes over some of these options.
# 超参数
options = dlib.simple_object_detector_training_options()
# Since faces are left/right symmetric we can tell the trainer to train a
# symmetric detector.  This helps it get the most value out of the training
# data.
# 对称检测器
options.add_left_right_image_flips = True
# The trainer is a kind of support vector machine and therefore has the usual
# SVM C parameter.  In general, a bigger C encourages it to fit the training
# data better but might lead to overfitting.  You must find the best C value
# empirically by checking how well the trained detector works on a test set of
# images you haven't trained on.  Don't just leave the value set at 5.  Try a
# few different C values and see what works best for your data.
options.C = 5
# Tell the code how many CPU cores your computer has for the fastest training.
options.num_threads = 4
options.be_verbose = True

training_xml_path = '/home/users/chenzhuo/program/dlib-19-15/python_test/dlib_face_detector_training_data/frontal_faces.xml'
# testing_xml_path = '/home/users/chenzhuo/program/dlib-19-15/python_test/cats/cats_test/cat_test.xml'
# This function does the actual training.  It will save the final detector to
# detector.svm.  The input is an XML file that lists the images in the training
# dataset and also contains the positions of the face boxes.  To create your
# own XML files you can use the imglab tool which can be found in the
# tools/imglab folder.  It is a simple graphical tool for labeling objects in
# images with boxes.  To see how to use it read the tools/imglab/README.txt
# file.  But for this example, we just use the training.xml file included with
# dlib.
dlib.train_simple_object_detector(training_xml_path, "detector.svm", options)

# Now that we have a face detector we can test it.  The first statement tests
# it on the training data.  It will print(the precision, recall, and then)
# average precision.
print("")  # Print blank line to create gap from previous output
print("Training accuracy: {}".format(
    dlib.test_simple_object_detector(training_xml_path, "detector.svm")))
# However, to get an idea if it really worked without overfitting we need to
# run it on images it wasn't trained on.  The next line does this.  Happily, we
# see that the object detector works perfectly on the testing images.
# print("Testing accuracy: {}".format(
#    dlib.test_simple_object_detector(testing_xml_path, "detector.svm")))
将上述代码命名为object_detection_train.py,将代码中training_xml_path改为自己的数据集xml文件路径,进入.py文件所在目录,执行
# python3 object_detection_train.py
3.3.3 测试部分
测试代码训练代码参考python_examples/train_object_detection.py,如下:
import os
import sys
import glob
import dlib
import cv2

if len(sys.argv) != 2:
    print(
        "Give the path to the examples/faces directory as the argument to this "
        "program. For example, if you are in the python_examples folder then "
        "execute this program by running:\n"
        "    ./train_object_detector.py ../examples/faces")
    exit()
faces_folder = sys.argv[1]

# Now let's use the detector as you would in a normal application.  First we
# will load it from disk.
detector = dlib.simple_object_detector("detector.svm")

# We can look at the HOG filter we learned.  It should look like a face.  Neat!
win_det = dlib.image_window()
win_det.set_image(detector)

# Now let's run the detector over the images in the faces folder and display the
# results.
print("Showing detections on the images in the faces folder...")
win = dlib.image_window()
for f in glob.glob(os.path.join(faces_folder, "*.jpg")):
    print("Processing file: {}".format(f))
    # img = dlib.load_rgb_image(f)
    img = cv2.imread(f)
    dets = detector(img)
    print("Number of faces detected: {}".format(len(dets)))
    for k, d in enumerate(dets):
        print("Detection {}: Left: {} Top: {} Right: {} Bottom: {}".format(
            k, d.left(), d.top(), d.right(), d.bottom()))

    win.clear_overlay()
    win.set_image(img)
    win.add_overlay(dets)
    dlib.hit_enter_to_continue()
将上述代码命名为object_detection_test.py,打开VNC客户端,进入.py文件所在目录,执行
# python3 object_detection_test.py /home/users/chenzhuo/program/dlib-19-15/examples/faces
3.3.4 优化部分
目前训练好的人脸检测器为正脸检测器,对侧脸的检测效果较差。
为了提高人脸检测的准确性,可以训练多个人脸检测器进行人脸预测,比如训练正脸检测器、左侧脸检测器、右侧脸检测器等多个检测器进行组合,使用关键操作如下:
image = dlib.load_rgb_image(faces_folder + '/2008_002506.jpg')
detector1 = dlib.fhog_object_detector("detector.svm")
detector2 = dlib.fhog_object_detector("detector.svm")
detectors = [detector1, detector2]
 [boxes, confidences, detector_idxs] = dlib.fhog_object_detector.run_multiple (detectors, image, upsample_num_times=1, adjust_threshold=0.0)
for i in range(len(boxes)):
    print("detector {} found box {} with confidence {}.".format(detector_idxs[i], boxes[i], confidences[i]))
3.4 总结
从上面的训练操作流程看,dlib库不仅可以做人脸检测、识别,还可以做其他物体的检测、识别等功能。
四 C++训练自己的模型
4.1 训练自己的人脸关键点检测器
每一个代码的程序配置参见1.2.2节。选择在Release模式下进行项目配置并运行,加快运行速度。
![]()
4.1.1 数据集
使用imglab工具,给训练的图片和测试的图片标注人脸框和关键点(5个关键点:眼睛、鼻子、嘴巴),训练图片7张,测试图片5张。生成标注文件train_landmarks.xml和test_landmarks.xml。目录如下,train、test文件夹中存放训练、测试图片。

4.1.2 训练部分
使用examples/train_shape_predictor_ex.cpp代码进行项目配置后,命令参数中输入标注xml文件所在的目录,点击调试-开始执行,进行模型的训练,生成模型文件sp.dat。
load_image_dataset(images_train, face_boxes_train,faces_directory+"\\***.xml");
load_image_dataset(images_test,face_boxes_test, faces_directory+"\\***.xml");
4.1.3 测试
使用examples/face_landmark_detection_ex.cpp代码进行项目配置后,在命令参数中输入生成的模型文件sp.dat的路径和待检测的图片路径,点击调试-开始执行,测试结果如下:

4.1.4 优化部分
训练时可以用多姿态的训练数据,比如正脸、左侧脸、右侧脸的标注数据集进行训练。
4.2 训练自己的人脸检测器
4.2.1 数据集
使用imglab工具,给训练的图片和测试的图片标注人脸框,训练图片7张,测试图片5张。生成标注文件train.xml和test.xml。
4.2.2 训练部分
使用examples/ fhog_object_detector_ex.cpp代码进行项目配置后,在代码里修改以下语句,将自己标注的xml文件名写入代码相应位置中。
load_image_dataset(images_train, face_boxes_train,faces_directory+"\\***.xml");
load_image_dataset(images_test,face_boxes_test, faces_directory+"\\***.xml");
点击调试-开始执行,训练效果图如下,结果会生成face_predictor.svm模型文件:

4.2.3 测试
示例中没提供测试代码,该部分为自写代码,命名为face_object_detection:
/*
人脸检测器测试
*/

#include
#include
#include
#include

#include
#include


using namespace std;
using namespace dlib;

// ----------------------------------------------------------------------------------------

int main(int argc, char** argv)
{

	try
	{
		// In this example we are going to train a face detector based on the
		// small faces dataset in the examples/faces directory.  So the first
		// thing we do is load that dataset.  This means you need to supply the
		// path to this faces folder as a command line argument so we will know
		// where it is.
		if (argc == 1)
		{
			cout << "Call this program like this:" << endl;
			cout << "./face_detector.svm faces/*.jpg" << endl;
			return 0;
		}

		//定义scanner类型,用于扫描图片并提取特征(HOG)
		typedef scan_fhog_pyramid > image_scanner_type;
		// 加载模型
		object_detector detector;
		deserialize(argv[1]) >> detector;

		//显示hog
		image_window hogwin(draw_fhog(detector), "Learned fHOG detector");

		// 显示测试集的人脸检测结果
		image_window win;
		// Loop over all the images provided on the command line.
		for (int i = 2; i < argc; ++i)
		{
			cout << "processing image " << argv[i] << endl;
			array2d img;
			// 读取图片数据
			load_image(img, argv[i]);
			// Make the image larger so we can detect small faces.
			pyramid_up(img);

			// Now tell the face detector to give us a list of bounding boxes
			// around all the faces in the image.
			// 人脸预测
			std::vector dets = detector(img);
			cout << "Number of faces detected: " << dets.size() << endl;
			win.clear_overlay();
			win.set_image(img);
			win.add_overlay(dets, rgb_pixel(255, 0, 0));
			cout << "Hit enter to process the next image..." << endl;
			cin.get();
		}

	}
	catch (exception& e)
	{
		cout << "\nexception thrown!" << endl;
		cout << e.what() << endl;
	}
	system("pause");
}
在命令参数中输入生成的模型文件face_predictor.svm的路径和待检测的图片路径,点击调试-开始执行,测试结果如下:

4.2.4 优化部分
目前训练好的人脸检测器为正脸检测器,对侧脸的检测效果较差:
frontal_face_detector detector = get_frontal_face_detector();
训练多个人脸检测器进行人脸预测,比如训练正脸检测器、左侧脸检测器、右侧脸检测器等多个检测器进行组合,使用关键操作如下:
std::vector > my_detectors;
my_detectors.push_back(detector);
std::vector dets = evaluate_detectors(my_detectors, image);


