【图文解说】Azure 安装 虚拟机(Virtual Machine)
因为可以免费注册,使用30天($200 额度),所以注册一个了解一下,注册网址:https://azure.microsoft.com/zh-cn/free/
我这文章主要介绍在 Azure 上架设 CentOS 虚拟机,按照以下步骤你也可以选择任何Windows和Linux的 Server(参考步骤4)。
可以通过三种方法(择其一)建立虚拟机:
Azure Portal (网站界面)
Azure CLI(跨平台语言命令)
Azure PowerShell(语言命令)
创建虚拟机需要6个基本资源 Resource:
- Virtual network 虚拟网络
- Public IP address 公共IP分配
- Network interface 网络接口
- Network security group 网络安全组
- Virtual machine 虚拟机
- Disk 硬盘
下面介绍快速创建虚拟机
Azure Portal (网站界面)
- 登录 Azure :https://azure.microsoft.com/
- 修改语言界面:(我要修改成英文,因为很多命令是英文,这样便于一一对应)
点最上面【齿轮】 ,然后选【语言】Language,最后点下面【刷新】refresh
- 创建虚拟机
1)左边选 【Virtural machines】 (虚拟机)
2)中间点【Create virtural machine】创建虚拟机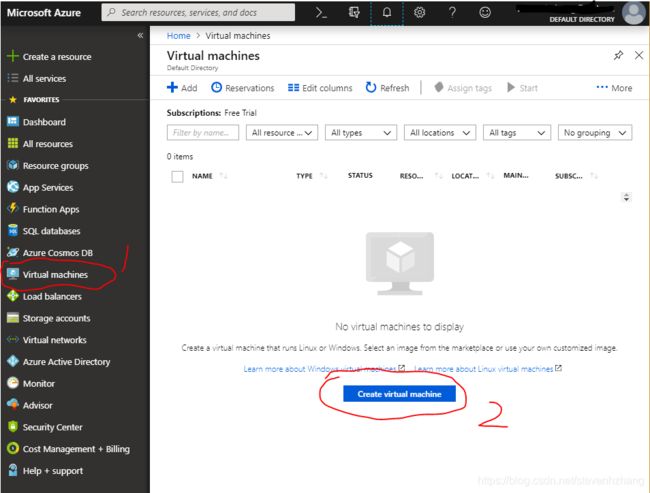
- 创建虚拟机
1)选择【Resource group】资源组,如果之前没有建立,就点下面【Create new】新建)资源组可以理解把所有相关的网络,磁盘,虚拟机等归类到一个目录下。示例取名:myResourceGroup
2)取【Virtual machine name】虚拟机名称。示例取名:myVM
3)选择【Region】区域,虚拟机放置的区域,可以加快访问速度。示例选 West US
4)选择【Image】需要安装的操作系统(Windows, Linux),如果没有,可以按【Brose all images and disks】。示例安装CentOS
5)选择【Size】大小,选择虚拟机所需CPU,内存等等参数,点【Change Size】有更多虚拟机配置选择,当然配置越好月费越高。示例用了默认 Standard D2s v3 / 2 vcpus, 8 GB memory。
6)填写【Administrator Account】管理员登录信息,用于SSH登录(如果是 Windows虚拟机,就是创建Remote Desktop Connection 远程桌面登录帐号)
7)选择【Public inbound ports】公共入站端口,默认是【None】,这样SSH 或者 Windows 的 Remote Desktop都无法登录。下面放大再讲。(万一误选择,可以再去添加)
8)点【Next: Disks >】继续选择磁盘,前往下一页
7)示例选择了 HTTP, HTTPS, SSH(如果你安装Windows操作系统,可以不选 SSH,选 RDP)
- 选择 OS disk type 操作系统磁盘类型,SSD价格比HDD贵,当然也会影响月费。示例选择默认 Premium SSD
点【Next: Networking >】,前往下一页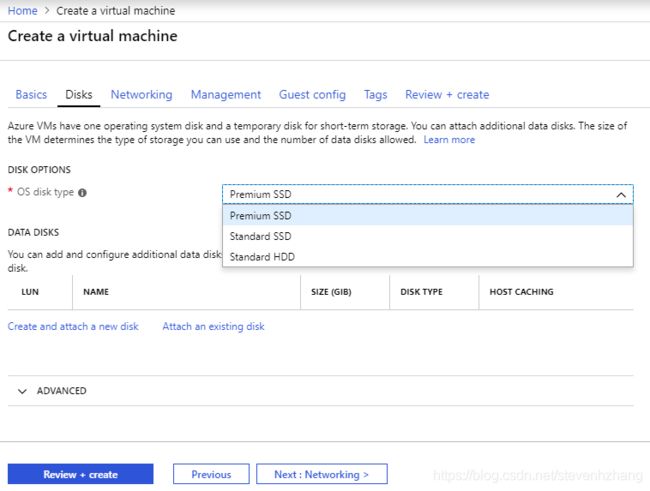
- 设置网络,示例都用默认设置,名字都自动生成
1)【Virtual network】 虚拟网络名称。示例使用自动生成 myResrouceGroup-vnet
2)【Public IP】 公共IP地址。示例使用自动生成 myVM-ip
3)【Public inbourd ports】公共入站端口,如果没有需求就不用更改,因为这个ip地址除了虚拟机,也可以用于其它资源Resource,譬如:SQL 数据库,API 等等等
4)点【Next: Management >】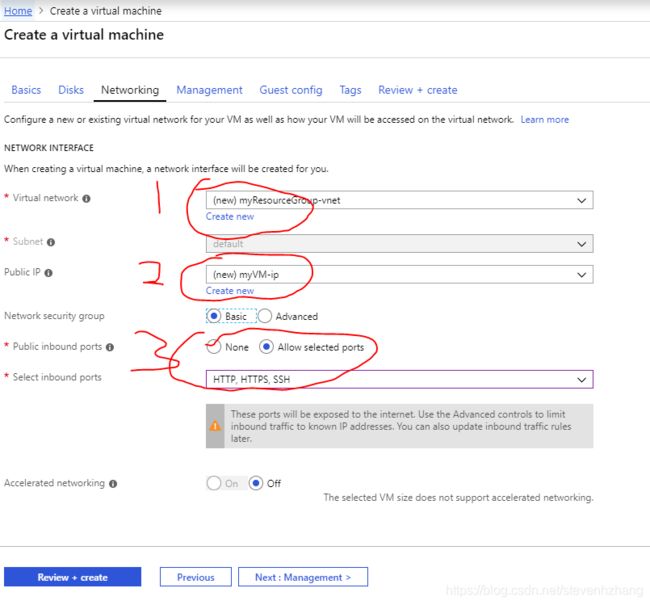
- 选择管理,
1)这里作为测试,我们就简便,把【Boot diagnostics】启动诊断 从默认 On 设置为 Off
2)到这里,基本配置完成,可以直接按【Review + create】 查看 + 创建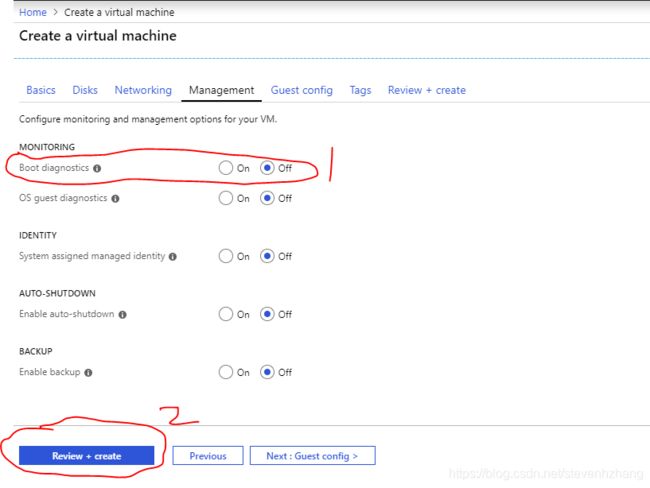
- 最后查看,如果是绿色,就通过,如果红色,根据提示去修改。一般也就是漏填哪里。
点【Create】 创建
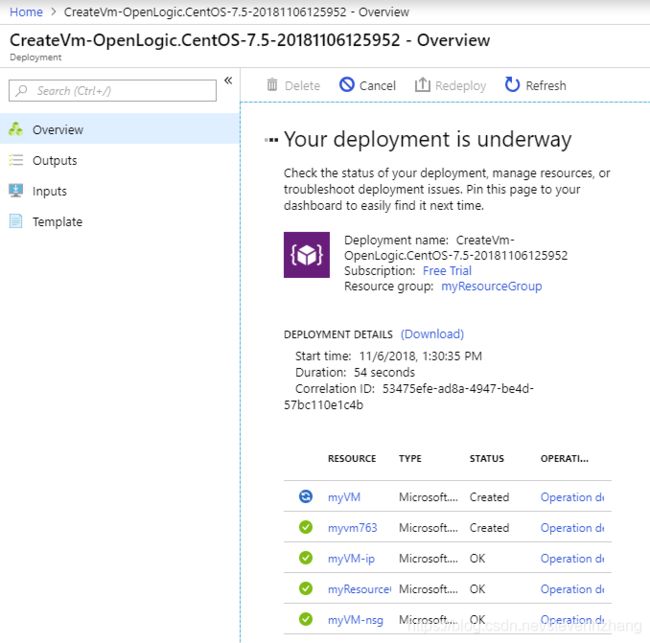
- 你可以看着界面,一个一个创建,绿色勾
 创建好了,蓝色箭头
 正在创建,结束后上面小铃
 会有通知
会有通知 
- 见证奇迹的时刻到了
1)点左边的【Dashboard】仪表板
2)All resources 下面多出了6个资源,这就是你刚刚创建。怎么获得IP?
3)点 myVM,可以获得SSH登录所需的IP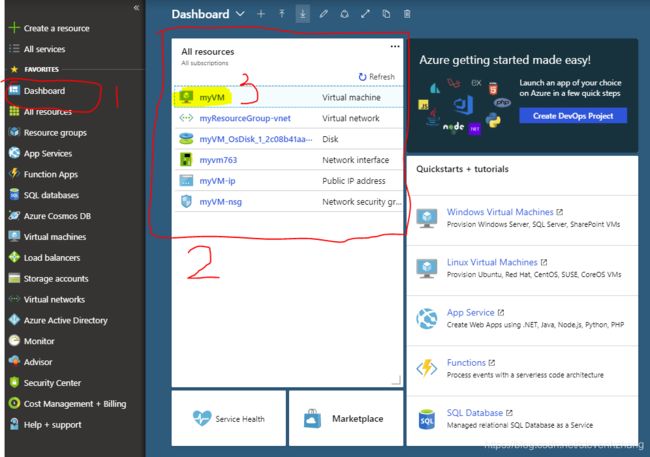
4)点击 Connect,右边会多出一篇
5)这就是 SSH 链接信息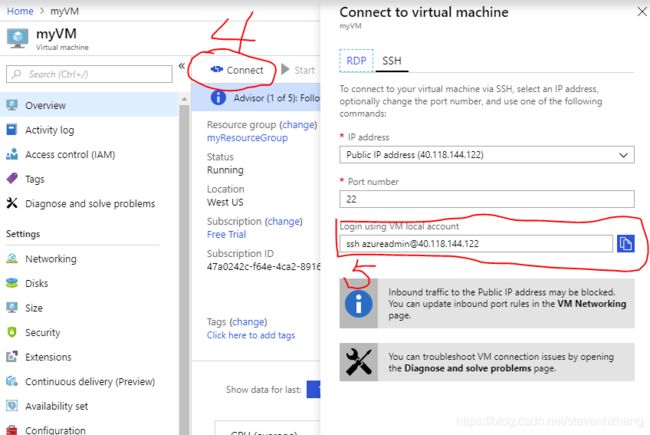
6)通过 Putty 连接成功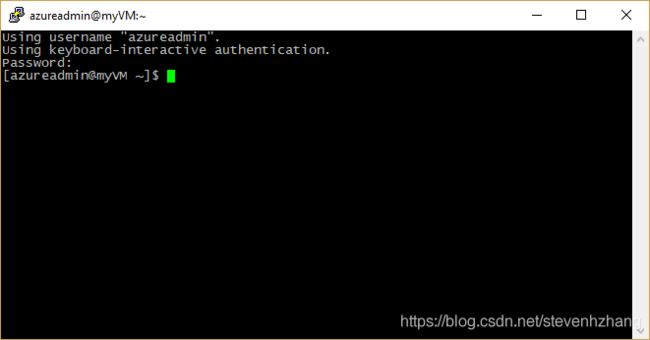
- 连接不通,会碰到一些问题:
1)端口没打开 (Port)
1.1)点左边的【Dashboard】仪表板 -> 点 myVM 进入下面界面
1.2)选 【Networks】 网络
1.3)检查 Inbourd Port Rules,是否相应端口已经存在
1.4)如果没有,就点【Add inbound】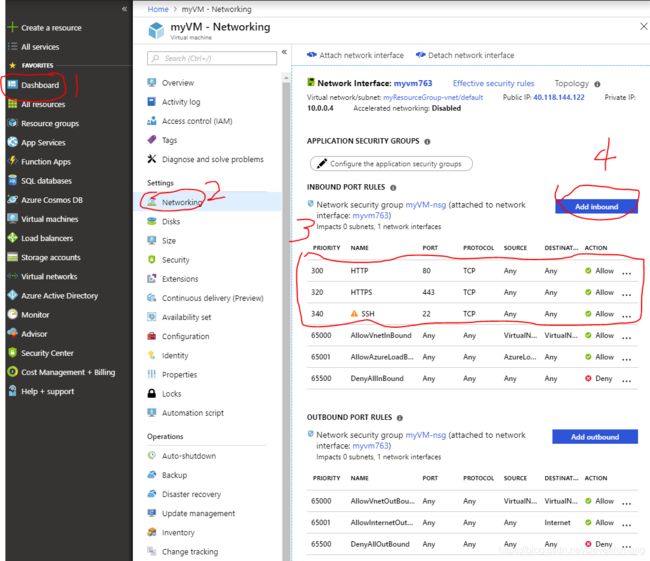
2)查看 ip 是否正确,因为我们设置的 myVM-ip 是 Dynamic 动态的,可以改成 Static 静态
2.1)点左边的【Dashboard】仪表板 -> 点 myVM-ip 进入下面界面
2.2)点 Configuration 配置
2.3)【Assignment】默认是 Dynamic 动态,选 Static 静态
2.4)点 【Save】保存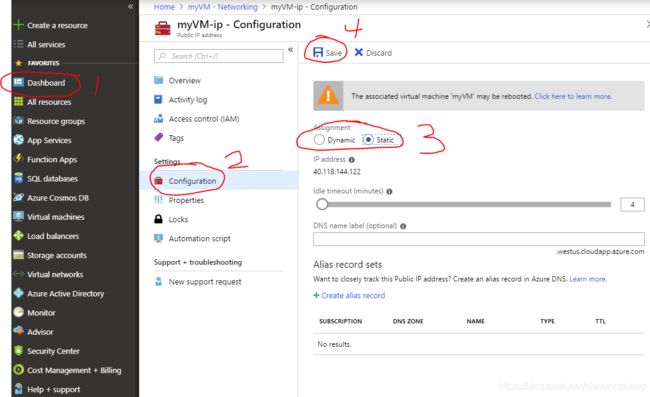
Azure CLI(跨平台语言命令)
- 安装 Azure CLI Cloud Shell,中文参考:https://docs.azure.cn/zh-cn/cli/install-azure-cli?view=azure-cli-latest
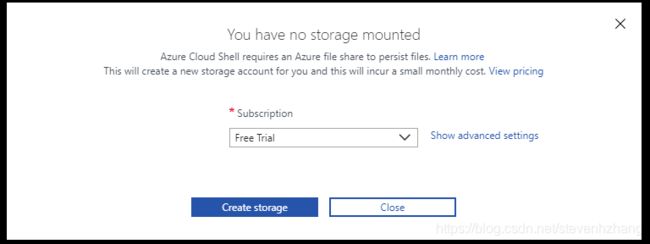
- 我们只是测试,从浏览器直接设置,
登录 Azure :https://azure.microsoft.com/ 点击最上面的 进入,然后选【Bash】,再选【Create Storage】
安装成功后,会显示:
Initializing your account for Cloud Shell...\
Requesting a Cloud Shell.Succeeded.
Connecting terminal...

Welcome to Azure Cloud Shell

Type "az" to use Azure CLI 2.0
Type "help" to learn about Cloud Shell

steven@Azure:~$
同时在你的帐号下,会自动建立二个资源:1个 Resource Group 和 1个 Storage account,可以点Azure网站界面左边点相应看到。
-
正式开始创建虚拟机:
创建 Resource Group 资源组az group create --name myResourceGroup --location westus资源组名称:myResrouceGroup
可以自己取资源组所在区域:westus
需要知道更多区域:az account list-locations创建 Virtual Machine 虚拟机
az vm create \
  --resource-group myResourceGroup \
  --name myVM \
  --image CentOS \
  --admin-username azureadmin \
  --admin-password 'myPassword123'
加入资源组:myResourceGroup
此资源组必须已经建立,如果没有参照上一步骤虚拟机名称:myVM
可以自己取名安装操作系统:CentOS
要获取更多名单,使用命令:az vm image list --output table ,取UrnAlias下名字就可以,如果还要更多指定版本,需要更复杂命令,参考网站:https://docs.microsoft.com/en-us/azure/virtual-machines/linux/tutorial-manage-vm管理员用户名:azuradmin
可以自己取名管理员口令:myPassword123
必须前后引号,口令必须是:12-72个字符,字符满足下列条件中的3个即可:1个大写字母,1个小写字母,1个数字,1个特殊字符(但不能是 反斜杠 \ 和减号 -)执行结束后会显示如下结果,其中 publicIpAddress 后面跟的就是你外部能访问的 IP 地址 40.68.254.142
{
  "fqdns": "",
  "id": "/subscriptions//resourceGroups/myResourceGroup/providers/Microsoft.Compute/virtualMachines/myVM",
  "location": "eastus",
  "macAddress": "00-0D-3A-23-9A-49",
  "powerState": "VM running",
  "privateIpAddress": "10.0.0.4",
  "publicIpAddress": "40.68.254.142",
  "resourceGroup": "myResourceGroup"
}
通过SSH连接,看是否通
ssh [email protected]如果要做网站服务器,打开 80 端口
az vm open-port --port 80 --resource-group myResourceGroup --name myVM -
查看所有资源
az resource list --output table显示如下,除了csxxxxx是因为cloud shell建立的,其他都是创建虚拟机后建立
Name                                            ResourceGroup               Location    Type                                     Status
----------------------------------------------  --------------------------  ----------  ---------------------------------------  --------
cs447a0242cf64ex4ca2x891                        cloud-shell-storage-westus  westus      Microsoft.Storage/storageAccounts
myVM_OsDisk_1_5df9f28dda8140659eff428ccefeeb53  MYRESOURCEGROUP             eastus      Microsoft.Compute/disks
myVM                                            myResourceGroup             eastus      Microsoft.Compute/virtualMachines
myVMVMNic                                       myResourceGroup             eastus      Microsoft.Network/networkInterfaces
myVMNSG                                         myResourceGroup             eastus      Microsoft.Network/networkSecurityGroups
myVMPublicIP                                    myResourceGroup             eastus      Microsoft.Network/publicIPAddresses
myVMVNET                                        myResourceGroup             eastus      Microsoft.Network/virtualNetworks
只查看刚刚建立的虚拟机有关的资源(都在 myResourceGroup下)
az resource list --resource-group myResourceGroup --output table -
删除和刚建立的虚拟机有关的资源(都在 myResrouceGroup下)
az group delete -n myResourceGroup
Azure PowerShell(语言命令)
- 安装 Azure PowerShell,参考:https://docs.microsoft.com/en-us/powershell/scripting/install/installing-powershell
- 我们只是测试,从浏览器直接设置,
登录 Azure :https://azure.microsoft.com/ 点击最上面的 进入,然后选【PowerShell】,再选【Create Storage】
也可以从 https://shell.azure.com/powershell 进入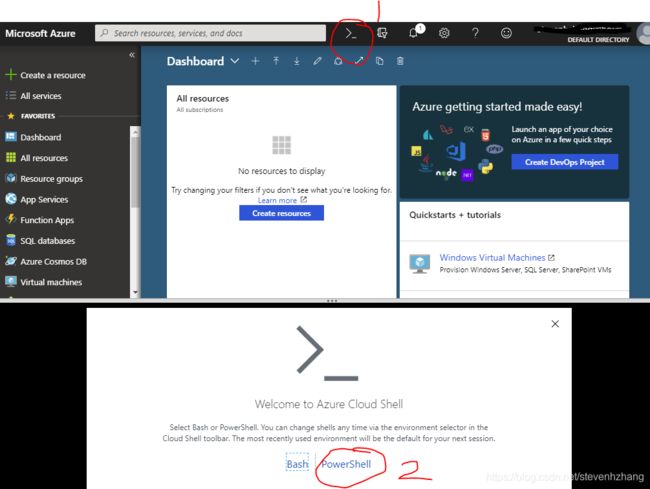
如果之前安装过了,就按左上角,选PowerShell
安装成功后,会显示:
Welcome to Azure Cloud Shell

Type "dir" to see your Azure resources
Type "help" to learn about Cloud Shell

MOTD: Scripts installed with 'Install-Script' can be run from the shell

VERBOSE: Authenticating to Azure ...
VERBOSE: Building your Azure drive ...
Azure:/
PS Azure:\>
同时在你的帐号下,会自动建立二个资源:1个 Resource Group 和 1个 Storage account,可以点Azure网站界面左边点相应看到。
-
正式开始创建虚拟机:
创建 Resource Group 资源组New-AzureRmResourceGroup -Name "myResourceGroup" -Location "WestUS"资源组名称:myResrouceGroup
可以自己取资源组所在区域:westus
需要知道更多区域:Get-AzureRmLocation |Format-Table创建 Virtual Network 虚拟网络
创建虚拟网络、子网和公共 IP 地址。 这些资源用来与虚拟机建立网络连接,以及将其连接到 Internet:# Create a subnet configuration $subnetConfig = New-AzureRmVirtualNetworkSubnetConfig ` -Name "mySubnet" ` -AddressPrefix 192.168.1.0/24 # Create a virtual network $vnet = New-AzureRmVirtualNetwork ` -ResourceGroupName "myResourceGroup" ` -Location "WestUS" ` -Name "myResourceGroup-vnet" ` -AddressPrefix 192.168.0.0/16 ` -Subnet $subnetConfig # Create a public IP address and specify a DNS name $pip = New-AzureRmPublicIpAddress ` -ResourceGroupName "myResourceGroup" ` -Location "WestUS" ` -AllocationMethod Static ` -IdleTimeoutInMinutes 4 ` -Name "myVM-ip"建立虚拟网络名称:myResourceGroup-vnet
建立公共静态ip地址,名称:myVM-ip
建立 Network Security Group 网络安全组
添加 22端口,让SSH能访问,添加 80 端口,让网站可以访问。# Create an inbound network security group rule for port 22 $nsgRuleSSH = New-AzureRmNetworkSecurityRuleConfig ` -Name "SSH_port" ` -Protocol "Tcp" ` -Direction "Inbound" ` -Priority 1000 ` -SourceAddressPrefix * ` -SourcePortRange * ` -DestinationAddressPrefix * ` -DestinationPortRange 22 ` -Access "Allow" # Create an inbound network security group rule for port 80 $nsgRuleWeb = New-AzureRmNetworkSecurityRuleConfig ` -Name "HTTP_port" ` -Protocol "Tcp" ` -Direction "Inbound" ` -Priority 1001 ` -SourceAddressPrefix * ` -SourcePortRange * ` -DestinationAddressPrefix * ` -DestinationPortRange 80 ` -Access "Allow" # Create a network security group $nsg = New-AzureRmNetworkSecurityGroup ` -ResourceGroupName "myResourceGroup" ` -Location "WestUS" ` -Name "myVM-nsg" ` -SecurityRules $nsgRuleSSH,$nsgRuleWeb建立网络安全组,名称:myVM-nsg
建立 Virtural Network Interface Card 虚拟网络接口卡
添加 22端口,让SSH能访问,添加 80 端口,让网站可以访问。# Create a virtual network card and associate with public IP address and NSG $nic = New-AzureRmNetworkInterface ` -Name "myVM-nic" ` -ResourceGroupName "myResourceGroup" ` -Location "WestUS" ` -SubnetId $vnet.Subnets[0].Id ` -PublicIpAddressId $pip.Id ` -NetworkSecurityGroupId $nsg.Id建立虚拟网络接口卡,名称:myVM-nic
创建 Virtual Machine 虚拟机
在 PowerShell 中创建虚拟机,先要创建一个配置,其中包含要使用的操作系统、大小和身份验证选项等设置。 然后,系统会使用此配置来生成 VM。# Define a credential object $securePassword = ConvertTo-SecureString 'myPassword123' -AsPlainText -Force $cred = New-Object System.Management.Automation.PSCredential ("azureadmin", $securePassword) # Create a virtual machine configuration $vmConfig = New-AzureRmVMConfig ` -VMName "myVM" ` -VMSize "Standard_D1" | ` Set-AzureRmVMOperatingSystem ` -Linux ` -ComputerName "myVM" ` -Credential $cred | ` Set-AzureRmVMSourceImage ` -PublisherName "OpenLogic" ` -Offer "CentOS" ` -Skus "7.5" ` -Version "latest" | ` Add-AzureRmVMNetworkInterface ` -Id $nic.Id # Create a virtual machine New-AzureRmVM ` -ResourceGroupName "myResourceGroup" ` -Location westus ` -VM $vmConfig# 定义管理员验证,本示例:管理员用户名 azureadmin;管理员口令:myPassword123,
口令必须是:12-72个字符,字符满足下列条件中的3个即可:1个大写字母,1个小写字母,1个数字,1个特殊字符(但不能是 反斜杠 \ 和减号 -)# 创建虚拟机配置
New-AzureRmVMConfig 服务器硬件配置
虚拟机名称:myVMSet-AzureRmVMOperatingSystem 建立操作系统配置
在此处加入刚才建立的管理员登录信息 -Credential $credSet-AzureRmVMSourceImage 建立镜像配置:
安装操作系统:CentOS 7.5
你想找到更多的操作系统,参见:https://docs.microsoft.com/en-us/azure/virtual-machines/windows/cli-ps-findimageAdd-AzureRmVMNetworkInterface 链接上之前建立的虚拟网络接口
注意,如果提示找不到 $nic,可能因为此参数丢失,在这整个步骤前,运行 $nic = Get-AzureRmNetworkInterface# 创建虚拟机,把以上设置配置的参数输入。
执行结束后会显示如下结果,其中 publicIpAddress 后面跟的就是你外部能访问的 IP 地址 40.68.254.142
RequestId IsSuccessStatusCode StatusCode ReasonPhrase
--------- ------------------- ---------- ------------
                         True         OK OK
要进行 SSH测试,不过还不知道ip地址,获得ip方法
Get-AzureRmPublicIpAddress -ResourceGroupName "myResourceGroup" | Select "IpAddress"通过SSH连接虚拟机
ssh [email protected] -
查看所有资源
Get-AzureRmResource |Format-Table显示如下,除了csxxxxx是因为cloud shell建立的,其他都是创建虚拟机后建立
Name                                           ResourceGroupName          ResourceType                            Location
----                                           -----------------          ------------                            --------
cs447a0242cf64ex4ca2x891                       cloud-shell-storage-westus Microsoft.Storage/storageAccounts       westus
myVM_OsDisk_1_062f60b5e99b48728b49a597eeb7e4c0 MYRESOURCEGROUP            Microsoft.Compute/disks                 westus
myVM                                           myResourceGroup            Microsoft.Compute/virtualMachines       westus
myVM-nic                                       myResourceGroup            Microsoft.Network/networkInterfaces     westus
myVM-nsg                                       myResourceGroup            Microsoft.Network/networkSecurityGroups westus
myVM-ip                                        myResourceGroup            Microsoft.Network/publicIPAddresses     westus
myResourceGroup-vnet                           myResourceGroup            Microsoft.Network/virtualNetworks       westus
只查看刚刚建立的虚拟机有关的资源(都在 myResourceGroup下)
Get-AzureRmResource -ResourceGroupName 'myResourceGroup' |Format-Table -
删除和刚建立的虚拟机有关的资源(都在 myResrouceGroup下)
Remove-AzureRmResourceGroup -Name myResourceGroup -Force