springboot启动过程原理分析
前言
现在绝大多数java项目都上了Springboot框架, 因此深入理解Springboot框架的运行原理,能帮助我们更好的在Springboot框架下进行业务开发,同时能学习框架中优秀的设计思想, 本文主要是通过对Springboot源码的分析, 来理解整个springboot项目的启动流程. 因为Springboot不同版本的源码有差异, 因此特别声明, 本文是基于2.2.10.RELEASE版本进行的原理分析.
1. 导入依赖
 <parent>
        <groupId>org.springframework.boot</groupId>
        <artifactId>spring-boot-starter-parent</artifactId>
        <version>2.2.10.RELEASE</version>
    </parent>
1.1 Springboot项目在spring官网已经作为顶级项目存在, 官网描述非常清楚,如果只是想搭建一个springboot项目, 只需要导入spring-boot-starter-parent, 如果是做web开发, 则还需导入spring-boot-starter-web, 本文只分析Springboot的启动流程,因此只需要导入spring-boot-starter-parent
2. 创建启动类
@SpringBootApplication
public class SpringbootApplication{
    public static void main(String[] args) {
        SpringApplication.run(SpringbootApplication.class, args);
    }
}
2.1 一个Springboot项目只需要在启动类上加@SpringBootApplicatio注解就可以, 可能很多人会有疑问,为什么加入了这个注解,就是一个springboot项目了,回答这个问题之前,我们首先要知道什么是一个Springboot项目, 接下来我会从源码角度为大家深入分析.
3. springboot启动流程图
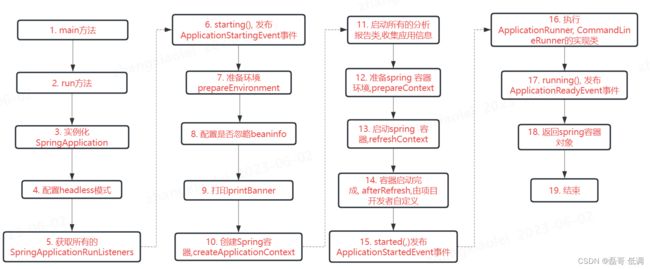
3.1 以上是整个Springboot的run方法的执行流程, 这只是一个总体流程图, 接下里对每一步我将通过源码深入分析.
4. 实例化SpringAppliaciton
4.1 实例化SpringAppliaciton的核心是实例化了两种类型的class, 一个是ApplicationContextInitializer.class, 另一个是 ApplicationListener.class
setInitializers((Collection) getSpringFactoriesInstances(ApplicationContextInitializer.class));
setListeners((Collection) getSpringFactoriesInstances(ApplicationListener.class));
4.2 getSpringFactoriesInstances该方法的核心是实例化所有依赖下META-INF/spring.factories文件里ApplicationContextInitializer和ApplicationListener类型, 并放入initializers和listeners属性中
//将META-INF/spring.factories目录下对应类型的全类名加入到set集合中
Set<String> names = new LinkedHashSet<>
(SpringFactoriesLoader.loadFactoryNames(type, classLoader));

//通过反射实例化
List<T> instances = createSpringFactoriesInstances(type, parameterTypes, classLoader, args, names);
4.3 SpringFactoriesLoader.loadFactoryNames方法就是去加载META-INF/spring.factories, 请对这个方法有些印象, 因为这个方法在Springboot自动装配的时候也会调用.
 public static List<String> loadFactoryNames(Class<?> factoryType, @Nullable ClassLoader classLoader) {
 		//对应类型的全类名,这里是org.springframework.context.ApplicationContextInitializer和org.springframework.context.ApplicationListener
        String factoryTypeName = factoryType.getName();

       //通过key筛选对应的value集合
        return (List)loadSpringFactories(classLoader).getOrDefault(factoryTypeName, Collections.emptyList());
    }
private static Map<String, List<String>> loadSpringFactories(@Nullable ClassLoader classLoader) {
	//这个集合在web项目的源码中经常出现,它和普通的map区别在于一个key可以对应多个value
    MultiValueMap<String, String> result = (MultiValueMap)cache.get(classLoader);
    if (result != null) {
        return result;
    } else {
        try {
        	//核心是加载所有类路径下META-INF/spring.factories文件
            Enumeration<URL> urls = classLoader != null ? classLoader.getResources("META-INF/spring.factories") : ClassLoader.getSystemResources("META-INF/spring.factories");
            LinkedMultiValueMap result = new LinkedMultiValueMap();

            while(urls.hasMoreElements()) {
                URL url = (URL)urls.nextElement();
                UrlResource resource = new UrlResource(url);
                Properties properties = PropertiesLoaderUtils.loadProperties(resource);
                Iterator var6 = properties.entrySet().iterator();

                while(var6.hasNext()) {
                    Entry<?, ?> entry = (Entry)var6.next();
                    String factoryTypeName = ((String)entry.getKey()).trim();
                    String[] var9 = StringUtils.commaDelimitedListToStringArray((String)entry.getValue());
                    int var10 = var9.length;

                    for(int var11 = 0; var11 < var10; ++var11) {
                        String factoryImplementationName = var9[var11];
                        result.add(factoryTypeName, factoryImplementationName.trim());
                    }
                }
            }

            cache.put(classLoader, result);
            return result;
        } catch (IOException var13) {
            throw new IllegalArgumentException("Unable to load factories from location [META-INF/spring.factories]", var13);
        }
    }
}
4.4 createSpringFactoriesInstances是通过反射实例化所有的对象
private <T> List<T> createSpringFactoriesInstances(Class<T> type, Class<?>[] parameterTypes,
		ClassLoader classLoader, Object[] args, Set<String> names) {
	List<T> instances = new ArrayList<>(names.size());
	for (String name : names) {
		try {
			Class<?> instanceClass = ClassUtils.forName(name, classLoader);
			Assert.isAssignable(type, instanceClass);
			Constructor<?> constructor = instanceClass.getDeclaredConstructor(parameterTypes);
			T instance = (T) BeanUtils.instantiateClass(constructor, args);
			instances.add(instance);
		}
		catch (Throwable ex) {
			throw new IllegalArgumentException("Cannot instantiate " + type + " : " + name, ex);
		}
	}
	return instances;
}
4.5 因为是加载所有类路径下的spring.factories文件, 因此会加载spring-boot-starter-parent依赖的所有模块的spring.factories文件, 默认是加载8个initializer对象和12个listener对象.
5. 配置headless模式
5.1 headless模式springboot是默认开启的,通过System.setProperty(“java.awt.headless”,”true”)设置, 因为对于服务端而言,可能缺少显示屏、键盘或者鼠标等设备.
private void configureHeadlessProperty() {
	System.setProperty(SYSTEM_PROPERTY_JAVA_AWT_HEADLESS,
			System.getProperty(SYSTEM_PROPERTY_JAVA_AWT_HEADLESS, Boolean.toString(this.headless)));
}
6. 获取所有的SpringApplicationRunListeners
6.1 同样是加载META-INF/spring.factories文件下所有的SpringApplicationRunListener类型的全类名,通过反射实例化.
因为我们只导入了spring-boot-starter-parent包,在子模块spring-boot下的META-INF/spring.factories文件中只有一个EventPublishingRunListener实现了SpringApplicationRunListener,因此只实例化一个SpringApplicationRunListener类型
# Run Listeners
org.springframework.boot.SpringApplicationRunListener=\
org.springframework.boot.context.event.EventPublishingRunListener
7. starting(), 发布ApplicationStartingEvent事件
void starting() {
	for (SpringApplicationRunListener listener : this.listeners) {
		listener.starting();
	}
}
7.1 会遍历所有的SpringApplicationRunListener类型, 因为上面我们说只有一个EventPublishingRunListener实现了SpringApplicationRunListener,因此我们进入EventPublishingRunListener的starting()
@Override
public void starting() {
	this.initialMulticaster.multicastEvent(new ApplicationStartingEvent(this.application, this.args));
}
7.2 这里的initialMulticaster是SimpleApplicationEventMulticaster类型, 读过Spring源码的都知道, spring的事件派发器就是SimpleApplicationEventMulticaster, 通过这个对象发布事件, 因为spring事件监听是通过观察者模式实现的, 我们只需要实现ApplicationListener接口监听对应的事件就行.这里是发布了一个ApplicationStartingEvent事件, 其实在整个Springboot启动过程会发布各个节点事件, 都是通过SimpleApplicationEventMulticaster派发器派发.
8. 准备环境prepareEnvironment
private ConfigurableEnvironment prepareEnvironment(SpringApplicationRunListeners listeners,
		ApplicationArguments applicationArguments) {
	//检测对应的环境,因为我们是开发web,所以是web环境, 会示例化StandardServletEnvironment对象
	ConfigurableEnvironment environment = getOrCreateEnvironment();
	//将所有的环境参数加载到environment对象中,这样我们就可以用environment获取配置
	configureEnvironment(environment, applicationArguments.getSourceArgs());
	ConfigurationPropertySources.attach(environment);
	listeners.environmentPrepared(environment);
	bindToSpringApplication(environment);
	if (!this.isCustomEnvironment) {
		environment = new EnvironmentConverter(getClassLoader()).convertEnvironmentIfNecessary(environment,
				deduceEnvironmentClass());
	}
	ConfigurationPropertySources.attach(environment);
	return environment;
}
9. 配置是否忽略beaninfo
private void configureIgnoreBeanInfo(ConfigurableEnvironment environment) {
	if (System.getProperty(CachedIntrospectionResults.IGNORE_BEANINFO_PROPERTY_NAME) == null) {
		Boolean ignore = environment.getProperty("spring.beaninfo.ignore", Boolean.class, Boolean.TRUE);
		System.setProperty(CachedIntrospectionResults.IGNORE_BEANINFO_PROPERTY_NAME, ignore.toString());
	}
}
9.1 spring.beaninfo.ignore值默认是true, 表示跳过对BeanInfo类的搜索, 这些bean并不会被spring容器管理
10. 打印printBanner
private Banner printBanner(ConfigurableEnvironment environment) {
		if (this.bannerMode == Banner.Mode.OFF) {
			return null;
		}
		ResourceLoader resourceLoader = (this.resourceLoader != null) ? this.resourceLoader
				: new DefaultResourceLoader(getClassLoader());
		SpringApplicationBannerPrinter bannerPrinter = new SpringApplicationBannerPrinter(resourceLoader, this.banner);
		if (this.bannerMode == Mode.LOG) {
			return bannerPrinter.print(environment, this.mainApplicationClass, logger);
		}
		return bannerPrinter.print(environment, this.mainApplicationClass, System.out);
	}
10.1 因为springboot的默认banner模式是CONSOLE, 因此会走bannerPrinter.print(environment, this.mainApplicationClass, System.out)
Banner print(Environment environment, Class<?> sourceClass, PrintStream out) {
	//获取banner
	Banner banner = getBanner(environment);
	//打印banner
	banner.printBanner(environment, sourceClass, out);
	return new PrintedBanner(banner, sourceClass);
}
private Banner getBanner(Environment environment) {
		Banners banners = new Banners();
		//如果项目配置了spring.banner.image.location路径下的图片文件会被加载
		banners.addIfNotNull(getImageBanner(environment));
		//如果项目配置了spring.banner.location路径下的文件会被加载, 或则在类路径下添加了banner.txt文件也会被加载
		banners.addIfNotNull(getTextBanner(environment));
		if (banners.hasAtLeastOneBanner()) {
			return banners;
		}
		if (this.fallbackBanner != null) {
			return this.fallbackBanner;
		}
		return DEFAULT_BANNER;
	}
10.2 如果图片banner和文本banner都没有配置,那么就使用默认的DEFAULT_BANNER 也就是 SpringBootBanner
@Override
	public void printBanner(Environment environment, Class<?> sourceClass, PrintStream printStream) {
		for (String line : BANNER) {
			printStream.println(line);
		}
		String version = SpringBootVersion.getVersion();
		version = (version != null) ? " (v" + version + ")" : "";
		StringBuilder padding = new StringBuilder();
		while (padding.length() < STRAP_LINE_SIZE - (version.length() + SPRING_BOOT.length())) {
			padding.append(" ");
		}

		printStream.println(AnsiOutput.toString(AnsiColor.GREEN, SPRING_BOOT, AnsiColor.DEFAULT, padding.toString(),
				AnsiStyle.FAINT, version));
		printStream.println();
	}

}
10.3 这里的BANNER就是我们常见的springboot标志的log
 .   ____          _            __ _ _
 /\\ / ___'_ __ _ _(_)_ __  __ _ \ \ \ \
( ( )\___ | '_ | '_| | '_ \/ _` | \ \ \ \
 \\/  ___)| |_)| | | | | || (_| |  ) ) ) )
  '  |____| .__|_| |_|_| |_\__, | / / / /
 =========|_|==============|___/=/_/_/_/
11. 创建Spring容器,createApplicationContext
protected ConfigurableApplicationContext createApplicationContext() {
		Class<?> contextClass = this.applicationContextClass;
		if (contextClass == null) {
			try {
				switch (this.webApplicationType) {
				//进行web开发就是SERVLET环境
				case SERVLET:
					contextClass = Class.forName(DEFAULT_SERVLET_WEB_CONTEXT_CLASS);
					break;
				case REACTIVE:
					contextClass = Class.forName(DEFAULT_REACTIVE_WEB_CONTEXT_CLASS);
					break;
				default:
					contextClass = Class.forName(DEFAULT_CONTEXT_CLASS);
				}
			}
			catch (ClassNotFoundException ex) {
				throw new IllegalStateException(
						"Unable create a default ApplicationContext, please specify an ApplicationContextClass", ex);
			}
		}
		return (ConfigurableApplicationContext) BeanUtils.instantiateClass(contextClass);
	}
11.1 我们项目通常是做的B/S架构开发,Springboot默认的是servlet环境, 创建的默认是AnnotationConfigServletWebServerApplicationContex容器, 这里通过反射实例化容器, 之后刷新容器的操作就是AnnotationConfigServletWebServerApplicationContex对象.
12. 启动所有的分析报告类,收集应用信息
exceptionReporters = getSpringFactoriesInstances(SpringBootExceptionReporter.class,
		new Class[] { ConfigurableApplicationContext.class }, context);
12.1 这里还是从META-INF/sprign.factories文件下实例化SpringBootExceptionReporter类型的对象, 默认的对象是FailureAnalyzers,它实现了SpringBootExceptionReporter, 它的主要作用就是在Springboot项目启动过程中出现报错给开发者一些修改建议.
13. 准备spring 容器环境,prepareContext
private void prepareContext(ConfigurableApplicationContext context, ConfigurableEnvironment environment,
			SpringApplicationRunListeners listeners, ApplicationArguments applicationArguments, Banner printedBanner) {

		//这段代码是让我们可以通过context对象获取环境对象, 其实Springboot也装配了environment对象, 想用可以直接注入
		context.setEnvironment(environment);

		postProcessApplicationContext(context);

		//还记得在初始化springboot对象的时候, 在构造器中实例化ApplicationContextInitializer类型的对象不, 这里就是执行初始化类型实例的initialize方法
		applyInitializers(context);

		//这里发布ApplicationContextInitializedEvent事件, 上面说过整个springboot项目启动过程的各个节点会发布对应的事件
		listeners.contextPrepared(context);

		if (this.logStartupInfo) {
			logStartupInfo(context.getParent() == null);
			logStartupProfileInfo(context);
		}
		// 注意这个对象, 这个就是spring工厂
		ConfigurableListableBeanFactory beanFactory = context.getBeanFactory();
		beanFactory.registerSingleton("springApplicationArguments", applicationArguments);
		if (printedBanner != null) {
			beanFactory.registerSingleton("springBootBanner", printedBanner);
		}
		if (beanFactory instanceof DefaultListableBeanFactory) {
			((DefaultListableBeanFactory) beanFactory)
					.setAllowBeanDefinitionOverriding(this.allowBeanDefinitionOverriding);
		}
		if (this.lazyInitialization) {
			context.addBeanFactoryPostProcessor(new LazyInitializationBeanFactoryPostProcessor());
		}
		// Load the sources
		Set<Object> sources = getAllSources();
		Assert.notEmpty(sources, "Sources must not be empty");
		load(context, sources.toArray(new Object[0]));

		//这里发布ApplicationPreparedEvent事件
		listeners.contextLoaded(context);
	}
13.1 准备容器环境准备的是什么.
- 让跟容器相关的组件和容器产生关联
- 通过发布事件让容器的节点有记录.
14. 启动spring 容器,refreshContext
private void refreshContext(ConfigurableApplicationContext context) {
	//刷新容器, 执行整个bean的生命周期
	refresh(context);
	if (this.registerShutdownHook) {
		try {
			//发布ContextClosedEvent事件
			context.registerShutdownHook();
		}
		catch (AccessControlException ex) {
			// Not allowed in some environments.
		}
	}
}
14.1 这一步就是我们常说的刷新容器, 执行整个bean的生命周期,所有的bean都交由spring容器管理,这里走的就是Spring源码的核心内容, 想把这部分搞懂的,需要去研究spring源码, 我研究Spring源码有3年了, 建议把Spring源码download下来,编译成功后阅读, 这才是阅读源码的正确姿势,
14.2 同时这里会注册一个ContextClosedEvent事件, 这个在我的另一篇博客中有详细说明, 这个可以用于应用宕机的判断.
14.3 我们常说springboot的核心是自动装配, 那自动装配是什么时候执行的呢,其实就是在刷新容器的时候, 为什么是这个时候呢, 百度上的很多博客说自动装配的时候只是把加载spring.factories的源码说了一遍, 而且很多博客中还把自动装配的入口都说错了, 更不知道什么时候自动装配的, 下面我将用大量的篇幅将springboot自动装配的原理解释清楚
自动装配
@SpringBootApplication
public class SpringbootApplication{
    public static void main(String[] args) {
        SpringApplication.run(SpringbootApplication.class, args);
    }
}
1.用过SpringBoot都知道在启动类上有一个@SpringBootApplication注解, 这是一个Springboot项目的标志, 我将通过这个注解把整个自动装配的入口和原理讲清楚
2. SpringBootApplication注解由三个核心注解组成,分别是@SpringBootConfiguration, @EnableAutoConfiguration, @ComponentScan, 下面我分别解释这3个注解
3. @SpringBootConfiguration注解
3.1 @SpringBootConfiguration实际上是由@Configuration注解组成, 而@Configuration又是由@Component注解组成, 因此这个注解的作用是将启动类交给了Spring容器管理, 因此我说在refresh容器的时候才会执行自动装配,因为这个时候启动类才会交给Spring管理, Spring才会用对应的组件解析启动类
4. @ComponentScan注解
4.1 熟悉Spring项目的都知道, 这个注解告诉了Spring包扫描路径, 通过basePackages属性或value属性指定,
4.2 而在Springboot项目中通常是通过@SpringBootApplication注解的scanBasePackages属性指定, 那这两则之间又是如何产生联系的呢, 在@SpringBootApplication注解的scanBasePackages属性中有这样一个注解@AliasFor(annotation = ComponentScan.class, attribute = “basePackages”), 看到这里应对都明白了,我们指定scanBasePackages属性,其实最终就是指定basePackages属性
5. @EnableAutoConfiguration注解
5.1 这是自动装配的核心注解, 它由@AutoConfigurationPackage和@Import(AutoConfigurationImportSelector.class)组成
5.2 @AutoConfigurationPackage注解是通过@Import(AutoConfigurationPackages.Registrar.class), 交给Spring管理了一个静态内部类Registrar.
static class Registrar implements ImportBeanDefinitionRegistrar, DeterminableImports {

@Override
	public void registerBeanDefinitions(AnnotationMetadata metadata, BeanDefinitionRegistry registry) {
		//获取当前注解所在的包名
		register(registry, new PackageImport(metadata).getPackageName());
	}

	@Override
	public Set<Object> determineImports(AnnotationMetadata metadata) {
		return Collections.singleton(new PackageImport(metadata));
	}

}
5.3这段代码的意思是说获取到当前注解所在的包名, 而当前注解通常是被最外层的@SpringBootConfiguration注解所包裹, 而@SpringBootConfiguration注解就是写在启动类上的,所以就相当于获取启动类所在的包名, 因为优先注入的是当前包下的bean, 因此当我们想把一些bean注入的优先级放到最大, 可以在启动类中注入bean.
public static void register(BeanDefinitionRegistry registry, String... packageNames) {
		if (registry.containsBeanDefinition(BEAN)) {
			BeanDefinition beanDefinition = registry.getBeanDefinition(BEAN);
			ConstructorArgumentValues constructorArguments = beanDefinition.getConstructorArgumentValues();
			constructorArguments.addIndexedArgumentValue(0, addBasePackages(constructorArguments, packageNames));
		}
		else {
			GenericBeanDefinition beanDefinition = new GenericBeanDefinition();
			//注册一个BasePackages类型的bean
			beanDefinition.setBeanClass(BasePackages.class);
			//将包名传入构造器
			beanDefinition.getConstructorArgumentValues().addIndexedArgumentValue(0, packageNames);
			beanDefinition.setRole(BeanDefinition.ROLE_INFRASTRUCTURE);
			registry.registerBeanDefinition(BEAN, beanDefinition);
		}
	}
5.4 先在spring中注册一个BasePackages类型的bean,再将将包名传入构造器, 大家都知道Springboot项目默认扫描的是当前包和子包, 这就是将当前包信息存储的bean, 而如果我们通过@SpringBootApplication指定了包名将走指定的包名,因为这个包名的会覆盖默认的包名.
5.5 @Import(AutoConfigurationImportSelector.class)实现自动装配
5.5.1 AutoConfigurationImportSelector类实现了DeferredImportSelector, 而DeferredImportSelector又实现了ImportSelector, 百度上很多博客说因为AutoConfigurationImportSelector实现了ImportSelector,所以自动装配的入口是重写的selectImports方法, 而大家在实际阅读源码的时候会发现, 根本没有走下面selectImports方法,下面我把源码贴出来,防止大家入坑, 那这又是为什么呢,很多人说这不是和Spring的ImportSelector作用冲突了吗,其实不然.
@Override
	public String[] selectImports(AnnotationMetadata annotationMetadata) {
		if (!isEnabled(annotationMetadata)) {
			return NO_IMPORTS;
		}
		AutoConfigurationMetadata autoConfigurationMetadata = AutoConfigurationMetadataLoader
				.loadMetadata(this.beanClassLoader);
		AutoConfigurationEntry autoConfigurationEntry = getAutoConfigurationEntry(autoConfigurationMetadata,
				annotationMetadata);
		return StringUtils.toStringArray(autoConfigurationEntry.getConfigurations());
	}
5.5.2 DeferredImportSelector方法是实现了ImportSelector,但是在这个类中又定义了一个getImportGroup方法, 如果实现类重写了这个方法, 同时实现类又通过内部类实现了DeferredImportSelector.Group的话,那么就不会走selectImports方法, 而是会走实现了DeferredImportSelector.Group类的process()和selectImports()方法
 @Nullable
    default Class<? extends DeferredImportSelector.Group> getImportGroup() {
        return null;
    }
5.5.3 我们通过阅读AutoConfigurationImportSelector的源码会发现, 这个类确实重写了getImportGroup方法, 同时实现类又通过内部类实现了DeferredImportSelector.Group, 因为在Spring容器启动的时候, 实际上会执行AutoConfigurationImportSelector中的下面两个方法.
//先执行process方法
@Override
	public void process(AnnotationMetadata annotationMetadata, DeferredImportSelector deferredImportSelector) {
		Assert.state(deferredImportSelector instanceof AutoConfigurationImportSelector,
				() -> String.format("Only %s implementations are supported, got %s",
						AutoConfigurationImportSelector.class.getSimpleName(),
						deferredImportSelector.getClass().getName()));
						//获取所有的需要自动装配的类的全类名和排除的全类名, 由AutoConfigurationEntry 来包装
		AutoConfigurationEntry autoConfigurationEntry = ((AutoConfigurationImportSelector) deferredImportSelector)
				.getAutoConfigurationEntry(getAutoConfigurationMetadata(), annotationMetadata);
		this.autoConfigurationEntries.add(autoConfigurationEntry);
		for (String importClassName : autoConfigurationEntry.getConfigurations()) {
			this.entries.putIfAbsent(importClassName, annotationMetadata);
		}
	}

	//再执行selectImports方法
	@Override
	public Iterable<Entry> selectImports() {
		if (this.autoConfigurationEntries.isEmpty()) {
			return Collections.emptyList();
		}
		Set<String> allExclusions = this.autoConfigurationEntries.stream()
				.map(AutoConfigurationEntry::getExclusions).flatMap(Collection::stream).collect(Collectors.toSet());
		Set<String> processedConfigurations = this.autoConfigurationEntries.stream()
				.map(AutoConfigurationEntry::getConfigurations).flatMap(Collection::stream)
				.collect(Collectors.toCollection(LinkedHashSet::new));
		processedConfigurations.removeAll(allExclusions);
		//将最终的结果集放入AutoConfigurationSorter中
		return sortAutoConfigurations(processedConfigurations, getAutoConfigurationMetadata()).stream()
				.map((importClassName) -> new Entry(this.entries.get(importClassName), importClassName))
				.collect(Collectors.toList());
	}
5.5.4 这里是获取自动装配类的核心代码, 通过这些代码,将需要自动装配的类最终包装成sortAutoConfigurations, 包装成这个类是因为自动装配类中可能存在依赖关系, 他可以解决这些复杂的依赖关系, 来决定优先装配哪个类
protected AutoConfigurationEntry getAutoConfigurationEntry(AutoConfigurationMetadata autoConfigurationMetadata,
			AnnotationMetadata annotationMetad`在这里插入代码片`ata) {
		if (!isEnabled(annotationMetadata)) {
			return EMPTY_ENTRY;
		}
		AnnotationAttributes attributes = getAttributes(annotationMetadata);

		//获取META-INF/spring.factories文件里EnableAutoConfiguration.class类型的全类型
		List<String> configurations = getCandidateConfigurations(annotationMetadata, attributes);

		//因为是所有的spring.factories文件,所以可能存在重复的, 需要去重
		configurations = removeDuplicates(configurations);

		//我们有时会在启动自动配置的时候主动过滤某些配置, 这里是获取开发者手动过滤的配置
		Set<String> exclusions = getExclusions(annotationMetadata, attributes);
		checkExcludedClasses(configurations, exclusions);

		//移除开发者手动过滤的配置
		configurations.removeAll(exclusions);

		//这个过滤的规则是通过spring-autoconfigure-metadata.properties文件中指定的规则进行filter
		configurations = filter(configurations, autoConfigurationMetadata);

		fireAutoConfigurationImportEvents(configurations, exclusions);

		//通过AutoConfigurationEntry包装结果
		return new AutoConfigurationEntry(configurations, exclusions);
	}
 private static Map<String, List<String>> loadSpringFactories(@Nullable ClassLoader classLoader) {
        MultiValueMap<String, String> result = (MultiValueMap)cache.get(classLoader);
        if (result != null) {
            return result;
        } else {
            try {
            	//读取META-INF/spring.factories文件
                Enumeration<URL> urls = classLoader != null ? classLoader.getResources("META-INF/spring.factories") : ClassLoader.getSystemResources("META-INF/spring.factories");
                LinkedMultiValueMap result = new LinkedMultiValueMap();

                while(urls.hasMoreElements()) {
                    URL url = (URL)urls.nextElement();
                    UrlResource resource = new UrlResource(url);
                    Properties properties = PropertiesLoaderUtils.loadProperties(resource);
                    Iterator var6 = properties.entrySet().iterator();

                    while(var6.hasNext()) {
                        Entry<?, ?> entry = (Entry)var6.next();
                        String factoryTypeName = ((String)entry.getKey()).trim();
                        String[] var9 = StringUtils.commaDelimitedListToStringArray((String)entry.getValue());
                        int var10 = var9.length;

                        for(int var11 = 0; var11 < var10; ++var11) {
                            String factoryImplementationName = var9[var11];
                            result.add(factoryTypeName, factoryImplementationName.trim());
                        }
                    }
                }

                cache.put(classLoader, result);
                return result;
            } catch (IOException var13) {
                throw new IllegalArgumentException("Unable to load factories from location [META-INF/spring.factories]", var13);
            }
        }
    }
5.5.5 我们在spring.factories文件中随便找一个EnableAutoConfiguration类型的实现类, 比如AopAutoConfiguration类, 会发现这个类中有一个@ConditionalOnProperty注解, 在springboot中之所以能实现按需装配,就是引入了@Conditional的一系列注解,这些注解的核心点就是满足了这个指定的条件,那我就将这个类交由spring管理, 开启这个类所有的自动注入
5.5.6 比如我现在想在项目中集成redis, 只需要导入spring-boot-starter-data-redis依赖, 然后再yml文件中配置redis参数,所有的东西都会自动装配完成, 因为springboot有一个RedisAutoConfiguration自动装配类, 当你导入了spring-boot-starter-data-redis依赖, RedisAutoConfiguration类中的@ConditionalOnClass(RedisOperations.class)条件就会被满足, 那么自动装配类中bean就会被Spring管理, 这就是为什么我们在Springboot项目中开发如此酸爽的原因. 至此自动装配的全流程已说清楚.
5.5.7 留两个思考问题, 1. 基于自动装配的源码实现, 如果我们想在Springboot项目中写一个自己的Spring-boot-start, 该如何实现呢? 2. 基于对Springboot的应用, Springboot的装配除了自动装配类的实现还有哪些实现方式, 我们可以自己做个技术总结吗, 举个简单例子, 如果我们的项目中引入了feign, 在不百度的情况下, 我如何知道阅读源码的入口呢, 在比如项目中引入了redis,我如何知道redis的源码入口呢
15. 容器启动完成, afterRefresh,由项目开发者自定义
15.1 这里是一个protected修饰的方法, 由开发者自定义
protected void afterRefresh(ConfigurableApplicationContext context, ApplicationArguments args) {
	}
16. started(,)发布ApplicationStartedEvent事件
16.1 通过事件派发器派发ApplicationStartedEvent事件
@Override
public void started(ConfigurableApplicationContext context) {
	context.publishEvent(new ApplicationStartedEvent(this.application, this.args, context));
}
17. 执行ApplicationRunner, CommandLineRunner的实现类
private void callRunners(ApplicationContext context, ApplicationArguments args) {
	List<Object> runners = new ArrayList<>();
	runners.addAll(context.getBeansOfType(ApplicationRunner.class).values());
	runners.addAll(context.getBeansOfType(CommandLineRunner.class).values());
	AnnotationAwareOrderComparator.sort(runners);
	for (Object runner : new LinkedHashSet<>(runners)) {
		if (runner instanceof ApplicationRunner) {
			callRunner((ApplicationRunner) runner, args);
		}
		if (runner instanceof CommandLineRunner) {
			callRunner((CommandLineRunner) runner, args);
		}
	}
}
17.1 如果项目中有实现了ApplicationRunner和CommandLineRunner接口的类, 这里将执行对应的实现方法, 通常我们可以在Springboot项目启动完成时想做一些的一些事情可以通过这两个类来做.
18. running(), 发布ApplicationReadyEvent事件
@Override
public void running(ConfigurableApplicationContext context) {
	context.publishEvent(new ApplicationReadyEvent(this.application, this.args, context));
}
19. 返回spring容器对象
19.1因为我们是servlet环境,因此返回的是org.springframework.boot.web.servlet.context.AnnotationConfigServletWebServerApplicationContext对象