前后端分离项目SpringBoot-Shiro-jwt处理401响应码的方案
问题现象:
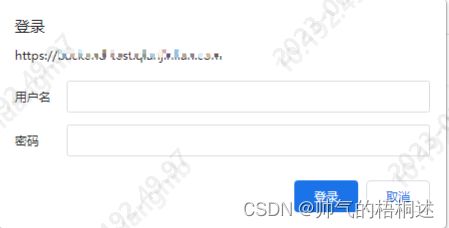
现在大多数项目已经实现前后端分离,当采用shiro作为安全框架时,如果请求的token已过期或未认证请求,会得到401的HTTP STATUS。此时在前端还会因为401的错误弹出一个登录认证的弹框。效果如下:
经分析,浏览器弹出该弹框,主要是由于请求头中包含了:
WWW-Authenticate: BASIC realm="application"
当客户端(浏览器)收到带有类似“WWW-Authenticate: Basic realm=“.””的信息后,将会弹出一个对话框,要求用户输入验证信息。在实际项目中我们可能不希望浏览器帮助做登录认证,而是希望返回到自己的登录页面。
问题分析:
首先分析为什么后台会返回401和在response header中添加WWW-Authenticate: BASIC realm="application"。这些可能在项目代码中压根都找不到的东西。这段东西的源码在:
org.apache.shiro.web.filter.authc.HttpAuthenticationFilter
中,详细截图如下:
    protected boolean onAccessDenied(ServletRequest request, ServletResponse response) throws Exception {
        boolean loggedIn = false;
        if (this.isLoginAttempt(request, response)) {
            loggedIn = this.executeLogin(request, response);
        }

        if (!loggedIn) {
            this.sendChallenge(request, response);
        }

        return loggedIn;
}上边的方法是访问拒绝处理的逻辑, isLoginAttempt(),该方法前面已经出现,通过请求头判断是否为尝试登陆,如果 true,则执行登录逻辑;反之,sendChallenge
    protected boolean sendChallenge(ServletRequest request, ServletResponse response) {
        log.debug("Authentication required: sending 401 Authentication challenge response.");
        HttpServletResponse httpResponse = WebUtils.toHttp(response);
        httpResponse.setStatus(401);
        String authcHeader = this.getAuthcScheme() + " realm=\"" + this.getApplicationName() + "\"";
        httpResponse.setHeader("WWW-Authenticate", authcHeader);
        return false;
    }
解决办法:
其实看到上边的源码之后,解决办法就差不多有了。那就是把
onAccessDenied
方法重写,让他走我们自己实现的方法。本文主要介绍JWT的解决办法。shiro+jwt通常都会自定义一个
JwtFilter extends BasicHttpAuthenticationFilter
看见了吧,这就是重点。既然继承了,那么当然可以重写父类的方法。至于怎么重写,写成什么样就根据自己的需求来了。本篇文章介绍另外一种方法,不重写onAccessDenied方法。
1、首先我们在JwtFilter中自定义一个401状态码的处理方法
    /**
     * 将非法请求跳转到 /401
     */
    private void response401(ServletRequest req, ServletResponse resp) {
        try {
            HttpServletResponse httpServletResponse = (HttpServletResponse) resp;
            httpServletResponse.sendRedirect("/401");
        } catch (IOException e) {
            LOGGER.error(e.getMessage());
        }
    }
2、在JwtFilter中一般有isAccessAllowed方法,里边会有认证失败的处理逻辑,我们把处理401请求的方法放到里边,实例如下:
    @Override
    protected boolean isAccessAllowed(ServletRequest request, ServletResponse response, Object mappedValue) {
        if (isLoginAttempt(request, response)) {
            try {
                executeLogin(request, response);
            } catch (Exception e) {
                response401(request, response);
            }
        }
        return true;
    }
3、然后搞个专门处理/401的接口,示例如下:
    @RequestMapping(path = "/401")
    @ResponseStatus(HttpStatus.UNAUTHORIZED)
    public Result unauthorized() {
        return ResultUtils.success(401, "未授权", null);
    }
4、最后配一下把所有未认证的请求转发到我们自定义的401接口上,配置如下:
 @Bean("shiroFilter")
    public ShiroFilterFactoryBean factory(DefaultWebSecurityManager securityManager) {
        ShiroFilterFactoryBean factoryBean = new ShiroFilterFactoryBean();

        // 添加自己的过滤器并且取名为jwt
        Map filterMap = new HashMap<>();
        filterMap.put("jwt", new JWTFilter());
        factoryBean.setFilters(filterMap);

        factoryBean.setSecurityManager(securityManager);
        factoryBean.setUnauthorizedUrl("/401");

        /*
         * 自定义url规则
         * http://shiro.apache.org/web.html#urls-
         */
        Map filterRuleMap = new HashMap<>();
        // 所有请求通过我们自己的JWT Filter
        filterRuleMap.put("/**", "jwt");
        // 访问401和404页面不通过我们的Filter
        filterRuleMap.put("/401", "anon");
        factoryBean.setFilterChainDefinitionMap(filterRuleMap);
        return factoryBean;
} 