Yolov8训练调试简单教程
文章目录
- 参考
- 前言
- YOLO: A Brief History
- 官方使用指南引导
- YOLOV8训练调试使用
-
- 训练
- 验证
- 预测
参考
YOLOv8自用训练教程——训练、测试、推理
代码下载地址
前言
YOLOV5跟YOLOV8的项目都是ultralytics发布的,刚下载YOLOV8的时候发现V8的项目跟V5变化还是挺大的,看了一下README同时看了看别人写的。大致是搞懂了V8具体使用。这一篇笔记,大部分都是项目里的文档内容。建议直接去看项目里的文档。
首先在V8中需要先安装pip install ultralytics,这是作者ultralytics出的第三方python库。
ultralytics在V8中提供两种使用模式:CLI跟python,CLI模式可以直接在命令行界面使用,如下:
yolo predict model=yolov8n.pt source='https://ultralytics.com/images/bus.jpg'
也可以在python的环境中使用,因为看这个项目,有时候需要debug去看每个环节的输出,所以还是更习惯用python环境,这一篇笔记主要也是记录python模式下的使用。先简单举个例子:
from ultralytics import YOLO

# 加载模型
model = YOLO("yolov8n.yaml")  # 从头开始构建新模型
model = YOLO("yolov8n.pt")  # 加载预训练模型(建议用于训练)

# 使用模型
model.train(data="coco128.yaml", epochs=3)  # 训练模型
metrics = model.val()  # 在验证集上评估模型性能
results = model("https://ultralytics.com/images/bus.jpg")  # 对图像进行预测
success = model.export(format="onnx")  # 将模型导出为 ONNX 格式
YOLO: A Brief History
这是文档里的介绍,简单总结就这东西很好。
YOLO (You Only Look Once), a popular object detection and image segmentation model, was developed by Joseph Redmon and Ali Farhadi at the University of Washington. Launched in 2015, YOLO quickly gained popularity for its high speed and accuracy.
-
YOLOv5 further improved the model’s performance and added new features such as hyperparameter optimization, integrated experiment tracking and automatic export to popular export formats.
-
YOLOv8 is the latest version of the YOLO object detection and image segmentation model. As a cutting-edge, state-of-the-art (SOTA) model, YOLOv8 builds on the success of previous versions, introducing new features and improvements for enhanced performance, flexibility, and efficiency.
YOLOv8的设计非常注重速度、尺寸和精度,使其成为各种视觉人工智能任务的令人注目的选择。它通过整合新的骨干网、新的无锚分头和新的损失函数等创新,超越了以前的版本。这些改进使YOLOv8能够提供卓越的结果,同时保持紧凑的尺寸和卓越的速度。
官方使用指南引导
官方的快速使用指南帮助文档地址如下:
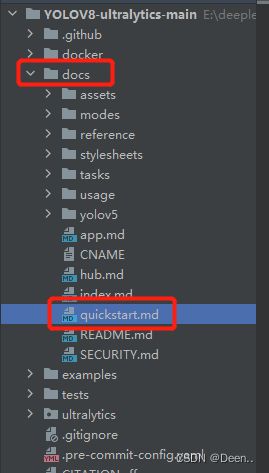
这个文件里简单的列举了安装、用CLI使用V8、用python环境使用V8。
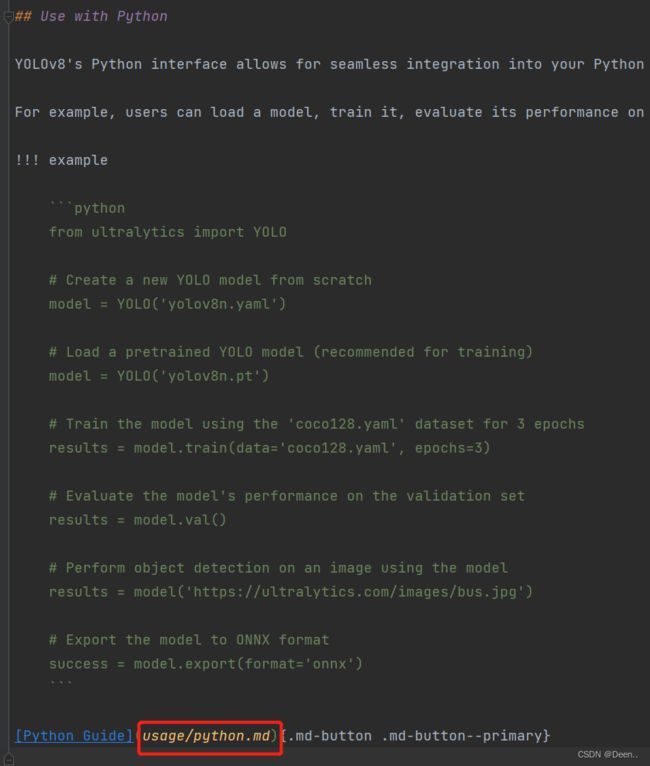
如下是用python环境使用V8,想要看具体怎么用python环境调试,直接点我画红框部分(ctrl+鼠标左键)。
YOLOV8训练调试使用
文档里内容很多,以下仅介绍这三部分,有精力还是建议去读帮助文档。
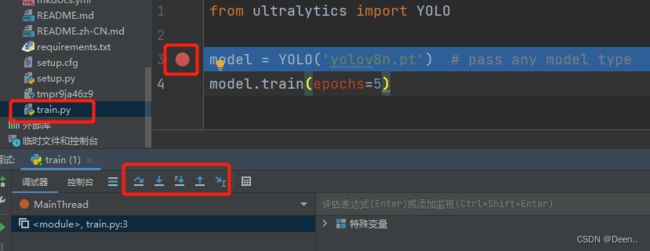
自己创建一个python文件,例如我创建了个叫train的文件:

然后把需要的代码写到这个文件里,直接run或者debug都行,这样子你就可以去看代码一步步是怎么进行了的。
训练
训练模式用于在自定义数据集上训练YOLOv8模型。在这种模式下,使用指定的数据集和超参数训练模型。训练过程包括优化模型的参数,使其能够准确预测图像中物体的类别和位置。
=== "From pretrained(recommended)"
    ```python
    #有预训练模型,默认使用coco数据集。
    from ultralytics import YOLO
	#加载了预训练模型,然后再进行5轮训练。
    model = YOLO('yolov8n.pt') # pass any model type
    model.train(epochs=5)
    ```

=== "From scratch"
    ```python
    #从0开始训练,没有预训练模型
    from ultralytics import YOLO
	#根据yolov8n.yaml的这文件重新搭建一个新的模型。
    model = YOLO('yolov8n.yaml')
    #然后从头开始训练。
    model.train(data='coco128.yaml', epochs=5)
    ```

=== "Resume"
    ```python
    #因为一些原因(停电等等)中断了之前的训练,然后想继续之前的训练,用resume。
    model = YOLO("last.pt")
    model.train(resume=True)
    ```
先来看YOLO这个类,这个类提供了两种方法,一个是_new(cfg:str),读取的是一个cfg的配置文件,其实就是yaml文件,另一个方法是_load(weights:str)直接读取模型。这两个方法都可以用来生成一个新的模型,用以后续的训练。:
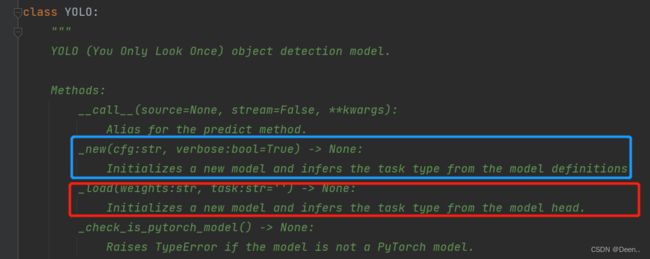
代码也很简单不管是model = YOLO('yolov8n.yaml')还是model = YOLO('yolov8n.pt')读进来的都是字符串,首先先获取读进来的字符串的后缀,然后判断后缀是yaml还是pt,然后对应的直接生成新模型。:
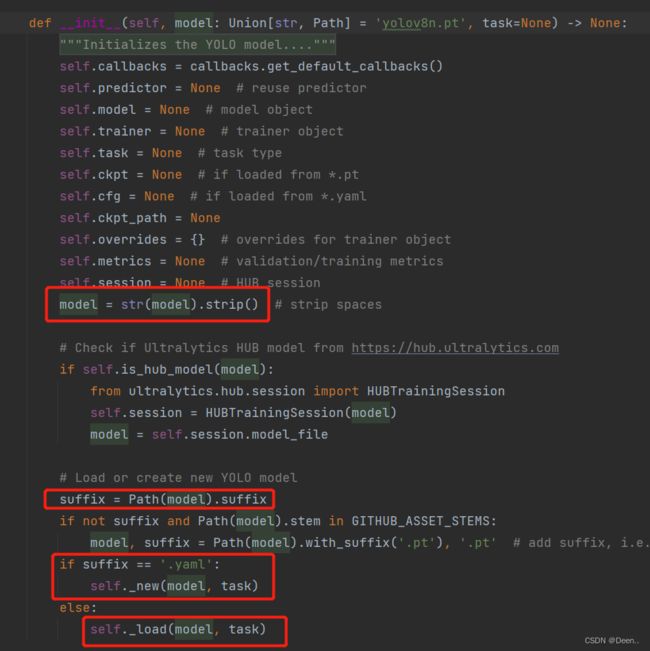
在帮助文档里还举了另一个例子,告诉我们,怎么把预训练权值加载到新建的模型里,如下代码所示model = YOLO('yolov8n.yaml').load('yolov8n.pt')这一句就是将yolov8n.pt这个预训练模型加载到通过yolov8n.yaml文件创建的新模型中。
在V5中很多参数(例如epochs, imgsz等等)在parser中可以直观的设置。
在v8中直接封装到train函数中,例如下列代码model.train(data='coco128.yaml', epochs=100, imgsz=640)我们需要将我们所需的设置传参给train函数。
    from ultralytics import YOLO

    # Load a model
    model = YOLO('yolov8n.yaml')  # build a new model from YAML
    model = YOLO('yolov8n.pt')  # load a pretrained model (recommended for training)
    model = YOLO('yolov8n.yaml').load('yolov8n.pt')  # build from YAML and transfer weights

    # Train the model
    model.train(data='coco128.yaml', epochs=100, imgsz=640)
下列是可传入train参数:
| Key | Value | Description |
|---|---|---|
model |
None |
模型路径. yolov8n.pt, yolov8n.yaml |
data |
None |
数据集路径, i.e. coco128.yaml |
epochs |
100 |
训练的总轮次 |
patience |
50 |
等待没有明显的改善,尽早停止训练的轮次 |
batch |
16 |
number of images per batch (-1 for AutoBatch) |
imgsz |
640 |
size of input images as integer or w,h |
save |
True |
save train checkpoints and predict results |
save_period |
-1 |
保存检查点每x个epoch ( (disabled if < 1) |
cache |
False |
True/ram, disk or False. 用于数据加载的Usle缓存 |
device |
None |
device to run on, i.e. cuda device=0 or device=0,1,2,3 or device=cpu |
workers |
8 |
number of worker threads for data loading (per RANK if DDP) 用于数据加载的工作线程数 |
project |
None |
project name 项目名称 |
name |
None |
experiment name 实验名称 |
exist_ok |
False |
whether to overwrite existing experiment 是否覆盖现有实验 |
pretrained |
False |
whether to use a pretrained model 是否使用预训练的模型 |
optimizer |
'SGD' |
optimizer to use, choices=[‘SGD’, ‘Adam’, ‘AdamW’, ‘RMSProp’] 使用优化器, |
verbose |
False |
whether to print verbose output 是否打印详细输出 |
seed |
0 |
random seed for reproducibility 随机种子的重现性 |
deterministic |
True |
whether to enable deterministic mode 是否启用确定性模式 |
single_cls |
False |
train multi-class data as single-class 将多类数据训练为单类 |
image_weights |
False |
use weighted image selection for training 使用加权图像选择进行训练 |
rect |
False |
rectangular training with each batch collated for minimum padding |
cos_lr |
False |
use cosine learning rate scheduler |
close_mosaic |
0 |
(int) disable mosaic augmentation for final epochs |
resume |
False |
resume training from last checkpoint |
amp |
True |
Automatic Mixed Precision (AMP) training, choices=[True, False] |
lr0 |
0.01 |
initial learning rate (i.e. SGD=1E-2, Adam=1E-3) |
lrf |
0.01 |
final learning rate (lr0 * lrf) |
momentum |
0.937 |
SGD momentum/Adam beta1 |
weight_decay |
0.0005 |
optimizer weight decay 5e-4 |
warmup_epochs |
3.0 |
warmup epochs (fractions ok) |
warmup_momentum |
0.8 |
warmup initial momentum |
warmup_bias_lr |
0.1 |
warmup initial bias lr |
box |
7.5 |
box loss gain |
cls |
0.5 |
cls loss gain (scale with pixels) |
dfl |
1.5 |
dfl loss gain |
pose |
12.0 |
pose loss gain (pose-only) |
kobj |
2.0 |
keypoint obj loss gain (pose-only) |
label_smoothing |
0.0 |
label smoothing (fraction) |
nbs |
64 |
nominal batch size |
overlap_mask |
True |
masks should overlap during training (segment train only) |
mask_ratio |
4 |
mask downsample ratio (segment train only) |
dropout |
0.0 |
use dropout regularization (classify train only) |
val |
True |
validate/test during training |
验证
Val模式用于YOLOv8模型训练后的验证。在这种模式下,模型在验证集上进行评估,以衡量其准确性和泛化性能。该模式可用于调优模型的超参数,以提高模型的性能。
=== "Val after training"
	#训练后验证
    ```python
      from ultralytics import YOLO

      model = YOLO('yolov8n.yaml')
      model.train(data='coco128.yaml', epochs=5) #训练五轮
      model.val() #训练完毕后进行验证集验证,会根据数据集的yaml文件寻找验证集 It'll automatically evaluate the data you trained.
    ```

=== "Val independently"
	#独立验证
    ```python
      from ultralytics import YOLO

      model = YOLO("model.pt") #先载入模型
      # It'll use the data yaml file in model.pt if you don't set data.
      model.val()# 如果不给验证函数val传参,他只验证模型里数据集yaml文件下的val数据。
      # or you can set the data you want to val
      model.val(data='coco128.yaml')#给验证函数传入数据集,模型对这个数据集进行验证。
    ```
帮助文档里还有一个例子:
这里例子里通过metrics.box.map等去获得模型的map情况。
    ```python
    from ultralytics import YOLO

    # Load a model 加载模型
    model = YOLO('yolov8n.pt')  # load an official model
    model = YOLO('path/to/best.pt')  # load a custom model

    # Validate the model 验证模型
    metrics = model.val()  # no arguments needed, dataset and settings remembered
    metrics.box.map    # map50-95
    metrics.box.map50  # map50
    metrics.box.map75  # map75
    metrics.box.maps   # a list contains map50-95 of each category
    ```
可传入val()函数的参数较训练模式少了一些,具体如下:
| Key | Value | Description |
|---|---|---|
data |
None |
path to data file, i.e. coco128.yaml |
imgsz |
640 |
image size as scalar or (h, w) list, i.e. (640, 480) |
batch |
16 |
number of images per batch (-1 for AutoBatch) |
save_json |
False |
save results to JSON file |
save_hybrid |
False |
save hybrid version of labels (labels + additional predictions) |
conf |
0.001 |
object confidence threshold for detection |
iou |
0.6 |
intersection over union (IoU) threshold for NMS |
max_det |
300 |
maximum number of detections per image |
half |
True |
use half precision (FP16) |
device |
None |
device to run on, i.e. cuda device=0/1/2/3 or device=cpu |
dnn |
False |
use OpenCV DNN for ONNX inference |
plots |
False |
show plots during training |
rect |
False |
rectangular val with each batch collated for minimum padding |
split |
val |
dataset split to use for validation, i.e. ‘val’, ‘test’ or ‘train’ |
预测
预测模式用于使用经过训练的YOLOv8模型对新图像或视频进行预测。在这种模式下,从检查点文件加载模型,用户可以提供图像或视频来执行推断。该模型预测输入图像或视频中对象的类别和位置。
不同的数据源的处理方法不同:
=== "From source"
    ```python
    from ultralytics import YOLO
    from PIL import Image
    import cv2

    model = YOLO("model.pt") #模型加载
    # accepts all formats - image/dir/Path/URL/video/PIL/ndarray. 0 for webcam
    #接受所有格式- image/dir/Path/URL/video/PIL/ndarray。0代表网络摄像头
    results = model.predict(source="0")
    results = model.predict(source="folder", show=True) # Display preds. Accepts all YOLO predict arguments

    # from PIL
    #通过PIL接受数据源
    im1 = Image.open("bus.jpg")
    results = model.predict(source=im1, save=True)  # save plotted images 保存绘制图片

    # from ndarray
    #通过opencv接受数据源
    im2 = cv2.imread("bus.jpg")
    results = model.predict(source=im2, save=True, save_txt=True)  # save predictions as labels

    # from list of PIL/ndarray
    #可以做列表接受两种数据源接受模式。
    results = model.predict(source=[im1, im2])
    ```
