Python爬虫实战:2020最新京东商品数据爬虫保姆式教程(小白也能懂)!
Python爬虫:基于Scrapy爬取京东商品数据并保存到mysql且下载图片
-
- 一、项目准备
- 二、网页及代码分析
- 三、完整代码
一、项目准备
创建scrapy京东项目
scrapy startproject Jingdong

cd Jingdong

scrapy genspider JD
修改和添加基本配置
from scrapy import cmdline

cmdline.execute("scrapy crawl JD".split())
二、网页及代码分析
代码分析
JD.py
# -*- coding: utf-8 -*-
import scrapy
from Jingdong.items import JingdongItem
import time


class JdSpider(scrapy.Spider):
    name = 'JD'
    allowed_domains = ['jingdong.com']
    start_urls = ['https://search.jd.com/Search?keyword=%E6%89%8B%E6%9C%BA&wq=%E6%89%8B%E6%9C%BA&page=1&s=1&click=0']
    #定义num和s,其实为page和s,通过修改用来进行多页爬取
    num = 1
    s = 1

    def parse(self, response):
        time.sleep(0.5)
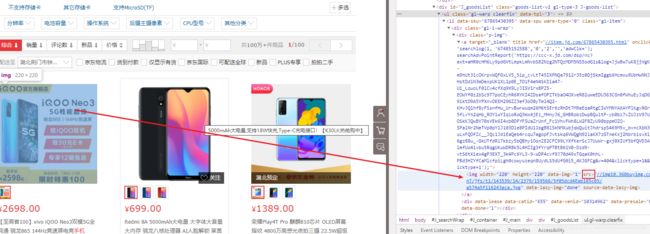
        #使用xpath语法找寻数据位置,可参考上图
        ul_list = response.xpath("//ul[@class='gl-warp clearfix']/li")
        for ul in ul_list:
            img_url = "http:" + ul.xpath(".//img/@src").get()
            price = ul.xpath(".//i/text()").get()
            title = ul.xpath(".//div[@class='p-name p-name-type-2']//em/text()").get()
            item = JingdongItem(img_url=img_url,title=title,price=price)
            yield item
        self.s += 50
        self.num += 2
        #注意要将s和num转化为string字符串再进行拼接
        next_url = "https://search.jd.com/Search?keyword=%E6%89%8B%E6%9C%BA&wq=%E6%89%8B%E6%9C%BA&page=" + str(self.num) + "&s=" + str(self.s) + "&click=0"
        #我们这里只爬取四页
        if self.num <= 7:
            print(next_url)
            print(self.num)
            #设置dont_filter=True不过滤重复网页,不设置的话只能爬取一页
            yield scrapy.Request(url=next_url,callback=self.parse,encoding="utf-8",dont_filter=True)
CREATE TABLE `jingdong` (
  `id` int(11) NOT NULL AUTO_INCREMENT,
  `img_url` varchar(255) DEFAULT NULL,
  `title` varchar(255) DEFAULT NULL,
  `price` decimal(10,2) DEFAULT NULL,
  PRIMARY KEY (`id`)
) ENGINE=InnoDB AUTO_INCREMENT=121 DEFAULT CHARSET=utf8mb4 COLLATE=utf8mb4_0900_ai_ci;
分析
# -*- coding: utf-8 -*-

# Define your item pipelines here
#
# Don't forget to add your pipeline to the ITEM_PIPELINES setting
# See: https://docs.scrapy.org/en/latest/topics/item-pipeline.html

from scrapy.pipelines.images import ImagesPipeline
import scrapy
import pymysql

#下载商品图片
class JingdongDownloadPipeline(ImagesPipeline):
    num = 0

    def get_media_requests(self, item, info):
        img_url = item['img_url']
        img_name = item['title']
        #传递img_name对图片进行重命名
        yield scrapy.Request(url=img_url,meta={"name":img_name},dont_filter=True)

    def file_path(self, request, response=None, info=None):
        name = request.meta["name"]
        self.num += 1
        #把图片名称中的\t和\n都替换掉
        img_name = str(name).replace("\t","").replace("\n","")
        #在图片名称最后拼上数字式使每张图片名称都不同(这是经过博主测试得到的)
        return img_name + str(self.num) + ".jpg"

#保存商品数据到Mysql
class JingdongPipeline(object):
    def __init__(self):
        dbparams = {
            'host': '127.0.0.1',
            'port': 3306,
            'user': 'mysql账号',
            'password': 'mysql密码',
            'database': 'jingdong', #数据库名称
            'charset': 'utf8'
        }
        self.conn = pymysql.connect(**dbparams)  #构建连接
        self.cursor = self.conn.cursor()  #创建一个游标
        self._sql = None

    def process_item(self,item,spider):
    	#执行sql语句
        self.cursor.execute(self.sql, (item['img_url'], item['title'], item['price']))
        self.conn.commit()  #事务提交
        return item

	#使用@property装饰器来创建只读属性,@property装饰器会将方法转换为相同名称的只读属性,可以与所定义的属性配合使用,这样可以防止属性被修改。
    @property
    def sql(self):
        if not self._sql:
            self._sql = """
                        insert into jingdong(id,img_url,title,price)
                        values(null ,%s,%s,%s)
                    """
            return self._sql
        return self._sql
三、完整代码
JD.py
# -*- coding: utf-8 -*-
import scrapy
from Jingdong.items import JingdongItem
import time


class JdSpider(scrapy.Spider):
    name = 'JD'
    allowed_domains = ['jingdong.com']
    start_urls = ['https://search.jd.com/Search?keyword=%E6%89%8B%E6%9C%BA&wq=%E6%89%8B%E6%9C%BA&page=1&s=1&click=0']
    num = 1
    s = 1
    def parse(self, response):
        time.sleep(0.5)
        ul_list = response.xpath("//ul[@class='gl-warp clearfix']/li")
        for ul in ul_list:
            img_url = "http:" + ul.xpath(".//img/@src").get()
            price = ul.xpath(".//i/text()").get()
            title = ul.xpath(".//div[@class='p-name p-name-type-2']//em/text()").get()
            item = JingdongItem(img_url=img_url,title=title,price=price)
            yield item
        self.s += 50
        self.num += 2
        next_url = "https://search.jd.com/Search?keyword=%E6%89%8B%E6%9C%BA&wq=%E6%89%8B%E6%9C%BA&page=" + str(self.num) + "&s=" + str(self.s) + "&click=0"
        if self.num <= 7:
            print(next_url)
            print(self.num)
            yield scrapy.Request(url=next_url,callback=self.parse,encoding="utf-8",dont_filter=True)
pipelines.py
# -*- coding: utf-8 -*-

# Define your item pipelines here
#
# Don't forget to add your pipeline to the ITEM_PIPELINES setting
# See: https://docs.scrapy.org/en/latest/topics/item-pipeline.html

from scrapy.pipelines.images import ImagesPipeline
import scrapy
import pymysql

class JingdongDownloadPipeline(ImagesPipeline):
    num = 0

    def get_media_requests(self, item, info):
        img_url = item['img_url']
        img_name = item['title']
        yield scrapy.Request(url=img_url,meta={"name":img_name},dont_filter=True)

    def file_path(self, request, response=None, info=None):
        name = request.meta["name"]
        self.num += 1
        img_name = str(name).replace("\t","").replace("\n","")
        return img_name + str(self.num) + ".jpg"

class JingdongPipeline(object):
    def __init__(self):
        dbparams = {
            'host': '127.0.0.1',
            'port': 3306,
            'user': 'root',
            'password': 'wad07244058664',
            'database': 'Jingdong',
            'charset': 'utf8'
        }
        self.conn = pymysql.connect(**dbparams)
        self.cursor = self.conn.cursor()
        self._sql = None

    def process_item(self,item,spider):
        self.cursor.execute(self.sql, (item['img_url'], item['title'], item['price']))
        self.conn.commit()
        return item

    @property
    def sql(self):
        if not self._sql:
            self._sql = """
                        insert into jingdong(id,img_url,title,price)
                        values(null ,%s,%s,%s)
                    """
            return self._sql
        return self._sql
settings.py
# -*- coding: utf-8 -*-

# Scrapy settings for Jingdong project
#
# For simplicity, this file contains only settings considered important or
# commonly used. You can find more settings consulting the documentation:
#
#     https://docs.scrapy.org/en/latest/topics/settings.html
#     https://docs.scrapy.org/en/latest/topics/downloader-middleware.html
#     https://docs.scrapy.org/en/latest/topics/spider-middleware.html

BOT_NAME = 'Jingdong'

SPIDER_MODULES = ['Jingdong.spiders']
NEWSPIDER_MODULE = 'Jingdong.spiders'


LOG_LEVEL = "ERROR"

# Crawl responsibly by identifying yourself (and your website) on the user-agent
#USER_AGENT = 'Jingdong (+http://www.yourdomain.com)'

# Obey robots.txt rules
ROBOTSTXT_OBEY = False

# Configure maximum concurrent requests performed by Scrapy (default: 16)
#CONCURRENT_REQUESTS = 32

# Configure a delay for requests for the same website (default: 0)
# See https://docs.scrapy.org/en/latest/topics/settings.html#download-delay
# See also autothrottle settings and docs
#DOWNLOAD_DELAY = 3
# The download delay setting will honor only one of:
#CONCURRENT_REQUESTS_PER_DOMAIN = 16
#CONCURRENT_REQUESTS_PER_IP = 16

# Disable cookies (enabled by default)
#COOKIES_ENABLED = False

# Disable Telnet Console (enabled by default)
#TELNETCONSOLE_ENABLED = False

# Override the default request headers:
DEFAULT_REQUEST_HEADERS = {
  'Accept': 'text/html,application/xhtml+xml,application/xml;q=0.9,*/*;q=0.8',
  'Accept-Language': 'en',
  'user-agent': 'Mozilla/5.0 (Windows NT 10.0; Win64; x64) AppleWebKit/537.36 (KHTML, like Gecko) Chrome/83.0.4103.116 Safari/537.36'
}

# Enable or disable spider middlewares
# See https://docs.scrapy.org/en/latest/topics/spider-middleware.html
#SPIDER_MIDDLEWARES = {
#    'Jingdong.middlewares.JingdongSpiderMiddleware': 543,
#}

# Enable or disable downloader middlewares
# See https://docs.scrapy.org/en/latest/topics/downloader-middleware.html
# DOWNLOADER_MIDDLEWARES = {
#    'Jingdong.middlewares.JingdongDown': 543,
# }

# Enable or disable extensions
# See https://docs.scrapy.org/en/latest/topics/extensions.html
#EXTENSIONS = {
#    'scrapy.extensions.telnet.TelnetConsole': None,
#}

# Configure item pipelines
# See https://docs.scrapy.org/en/latest/topics/item-pipeline.html
ITEM_PIPELINES = {
   'Jingdong.pipelines.JingdongDownloadPipeline': 1,
   # 'Jingdong.pipelines.JingdongPipeline': 300,
}

# Enable and configure the AutoThrottle extension (disabled by default)
# See https://docs.scrapy.org/en/latest/topics/autothrottle.html
#AUTOTHROTTLE_ENABLED = True
# The initial download delay
#AUTOTHROTTLE_START_DELAY = 5
# The maximum download delay to be set in case of high latencies
#AUTOTHROTTLE_MAX_DELAY = 60
# The average number of requests Scrapy should be sending in parallel to
# each remote server
#AUTOTHROTTLE_TARGET_CONCURRENCY = 1.0
# Enable showing throttling stats for every response received:
#AUTOTHROTTLE_DEBUG = False

# Enable and configure HTTP caching (disabled by default)
# See https://docs.scrapy.org/en/latest/topics/downloader-middleware.html#httpcache-middleware-settings
#HTTPCACHE_ENABLED = True
#HTTPCACHE_EXPIRATION_SECS = 0
#HTTPCACHE_DIR = 'httpcache'
#HTTPCACHE_IGNORE_HTTP_CODES = []
#HTTPCACHE_STORAGE = 'scrapy.extensions.httpcache.FilesystemCacheStorage'

import os

IMAGES_STORE = "Download"
items.py
# -*- coding: utf-8 -*-

# Define here the models for your scraped items
#
# See documentation in:
# https://docs.scrapy.org/en/latest/topics/items.html

import scrapy


class JingdongItem(scrapy.Item):
    img_url = scrapy.Field()
    price = scrapy.Field()
    title = scrapy.Field()
到这也算结束了,觉得博主写的不错的可以点赞收藏关注哦,谢谢各位!
本次爬取京东虽然完成,但还是有些美中不足,那就是京东的每页有60条数据,默认加载30条数据,还有30数据需要向下滑动滚轮才会继续加载,这就需要使用到Selenium操纵滚轮进行滑动,但本次博主没有使用,有强迫症的读者大大可以看我的下一篇文章。
Python爬虫:Selenium+BeautifulSoup实现对京东商品完整数据的爬取
博主会持续更新,有兴趣的小伙伴可以点赞、关注和收藏下哦,你们的支持就是我创作最大的动力!
更多博主开源爬虫教程目录索引(宝藏教程,你值得拥有!)
本文爬虫源码已由 GitHub https://github.com/2335119327/PythonSpider 已经收录(内涵更多本博文没有的爬虫,有兴趣的小伙伴可以看看),之后会持续更新,欢迎Star。
![]()


