Vue3-路由跳转专题详细总结
一、基本路由
点击事件似乎可以使用模板更改视图中的内容,个人认为与路由的区别是路由能使网页中的地址栏发生变化
请先阅读基础第二篇

1.创建一个组件,并引入
![]()
2.js文件中配置路径
//name相当于别名
     {
        path:'/tabView',
        component:TabView
      },
     {
        name:'myComPany',
        path:'company',
        component:Company,
      }
3.使用方式
<router-link to="/tabView">首页router-link>
- 携带参数
query
   <router-link :to="{
                path: '/tabView',
                query: {
                  title: 'query路由传值tabView',
                },
              }"
   >首页router-link>
query传参可以用name,也可以用path
  <router-link
              :to="{
                name: 'myComPany',
                params: {
                  title: '使用params进行company路由传参必须要用name命名',
                },
              }"
              >首页router-link
            >
只能用name
   <router-link :to="`/home/comPus/666/使用params传值`" class="botTabFather"
              >校园招聘<span class="hotTab"
                ><p class="txt">hot</p></span
              ></router-link
            >
直接在路径中传递,前提要保证路由文件中已经声明传递的变量值,否则会当作路径处理
     {
        path:'comPus/:id/:title',
        component:ComPus
      },
- 路由文件中携带参数
    {
        name:'myComPany',
        path:'company',
        component:Company,
        // props: {
        //   id:1,
        //   title: '路由中带参数'
        // },
        props: true
      }
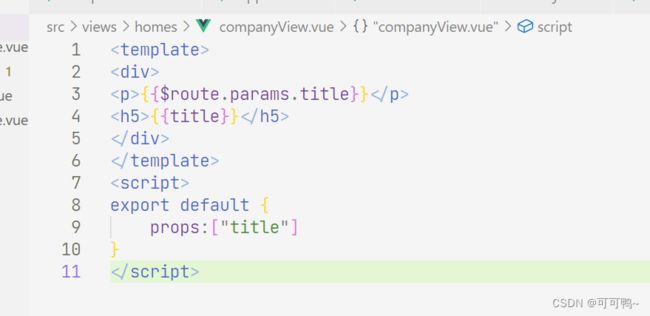
props为true时,从当前组件中引入传参变量就可以使用路由中携带的参数,使用方式如下

二、嵌套路由
嵌套路由,顾名思义就是套娃,因而有着严格的父子关系,实际开发中三四层比较常见,至多就是七层。下面以home页面为例子,进行说明路由嵌套的实质关系。
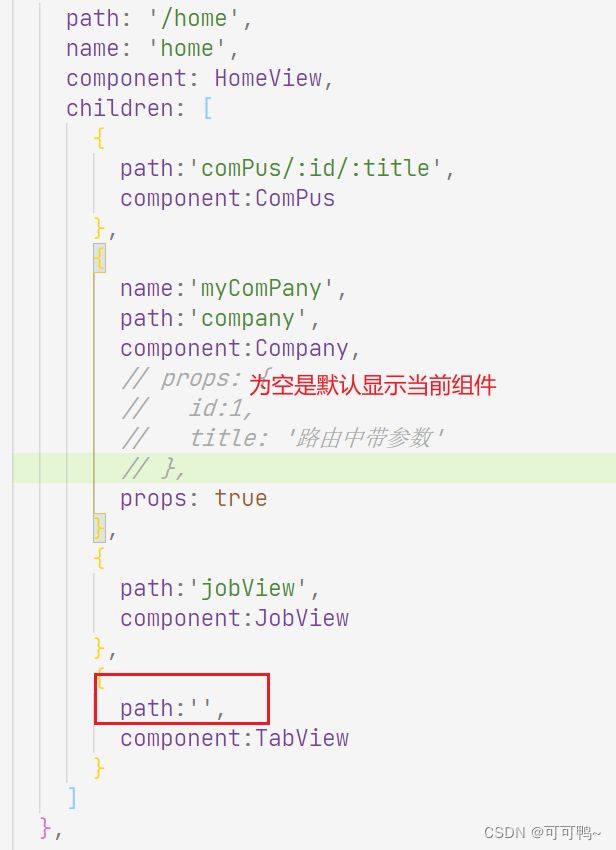
1.确定父亲是home,其它几个页面都是home的孩子,写法如下
在孩子中不需要去写/,默认系统在你引入父级路径下自动给你添加过了,孩子的默认展示页面是不需要写路径名的,子页面的使用方式:
path: '/home/JobView',
三、编程式路由导航
<template>
    <div>
        <button @click="toindexpage">跳转到首页</button>
    </div>
</template>
<script>
export default {
    methods:{
        toindexpage(){
            console.log("跳转到about页面")
            this.$router.push({path:'/about'})
//this.$router.push({path:'/mypage/123'})
//携带参数
//this.$router.push({name:"mypage",params:{id:132}})
        }
    }
}
</script>
<template>
  <div class="bar">
    <div class="barCom w">
      <div class="leftNav">
        <ul>
          <li><a href="https://www.lagou.com/" class="logo"></a></li>
          <li>
            <a href="" class="cIcon green">全国站<em></em></a>
          </li>
          <li class="defaultNav">
            <router-link to="/home">首页</router-link>
          </li>
          <li>
            <router-link
              :to="{
                path: '/home/JobView',
                query: {
                  title: 'query路由传值JobView',
                },
              }"
            >
              职位</router-link
            >
          </li>
          <li>
            <router-link
              :to="{
                name: 'myComPany',
                params: {
                  title: '使用params进行company路由传参必须要用name命名',
                },
              }"
              >公司</router-link
            >
          </li>
          <li>
            <router-link :to="`/home/comPus/666/使用params传值`" class="botTabFather"
              >校园招聘<span class="hotTab"
                ><p class="txt">hot</p></span
              ></router-link
            >
          </li>
          <li>
            <a href="" class="botTabFather"
              >课程<span class="hotTab"><p class="txt">hot</p></span></a
            >
          </li>
          <li><a href="" class="green">拉勾App</a></li>
        </ul>
      </div>
      <div class="rightNav">
        <ul>
          <li><a href="" @click.prevent="pushLoginPage">登录</a></li>
          <li><span class="grey">|</span></li>
          <li><a href="" @click.prevent="pushRegisterPage">注册</a></li>
          <li><a href="">进入企业版</a></li>
        </ul>
      </div>
    </div>
  </div>
</template>
<script>
export default {
  methods:{
    pushLoginPage(){
      this.$router.push({
        path:"/loginPage"
      });
    },
  },
};
</script>
<style scoped>
.barCom {
  line-height: 40px;
  color: white;
  font-size: 13px;
}
.leftNav {
  float: left;
}
.leftNav ul li {
  float: left;
}
a,
router-link {
  display: block;
  padding: 0 21px;
  color: #afb5c0;
  transition: color 0.3s;
}
a:hover,
router-link {
  color: #ffffff;
}
.logo {
  width: 66px;
  height: 40px;
  background-repeat: no-repeat;
  background-size: 66px auto;
  background-position: center center;
  background-image: url(https://lagou-zhaopin-fe.lagou.com/fed/lg-www-fed/image/20210624/1624523613071.png);
}
.cIcon {
  height: 40px;
  position: relative;
  margin-right: 20px;
}
em {
  position: absolute;
  height: 0;
  width: 0;
  border-width: 5px;
  border-style: solid;
  border-color: #5f646d transparent transparent;
  right: 3px;
  top: 18px;
}
.green {
  color: #00b188;
}
.defaultNav {
  background-color: #24282c;
}
.defaultNav a {
  color: #fff;
}
.grey {
  color: #afb5c0;
}
.leftNav ul li:nth-child(2) a:hover,
.leftNav ul li:nth-child(8) a:hover {
  color: #00b188;
}

.leftNav ul li:nth-child(8) a:before {
  content: "";
  display: inline-block;
  margin: 0 2px 0 13px;
  width: 13px;
  height: 16px;
  vertical-align: text-bottom;
  background-repeat: no-repeat;
  background-size: 13px auto;
  background-position: center center;
  background-image: url("https://www.lgstatic.com/lg-www-fed/common/widgets/header_c/modules/topbar/img/icon_phone_a4c2aad.png");
}
.botTabFather {
  position: relative;
}

.hotTab {
  position: absolute;
  top: 3px;
  right: -3px;
  width: 27px;
  height: 16px;
  line-height: 14px;
  font-size: 12px;
  color: #fff;
  text-align: center;
  background: #ff7452;
  border-radius: 9px;
  z-index: 1;
}
.txt {
  -webkit-transform: scale(0.9);
}

.rightNav {
  float: right;
  margin-right: 20px;
}
.rightNav ul li {
  float: left;
}
.rightNav ul li:nth-child(1) a,
.rightNav ul li:nth-child(3) a {
  padding: 0;
}
.rightNav ul li:nth-child(3) a {
  padding-right: 21px;
}
.rightNav ul li:nth-child(2) span {
  padding: 0 7px;
}
.rightNav ul li:nth-child(1) a {
  position: relative;
}
.rightNav ul li:nth-child(1) a:before {
  position: absolute;
  top: 11px;
  left: -26px;
  width: 18px;
  height: 18px;
  content: "";
  vertical-align: text-bottom;
  background-repeat: no-repeat;
  background-size: 18px auto;
  background-position: center center;
  background-image: url("https://www.lgstatic.com/lg-www-fed/common/widgets/header_c/modules/topbar/img/icon_login@2x_a6d7b9d.png");
}
</style>
<template>
  <div class="content">
<a href="" @click.prevent="pushRegisterPage">注册</a>
  </div>
</template>

<script>
export default {
  methods:{
    pushRegisterPage(){
      console.log("此处是替换路由")
      this.$router.replace({
        path:"/loginPage"
      });
    },
  },
};
</script>
四、Vue3缓存路由组件
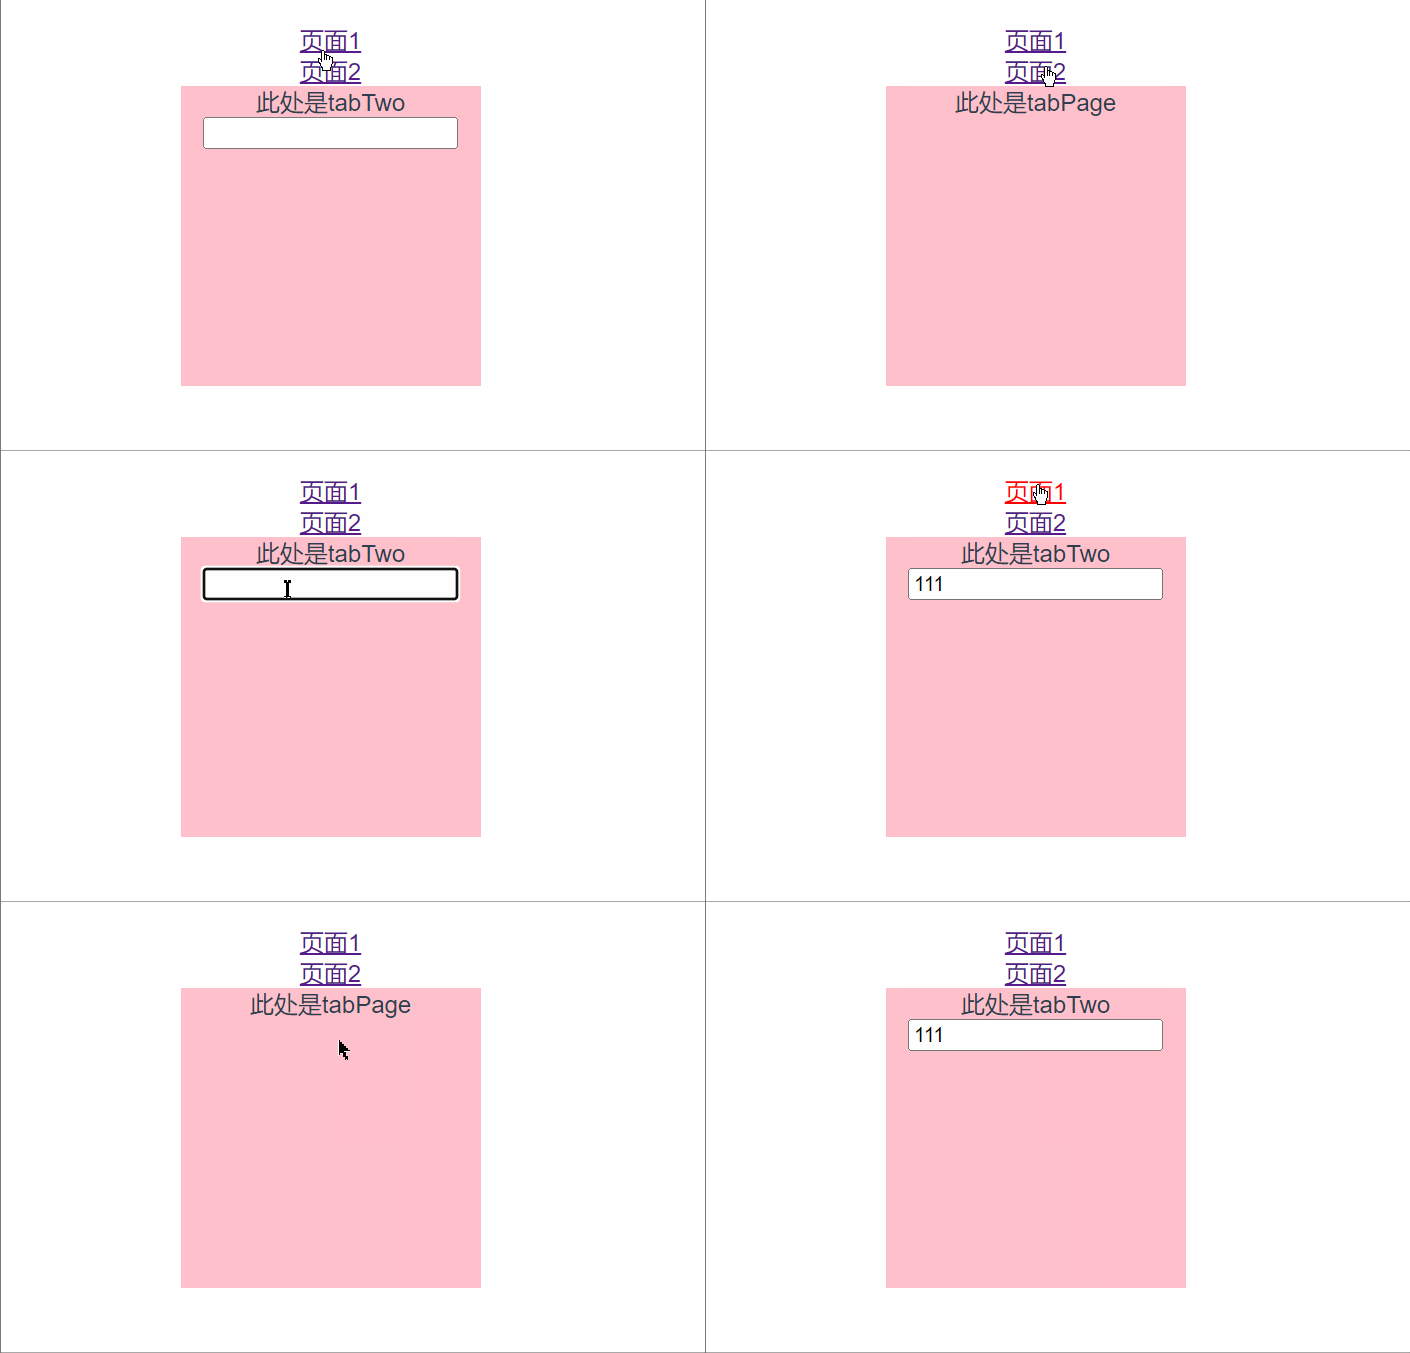
目的是将组件在页面的呈现效果保存,可以是整个路由组件分页面全部保存也可以是部分保存。
示例效果

vue3中引入keep-alive与vue2中效果稍作区别,使用规则可粘贴如下代码
  <router-view v-slot="{ Component }">
        <keep-alive :include="['TabTwo', 'TabPage']">
          <Component :is="Component" />
        </keep-alive>
      </router-view>
include中则是限制保存那些页面,根据每个页面下写的name区分
<template>
  <div>
    此处是tabTwo
    <br />
    <input type="text" />
  </div>
</template>
<script>
export default {
  name: "TabTwo",
};
</script>
在对应页面路由中粘贴以下配置
   meta: {
          keepAlive: true, //此页面需要缓存
        },
五、Vue3路由守卫
全局路由守卫
import {
  createRouter,
  createWebHashHistory
} from 'vue-router'
import HomeView from '../views/HomeView.vue'
import Company from '../views/homes/companyView.vue'
import ComPus from '../views/homes/campusView.vue'
import JobView from '../views/homes/JobView.vue'
import TabView from '../views/homes/TabView.vue'
import LoginPage from '../views/LoginPage.vue'
import RegisterPage from '../views/RegisterPage.vue'
const routes = [{
    path: '/',
    component: HomeView,
    children: [{
        // 新增
        meta: {
          keepAlive: true, //此页面需要缓存
        },
        path: 'comPus/:id/:title',
        component: ComPus
      },
      {
        name: 'myComPany',
        path: 'company',
        component: Company,
        // props: {
        //   id:1,
        //   title: '路由中带参数'
        // },
        props: true
      },
      {
        path: 'jobView',
        component: JobView
      },
      {
        path: '',
        component: TabView
      }
    ]
  },
  {
    meta: {
      keepAlive: true, //此页面需要缓存
    },
    path: '/loginPage',
    component: LoginPage
  },
  {
    path: '/registerPage',
    component: RegisterPage,
    meta: {
      isAuth: true,
      title: "注册"
    }
  }

]

const router = createRouter({
  history: createWebHashHistory(),
  routes
})
router.beforeEach((to, from, next) => {
  if (to.meta.isAuth) {
    console.log("注册页面路由守卫");
    next();
  }
  console.log("前置路由守卫,跳转之前触发");
  next(); //如果想要继续访问使用next()调用起来
})
router.beforeResolve((to, from, next) => {
  console.log("全局解析守卫 在所有组件内守卫和异步路由组件被解析之后触发");
  next();
})
router.afterEach((to, from) => {
  console.log("后置路由守卫,完成跳转触发");
  document.title = to.meta.title || "拉勾招聘"; //更改文件标题名称,放在放行之前
})

export default router
独享路由守卫
{
        // 新增
        meta: {
          keepAlive: true, //此页面需要缓存
        },
        path: 'comPus/:id/:title',
        component: ComPus,
        beforeEnter: (to, from, next) => {
          console.log("独享只有前置路由守卫");
        }
      },
组件路由守卫
//通过组件进入路由时进行调用
  beforeRouteEnter(){
        console.log("通过路由规则路由进入")
    },
    beforeRouteUpdate(){
        console.log("路由更新组件")
    },
    beforeRouteLeave(){
        console.log("通过路由规则路由离开组件")
    }


