【Spring MVC】这几种传参方式这么强大,让我爱不释手,赶快与我一起去领略吧 ! ! !
前言:
大家好,我是良辰丫,在上2一篇文章中我们已经初步认识了Spring MVC,并且学习了热部署的配置,今天我们将继续开始我们的Spring MVC的学习! ! !
个人主页:良辰针不戳
所属专栏:javaEE进阶篇之框架学习
励志语句:生活也许会让我们遍体鳞伤,但最终这些伤口会成为我们一辈子的财富。
期待大家三连,关注,点赞,收藏。
作者能力有限,可能也会出错,欢迎大家指正。
愿与君为伴,共探Java汪洋大海。
目录
- 1. Spring MVC
- 2. 整型等基本类型传参的问题
- 3. 参数传递对象
- 4. 表单传递参数
- 5. 后端参数重命名(映射)
- 6. 后端接收前端的JSON对象
- 7. 获取URL中参数
- 8. 上传文件
1. Spring MVC
- 我们在上一篇文章了学习了Spring MVC在Spring Boot的重要性,但是Spring MVC毕竟不是Spring Boot,我还是带大家一起去了解一下Spring MVC.
Spring MVC是Spring Framework提供的Web组件,全称是Spring Web MVC,是目前主流的实现MVC设计模式的框架,提供前端路由映射、视图解析等功能.- 有人可能会问?这就够了?确实够了,咱们已经会使用Spring MVC了,现在我们又了解了Spring MVC在Spring Boot中干了什么,这就够了,在我们脑海中一定默念Spring MVC并不是Spring Boot.
2. 整型等基本类型传参的问题
在上一篇文章我们学习了基本参数的参数的传递,但忽略了一个细节,我们来看一下是什么呢?
package com.example.demo;

import org.springframework.web.bind.annotation.RequestMapping;
import org.springframework.web.bind.annotation.RestController;

@RestController
@RequestMapping("/user3")
public class User3 {
    @RequestMapping("/hello")
    public String say(int id){
        return id + " , " + "叶良辰";
    }
}
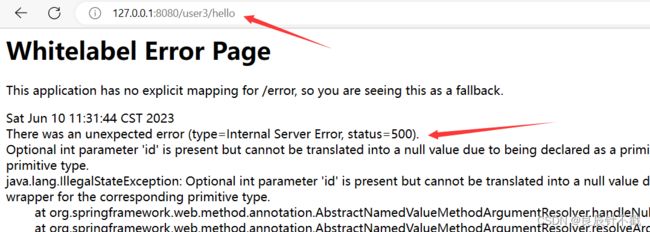
当我们代码中传递的是整型的基本参数的时候,如果访问页面的时候进行传参了,那么能够访问成功.
但是当我们访问页面不进行传参的时候,页面就会报错.

如果我们把基本类型换成包装类型呢,我们把int换成Integer?
package com.example.demo;

import org.springframework.web.bind.annotation.RequestMapping;
import org.springframework.web.bind.annotation.RestController;

@RestController
@RequestMapping("/user3")
public class User3 {
    @RequestMapping("/hello")
    public String say(Integer id){
        return id + " , " + "叶良辰";
    }
}
我们会发现访问页面不传参的时候,属性会为null,但并不会报错.
3. 参数传递对象
我们的Student类还是使用Lombok的注解,毕竟这个东西是真的香.
package com.example.demo;

import lombok.Data;

@Data
public class Student {
    private int id;
    private String name;
}
package com.example.demo;

import org.springframework.web.bind.annotation.RequestMapping;
import org.springframework.web.bind.annotation.RestController;

@RestController
@RequestMapping("/user4")
public class User4 {
    @RequestMapping("/show")
    public String show(Student student){
        return student.toString();
    }
}
4. 表单传递参数
在这里我们先用postman构造,后面我们会血洗前后端交互,大家不要着急哦.
package com.example.demo;

import org.springframework.web.bind.annotation.RequestMapping;
import org.springframework.web.bind.annotation.RestController;

@RestController
@RequestMapping("/user5")
public class User5 {
    @RequestMapping("/show")
    public Object func(int id,String name){
        return "/test.html";
    }
}
5. 后端参数重命名(映射)
- 有时候前端传递的参数 key 和我们后端接收的 key 可以不⼀致,⽐如前端传递了⼀个num 给后端,⽽后端⼜是有 id 字段来接收的,这样就会出现参数接收不到的情况,如果出现这种情况,我们就可以使⽤ @RequestParam 来重命名前后端的参数值。
- 也就是通过RequestParam这个注解,前后端字段名字不一样的时候也可以进行交互.
package com.example.demo;

import org.springframework.web.bind.annotation.RequestMapping;
import org.springframework.web.bind.annotation.RequestParam;
import org.springframework.web.bind.annotation.RestController;

@RequestMapping("/user6")
@RestController
public class User6 {
    @RequestMapping("/show")
    public String show(@RequestParam("num") Integer id,
                       @RequestParam("str") String name){
        return "id : "+id+"
"
                +"name : "+name;
    }
}
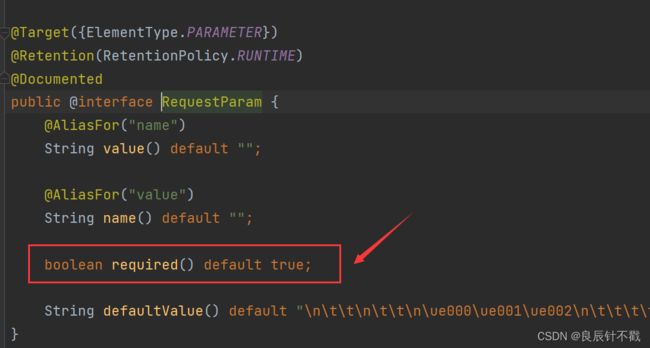
@RequestParam这个注解还有隐藏的功能,进入该注解的源码中,我们会发现,它有一个required方法,表示请求,它默认为true,也就是说如果有参数前端页面必须要传.
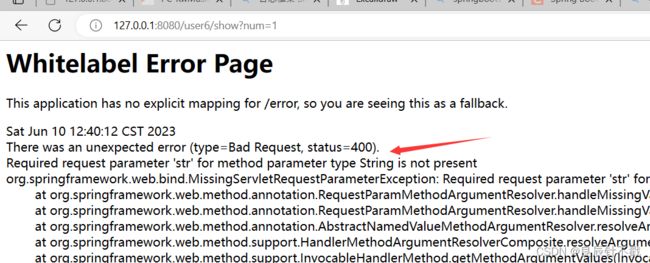
前端页面没有传它有的某个参数的时候,它会报错.
我们接下来把name属性修改为false,这个时候呢,不传该参数也不会报错.
package com.example.demo;

import org.springframework.web.bind.annotation.RequestMapping;
import org.springframework.web.bind.annotation.RequestParam;
import org.springframework.web.bind.annotation.RestController;

@RequestMapping("/user6")
@RestController
public class User6 {
    @RequestMapping("/show")
    public String show(@RequestParam("num") Integer id,
                       @RequestParam(value = "str",required = false) String name){
        return "id : "+id+"
"
                +"name : "+name;
    }
}
6. 后端接收前端的JSON对象
- 很多情况下前后端的交互是通过json的格式来进行传递的,因此呢,这种方式是我们必须掌握的.
- json是通过body来构造请求的,post请求中有body,get请求往往没有body,因此我们采取post的方式.
后端代码如下:
package com.example.demo;

import lombok.Data;

@Data
public class Student {
    private int id;
    private String name;
}
package com.example.demo;

import org.springframework.web.bind.annotation.PostMapping;
import org.springframework.web.bind.annotation.RequestBody;
import org.springframework.web.bind.annotation.RequestMapping;
import org.springframework.web.bind.annotation.RestController;

@RestController
@RequestMapping("/user7")
public class User7 {
    @PostMapping("/show")
    public String show(@RequestBody Student student){
        return student.toString();
    }
}
接下来我们通过postman来构造前端的json请求.
7. 获取URL中参数
这种方式不需要去使用问号去连接,我们可以按照我们指定的方式.
package com.example.demo;

import org.springframework.web.bind.annotation.PathVariable;
import org.springframework.web.bind.annotation.RequestMapping;
import org.springframework.web.bind.annotation.RestController;

@RequestMapping("/user8")
@RestController
public class User8 {
    @RequestMapping("/login/{username}/{password}")
    public String login(@PathVariable("username") String username,
                        @PathVariable("password") String password) {
        return "账号 : "+username + "
" + "密码 : "+password;
    }
}
当然我们也可以在我们的传参中加上别的东西,比如and,加了之后,必须要按照这种格式进行页面访问.
package com.example.demo;

import org.springframework.web.bind.annotation.PathVariable;
import org.springframework.web.bind.annotation.RequestMapping;
import org.springframework.web.bind.annotation.RestController;

@RequestMapping("/user8")
@RestController
public class User8 {
    @RequestMapping("/login/{username}/and/{password}")
    public String login(@PathVariable("username") String username,
                        @PathVariable("password") String password) {
        return "账号 : "+username + "
" + "密码 : "+password;
    }
}
8. 上传文件
package com.example.demo;

import org.springframework.web.bind.annotation.RequestMapping;
import org.springframework.web.bind.annotation.RequestPart;
import org.springframework.web.bind.annotation.RestController;
import org.springframework.web.multipart.MultipartFile;

import java.io.File;
import java.io.IOException;
@RequestMapping("/user9")
@RestController
public class User9 {
    @RequestMapping("/file")
    public String upfile(@RequestPart("myfile") MultipartFile file) throws IOException {
        String path = "D:\\aaa\\img.png";
        // 把文件保存到path路径
        file.transferTo(new File(path));
        return path;
    }
}
我们使用postman来构造一下上传图片的请求.
- 自己输入自己后端定义的key : myfile.
- 选择file.
- select选择自己要上传的图片
- 点击send上传成功.
我们接下来看一下我们的文件夹里面是否有该图片,可见图片已经保存在该路径下.
但是在这里我们有发现一系列的问题.
- 如果我们多次上传不同的图片,新的图片就会把旧的图片覆盖掉.
- 这里指的是上传文件,但是我们已经指定了后缀,那么如果我们想上传别的文件呢?
- 一系列的问题油然而生,接下来我们就要去解决它.
我们的做法是把目录的每个部分进行拼接.
package com.example.demo;

import org.springframework.web.bind.annotation.RequestMapping;
import org.springframework.web.bind.annotation.RequestPart;
import org.springframework.web.bind.annotation.RestController;
import org.springframework.web.multipart.MultipartFile;

import java.io.File;
import java.io.IOException;
import java.util.UUID;

@RestController
@RequestMapping("/user10")
public class User10 {
    @RequestMapping("/file")
    public String myUpFile(@RequestPart("myfile") MultipartFile file) throws IOException {
        // 根目录
        String path = "D:\\aaa\\";
        // 根目录 + 文件名(这是随机生成的)
        path += UUID.randomUUID().toString().replace("-", "");
        // 根目录 + 文件名 + 文件的后缀(这是截取到的)
        path += file.getOriginalFilename().substring(file.getOriginalFilename().lastIndexOf("."));
        // 保存到指定的路径中
        file.transferTo(new File(path));
        return path;
    }
}
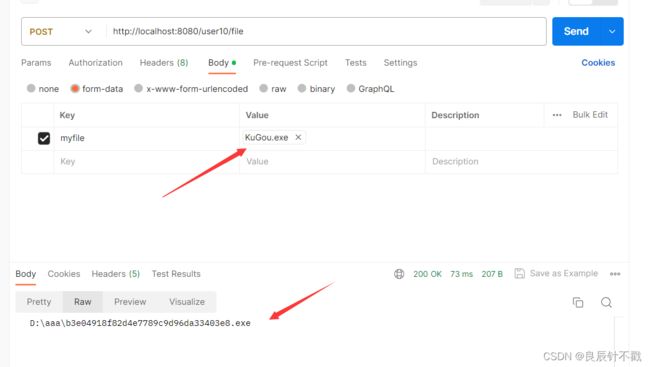
现在我们可以上传各种各样的代码.
后序:
今天我们的内容到这里就结束了,想必大家已经对Spring MVC的几种传参方式熟悉了,希望小小的文章可以帮助到大家.


