Yolov5(tag v7.0)网络结构解读,以yolov5s为例
最近yolov5用的多,发现确实好用,于是较深入学了一下。下面按照训练的流程梳理一下网络的结构,同时也是自己记一下便于后面查阅。
同时,我也查了一些关于yolov5网络结构介绍的资料,发现大多是v5.0,少数v6.0的,我是从v7.0开始用,所以对比v7.0的代码有出入,于是打算梳理一下yolov5s的v7.0版本的网络结构。
1、模型构建, 在train.py下关于模型的定义
# Model
  check_suffix(weights, '.pt')  # check weights
  pretrained = weights.endswith('.pt')
  """定义模型的加载,是否是预训练模型还是配置文件格式的网络结构"""
  if pretrained:
      with torch_distributed_zero_first(LOCAL_RANK):
          weights = attempt_download(weights)  # download if not found locally
      ckpt = torch.load(weights, map_location='cpu')  # load checkpoint to CPU to avoid CUDA memory leak
      model = Model(cfg or ckpt['model'].yaml, ch=3, nc=nc, anchors=hyp.get('anchors')).to(device)  # create
      exclude = ['anchor'] if (cfg or hyp.get('anchors')) and not resume else []  # exclude keys
      csd = ckpt['model'].float().state_dict()  # checkpoint state_dict as FP32
      csd = intersect_dicts(csd, model.state_dict(), exclude=exclude)  # intersect
      model.load_state_dict(csd, strict=False)  # load
      LOGGER.info(f'Transferred {len(csd)}/{len(model.state_dict())} items from {weights}')  # report
  else:
  	  """不是预训练模型加载网络配置文件,通过cfg参数传入,可在models下找到,如models/yolov5s.yaml"""
      model = Model(cfg, ch=3, nc=nc, anchors=hyp.get('anchors')).to(device)  # create
根据上面的代码,我们看else后面的网络构建方法,这是以配置文件cfg传入,可以进行自定义和修改网络。可以看到 Model 有四个传入参数:
cfg 是网络配置文件
ch 是输入数据维度(通道)rgb图像
nc 是数据集类别数量
anchors 没细看,自查
然后去定义 Model 的位置,找到models.yolo,可以看到:
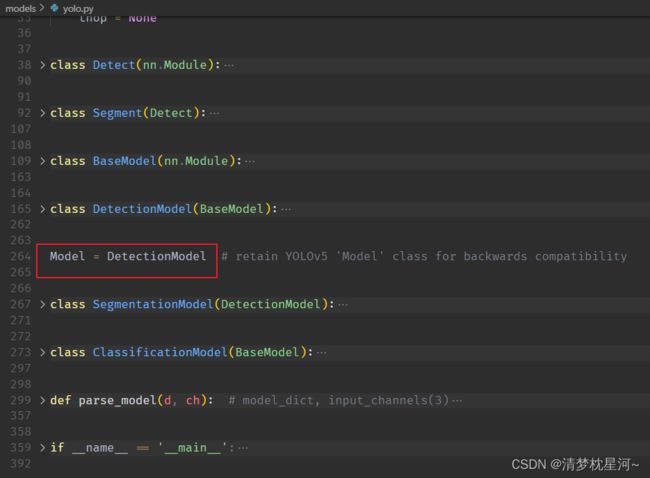
Model = DetectionModel,DetectionModel继承于BaseModel,BaseModel继承于torch的类nn.Model,基本上知道了模型的构建流程。
再根据参数cfg看一下具体的网络构建:
class DetectionModel(BaseModel):
    # YOLOv5 detection model
    def __init__(self, cfg='yolov5s.yaml', ch=3, nc=None, anchors=None):  # model, input channels, number of classes
        super().__init__()
        if isinstance(cfg, dict):
            self.yaml = cfg  # model dict
        else:  # is *.yaml
            import yaml  # for torch hub
            self.yaml_file = Path(cfg).name
            with open(cfg, encoding='ascii', errors='ignore') as f:
                self.yaml = yaml.safe_load(f)  # model dict

        # Define model
        ch = self.yaml['ch'] = self.yaml.get('ch', ch)  # input channels
        if nc and nc != self.yaml['nc']:
            LOGGER.info(f"Overriding model.yaml nc={self.yaml['nc']} with nc={nc}")
            self.yaml['nc'] = nc  # override yaml value
        if anchors:
            LOGGER.info(f'Overriding model.yaml anchors with anchors={anchors}')
            self.yaml['anchors'] = round(anchors)  # override yaml value
        """self.model是构建好的模型"""
        self.model, self.save = parse_model(deepcopy(self.yaml), ch=[ch])  # model, savelist
        self.names = [str(i) for i in range(self.yaml['nc'])]  # default names
        self.inplace = self.yaml.get('inplace', True)
上面的模型构建代码中,self.model是构建好的模型,可以发现网络构建的具体执行由函数parse_model()完成
self.model, self.save = parse_model(deepcopy(self.yaml), ch=[ch])
从上可以发现函数parse_model()的输入是cfg对应的配置文件,如yolov5s.yaml,ch表示初始输入数据维度(通道),具体看看函数是如何构建网络的,可以结合后面贴上的以yolov5s.yaml为例的内容看
def parse_model(d, ch):  # model_dict, input_channels(3)
    # Parse a YOLOv5 model.yaml dictionary
    LOGGER.info(f"\n{'':>3}{'from':>18}{'n':>3}{'params':>10}  {'module':<40}{'arguments':<30}")
    anchors, nc, gd, gw, act = d['anchors'], d['nc'], d['depth_multiple'], d['width_multiple'], d.get('activation')

    """anchors, nc, gd, gw分别是yolov5s的

    nc: 80  # number of classes
	depth_multiple: 0.33  # model depth multiple
	width_multiple: 0.50  # layer channel multiple
	anchors:
  	- [10,13, 16,30, 33,23]  # P3/8
  	- [30,61, 62,45, 59,119]  # P4/16
  	- [116,90, 156,198, 373,326]  # P5/32

	"""
    if act:
        Conv.default_act = eval(act)  # redefine default activation, i.e. Conv.default_act = nn.SiLU()
        LOGGER.info(f"{colorstr('activation:')} {act}")  # print
    na = (len(anchors[0]) // 2) if isinstance(anchors, list) else anchors  # number of anchors
    no = na * (nc + 5)  # number of outputs = anchors * (classes + 5)

	"""开始构建网络"""
    layers, save, c2 = [], [], ch[-1]  # layers, savelist, ch out
    for i, (f, n, m, args) in enumerate(d['backbone'] + d['head']):  # from, number, module, args
    	"""
    	d['backbone'] + d['head']表示yolov5s.yaml的backbone和head的信息
    	f, n, m, args分别对应如下列表中每个单元的信息,f表示从哪一层输入,n表示该模块的数量,m表示模块名称,如Conv,args表示该模块数据进入的具体信息,[64, 6, 2, 2],64表示输出维度,6表示卷积核大小,2表示卷积步长,第二个2看具体定义
    	[[-1, 1, Conv, [64, 6, 2, 2]],  # 0-P1/2
   		[-1, 1, Conv, [128, 3, 2]],  # 1-P2/4
   		[-1, 3, C3, [128]],
   		[-1, 1, Conv, [256, 3, 2]],  # 3-P3/8
   		[-1, 6, C3, [256]],
   		[-1, 1, Conv, [512, 3, 2]],  # 5-P4/16
   		[-1, 9, C3, [512]],
   		[-1, 1, Conv, [1024, 3, 2]],  # 7-P5/32
   		[-1, 3, C3, [1024]],
   		[-1, 1, SPPF, [1024, 5]],  # 9
  		]
    	"""
        m = eval(m) if isinstance(m, str) else m  # eval strings
        for j, a in enumerate(args):
            with contextlib.suppress(NameError):
                args[j] = eval(a) if isinstance(a, str) else a  # eval strings

        n = n_ = max(round(n * gd), 1) if n > 1 else n  # depth gain
        """
        m表示模块名称,通用的模块放一块便于设置输入输出的参数信息c1,c2
        """
        if m in {
                Conv, GhostConv, Bottleneck, GhostBottleneck, SPP, SPPF, DWConv, MixConv2d, Focus, CrossConv,
                BottleneckCSP, C3, C3TR, C3SPP, C3Ghost, nn.ConvTranspose2d, DWConvTranspose2d, C3x}:
            """
            c1,c2表示该模块的数据输入输出维度,ch[f]=ch[-1]=3,具体看前面ch定义,表示数据输入维度;args[0]对应上面的64,说明该层输出的数据维度为64
            """
            c1, c2 = ch[f], args[0]
            if c2 != no:  # if not output
                c2 = make_divisible(c2 * gw, 8)

            args = [c1, c2, *args[1:]]
            if m in {BottleneckCSP, C3, C3TR, C3Ghost, C3x}:
                args.insert(2, n)  # number of repeats
                n = 1
        elif m is nn.BatchNorm2d:
            args = [ch[f]]
        elif m is Concat:
            c2 = sum(ch[x] for x in f)
        # TODO: channel, gw, gd
        elif m in {Detect, Segment}:
            args.append([ch[x] for x in f])
            if isinstance(args[1], int):  # number of anchors
                args[1] = [list(range(args[1] * 2))] * len(f)
            if m is Segment:
                args[3] = make_divisible(args[3] * gw, 8)
        elif m is Contract:
            c2 = ch[f] * args[0] ** 2
        elif m is Expand:
            c2 = ch[f] // args[0] ** 2
        else:
            c2 = ch[f]

		"""
		m_ 把模块m (如Conv)和 m 的输入参数 args 进行实例化并通过nn.sequential来把模块连接起来构建成网络
		"""
        m_ = nn.Sequential(*(m(*args) for _ in range(n))) if n > 1 else m(*args)  # module
        t = str(m)[8:-2].replace('__main__.', '')  # module type
        np = sum(x.numel() for x in m_.parameters())  # number params
        m_.i, m_.f, m_.type, m_.np = i, f, t, np  # attach index, 'from' index, type, number params
        LOGGER.info(f'{i:>3}{str(f):>18}{n_:>3}{np:10.0f}  {t:<40}{str(args):<30}')  # print
        save.extend(x % i for x in ([f] if isinstance(f, int) else f) if x != -1)  # append to savelist
        layers.append(m_)
        if i == 0:
            ch = []
        ch.append(c2)
        """ch用于记录各层的输出维度,所以上面每次循环时的ch[f]=ch[-1]都会等于上一层的输出维度,可以保证数据维度对应"""
    return nn.Sequential(*layers), sorted(save)
    """
    最终由layers.append(m_)把各个模块实例化连接后再通过nn.Sequential(*layers)搭建成网络,由此得到model,完成模型构建
    """
下面是yolov5s.yaml的具体内容:
# YOLOv5  by Ultralytics, GPL-3.0 license

# Parameters
nc: 80  # number of classes
depth_multiple: 0.33  # model depth multiple
width_multiple: 0.50  # layer channel multiple
anchors:
  - [10,13, 16,30, 33,23]  # P3/8
  - [30,61, 62,45, 59,119]  # P4/16
  - [116,90, 156,198, 373,326]  # P5/32

# YOLOv5 v6.0 backbone
backbone:
  # [from, number, module, args]
  [[-1, 1, Conv, [64, 6, 2, 2]],  # 0-P1/2
   [-1, 1, Conv, [128, 3, 2]],  # 1-P2/4
   [-1, 3, C3, [128]],
   [-1, 1, Conv, [256, 3, 2]],  # 3-P3/8
   [-1, 6, C3, [256]],
   [-1, 1, Conv, [512, 3, 2]],  # 5-P4/16
   [-1, 9, C3, [512]],
   [-1, 1, Conv, [1024, 3, 2]],  # 7-P5/32
   [-1, 3, C3, [1024]],
   [-1, 1, SPPF, [1024, 5]],  # 9
  ]

# YOLOv5 v6.0 head
head:
  [[-1, 1, Conv, [512, 1, 1]],
   [-1, 1, nn.Upsample, [None, 2, 'nearest']],
   [[-1, 6], 1, Concat, [1]],  # cat backbone P4
   [-1, 3, C3, [512, False]],  # 13

   [-1, 1, Conv, [256, 1, 1]],
   [-1, 1, nn.Upsample, [None, 2, 'nearest']],
   [[-1, 4], 1, Concat, [1]],  # cat backbone P3
   [-1, 3, C3, [256, False]],  # 17 (P3/8-small)

   [-1, 1, Conv, [256, 3, 2]],
   [[-1, 14], 1, Concat, [1]],  # cat head P4
   [-1, 3, C3, [512, False]],  # 20 (P4/16-medium)

   [-1, 1, Conv, [512, 3, 2]],
   [[-1, 10], 1, Concat, [1]],  # cat head P5
   [-1, 3, C3, [1024, False]],  # 23 (P5/32-large)

   [[17, 20, 23], 1, Detect, [nc, anchors]],  # Detect(P3, P4, P5)
  ]
下面是我根据查的结构图在yolov5s.yaml的基础上做的修改

可以看出backbone部分网络做下采样操作,在第四层、第六层和第九层分别对应8,16,32倍下采样的输出数据进行后续neck处理,neck部分先是第十层做上采样到4倍下采样再继续做下采样,相当于做了两遍数据融合