【Python】浅谈python和PLC的直接通讯(深度解析)
文章目录
- 前言
- 一、Snap7到底是什么?
- 二、开发环境搭建的详细步骤
-
- 1.安装Snap7
- 2.安装python-snap7
- 4.读写PLC
- 实战实操(重点)
前言
PLC(Programmable Logic Controller)可编程逻辑控制器,可以理解为一个微型计算机,广泛应用于工业控制中,如楼宇智控、精密机床、汽车电子等等。
随着物联网的兴起,越来越多的传统工业设备需要和外界通信,但很多情况下,类似PLC这种微控制器,由于自身硬件的因素,无法直接与外界互联互通,通过PC这种上位机作为一个中介桥梁,为PLC与外界沟通打开了一扇门。
Python作为当前最火的语言,在AI、云计算等诸多方面都能看到它的身影,当然在工业控制中,也不能少了它。
这里,就小说一把如何使用Python构建PC与PLC的通信,也算show一把Python在工控领域的风采。
提示:以下是本篇文章正文内容,下面案例可供参考
一、Snap7到底是什么?
当前市场上主流的PLC通信方式为网络通信和串行通信。网络通信这块主要协议有profinet,modbus-tcp等,串行通信主要是基于RS232/485的modbus居多。
本次接触到的是西门子S7系列的PLC,通信方式都为网络型的,而Snap7正是一个开源的、32/64位的、多平台的以太网通讯库:
支持多硬件体系结构(i386/x86_64、ARM/ARM64、Sun Sparc、Mips)
支持多系统(Windows、Linux、BSD、Solaris)
支持多语言(C/C++、Phyton、Node.js、Pascal、C#、VB)
官网为: http://snap7.sourceforge.net/
Python对其进行了封装,具体可以参见:
https://github.com/gijzelaerr/python-snap7
二、开发环境搭建的详细步骤
这里主要从Windows和Linux(Ubuntu)两个平台,说说如何搭建Python环境下的Snap7开发环境。
Python的安装这里就不再赘述,环境搭建主要就是Snap7和python-snap7两个库的安装。
1.安装Snap7
Windows下,需要根据Python的结构版本(32位/64位),将下载的Snap7的发布库copy到对应的Python安装根目录下即可。
如上图所示,我的python是32bit,所以需要将Snap7中Win32目录下的文件copy到python的安装根目录下,如下图所示:

Linux(Ubuntu)下安装,相对简单些,按如下命令即可:
2.安装python-snap7
nap7的python库安装就简单很多了,不管是Windows还是Linux,直接pip安装即可。
$ pip install python-snap7
经过上面两步,环境就算搭建好了,通过一个连接测试代码试试,判断下环境是否搭建正常。
import snap7
client = snap7.client.Client()
client.connect(‘192.168.0.1’, 0, 1)
client.disconnect()
如果是下图提示,则环境正常(192.168.0.1的PLC不存在)
4.读写PLC

环境搭建正常后,在正式建立通信前PLC还需做些配置工作,主要是开发自身的读写权限,具体参照下图配置:

通过上述配置,PLC可以正常通信了。
结合python-snap7的文档API和源码分析,python-sna7重要的两个方法是read_area和write_area,通过这两个方法就能读和写PLC的对应存储地址。
def read_area(self, area, dbnumber, start, size):
       """This is the main function to read data from a PLC.
       With it you can read DB, Inputs, Outputs, Merkers, Timers and Counters.

       :param dbnumber: The DB number, only used when area= S7AreaDB
       :param start: offset to start writing
       :param size: number of units to read
       """
       assert area in snap7.snap7types.areas.values()
       wordlen = snap7.snap7types.S7WLByte
       type_ = snap7.snap7types.wordlen_to_ctypes[wordlen]
       logger.debug("reading area: %s dbnumber: %s start: %s: amount %s: "
                     "wordlen: %s" % (area, dbnumber, start, size, wordlen))
       data = (type_ * size)()
       result = self.library.Cli_ReadArea(self.pointer, area, dbnumber, start,
                               size, wordlen, byref(data))
       check_error(result, context="client")
       return bytearray(data)

   @error_wrap
   def write_area(self, area, dbnumber, start, data):
       """This is the main function to write data into a PLC. It's the
       complementary function of Cli_ReadArea(), the parameters and their
       meanings are the same. The only difference is that the data is
       transferred from the buffer pointed by pUsrData into PLC.

       :param dbnumber: The DB number, only used when area= S7AreaDB
       :param start: offset to start writing
       :param data: a bytearray containing the payload
       """
       wordlen = snap7.snap7types.S7WLByte
       type_ = snap7.snap7types.wordlen_to_ctypes[wordlen]
       size = len(data)
       logger.debug("writing area: %s dbnumber: %s start: %s: size %s: "
                     "type: %s" % (area, dbnumber, start, size, type_))
       cdata = (type_ * len(data)).from_buffer_copy(data)
       return self.library.Cli_WriteArea(self.pointer, area, dbnumber, start,
                              size, wordlen, byref(cdata))
从参数可见,需要提供PLC的区域地址、起始地址、读和写的数据长度。
区域地址什么东西,PLC能提供的是如下信息:

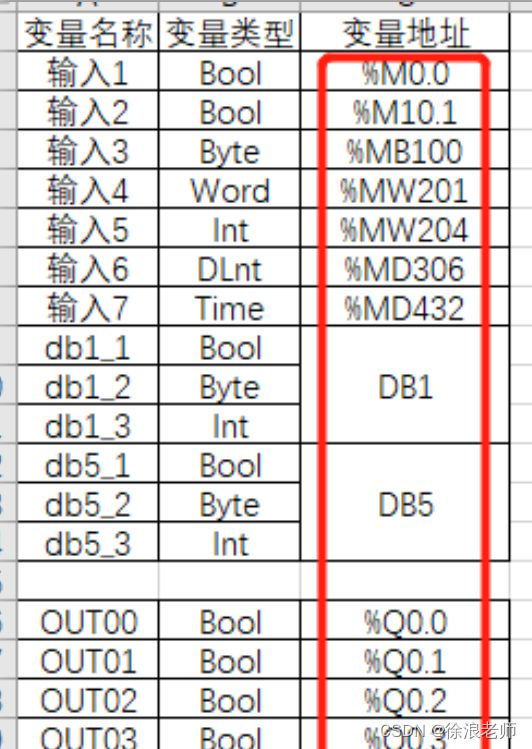
PLC程序员的眼里只有I、M、Q、DB,
python程序员,现在慌了一比,这是what?
如何才能看到PLC程序员眼里的美丽风景,就得多看一眼PLC了。
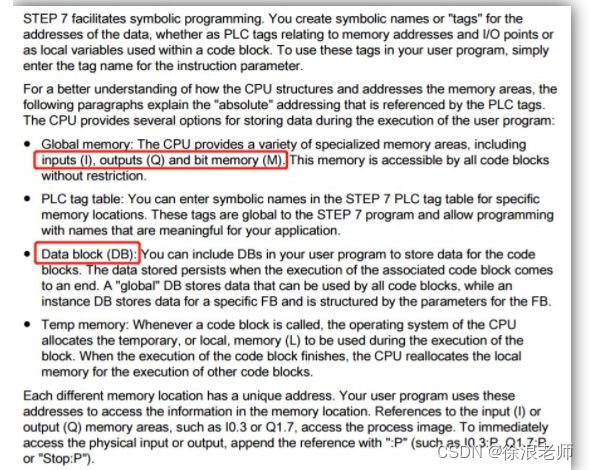
PLC的数据存储通过tag的形式与存储区间关联,分为输入(I)、输出(O)、位存储(M)和数据块(DB),程序在访问对应(I/O)tag时,是通过访问CPU的Process Image Out,对相应地址进行操作,具体对应关系如下:
到这里就能明白python-snap7中定义的areas地址是什么含义了。
areas = ADict({
‘PE’: 0x81, #input
‘PA’: 0x82, #output
‘MK’: 0x83, #bit memory
‘DB’: 0x84, #DB
‘CT’: 0x1C, #counters
‘TM’: 0x1D, #Timers
})
现在离读写PLC还差最后一步,就是起始地址如何确定呢?

从上可见对于M3.4,对应的就是M(0x83),起始地址是3,对应bit位是4。
实战实操(重点)
经过上面的精心准备,下面就来一波实战。
通过读写PLC的M10.1、MW201来具体看看如何读写PLC。
import struct
import time

import snap7

def plc_connect(ip, rack=0, slot=1):
   """
   连接初始化
   :param ip:
   :param rack: 通常为0
   :param slot: 根据plc安装,一般为0或1
   :return:
   """
   client = snap7.client.Client()
   client.connect(ip, rack, slot)
   return client


def plc_con_close(client):
   """
   连接关闭
   :param client:
   :return:
   """
   client.disconnect()

def test_mk10_1(client):
   """
   测试M10.1
   :return:
   """
   area = snap7.snap7types.areas.MK
   dbnumber = 0
   amount = 1
   start = 10
   print(u'初始值')
   mk_data = client.read_area(area, dbnumber, start, amount)
   print(struct.unpack('!c', mk_data))

   print(u'置1')
   client.write_area(area, dbnumber, start, b'\x01')
   print(u'当前值')
   mk_cur = client.read_area(area, dbnumber, start, amount)
   print(struct.unpack('!c', mk_cur))

def test_mk_w201(client):
   """
   测试MW201,数据类型为word
   :param client:
   :return:
   """
   area = snap7.snap7types.areas.MK
   dbnumber = 0
   amount = 2
   start = 201
   print(u'初始值')
   mk_data = client.read_area(area, dbnumber, start, amount)
   print(struct.unpack('!h', mk_data))

   print(u'置12')
   client.write_area(area, dbnumber, start, b'\x00\x0C')
   print(u'当前值')
   mk_cur = client.read_area(area, dbnumber, start, amount)
   print(struct.unpack('!h', mk_cur))

   time.sleep(3)
   print(u'置3')
   client.write_area(area, dbnumber, start, b'\x00\x03')
   print(u'当前值')
   mk_cur = client.read_area(area, dbnumber, start, amount)
   print(struct.unpack('!h', mk_cur))

if __name__ == "__main__":
   client_fd = plc_connect('192.168.0.1')
   test_mk10_1(client_fd)
   test_mk10_1(client_fd)
   plc_con_close(client_fd)
从代码可见,MW201,根据M确定area为MK,根据W确定数据amount为2Btye,根据201确定start为201,读出来的数据根据数据长度用struct进行unpack,写数据对应strcut的pack。
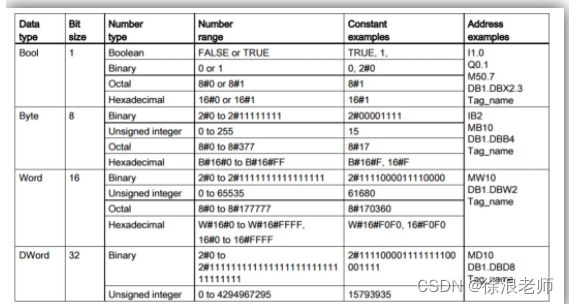
这里给出PLC变量类型和大小,这样对应确定读写的amount。


