iCache && dCache

前言

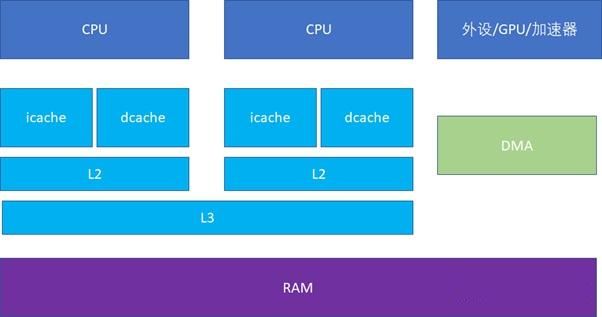
CPU 和 RAM 之间存在多级高速缓存,一般分为 3 级,分别是 L1、L2、L3。
另外,我们的代码都是由两部分组成的:指令、数据。
L1 Cache 比较特殊,每个 CPU 会有两个 L1 Cache,分别为 iCache(指令高速缓存,Instruction Cache)和 dCache(数据高速缓存,Data Cache)。
L2 和 L3 一般不区分指令和数据,可以同时缓存指令和数据。

iCache && dCache_第1张图片
下图是使用 CPU-Z 查看的两台 PC 的缓存情况
iCache && dCache_第2张图片

iCache && dCache_第3张图片

iCache Vs dCache

为什么要区分指令和数据呢?
原因是指令一般不会被修改,所以 iCache 在硬件设计上是只读的,这在一定程度上可以降低硬件设计成本。
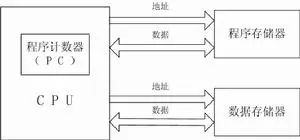
另外一方面是出于性能的考量,ARM 是哈佛结构,即指令存储和数据存储是分开的。硬件上地址总线和数据总线是分开的,地址总线取的数据就是指令,数据总线取的数据就是数据。CPU 在执行程序时,可以同时获取指令和数据,做到硬件上并行,提升性能。
iCache && dCache_第4张图片

hit or miss

之前我们介绍过缓存一致性的问题,今天我们主要介绍缓存的命中与否对性能的影响。

iCache 命中与否对性能的影响

icache.c

#include 
#include 

void func1()
{
	int a = 0;
	int b = 0;
	int c = 0;
	int d = 0;

	if (a == b)
		a = b - 1;

	if (c == d)
		c = d - 1;
}

void func2()
{
	int a = 0;
	int b = 0;
	int c = 0;
	int d = 0;

	if (a == b)
		a = b - 1;

	if (c == d)
		c = d - 1;
}

void (*get_func(int i))()
{
	if (i % 2 == 0) {
		return &func1;
	} else {
		return &func2;
	}
}

void run(int use_icache)
{
	clock_t start, end;
	double time_used;
	void (*func)();

	start = clock();
	for (int i = 0; i < 100000000; i++) {
		if (use_icache == 0) {
			func = get_func(i);
			__builtin___clear_cache(func, func + sizeof(func));	 // 清除指令缓存
		}
		func = get_func(i);
		func();
	}
	end = clock();
	time_used = ((double)(end - start)) / CLOCKS_PER_SEC;
	printf("%s use icache, time_used=%lf\n", use_icache == 1 ? "   " : "not", time_used);
}

int main()
{
	run(0);	 // 不使用指令缓存
	run(1);	 // 使用指令缓存
	return 0;
}

$ ./performance/cache/icache.out 
not use icache, time_used=1.142477
    use icache, time_used=0.962193
$ ./performance/cache/icache.out 
not use icache, time_used=1.154025
    use icache, time_used=0.937854
$ ./performance/cache/icache.out 
not use icache, time_used=1.135354
    use icache, time_used=0.963610

使用 iCache 性能提升 (1.14 - 0.96) / 1.14 = 15.8%

dCache 命中与否对性能的影响

dcache.c

#include 
#include 
#include 

int binary_search(int *array, int number_of_elements, int key)
{
	int low = 0, high = number_of_elements - 1, mid;

	while (low <= high) {
		mid = (low + high) / 2;
#ifdef DO_PREFETCH
		__builtin_prefetch(&array[(mid + 1 + high) / 2], 0, 1);
		__builtin_prefetch(&array[(low + mid - 1) / 2], 0, 1);
#endif
		if (array[mid] < key)
			low = mid + 1;
		else if (array[mid] == key)
			return mid;
		else if (array[mid] > key)
			high = mid - 1;
	}

	return -1;
}

int main()
{
	int SIZE = 1024 * 1024 * 512;
	int *array = malloc(SIZE * sizeof(int));

	for (int i = 0; i < SIZE; i++) {
		array[i] = i;
	}

	int NUM_LOOKUPS = 1024 * 1024 * 4;
	srand(time(NULL));
	int *lookups = malloc(NUM_LOOKUPS * sizeof(int));
	for (int i = 0; i < NUM_LOOKUPS; i++) {
		lookups[i] = rand() % SIZE;
	}

	for (int i = 0; i < NUM_LOOKUPS; i++) {
		binary_search(array, SIZE, lookups[i]);
	}

	free(array);
	free(lookups);

	return 0;
}
$ gcc -O3 -std=c11 dcache.c -o nopre
$ gcc -O3 -std=c11 -DDO_PREFETCH dcache.c -o pre
$ time ./nopre 

real    0m12.516s
user    0m11.721s
sys     0m0.791s
$ time ./pre 

real    0m10.124s
user    0m9.463s
sys     0m0.660s
$ time ./nopre 

real    0m12.536s
user    0m11.816s
sys     0m0.717s
$ time ./pre 

real    0m10.280s
user    0m9.474s
sys     0m0.804s

使用 dCache 性能提升 (12.5 - 10.2) / 12.5 = 18.4%

linux 内核

内核中也经常见到调整 cacheline 来提升性能的提交,如 ceph: reorder fields in ‘struct ceph_snapid_map’

iCache && dCache_第5张图片
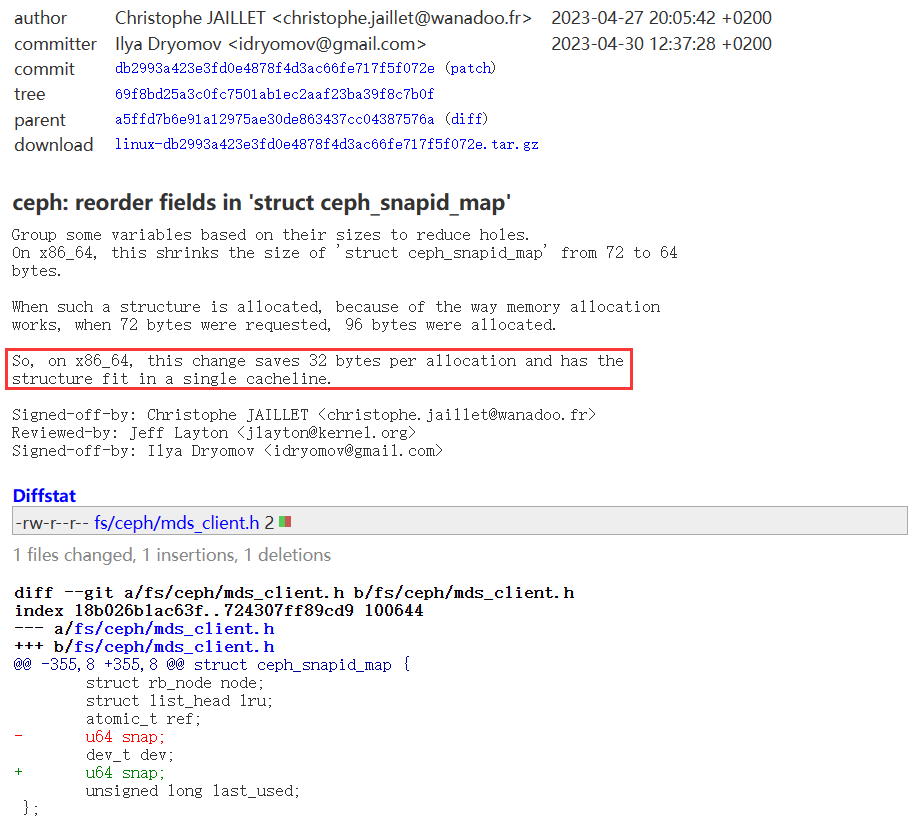
通过调整结构体成员的次序,适配缓存行,提高 dCache 命中率,进而提升性能。

实际工程

在我们的 WiFi 驱动中,通过链接脚本 lds 来让相同功能(rx、tx)的代码段排在一起,进而提升 iCache 的命中率,提升 WiFi 性能。
而提升 dCache 命中率的操作是,
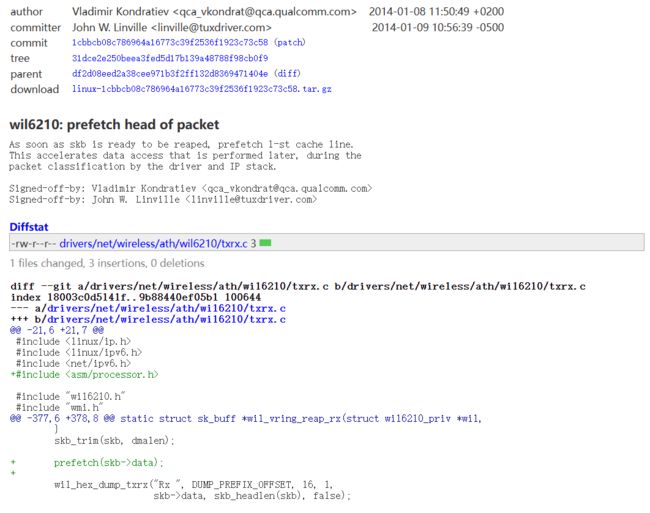
RX 方向:WiFi 收到了一个 skb,我们很快就要访问这个 skb 里面的数据来进行 packet 的分类以及提交给 IP stack 处理了,不如我们先 prefetch 一下,这样后面需要访问这个 skb-> data 的时候,流水线可以直接命中 dCache。
参考:wil6210: prefetch head of packet
iCache && dCache_第6张图片
TX 方向:来自 PON/Ethernet 的报文需要通过 WiFi 发送出去时,在 WiFi Driver 中会去访问 skb->data 的头部(保存了 DA)来决定发给哪个 station,所以在报文交给 WiFi Driver 之前,就调用 prefetch(skb->data) 来将数据缓存到 dCache,这样等到 WiFi Driver 处理时就可以直接命中 dCache 了,其实和上述 RX 原理一致。

你可能感兴趣的:(Linux,#,Driver,性能,高速缓存)