Spring的存储与获取Bean
Spring的存储与获取Bean
- Spring—存储Bean
-
- 配置扫描路径
- 利用类注解进行存储
-
- 添加注解存储Bean
- 关于Id
- 为什么需要五个类注解
- 类注解之间的关系
- 利用方法注解进行存储
-
- 关于Id
- Spring—获取Bean
-
- 属性注入
- Set注入
- 构造方法注入
- 总结(Spring的注入方式? 它们之间的区别?)
- @Resource
-
- 对比@Resource与@Autowired
- Tips
- 结尾
关于 Spring 的创建及简单的使用
可以参考这篇文章
Spring—存储Bean
之前的存储方式是利用
但这种方式存在一个弊端
即需要存储的 Bean 过多时, 手动添加过于繁琐
利用注解可以有效规避这种情况
- 添加注解存储 Bean
- 类注解
- @Controller: 控制器存储
- @Service: 服务存储
- @Repository: 仓库存储
- @Component: 组件存储
- @Configuration: 配置存储
- 方法注解
- @Bean: 对象存储(需搭配类注解一同使用)
- 类注解
配置扫描路径
添加如下代码至xml文件中
<content:component-scan base-package="">content:component-scan>
base-package=""
引号中填写的是扫描路径
完整代码
<beans xmlns="http://www.springframework.org/schema/beans"
       xmlns:xsi="http://www.w3.org/2001/XMLSchema-instance"
       xmlns:content="http://www.springframework.org/schema/context"
       xsi:schemaLocation="http://www.springframework.org/schema/beans http://www.springframework.org/schema/beans/spring-beans.xsd http://www.springframework.org/schema/context https://www.springframework.org/schema/context/spring-context.xsd">
    <content:component-scan base-package="">content:component-scan>

beans>
如图
base-package="com.demo"
扫描路径为com包下的demo包下的全部

所有的类都写在 Java 根路径下, 没有目录, 该如何存储 / 获取 Bean
(了解即可, 通常不会这么做)
base-package="**"
将扫描路径更改为根目录下的全部
*表示根目录
**表示根目录下的全部
利用类注解进行存储
在 Spring Core 中, 类注解之间的区别不大
添加注解存储Bean
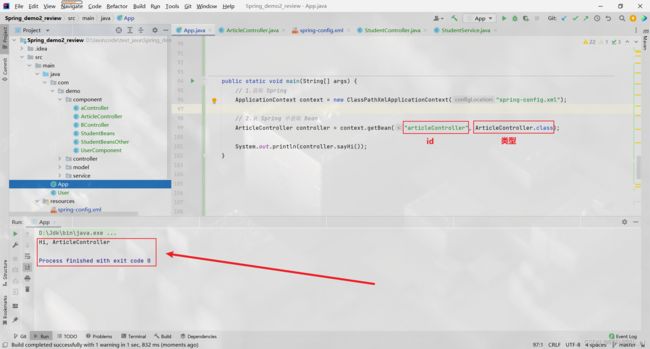
添加 @Controller 注解存储 Bean
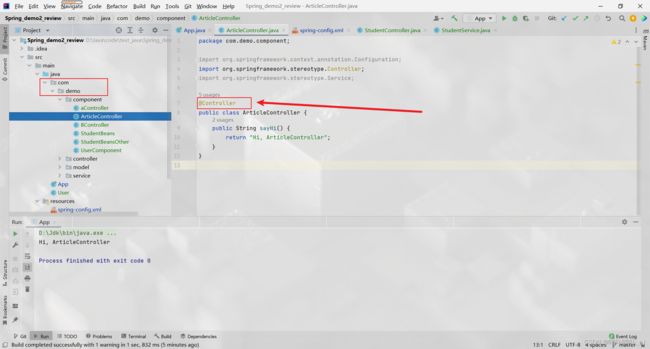
获取 Bean
添加 @Service 注解存储 Bean
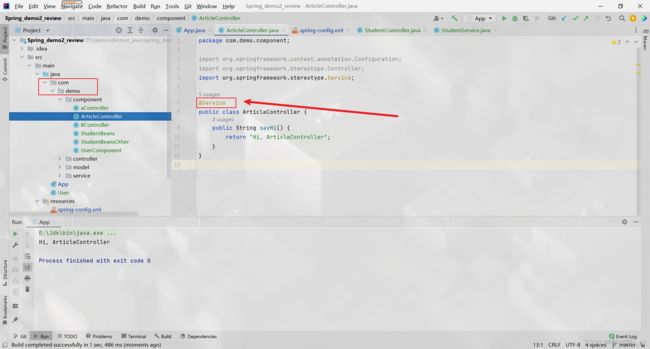
获取 Bean
添加 @Repository 注解存储 Bean

获取 Bean
添加 @Component 注解存储 Bean

获取 Bean
添加 @Configuration 注解存储 Bean

获取 Bean
关于Id
通过添加注解的方式存储 Bean, 获取 Bean 时的 Id 该如何命名
- 当类名为标准驼峰命名时, 将类名的首字母小写, 其余字母不变
- (例如类名为
UserInfo, 其对应的Id为userInfo)
- (例如类名为
- 当类名的首字母为小写时, 不做改变
- (例如类名为
userInfo, 其对应的Id为userInfo)
- (例如类名为
- 当类名的首字母和第二个字母均为大写, 不做改变
- (例如类名为
UInfo, 其对应的Id为UInfo)
- (例如类名为
源码分析
- AnnotationBeanNameGenerator
- Annotation, 注解
- BeanName, 对象名
- Generator, 生成
- Annotation BeanName Generator, 生成对象名注解

找到AnnotationBeanNameGenerator的generateBeanName()
点击buildDefaultBeanName()
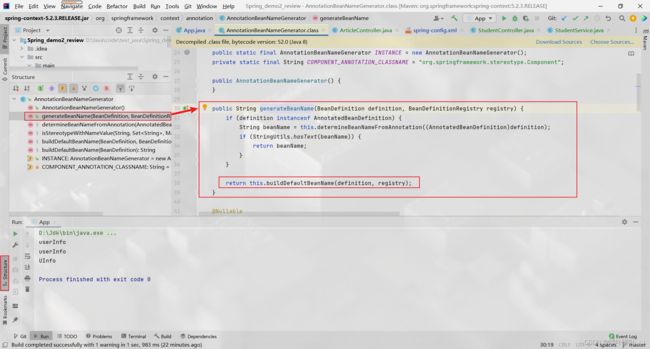
点击buildDefaultBeanName()

点击decapitalize()
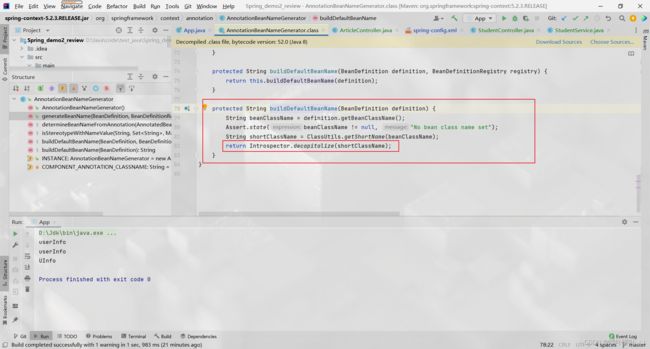
找到最终的调用方法
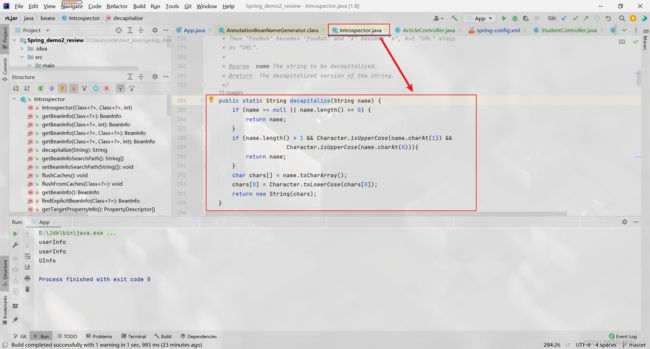
分析这段代码
public static String decapitalize(String name) {
    if (name == null || name.length() == 0) {
        return name;
    }
    if (name.length() > 1 && Character.isUpperCase(name.charAt(1)) &&
                    Character.isUpperCase(name.charAt(0))){
        return name;
    }
    char chars[] = name.toCharArray();
    chars[0] = Character.toLowerCase(chars[0]);
    return new String(chars);
}
if (name.length() > 1 && Character.isUpperCase(name.charAt(1)) && Character.isUpperCase(name.charAt(0))){ return name; }
如果长度 > 1 且第 1 个字符与第 0 个字符均是大写, 返回该字符串
(当类名的首字母和第二个字母均为大写, 不做改变)
chars[0] = Character.toLowerCase(chars[0]);
将第 0 个字符变为小写
(当类名为标准驼峰命名时, 将类名的首字母小写, 其余字母不变)
(当类名的首字母为小写时, 不做改变)
为什么需要五个类注解
既然都可以通过添加类注解的方式存储 Bean
那为何还需要五个类注解呢?
- 通过类注解可以了解当前类的用途
- 具体的功能存在差异
举个栗子
通过车牌可以了解是哪里的车, 例如 京 → 北京, 津 → 天津
(通过类注解可以了解当前类的用途)
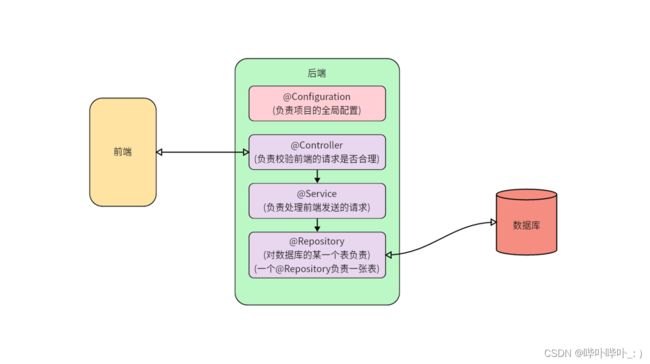
类注解的用途
- @Controller(控制器), 归属于业务逻辑层, 用于校验用户参数的有效性(控制用户的行为)
- @Service(服务), 归属于服务层, 调用持久化类实现相应的功能(不直接与数据库交互, 类似于控制中心)
- @Repository(仓库), 归属于持久层, 直接与数据库交互(通常一张表对应一个 @Repository)
- @Configuration(配置), 归属于配置层, 用于配置当前项目的一些信息
- @Component(组件), 归属于公共工具类, 提供某些公共方法
举个栗子
滑稽老哥家中失窃, 选择报警
接警员判断情况是否属实, 避免小孩子的恶作剧
(@Controller)
警局根据接警员的信息派出一些警察负责跟进
(@Service)
出警的警察负责这一起案件
(@Repository)
类注解之间的关系
@Component 是 @Controller, @Service, @Repository, @Configuration 的父类

利用方法注解进行存储
方法注解需搭配类注解一同使用
(目的是为了提高效率)
新建一个 Student 类

新建一个 StudentBeans 类
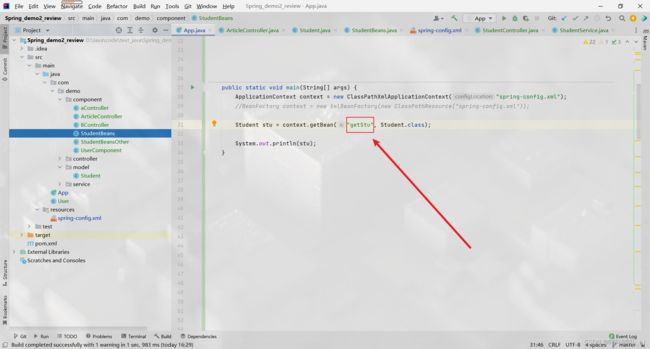
为 getStu() 添加方法注解(@Bean)
为 StudentBeans 添加类注解(@Component)
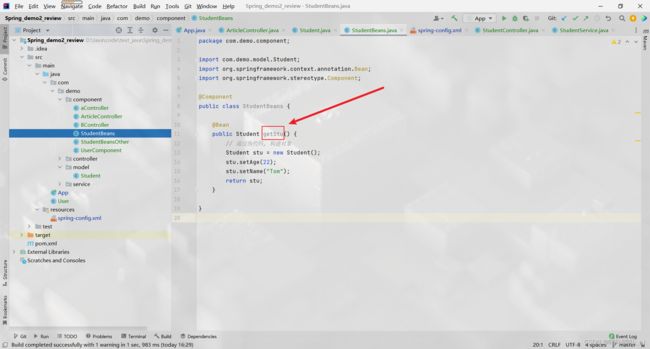
关于Id
- 默认情况下 getBean() 对应的 Id 为方法名
- @Bean 后可以跟 name
- (例如
@Bean(name = {"s1", "s2"}))
- (例如
- 当 @Bean 后添加了 name 时, 所对应的 Id 只能为 name 名, 不允许设置为方法名
默认情况下 getBean() 对应的 Id 为方法名
@Bean 后可以跟 name

Spring—获取Bean
从 Spring 中获取 Bean 也称为对象装配, 对象注入
对象装配(对象注入)的方式可以划分为 3 种
- 属性注入
- Set 注入
- 构造方法注入
属性注入

属性注入的效果等同于赋值
举个栗子
@Autowired
private StudentService studentService;

private int num = 10;
StudentService studentService利用属性注入, 由 Spring 框架赋值
int num未利用属性注入, 由程序员赋值
综上, 再次说明了 Spring 是一个包含众多工具方法的 IOC 容器
(IOC → 控制反转)
属性注入的优点
- 实现简单
属性注入的缺点
- 不能注入不可变对象(final 修饰)
- 只适用于 IOC 容器
- 更容易违背单一设计原则
不能注入不可变对象(final 修饰)
final 修饰的对象有 2 种赋值方式
- 直接赋值
- 在构造方法中赋值
只适用于 IOC 容器
@Autowired 来自于 Spring
Spring 是一个包含众多工具方法的 IOC 容器
因此只适用于 IOC 容器
更容易违背单一设计原则
属性注入的方式实现简单
因此也更容易将其他无关的对象一并注入
也就更容易违背单一设计原则
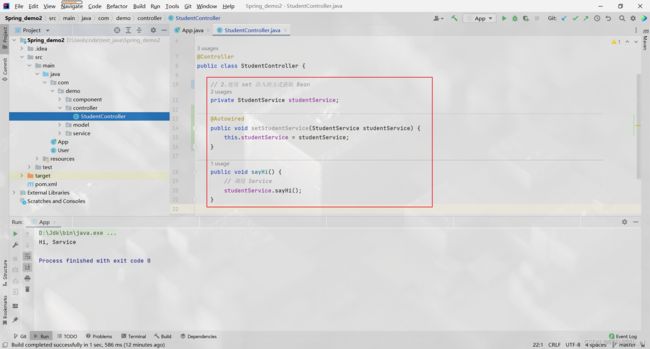
Set注入
Set 注入的优点
- 更符合单一设计原则
Set 注入的缺点
- 不能注入不可变对象(final 修饰)
- 注入的对象可被修改
更符合单一设计原则
Set 注入的实现方式相比于属性注入较复杂
因此相较于属性注入也就避免了将其他无关的对象一并注入的情况
(更符合单一设计原则)
不能注入不可变对象(final 修饰)
final 修饰的对象有 2 种赋值方式
- 直接赋值
- 在构造方法中赋值
注入的对象可被修改
Set 注入相较于属性注入更危险!
属性注入的对象也可被修改
但 Set 注入除通过属性注入的方式修改注入的对象
也可通过 set() 方法修改注入的对象
set() 方法既可以被 Spring 调用
也可以被其他对象调用
构造方法注入
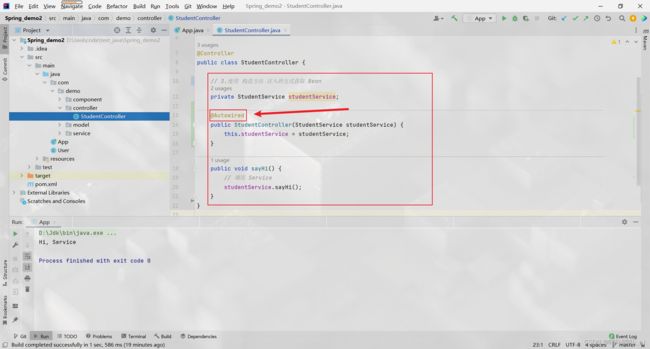
注意
- 当只存在一个构造方法时, @Autowired 可省略
- 当存在多个构造方法时, @Autowired 不可省略
构造方法注入的优点
- 能注入不可变对象(final 修饰)
- 注入的对象不可被修改
- final 修饰
- 构造方法随着类的加载只执行一次
- 注入的对象会被完全初始化(类加载时就会将对象进行初始化, 当执行其他方法时, 对象已被初始化 → 构造方法的机制)
- 通用性更好(任何一个类都会有构造方法)
构造方法注入的缺点
- 实现方式不如属性注入简单
总结(Spring的注入方式? 它们之间的区别?)

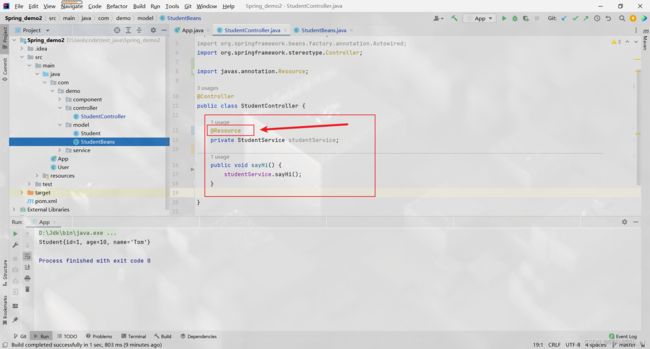
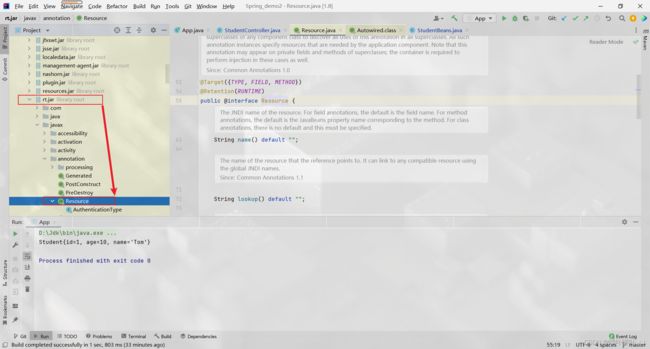
@Resource
- @Resource
- 可以实现属性注入
- 可以实现 Set 注入
- 不可以实现构造方法注入
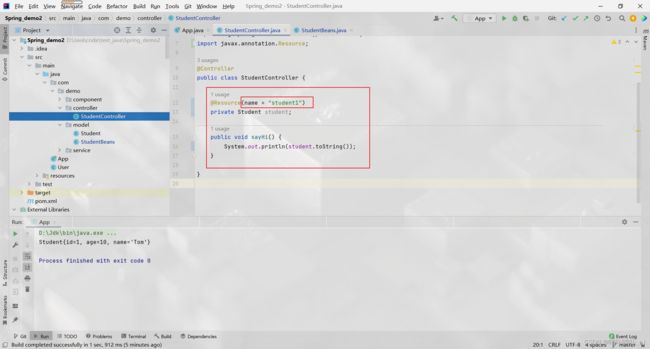
使用 @Resource 实现属性注入
使用 @Resource 实现 Set 注入

使用 @Resource 不能实现构造方法注入


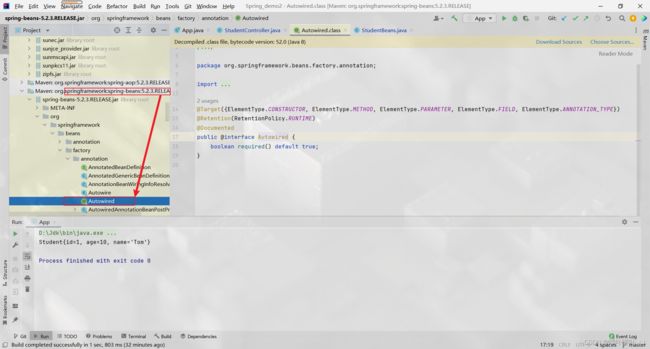
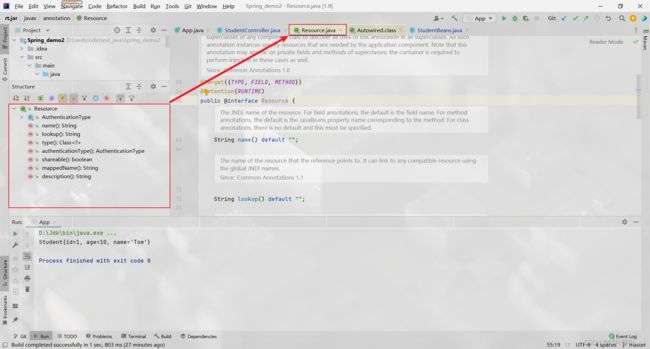
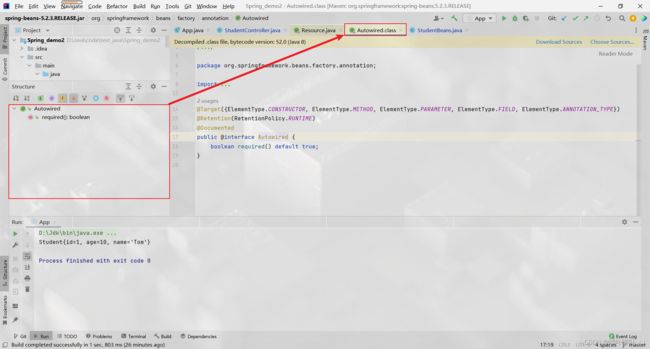
对比@Resource与@Autowired

来源不同
@Resource

@Autowired
支持参数不同
@Resource
@Autowired
Tips
存在返回同一个类型的多个方法时

利用@Resource(name = "")可以将其进行区分
@Autowired 无法设置 name
只能填写对应的对象

如果想写成 student 形式
需搭配@Qualifier()进行使用, 括号中填写的内容为对应的对象

结尾
创作不易,如果对您有帮助,希望您能点个免费的赞
大家有什么不太理解的,可以私信或者评论区留言,一起加油