SpringSecurity+Mybatis实现用户自助注册登录(含角色),打造简单安全的注册登录页面。
#项目架构、功能点
架构:
- Springboot2.5.+
- MySQL数据库8.0+(记录用户信息、角色清单、用户角色对照表)
- 持久层Mybatis
- 用户注册页面RegisterPage采用Thymeleaf动态网页
- 登录页面Login采用SpringSecurity标准表单登录网页
功能点:
- 实现用户自助注册登录
- 实现用户自助选择角色
- 用户信息、角色清单、用户角色对照表采用SpringSecurity标准架构
- 用户密码采用SpringSecurity首推的BCryptPasswordEncoder加密算法记录
- 实现登陆后URL访问与角色对应
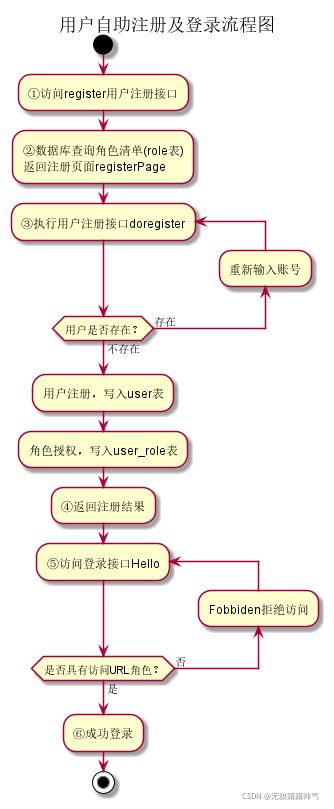
#用户自助注册及登录流程图
#项目文件结构、数据库设计、Maven依赖、aplication配置
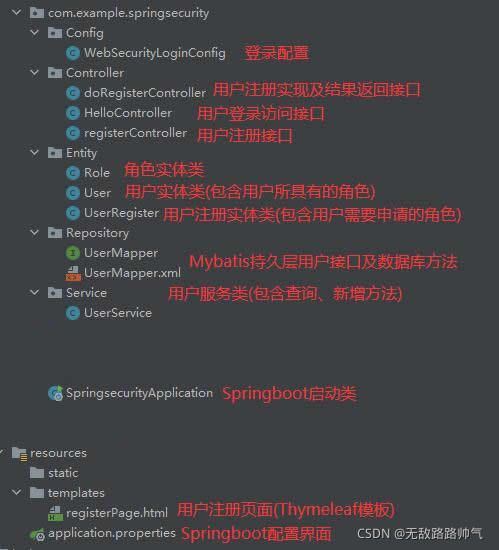
文件结构:
数据库设计:
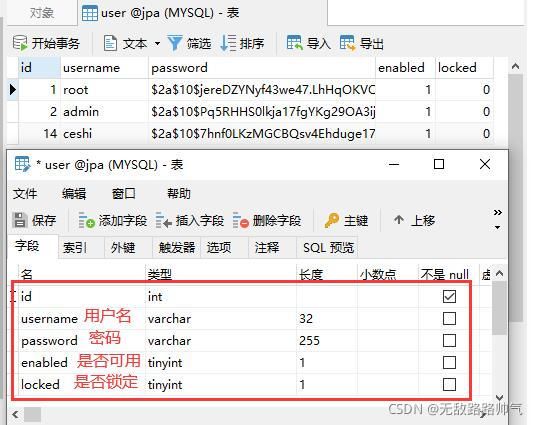
user表,记录用户信息
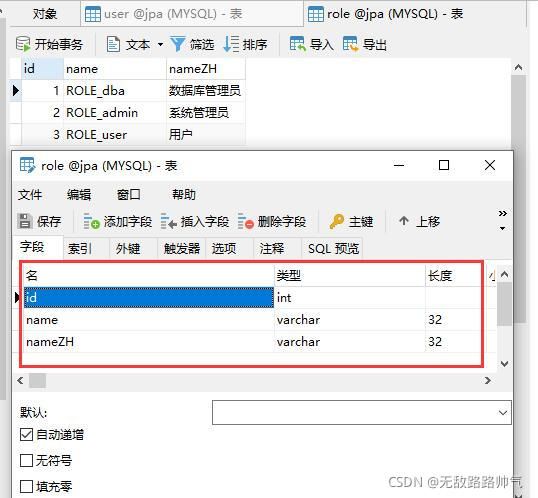
role表,记录角色清单
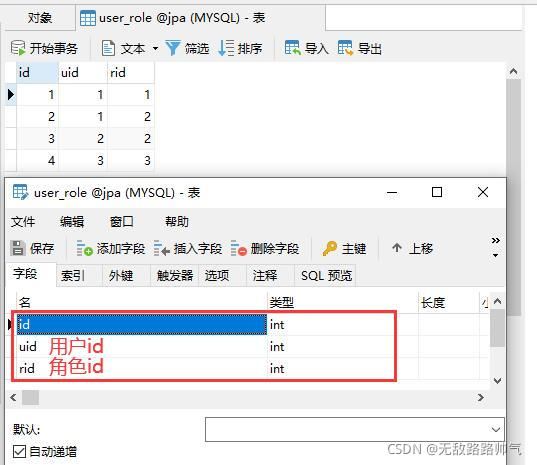
user_role表,用户角色对照表
Maven依赖:
            org.springframework.boot
            spring-boot-starter-security


            org.springframework.boot
            spring-boot-starter-web


            org.mybatis.spring.boot
            mybatis-spring-boot-starter
            2.2.0


            mysql
            mysql-connector-java
            runtime


            org.springframework.boot
            spring-boot-starter-thymeleaf
因为使用Mybatis,所以build要添加XML资源目录,否则编译会缺少UserMapper.XML。
                src/main/java

                    **/*.xml


                src/main/resources
aplication配置:
#datasource mybatis配置--------------------------------
spring.datasource.url=jdbc:mysql://127.0.0.1:3306/jpa?characterEncoding=UTF-8
spring.datasource.username=root
spring.datasource.password=12345678
spring.datasource.driver-class-name=com.mysql.cj.jdbc.Driver
#datasource mybatis配置--------------------------------
#thymeleaf配置--------------------------------
spring.thymeleaf.cache=true
spring.thymeleaf.checktemplate=true
spring.thymeleaf.check-template-location=true
spring.thymeleaf.encoding=UTF-8
spring.thymeleaf.servlet.content-type=text/html
spring.thymeleaf.suffix=.html
spring.thymeleaf.prefix=classpath:/templates/
#Thymeleaf配置--------------------------------
#用户前端注册页面registerPage.html代码(Thymeleaf模板动态网页)
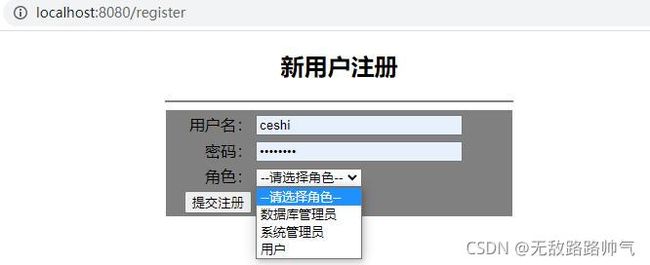
这里通过用户注册接口registerController去数据库查询角色清单(role表),将查询结果写入roles集合中,通过Thymeleaf模板进行调用并加入select-option选择列表,供用户注册时选择某一角色。
新用户注册
新用户注册
#实体类、Mybatis持久层接口、用户服务类、用户注册及登录接口
角色实体类Role:
package com.example.springsecurity.Entity;
import java.io.Serializable;
public class Role implements Serializable {
    private Integer id;
    private String name;
    private String nameZH;
    public Integer getId() {
        return id;
    }
    public void setId(Integer id) {
        this.id = id;
    }
    public String getName() {
        return name;
    }
    public void setName(String name) {
        this.name = name;
    }
    public String getNameZH() {
        return nameZH;
    }
    public void setNameZH(String nameZH) {
        this.nameZH = nameZH;
    }
}
用户实体类User(包含所具有的角色) :
该实体类主要用于用户登录,需要使用标准的UserDetails接口。
package com.example.springsecurity.Entity;
import org.springframework.security.core.GrantedAuthority;
import org.springframework.security.core.authority.SimpleGrantedAuthority;
import org.springframework.security.core.userdetails.UserDetails;
import java.util.ArrayList;
import java.util.Collection;
import java.util.List;
public class User implements UserDetails {
    private Integer id;
    private String username;
    private String password;
    private Boolean enabled;
    private Boolean locked;
    private List roles;
    @Override
    public Collection getAuthorities(){
        List authorities= new ArrayList<>();
        for (Role r:roles){
            authorities.add(new SimpleGrantedAuthority(r.getName()));
        }
        return authorities;
    }
    @Override
    public String getPassword(){
        return password;
    }
    @Override
    public String getUsername(){
        return username;
    }
    @Override
    public boolean isAccountNonExpired(){
        return true;
    }
    @Override
    public boolean isAccountNonLocked(){
        return true;
    }
    @Override
    public boolean isCredentialsNonExpired(){
        return true;
    }
    @Override
    public boolean isEnabled(){
        return true;
    }
    public Integer getId() {
        return id;
    }
    public void setId(Integer id) {
        this.id = id;
    }
    public void setUsername(String username) {
        this.username = username;
    }
    public void setPassword(String password) {
        this.password = password;
    }
    public Boolean getEnabled() {
        return enabled;
    }
    public void setEnabled(Boolean enabled) {
        this.enabled = enabled;
    }
    public Boolean getLocked() {
        return locked;
    }
    public void setLocked(Boolean locked) {
        this.locked = locked;
    }
    public List getRoles() {
        return roles;
    }
    public void setRoles(List roles) {
        this.roles = roles;
    }
}
用户注册实体类UserRegister(包含用户需要申请的角色) :
该实体类主要用于用户注册。
package com.example.springsecurity.Entity;
public class UserRegister {
    private Integer id;
    private String username;
    private String password;
    private Boolean enabled;
    private Boolean locked;
    private Integer role;
    public Integer getId() {
        return id;
    }
    public void setId(Integer id) {
        this.id = id;
    }
    public String getUsername() {
        return username;
    }
    public void setUsername(String username) {
        this.username = username;
    }
    public String getPassword() {
        return password;
    }
    public void setPassword(String password) {
        this.password = password;
    }
    public Boolean getEnabled() {
        return enabled;
    }
    public void setEnabled(Boolean enabled) {
        this.enabled = enabled;
    }
    public Boolean getLocked() {
        return locked;
    }
    public void setLocked(Boolean locked) {
        this.locked = locked;
    }
    public Integer getRole() {
        return role;
    }
    public void setRole(Integer role) {
        this.role = role;
    }
}
Mybatis持久层接口:
主要包含UserMapper.xml和UserMapper interface,包含:
loadUserByUsername方法,通过用户名查询用户
getUserRolesByUid方法,通过用户ID获取用户所有角色
addUserByUsername方法,通过UserRegister实体类注册新用户
getAllRole方法,获取当前系统所有角色
addRole方法,通过用户ID和角色ID,给用户添加角色
insert into user(username,password,enabled,locked) values(#{username},#{password},#{enabled},#{locked})
insert into user_role(uid,rid) values(#{uid},#{rid})
package com.example.springsecurity.Repository;
import com.example.springsecurity.Entity.Role;
import com.example.springsecurity.Entity.User;
import com.example.springsecurity.Entity.UserRegister;
import org.apache.ibatis.annotations.Mapper;
import java.util.List;
@Mapper
public interface UserMapper {
    User loadUserByUsername(String username);
    List getUserRolesByUid(Integer id);
    int addUserByUsername(UserRegister userRegister);
    List getAllRole();
    int addRole(Integer uid,Integer rid);
}
用户服务类UserService:
是上述接口方法的实现类,包含:
loadUserByUsername实现方法,用于查询用户以及所具有的角色
addUserByUsername实现方法,用于实现用户注册以及角色注册
getAllRole实现方法,用户查询所有角色清单
package com.example.springsecurity.Service;
import com.example.springsecurity.Entity.Role;
import com.example.springsecurity.Entity.User;
import com.example.springsecurity.Entity.UserRegister;
import com.example.springsecurity.Repository.UserMapper;
import org.springframework.beans.factory.annotation.Autowired;
import org.springframework.security.core.userdetails.UserDetails;
import org.springframework.security.core.userdetails.UserDetailsService;
import org.springframework.security.core.userdetails.UsernameNotFoundException;
import org.springframework.security.crypto.bcrypt.BCryptPasswordEncoder;
import org.springframework.stereotype.Service;
import java.util.List;
@Service
public class UserService implements UserDetailsService {
    @Autowired
    UserMapper userMapper;
    @Override
    public UserDetails loadUserByUsername(String username) throws UsernameNotFoundException{
        User user = userMapper.loadUserByUsername(username);
        if(user == null){
            throw new UsernameNotFoundException("账户不存在!");
        }
        user.setRoles(userMapper.getUserRolesByUid(user.getId()));
        return user;
    }
    public String addUserByUsername(UserRegister userRegister){
        User newuser = userMapper.loadUserByUsername(userRegister.getUsername());
        if (newuser != null){
            return "账户存在,注册失败!";
        }else {
            //新用户密码采用BCryptPasswordEncoder(10)格式存入数据库
            userRegister.setPassword(new BCryptPasswordEncoder(10).encode(userRegister.getPassword()));
            //设置用户状态可用,没有锁定
            userRegister.setEnabled(true);
            userRegister.setLocked(false);
            //执行用户注册
            int adduser = userMapper.addUserByUsername(userRegister);
            //用户成功注册后,添加用户角色
            if(adduser > 0){
                User getuser =userMapper.loadUserByUsername(userRegister.getUsername());
                int addrole = userMapper.addRole(getuser.getId(),userRegister.getRole());
                if (addrole > 0){
                    return "账户注册成功,角色注册成功!";
                }else{
                    return "账户注册成功!角色注册失败!";
                }
            }else {
                return "账户注册失败!";
            }
        }
    }
    public List getAllRole(){
        return userMapper.getAllRole();
    }
}
登录接口:
登录接口包含:
registerController用户注册接口
doRegisterController执行用户注册接口及返回注册结果
HelloController登录接口
package com.example.springsecurity.Controller;
import com.example.springsecurity.Service.UserService;
import org.springframework.beans.factory.annotation.Autowired;
import org.springframework.stereotype.Controller;
import org.springframework.web.bind.annotation.GetMapping;
import org.springframework.web.servlet.ModelAndView;
@Controller
public class registerController {
    @Autowired
    UserService userService;
    @GetMapping("/register")
    //registerController用户注册接口,将所有角色信息数据库取值并绑定roles赋给前端registerPage.html
    public ModelAndView resgister(){
        ModelAndView mv = new ModelAndView();
        mv.addObject("roles",userService.getAllRole());
        mv.setViewName("registerPage");
        return mv;
    }
}
package com.example.springsecurity.Controller;
import com.example.springsecurity.Entity.UserRegister;
import com.example.springsecurity.Service.UserService;
import org.springframework.beans.factory.annotation.Autowired;
import org.springframework.web.bind.annotation.PostMapping;
import org.springframework.web.bind.annotation.RestController;
@RestController
public class doRegisterController {
@Autowired
UserService userService;
@PostMapping("/doregister")
//doRegisterController执行用户注册接口及返回注册结果
public String doregister(UserRegister userRegister){
return userService.addUserByUsername(userRegister);
}
}package com.example.springsecurity.Controller;
import org.springframework.web.bind.annotation.GetMapping;
import org.springframework.web.bind.annotation.RestController;
@RestController
//HelloController登录接口,URL访问权限控制,分别对应不同的角色方能访问
public class HelloController {
@GetMapping("/admin/hello")
public String admin(){
return "hello admin";
}
@GetMapping("/user/hello")
public String user(){
return "hello user";
}
@GetMapping("/db/hello")
public String dba(){
return "hello dba";
}
@GetMapping("/hello")
public String hello(){
return "hello";
}
}#Spring Security核心配置类WebSecurityLoginConfig
①注入用户服务类用于登录验证。
②配置用户登录密码需要BCryptPasswordEncoder(10)密文认证。
③对可访问资源URL限定固定的角色方能访问。
④用户注册接口和执行用户注册接口允许访问。
⑤成功登陆后跳转hello接口。
package com.example.springsecurity.Config;
import com.example.springsecurity.Service.UserService;
import org.springframework.beans.factory.annotation.Autowired;
import org.springframework.context.annotation.Bean;
import org.springframework.context.annotation.Configuration;
import org.springframework.security.config.annotation.authentication.builders.AuthenticationManagerBuilder;
import org.springframework.security.config.annotation.web.builders.HttpSecurity;
import org.springframework.security.config.annotation.web.configuration.WebSecurityConfigurerAdapter;
import org.springframework.security.core.Authentication;
import org.springframework.security.crypto.bcrypt.BCryptPasswordEncoder;
import org.springframework.security.crypto.password.PasswordEncoder;
import org.springframework.security.web.authentication.AuthenticationSuccessHandler;
import javax.servlet.http.HttpServletRequest;
import javax.servlet.http.HttpServletResponse;
import java.io.IOException;
@Configuration
public class WebSecurityLoginConfig extends WebSecurityConfigurerAdapter {
    //注入用户服务
    @Autowired
    UserService userService;
    //配置用户登录密码需要BCryptPasswordEncoder密文认证
    @Bean
    PasswordEncoder passwordEncoder(){
        return new BCryptPasswordEncoder(10);
    }
    //基于数据库的用户账号密码、角色、过期、锁定等认证
    @Override
    protected void configure(AuthenticationManagerBuilder auth) throws Exception{
        auth.userDetailsService(userService);
    }
    @Override
    protected void configure(HttpSecurity httpSecurity) throws Exception {
        httpSecurity.authorizeRequests()
                //对可访问URL资源进行角色控制
                .antMatchers("/admin/**")
                .hasRole("admin")
                .antMatchers("/user/**")
                .access("hasAnyRole('admin','user')")
                .antMatchers("/db/**")
                .access("hasRole('dba') and hasRole('admin')")
                //用户注册接口和执行用户注册接口允许访问
                .antMatchers("/register","/doregister")
                .permitAll()
                //用户访问其他URL资源都必须认证后访问,即登陆后访问
                .anyRequest()
                .authenticated()
                //开启表单登录,即登录界面,登录URL为/login,登录参数用户名username密码password
                //Ajax或移动端通过POST请求登录,接口为/login,permitAll表示登录不需要认证即可访问
                .and()
                .formLogin()
                .loginProcessingUrl("/login")
                .permitAll()
                //成功登录后跳转到hello页面
                .successHandler(new AuthenticationSuccessHandler() {
                    @Override
                    public void onAuthenticationSuccess(HttpServletRequest request, HttpServletResponse response, Authentication authentication) throws IOException {
                        response.setContentType("application/json;charset=utf-8");
                        response.sendRedirect("/hello");
                    }
                })
                .and()
                .csrf()
                .disable();
    }
}
#启动数据库和项目,开始验证测试
第一步测试注册:
输入用户注册接口http://localhost:8080/register,自动跳转到registerPage.html,并将所有角色信息从数据库取出赋值给前端。
提交注册,跳转到http://localhost:8080/doregister接口,返回注册结果。

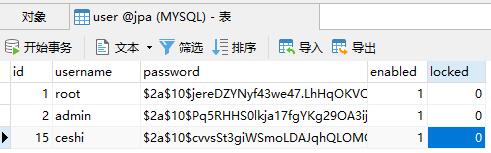
数据库中user表已经新增ceshi用户。
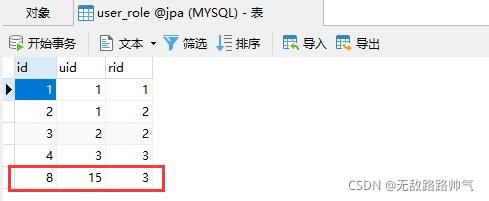
用户角色表user_role中新增数据:ceshi用户(uid:15)对应用户角色(rid:3)。
第二步测试登录:
我们输入登录网址http://localhost:8080/login或者任意输入后缀地址,均可以访问登录接口。
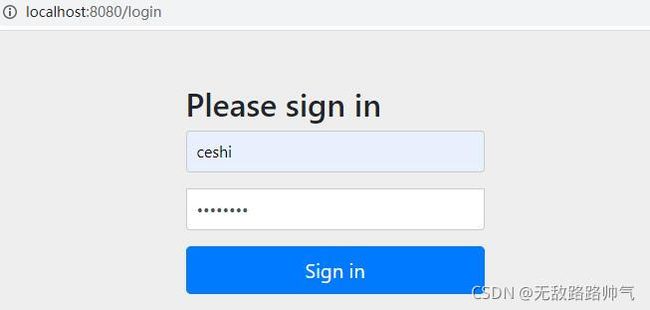
用ceshi用户登陆后,具有用户角色,可以访问/user/hello接口或者hello接口,当然系统会自动跳转到hello接口页面。

当我们访问管理员接口/admin/hello接口,系统会因为缺少权限而拒绝访问Forbidden。

#总结
SpringSecurity可以非常轻松的实现用户登录验证、注册、跳转、URL接口访问控制等。
Thymeleaf可以将后端数据赋值给前端,便于前端使用,非常适合做登录网页前端设计。
Mybatis持久层非常灵活,可以实现用户自助注册、角色赋值、用户查询、角色查询等各种方法并于数据库交互,实现存储加密。
通过以上技术,我们就可以轻松打造简单安全的注册登录页面了,而不去纠结于各项安全设置和各种接口的设计。