Qt Quick系列(4)—定位元素
作者:CAccept
专栏:Qt Quick
文章目录
- 前言
- 相对布局
- 代码示例
- 示例一
- 示例二
- 示例三
- 示例四
- 示例五
- 示例六
- 简单"布局器"
- Column
- Row
- Grid
- Flow
- 结语
前言
在Qt Quick中,可以使用以下方式来定位元素:
1、使用绝对定位:您可以直接指定元素的x和y坐标来将其放置在指定位置。例如:
Rectangle {
    width: 100
    height: 100
    x: 200
    y: 150
}
2、使用相对定位:您可以使用父项的属性或其他元素的属性来相对定位元素。例如,使用anchors属性将元素相对于其父项进行定位:
Rectangle {
    width: 100
    height: 100
    anchors {
        left: parent.left
        top: parent.top
    }
}
3、使用布局器:Qt Quick提供了多种内置布局器,如Row、Column、Grid和Flow等。您可以将元素放置在布局器中,布局器会自动管理元素的位置。例如,使用Row布局器将两个元素水平排列:
Row {
    spacing: 10
    Rectangle {
        width: 100
        height: 100
    }
    Rectangle {
        width: 150
        height: 100
    }
}
4、使用Qt Quick Controls中的布局:如果您使用Qt Quick Controls,可以使用Layouts来定位元素。Qt Quick Controls提供了一组用于构建常见界面布局的布局类型,如ColumnLayout、RowLayout、GridLayout等。
接下来本篇博客将会围绕着2和3进行详细讲解,希望对您能够有所帮助
相对布局
使用父项的属性或其他元素的属性来相对定位元素,对于相对布局来说很有用的一个属性是anchors,接下来将对anchors进行一些说明和举例:
anchors 属性可以应用于任何派生自 Item 类的元素。下面是一些常用的 anchors 属性:
1、anchors.left、anchors.right、anchors.horizontalCenter:用于控制元素的水平位置。例如,anchors.left: parent.left 将元素的左边缘锚定到其父项的左边缘,anchors.horizontalCenter: parent.horizontalCenter 将元素的水平中心与其父项的水平中心对齐。
2、anchors.top、anchors.bottom、anchors.verticalCenter:用于控制元素的垂直位置。例如,anchors.top: parent.top 将元素的顶边缘锚定到其父项的顶边缘,anchors.verticalCenter: parent.verticalCenter 将元素的垂直中心与其父项的垂直中心对齐。
3、anchors.fill:将元素的边缘锚定到其父项的对应边缘,实现元素与父项完全填充的效果。例如,anchors.fill: parent 将元素完全填充其父项。
4、anchors.centerIn:将元素的中心点锚定到另一个元素的中心点。例如,anchors.centerIn: parent 将元素的中心点与其父项的中心点对齐。
5、anchors.margins:用于定义元素与其锚定元素之间的外边距。例如,anchors.margins: 10 将为元素与其锚定元素之间的每个边缘添加 10 个逻辑像素的外边距。
代码示例
先提供两个qml文件用于component调用
GreenSquare.qml
import QtQuick 2.0

Rectangle
{
    width: 100;
    height: 100
    color: "green"
    border.color:Qt.lighter(color)
}
BlueSquare.qml
import QtQuick 2.0

Rectangle
{
    width: 50;
    height: 50
    color: "blue"
    border.color:Qt.lighter(color)
    //将text和label的text进行绑定,外部就可以通过更改text来更改label下的text
    property alias text: label.text
    Text
    {
        id:label
        text:qsTr("text")
        color:"white"
        anchors.centerIn: parent
    }
}
示例一
GreenSquare
{
      BlueSquare
      {
          text:"(1)"
          //四周都进行锚定
          anchors.fill:parent
          //离边框的距离为8个像素
          anchors.margins: 8

      }
}
示例二
GreenSquare
 {
       BlueSquare
       {
           text:"(2)"
           //left进行锚定
           anchors.left:parent.left
           y:8
           //离边框的距离为8个像素
           anchors.margins: 8
       }
}
示例三
GreenSquare
{
     BlueSquare
     {
         text:"(3)"
         //用父亲的右边来锚定left
         anchors.left:parent.right

     }
}
示例四
GreenSquare
{
     BlueSquare
      {
          id:blue1
          text:"(4-1)"
          //top进行锚定
          anchors.top:parent.top
		 //水平Center进行锚定
          anchors.horizontalCenter: parent.horizontalCenter
          //离边框的距离为8个像素
          anchors.margins: 8
          height:25
      }
      BlueSquare
        {
            id:blue2
            text:"(4-2)"
            width:75
            //将top与blue1的bottom进行锚定
            anchors.top: blue1.bottom
            anchors.horizontalCenter: parent.horizontalCenter
            //离边框的距离为8个像素
            anchors.margins: 8
            height:25
        }
 }
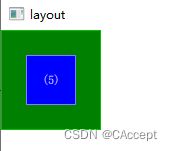
示例五
GreenSquare
{
     BlueSquare
     {
          text:"(5)"
          //中心进行锚定
          anchors.centerIn: parent
      }
 }
示例六
GreenSquare
{
      BlueSquare
        {
            text:"(6)"
            //依据parent对horizontalCenter进行锚定
            anchors.horizontalCenter: parent.horizontalCenter
            //向左偏移12个像素
            anchors.horizontalCenterOffset: -12
            //垂直进行锚定
            anchors.verticalCenter: parent.verticalCenter
        }
 }
简单"布局器"
可以将Row、Column、Grid和Flow看作是一些简单的布局器。它们提供了一种简单的方式来排列和定位子项,但功能相对有限。这些简单的布局器(Row、Column、Grid和Flow)适用于一些基本的布局需求,如水平排列、垂直排列、网格排列以及流式排列。它们是Qt Quick中的常见用法,可以方便地创建基本的布局结构。
然而,如果您需要更复杂的布局和更多的布局控制选项,您可能需要使用更高级的布局器,如RowLayout、ColumnLayout、和GridLayout等。这些布局器提供了更多的属性和选项,可以更精确地控制子项的位置、大小、对齐方式和间距。因此,如果您的布局需求比较简单且不需要高级的布局控制,那么使用Row、Column和Grid等简单的布局器就足够了。但如果您需要更多的布局控制选项,或者需要自定义布局的行为,那么可以考虑使用更高级的布局器。
Column
Column是垂直布局,直接看代码更好理解
Column{
        id:column
        //布局器位于父类的中间
        anchors.centerIn:parent
        //矩形之间的间距是8个像素
        spacing:8
        Rectangle{
            width: 50
            height: 50
            color:"blue"
        }
        Rectangle{
            width: 50
            height: 50
            color:"red"
        }
        Rectangle{
            width: 50
            height: 50
            color:"green"
        }
 }
Row
Row是水平布局
Row{
        id:column
        anchors.centerIn:parent
        //矩形之间的间距是8个像素
        spacing:8
        Rectangle{
            width: 50
            height: 50
            color:"blue"
        }
        Rectangle{
            width: 50
            height: 50
            color:"red"
        }
        Rectangle{
            width: 50
            height: 50
            color:"green"
        }
}
Grid
Grid 元素是 Qt Quick 中的一个容器元素,它提供了一种方便的方式来将子项放置在网格中。与 GridLayout 布局器不同,Grid 元素本身并不是布局器,而是一种布局容器,类似于 Row 和 Column 元素。它允许您以网格状方式排列子项,并使用行和列的定义来控制子项的位置。
我们创建了一个 Grid 元素,指定了列数为 3,并设置了子项之间的间距为 10。 然后,我们添加了6个矩形子项。Grid 元素会根据列数自动调整子项的位置,从左到右、从上到下依次填充子项到网格中。
Grid {
        columns: 3
        spacing: 10
        anchors.centerIn: parent
        Rectangle { width: 50; height: 50;color:"blue" }
        Rectangle { width: 50; height: 50;color:"red" }
        Rectangle { width: 50; height: 50;color:"green"}
        Rectangle { width: 50; height: 50;color:"red" }
        Rectangle { width: 50; height: 50;color:"blue"}
        Rectangle { width: 50; height: 50;color:"green"}
}
Flow
Flow 布局器是一种用于在可用空间内自动流式布局子项的高级布局器。它会根据可用空间的大小和子项的大小自动调整子项的位置和大小,以最大化利用可用空间。
Flow {
       //适应parent大小来调整布局
       anchors.fill: parent
       anchors.margins: 20
       spacing: 20
       Rectangle { width: 50; height: 50;color:"blue" }
       Rectangle { width: 50; height: 50;color:"red" }
       Rectangle { width: 50; height: 50;color:"green"}
       Rectangle { width: 50; height: 50;color:"red" }
       Rectangle { width: 50; height: 50;color:"blue"}
       Rectangle { width: 50; height: 50;color:"green"}
  }
结语
在本篇博客中,我们深入探讨了 Qt Quick 中的定位元素技术,包括使用 anchors 属性、布局器和定位器来精确定位和调整元素的位置和大小。我们学习了如何使用 Row、Column 和 Grid 布局器进行简单的布局,以及如何使用 Anchors 定位器进行更灵活的布局。通过示例代码和实际应用场景的介绍,我们展示了定位元素在构建用户界面中的关键作用。
掌握定位元素技术对于 Qt Quick 开发至关重要。通过灵活运用定位元素,我们可以实现各种复杂的用户界面布局,从简单的列表到复杂的仪表盘,都能得心应手。定位元素是创建响应式、可扩展和适应性强的用户界面的关键。
如果您有任何疑问、反馈或者想要分享您在使用定位元素时的经验,请在下方留言。我期待听到您的想法和问题。同时,请继续关注我的博客,我们将在下一篇文章中探讨更多关于 Qt Quick 的主题。谢谢您的阅读和支持!


