python 加速(1)
文章目录
- 简单步骤
- 像Python一样做torch 的一切
-
- 安装Cmake
- 安装 Torch (GPU)
- CMakeLists.txt
- 试用小样
- 设置 CLion 环境
- Cuda
-
- 配置VS C++ 环境
- 建上手的文件
-
- step1: interpolation.cpp
- step2: interpolation_kernel.cu
- step3: include/ utils.h
- step4: setup.py
- step5: pip install package
- step6: test.py
因为要修改yolo系列里NMS处的计算,如果用python,速度巨慢。torchvision 有自己的加速后的NMS function。但是不和形变后的IOU通用。因此需要做一个类似的。
回看torchvion, 发现里面有cpp的文件,因为之前没有接触过加速(资源比较丰富)。
C++ 并不是加速NMS那步操作的解药,解药是CUDA kernel。因此,如果要加速任何的function在model里,CUDA kernel 是最终目的。
自己之前误入歧途,以为C++就能加速一切。试图用libtorch & c++ 替代之前python的操作。但其实只要不能加速GPU操作,这些办法都毫无意义。在用libtorch 改写时,发现python导出的.pt文件,并没有办法被C++ 的libtorch直接load. 在试图解决这个bug,发现了,其实我该用cuda 改写~就无语。。。。
感谢:AI葵
https://www.youtube.com/watch?v=_QqG_I8nfH0
简单步骤
Header
wiou.h
#ifndef WIOU_WIOU_H
#define WIOU_WIOU_H

#ifdef __cplusplus
extern "C" {
#endif

int add(int a, int b); // Function declaration

#ifdef __cplusplus
}
#endif

#endif //WIOU_WIOU_H
CPP
wiou.cpp
#include "wiou.h"

extern "C" {
int add(int a, int b) {
    return a + b;
}
}
g++ -shared -o mylibrary.so wiou.cpp
# main.py
import ctypes

# 加载共享库
mylib = ctypes.CDLL('./mylibrary.so')

# 调用共享库中的函数
result = mylib.add(2, 3)
print(result)
像Python一样做torch 的一切
此处必须推荐Clion, 如果你的系统被装得五花八门,如果你赶时间,就用Clion, 最爱这种傻瓜式装环境。
安装Cmake
如果使用conda 环境, 就用conda install
如果不用,就一般操作来。(推荐这个,这个容易上手)
https://cmake.org/download/
如果你是打工族,不出意外都是X64
Windows x64 Installer:
cmake-3.27.0-rc2-windows-x86_64.msi
安装 Torch (GPU)
和python不一样,这里需要下载另一个库,并且需要将cuda 中的4个文件,copy paste到VS code中
https://github.com/NVlabs/tiny-cuda-nn/issues/164
我用的是Clion, 依然需要确保在装cuda的时候,把visual studio 下载了

CUDA 11.8 是来自你的nvcc 出来得版本号 nvcc -V
两个都下呗,都可以替换着使用
Copy 文件
源文件夹:
C:\Program Files\NVIDIA GPU Computing Toolkit\CUDA\v11.8\extras\visual_studio_integration\MSBuildExtensions
- CUDA 11.8.props
- CUDA 11.8.targets
- CUDA 11.8.xml
- Nvda.Build.CudaTasks.v11.8.dll
如果你没找到 ‘visual_studio_integration’, 这里重新下载安装一下cuda toolkit
https://developer.nvidia.com/cuda-11-8-0-download-archive
因为整个内容得解药和中心思想都来自visual studio, 所以不能没有这个!
目标文件夹:
D:\visualstudio\MSBuild\Microsoft\VC\v170\BuildCustomizations
这里得D:\visualstudio\ 是取决于你用 visual studio installer 安装时得路径。
默认是C:\Program Files (x86)\Microsoft Visual Studio\2017\Community\
- v160通常表示Visual Studio 2019,v170表示Visual Studio 2022
CMakeLists.txt
cmake_minimum_required(VERSION 3.25)
project(demo)

set(CMAKE_CXX_STANDARD 14)

set(CMAKE_PREFIX_PATH D:\\libtorch-release\\libtorch)
find_package(Torch REQUIRED)
set(CMAKE_CXX_FLAGS "${CMAKE_CXX_FLAGS} ${TORCH_CXX_FLAGS}")

add_executable(demo main.cpp) #before target_link_libraries
target_link_libraries(demo "${TORCH_LIBRARIES}")

# The following code block is suggested to be used on Windows.
# According to https://github.com/pytorch/pytorch/issues/25457,
# the DLLs need to be copied to avoid memory errors.
if (MSVC)
    file(GLOB TORCH_DLLS "${TORCH_INSTALL_PREFIX}/lib/*.dll")
    add_custom_command(TARGET demo
            POST_BUILD
            COMMAND ${CMAKE_COMMAND} -E copy_if_different
            ${TORCH_DLLS}
            $)
endif (MSVC)
试用小样
#include 设置 CLion 环境
参考来自于:
https://www.youtube.com/watch?v=Vj06cfj6LyI (1:22开始)
https://www.jetbrains.com/help/clion/quick-tutorial-on-configuring-clion-on-windows.html#clang-mingw
第一步:

第二步:
只用新建或者在原有里面改toolchain的地方到–>visual studio

第三步:
先不用管 build. Cmake 一次不成,改正错误就点击 最左边循环的icon, 再次Cmake
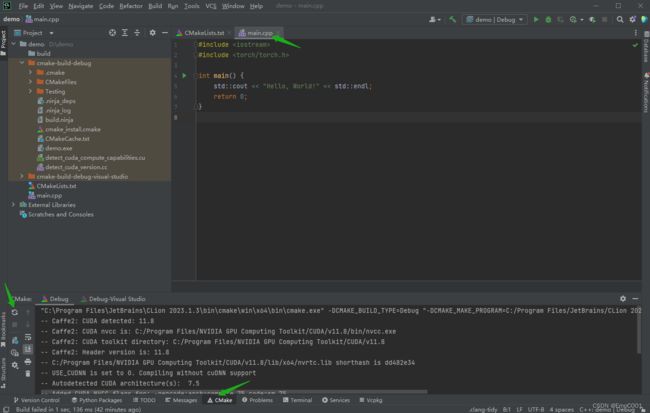
这三步做完,可以确保我们吧torch安装好了。 Torch 安装进去的迹象:

Cuda
这个比libtorch 好上手多了。基本还是python那一套。用VS code 比较容易。
配置VS C++ 环境
ctrl + shift + P, 找到关于配置C++的 UI选项
compiler path 和 intelliSenseMode 都不用管,我的机子windows,用啥都没关系。重要的是 includePath, 这个保证了在用VS code IDE 写代码时,不会因为找不到torch报错~
{
    "configurations": [
        {
            "name": "Linux",
            "includePath": [
                "${workspaceFolder}/**",
                "C:\\Users\\Remi\\anaconda3\\envs\\yolov8\\include",
                "C:\\Users\\Remi\\anaconda3\\envs\\yolov8\\Lib\\site-packages\\torch\\include",
                "C:\\Users\\Remi\\anaconda3\\envs\\yolov8\\Lib\\site-packages\\torch\\include\\torch\\csrc\\api\\include"
            ],
            "defines": [],
            "compilerPath": "/usr/bin/clang",
            "cStandard": "c17",
            "cppStandard": "c++14",
            "intelliSenseMode": "linux-clang-x64"
        }
    ],
    "version": 4
}
建上手的文件
按照从上到下顺序,依次建立
step1: interpolation.cpp
//
// Created by Remi on 2023/6/15.
//
#include step2: interpolation_kernel.cu
#include step3: include/ utils.h
#include step4: setup.py
如果是仿照写自己的内容时,这里比较容易出错。
sources 一定要包含 c++ 和 cuda 的内容
import glob
import os.path as osp
from setuptools import setup
from torch.utils.cpp_extension import CUDAExtension, BuildExtension
ROOT_DIR = osp.dirname(osp.abspath(__file__))
include_dirs = [osp.join(ROOT_DIR, "include")]
sources = glob.glob('*.cpp')+glob.glob('*.cu')

setup(
    name='speedyIOU',
    version='1.0',
    ext_modules=[
        CUDAExtension(
            name='speedyIOU',
            sources = sources,
            include_dirs = include_dirs
        )
    ],
    cmdclass={
        'build_ext': BuildExtension
    }
)
step5: pip install package
pip install .
step6: test.py
这里的speedyIOU 来自你在step5install的自己的 python 的库。
import torch
import speedyIOU

faets = torch.ones(2)
point = torch.ones(2)

print(speedyIOU.trilinear_interpolation(faets,point))
有东西输出,就说明从python 到 C++ 再到 cuda 这个套路,你就掌握了。