- SpringCloud/Boot集成LogBack
azoon.top
springcloudlogbackspringlog4jslf4j
一.简要介绍什么是SLF4J?官网介绍:SimpleLoggingFacadeforJava(SLF4J)充当简单的各种日志记录框架的Facade或抽象(e.g.java.util.logging、logback、log4j)允许最终用户在部署时插入所需的日志记录框架。类似java中的接口,如果只集成SLF4J,日志只能输出在控制台,并没有输出到文件的能力,要实现真正的日志能力,需要引入其实现层:
- spring boot、spring cloud、spring cloud alibaba 之间的版本对应关系
薄荷街的兔比先生
springbootspringcloudjava
大家在引用pom的时候还是要以官方推荐版本为主,不然容易出现未知的问题。1.springboot和springcloud的版本关系官方提供的版本对照表https://start.spring.io/actuator/info{"git":{"branch":"93e528fc7e79e41a513e493d057499401a15eb67","commit":{"id":"93e528f","ti
- 【Java 面试 八股文】Spring Cloud 篇
落啦啦
javajava面试springcloud
SpringCloud篇1.SpringCloud5大组件有哪些?2.服务注册和发现是什么意思?SpringCloud如何实现服务注册发现?3.我看你之前也用过nacos,你能说下nacos与eureka的区别?4.你们项目负载均衡如何实现的?5.Ribbon负载均衡策略有哪些?6.如果想自定义负载均衡策略如何实现?7.什么是服务雪崩,怎么解决这个问题?8.你们的微服务是怎么监控的?9.你们项目中
- 工程项目管理系统源码与Spring Cloud:实现高效系统管理与二次开发
微服务技术分享
springcloudjava企业工程管理系统源码工程项目管理系统源码工程管理系统源码
随着企业规模的不断扩大和业务的快速发展,传统的工程项目管理方式已经无法满足现代企业的需求。为了提高工程管理效率、减轻劳动强度、提高信息处理速度和准确性,企业需要借助先进的数字化技术进行转型。本文将介绍一款采用SpringCloud+SpringBoot+Mybatis技术框架的工程项目管理系统,该系统涵盖了项目管理、合同管理、预警管理、竣工管理、质量管理等多个方面,通过数据字典、编码管理、用户管理
- Spring Cloud中如何使用Eureka:超详细指南
一位卑微的码农
springcloudeurekajava
引言在微服务架构中,服务发现是一个至关重要的组件。它允许服务实例在启动时注册自己,并且能够发现其他服务实例的位置。SpringCloud提供了多种服务发现的实现方式,其中Eureka是最常用的之一。本文将深入探讨如何在SpringCloud中使用Eureka进行服务注册与发现,涵盖从基础到高级的配置和使用场景。什么是Eureka?Eureka是Netflix开源的服务发现组件,SpringClou
- JSONField、JsonProperty不生效的问题
FLGB
杂谈jsonjava
@JSONField(name="env_version")privateStringenvVersion;问题:openfeign请求接口一直获取的是线上的小程序码,无法获取到develop环境的小程序码排查:1、打开openfeigndebug日志#level后面是自己feign接口的包名,另外还需要添加feign的日志配置类logging.level.com.lf.feign:debug#f
- Spring Cloud 面试题及答案整理,最新面试题
扫地僧009
互联网大厂面试题springcloudspring后端面试
SpringCloud中断路器的原理及其作用是什么?SpringCloud断路器的原理和作用基于以下几个关键点:1、故障隔离机制:在微服务架构中,断路器作为一种故障隔离机制,当某个服务实例出现问题时,断路器会“断开”这个实例,防止故障蔓延到其他服务。2、快速失败机制:当断路器打开时,对该服务的调用将会快速失败而不是等待,从而避免资源浪费和延迟。3、服务降级:在断路器打开时,可以为用户提供备选的响应
- ProGuard加密混淆SpringBoot应用代码
lbmydream
springboot后端java
背景我们的项目是基于SpringCloud架构的微服务应用,采用Docker离线部署方式交付客户,通过授权证书来控制应用的许可功能模块和使用时间。我们已经在代码层已经实现:基于多维度硬件指纹的绑定验证,cpuid、mac地址、磁盘序列、系统时钟、应用初始时间等双重时间验证机制(系统时间+硬件时钟)安全续期机制支持离线更新防调试/防篡改保护来解决离线容器化部署Java应用程序授权问题。整体流程如下:
- Spring Cloud + Nacos + K8S 零影响发布方案
淡黄的Cherry
微服务相关kubernetesspringcloud容器
问题描述在生产环境中使用springcloud框架,由于服务更新过程中,容器服务会被直接停止,部分请求仍被分发到终止的容器,导致服务出现500错误,这部分错误请求数据占用比较少,因为Pod滚动更新都是一对一。因为部分用户会产生服务器错误的情况,考虑使用优雅的终止方式,将错误请求降到最低,直至滚动更新不影响用户。这里结合nacos使用来分析。在K8s的滚动升级中,比如5个Pod服务在升级过程中,会先
- SpringCloud Alibaba系列——6Dubbo的SPI机制分析
木木_2024
SpringCloudalibaba系列springclouddubbojavaspringboot微服务
目标理解Dubbo的SPI机制能口述Dubbo和JDK中的SPI机制的区别第1章SPI简介SPI,全称为ServiceProviderInterface,是一种服务发现机制。它通过在ClassPath路径下的META-INF/services文件夹查找文件,自动加载文件里所定义的类。这一机制为很多框架扩展提供了可能,比如在Dubbo、JDBC中都使用到了SPI机制。我们先通过一个很简单的例子来看下
- 面试题:SpringCloud的优缺点有哪些
clownAdam
SpringCloud面试springcloud后端面试微服务
面试题:SpringCloud的优缺点有哪些在面试中回答SpringCloud的优缺点时,可以结合其实际应用场景和技术特点,给出简洁、清晰的回答。以下是一个适合面试场景的回答模板:SpringCloud的优点微服务生态完善SpringCloud提供了微服务架构中常见的解决方案,如服务注册与发现(Eureka、Consul)、配置中心(SpringCloudConfig)、负载均衡(Ribbon)、
- 微服务的优势以及在Spring生态下的开源解决方案。
dushky
微服务spring开源
使用微服务架构是为了解决单体应用在复杂业务场景下的局限性,其核心思想是通过解耦和模块化提升系统的灵活性、可维护性和扩展性。以下是微服务的核心优势及对应的Spring生态下的技术栈实现方案:一、微服务的核心优势与实现1.服务独立开发与部署优势:每个微服务独立开发、测试、部署和扩展,避免单体应用“牵一发而动全身”的问题。SpringCloud实现方案:服务拆分:基于业务边界定义独立服务模块(如订单服务
- Linux安装部署nacos以及解决各种报错
学Java的小蛋黄
linux运维服务器java开发语言
运行环境:linux+jdk17+nacos2.2.31.nacos是什么Nacos是阿里巴巴开源的服务注册中心以及配置中心,Nacos干掉了SpringCloud的三大组件,分别是注册中心Eureka、服务配置Config,服务总线Bus。2.Nacos主要提供以下四大功能1.服务发现和服务健康监测Nacos使服务更容易注册,并通过DNS或HTTP接口发现其他服务,Nacos还提供服务的实时健康
- 基于Spring Boot 2.0.2版本——Eureka的使用
huaseven0703
springbooteurekaspingboot2.0.2
Eureka简介在SpringCloud微服务中,Eureka作为服务注册中心,其作用在于对于各个微服务提供注册并发送心跳检测,每个客户端都可以在服务器上面做声明注册,调用……注:文中带有底色的文字部分为重点改动区域一.springboot中创建Eureka1.pom.xml4.0.0com.mazh.eurakamyeuraka0.0.1-SNAPSHOTjarmyeurakaDemoproje
- 《Spring Cloud 微服务的设计模式》
@孤随
SpringClundspringcloud设计模式
SpringCloud为构建微服务架构提供了一系列强大的工具和组件,以下详细介绍SpringCloud微服务中常见的设计模式:1.服务注册与发现模式模式概述服务注册与发现是微服务架构的基础模式,它解决了微服务之间如何相互定位的问题。在分布式系统中,微服务的实例数量和地址可能动态变化,服务注册与发现机制可以让服务之间通过服务名称进行调用,而无需关心具体的实例地址。实现组件Eureka:Netflix
- SpringCloud-使用FFmpeg对视频压缩处理
m0_74824517
面试学习路线阿里巴巴springcloudffmpegspring
在现代的视频处理系统中,压缩视频以减小存储空间、加快传输速度是一项非常重要的任务。FFmpeg作为一个强大的开源工具,广泛应用于音视频的处理,包括视频的压缩和格式转换等。本文将通过Java代码示例,向您展示如何使用FFmpeg进行视频压缩,并介绍相关参数的设置。一、FFmpeg简介FFmpeg是一个可以用来录制、转换和流传输音视频的开源工具。它支持几乎所有的音视频格式,并提供了非常强大的编码、解码
- 庖丁解java(一篇文章学java)
庖丁解java
java开发语言
(大家不用收藏这篇文章,因为这篇文章会经常更新,也就是删除后重发)一篇文章学java,这是我滴一个执念...当然,真一篇文章就写完java基础,java架构,java业务实现,java业务扩展,根本不可能.所以,这篇文章,就是一个索引,索什么呢?请看下文...关于决定开始写博文的介绍(一切故事的起点源于这一次反省)中小技术公司的软扩展(微服务扩展是否有必要?)-CSDN博客SpringCloud(
- 庖丁解java(一篇文章学java)
庖丁解java
java开发语言
(大家不用收藏这篇文章,因为这篇文章会经常更新,也就是删除后重发)一篇文章学java,这是我滴一个执念...当然,真一篇文章就写完java基础,java架构,java业务实现,java业务扩展,根本不可能.所以,这篇文章,就是一个索引,索什么呢?请看下文...关于决定开始写博文的介绍(一切故事的起点源于这一次反省)中小技术公司的软扩展(微服务扩展是否有必要?)-CSDN博客SpringCloud(
- springCloud网关Zuul和GateWay区别
m0_74823292
面试学习路线阿里巴巴springcloudgatewayjava
getway和zuul在zuul没有进行参数调优的时候,getway的性能会远高于zuul。分析,在空负载的时候,SpringCloudGateway比zuul1性能高50%左右,在模拟处理50ms业务后,,SpringCloudGateway比zuul1性能高9倍左右。但是考虑到zuul使用默认配置,结果可能不准,上网查找zuul生产优化配置调优后再次进行50ms业务处理压测。而SpringCl
- 基于SpringCloud设计的题库管理系统
DS小龙哥
前端后端web设计案例springcloud微服务java
一、项目背景社会在不断的进步,人口数量也在不断的增长,越来越多的高校和企业不断的建立。对于目前的高校,无论是小学,初中,高中甚至是大学都有相应的考试来对学生进行一个初步的判定,而对于企业招聘,很多求职者在入职前也会做相应的笔试题或者综合的心理测评,而这些题目多可能来源与各个网站,书本以及可能是对心理能力,抗压能力的一个考察。这些试题可能来源比较广泛,很可能这些试题的成绩会是面试官对您的一个加分的项
- springcloud-consul初步配置
或许没看到
springcloudconsulspringcloud
Consul(代替Eureka)Eureka和Consul区别1.CAPConsul强一致性(CP)服务注册相比Eureka会稍慢一些。因为Consul的raft协议要求必须过半数的节点都写入成功才认为注册成功Leader挂掉时,重新选举期间整个consul不可用。保证了强一致性但牺牲了可用性。Eureka保证高可用和最终一致性(AP)服务注册相对要快,因为不需要等注册信息replicate到其他
- SpringCloud03—服务治理:SpringCloud Eureka
m0_75011249
程序员springcloudeurekajava
《一线大厂Java面试题解析+核心总结学习笔记+最新讲解视频+实战项目源码》,点击传送门,即可获取!spring-boot-starter-parent2.5.1org.springframework.cloudspring-cloud-starter-eureka1.4.7.RELEASEorg.springframework.cloudspring-cloud-dependencies2020
- 【云原生】SpringCloud-Spring Boot Starter使用测试
egekm_sefg
面试学习路线阿里巴巴springboot云原生springcloud
目录SpringBootStarter是什么?以前传统的做法使用SpringBootStarter之后starter的理念:starter的实现:?创建SpringBootStarter步骤在idea新建一个starter项目、直接执行下一步即可生成项目。?在xml中加入如下配置文件:创建proterties类来保存配置信息创建业务类:创建AutoConfiguration测试如下:SpringB
- 六、soul源码学习-SpringCloud项目本地运行
caihuayuan4
面试题汇总与解析springsqljava大数据
一、本地部署NacosNacos本地部署可以参考:http://www.iocoder.cn/Nacos/install/?self二、搭建SpringCloud项目示例代码:https://github.com/wyc192273/soul-learn-project/tree/main/sofa-demo搭建了简单的SpringCloud服务后,需要在项目中引入如下依赖:org.dromara
- SpringCloud----如何解决灾难性雪崩效应
Catalina_yep
SpringCloud
1.降级超时降级、资源不足时(线程或信号量)降级,降级后可以配合降级接口返回托底数据。实现一个fallback方法,当请求后端服务出现异常的时候,可以使用fallback方法返回的值.保证:服务出现问题整个项目还可以继续运行。2.熔断当失败率(如因网络故障/超时造成的失败率高)达到阀值自动触发降级,熔断器触发的快速失败会进行快速恢复。通俗理解:熔断就是具有特定条件的降级。所以在代码上熔断和降级都是
- SpringCloud微服务架构之断路器,如何解决微服务中的雪崩效应?
2401_89225002
架构微服务springcloud
图3.2极端情况下的微服务网状调用示意图最常见的场景就是当负载过高时,如果某个服务的性能或抗压能力不好,那么当请求到这个服务时就需要等待或直接出现超时、不可用等情况。在图3.2中,一旦服务C出现问题,可能会影响服务A和服务B,虽然服务D、E、F并没有直接与服务C相互依赖,但是服务C导致了服务A和服务B的阻塞,就会间接地影响服务D、E、F,从而让整个系统变得缓慢或不可用,这就是微服务的雪崩效应。微服
- Spring生态圈的概要说明
志大洋
#开发Java生态圈spring模块说明
《SpringCloud与Docker微服务架构实战》大多数Spring项目都是以“主版本号·次版本号·增量版本号·里程碑版本号”的形式命名版本号的。例如SpringFramework稳定版本4.3.5.RELEASE、里程碑版本5.0.0.M4等。其中,主版本号表示项目的重大重构;次版本号表示新特性的添加和变化;增量版本号一般表示Bug修复;里程碑版本号表示某版本号的里程碑。以下摘抄自《Spri
- 【图文详解】什么是微服务?什么是SpringCloud?
web15085181368
面试学习路线阿里巴巴微服务springcloud架构
目录一.认识微服务架构??微服务带来的挑战二.微服务解决方案SpringCloud??SpringCloud的版本??SpringCloud和SpringBoot的关系??SpringCloud实现方案SpringCloudNetfixSpringCloudAlibaba??SpringCloud实现对比在入门SpringCloud之前,我们需要先了解下什么是微服务,以及微服务的发展史。在架构发展
- 13-springcloud gateway集成nacos实现负载均衡
stars
微服务springcloudgateway负载均衡
网关作为访问系统的入口,负载均衡是必选项而不是可选项,本文介绍gateway与nacos集成,实现负载均衡的过程。关于springcloudgateway的基本用法,同学可以看看上篇文章:12-使用gateway作为网关。0、环境jdk:1.8springboot:2.4.2nacos:2.0.31、项目结构整体的项目目录结构如下:部署的时候,service-1我会部署两份,用来模拟多实例微服务的
- 【Spring】Spring的模块架构与生态圈—Spring Boot、Spring Cloud与Spring Security
AI人H哥会Java
JAVAjavaspring后端开发语言springbootspringcloud
随着互联网的发展,企业对快速开发和高可用性的需求不断增加,Spring生态系统(包括SpringBoot、SpringCloud和SpringSecurity)应运而生,为Java开发提供了强大的支持。在实际应用中,SpringBoot使得开发者能够快速构建独立的、生产级的Spring应用;SpringCloud则为微服务架构提供了完整的解决方案;而SpringSecurity则为应用提供了安全保
- web报表工具FineReport常见的数据集报错错误代码和解释
老A不折腾
web报表finereport代码可视化工具
在使用finereport制作报表,若预览发生错误,很多朋友便手忙脚乱不知所措了,其实没什么,只要看懂报错代码和含义,可以很快的排除错误,这里我就分享一下finereport的数据集报错错误代码和解释,如果有说的不准确的地方,也请各位小伙伴纠正一下。
NS-war-remote=错误代码\:1117 压缩部署不支持远程设计
NS_LayerReport_MultiDs=错误代码
- Java的WeakReference与WeakHashMap
bylijinnan
java弱引用
首先看看 WeakReference
wiki 上 Weak reference 的一个例子:
public class ReferenceTest {
public static void main(String[] args) throws InterruptedException {
WeakReference r = new Wea
- Linux——(hostname)主机名与ip的映射
eksliang
linuxhostname
一、 什么是主机名
无论在局域网还是INTERNET上,每台主机都有一个IP地址,是为了区分此台主机和彼台主机,也就是说IP地址就是主机的门牌号。但IP地址不方便记忆,所以又有了域名。域名只是在公网(INtERNET)中存在,每个域名都对应一个IP地址,但一个IP地址可有对应多个域名。域名类型 linuxsir.org 这样的;
主机名是用于什么的呢?
答:在一个局域网中,每台机器都有一个主
- oracle 常用技巧
18289753290
oracle常用技巧 ①复制表结构和数据 create table temp_clientloginUser as select distinct userid from tbusrtloginlog ②仅复制数据 如果表结构一样 insert into mytable select * &nb
- 使用c3p0数据库连接池时出现com.mchange.v2.resourcepool.TimeoutException
酷的飞上天空
exception
有一个线上环境使用的是c3p0数据库,为外部提供接口服务。最近访问压力增大后台tomcat的日志里面频繁出现
com.mchange.v2.resourcepool.TimeoutException: A client timed out while waiting to acquire a resource from com.mchange.v2.resourcepool.BasicResou
- IT系统分析师如何学习大数据
蓝儿唯美
大数据
我是一名从事大数据项目的IT系统分析师。在深入这个项目前需要了解些什么呢?学习大数据的最佳方法就是先从了解信息系统是如何工作着手,尤其是数据库和基础设施。同样在开始前还需要了解大数据工具,如Cloudera、Hadoop、Spark、Hive、Pig、Flume、Sqoop与Mesos。系 统分析师需要明白如何组织、管理和保护数据。在市面上有几十款数据管理产品可以用于管理数据。你的大数据数据库可能
- spring学习——简介
a-john
spring
Spring是一个开源框架,是为了解决企业应用开发的复杂性而创建的。Spring使用基本的JavaBean来完成以前只能由EJB完成的事情。然而Spring的用途不仅限于服务器端的开发,从简单性,可测试性和松耦合的角度而言,任何Java应用都可以从Spring中受益。其主要特征是依赖注入、AOP、持久化、事务、SpringMVC以及Acegi Security
为了降低Java开发的复杂性,
- 自定义颜色的xml文件
aijuans
xml
<?xml version="1.0" encoding="utf-8"?> <resources> <color name="white">#FFFFFF</color> <color name="black">#000000</color> &
- 运营到底是做什么的?
aoyouzi
运营到底是做什么的?
文章来源:夏叔叔(微信号:woshixiashushu),欢迎大家关注!很久没有动笔写点东西,近些日子,由于爱狗团产品上线,不断面试,经常会被问道一个问题。问:爱狗团的运营主要做什么?答:带着用户一起嗨。为什么是带着用户玩起来呢?究竟什么是运营?运营到底是做什么的?那么,我们先来回答一个更简单的问题——互联网公司对运营考核什么?以爱狗团为例,绝大部分的移动互联网公司,对运营部门的考核分为三块——用
- js面向对象类和对象
百合不是茶
js面向对象函数创建类和对象
接触js已经有几个月了,但是对js的面向对象的一些概念根本就是模糊的,js是一种面向对象的语言 但又不像java一样有class,js不是严格的面向对象语言 ,js在java web开发的地位和java不相上下 ,其中web的数据的反馈现在主流的使用json,json的语法和js的类和属性的创建相似
下面介绍一些js的类和对象的创建的技术
一:类和对
- web.xml之资源管理对象配置 resource-env-ref
bijian1013
javaweb.xmlservlet
resource-env-ref元素来指定对管理对象的servlet引用的声明,该对象与servlet环境中的资源相关联
<resource-env-ref>
<resource-env-ref-name>资源名</resource-env-ref-name>
<resource-env-ref-type>查找资源时返回的资源类
- Create a composite component with a custom namespace
sunjing
https://weblogs.java.net/blog/mriem/archive/2013/11/22/jsf-tip-45-create-composite-component-custom-namespace
When you developed a composite component the namespace you would be seeing would
- 【MongoDB学习笔记十二】Mongo副本集服务器角色之Arbiter
bit1129
mongodb
一、复本集为什么要加入Arbiter这个角色 回答这个问题,要从复本集的存活条件和Aribter服务器的特性两方面来说。 什么是Artiber? An arbiter does
not have a copy of data set and
cannot become a primary. Replica sets may have arbiters to add a
- Javascript开发笔记
白糖_
JavaScript
获取iframe内的元素
通常我们使用window.frames["frameId"].document.getElementById("divId").innerHTML这样的形式来获取iframe内的元素,这种写法在IE、safari、chrome下都是通过的,唯独在fireforx下不通过。其实jquery的contents方法提供了对if
- Web浏览器Chrome打开一段时间后,运行alert无效
bozch
Webchormealert无效
今天在开发的时候,突然间发现alert在chrome浏览器就没法弹出了,很是怪异。
试了试其他浏览器,发现都是没有问题的。
开始想以为是chorme浏览器有啥机制导致的,就开始尝试各种代码让alert出来。尝试结果是仍然没有显示出来。
这样开发的结果,如果客户在使用的时候没有提示,那会带来致命的体验。哎,没啥办法了 就关闭浏览器重启。
结果就好了,这也太怪异了。难道是cho
- 编程之美-高效地安排会议 图着色问题 贪心算法
bylijinnan
编程之美
import java.util.ArrayList;
import java.util.Collections;
import java.util.List;
import java.util.Random;
public class GraphColoringProblem {
/**编程之美 高效地安排会议 图着色问题 贪心算法
* 假设要用很多个教室对一组
- 机器学习相关概念和开发工具
chenbowen00
算法matlab机器学习
基本概念:
机器学习(Machine Learning, ML)是一门多领域交叉学科,涉及概率论、统计学、逼近论、凸分析、算法复杂度理论等多门学科。专门研究计算机怎样模拟或实现人类的学习行为,以获取新的知识或技能,重新组织已有的知识结构使之不断改善自身的性能。
它是人工智能的核心,是使计算机具有智能的根本途径,其应用遍及人工智能的各个领域,它主要使用归纳、综合而不是演绎。
开发工具
M
- [宇宙经济学]关于在太空建立永久定居点的可能性
comsci
经济
大家都知道,地球上的房地产都比较昂贵,而且土地证经常会因为新的政府的意志而变幻文本格式........
所以,在地球议会尚不具有在太空行使法律和权力的力量之前,我们外太阳系统的友好联盟可以考虑在地月系的某些引力平衡点上面,修建规模较大的定居点
- oracle 11g database control 证书错误
daizj
oracle证书错误oracle 11G 安装
oracle 11g database control 证书错误
win7 安装完oracle11后打开 Database control 后,会打开em管理页面,提示证书错误,点“继续浏览此网站”,还是会继续停留在证书错误页面
解决办法:
是 KB2661254 这个更新补丁引起的,它限制了 RSA 密钥位长度少于 1024 位的证书的使用。具体可以看微软官方公告:
- Java I/O之用FilenameFilter实现根据文件扩展名删除文件
游其是你
FilenameFilter
在Java中,你可以通过实现FilenameFilter类并重写accept(File dir, String name) 方法实现文件过滤功能。
在这个例子中,我们向你展示在“c:\\folder”路径下列出所有“.txt”格式的文件并删除。 1 2 3 4 5 6 7 8 9 10 11 12 13 14 15 16
- C语言数组的简单以及一维数组的简单排序算法示例,二维数组简单示例
dcj3sjt126com
carray
# include <stdio.h>
int main(void)
{
int a[5] = {1, 2, 3, 4, 5};
//a 是数组的名字 5是表示数组元素的个数,并且这五个元素分别用a[0], a[1]...a[4]
int i;
for (i=0; i<5; ++i)
printf("%d\n",
- PRIMARY, INDEX, UNIQUE 这3种是一类 PRIMARY 主键。 就是 唯一 且 不能为空。 INDEX 索引,普通的 UNIQUE 唯一索引
dcj3sjt126com
primary
PRIMARY, INDEX, UNIQUE 这3种是一类PRIMARY 主键。 就是 唯一 且 不能为空。INDEX 索引,普通的UNIQUE 唯一索引。 不允许有重复。FULLTEXT 是全文索引,用于在一篇文章中,检索文本信息的。举个例子来说,比如你在为某商场做一个会员卡的系统。这个系统有一个会员表有下列字段:会员编号 INT会员姓名
- java集合辅助类 Collections、Arrays
shuizhaosi888
CollectionsArraysHashCode
Arrays、Collections
1 )数组集合之间转换
public static <T> List<T> asList(T... a) {
return new ArrayList<>(a);
}
a)Arrays.asL
- Spring Security(10)——退出登录logout
234390216
logoutSpring Security退出登录logout-urlLogoutFilter
要实现退出登录的功能我们需要在http元素下定义logout元素,这样Spring Security将自动为我们添加用于处理退出登录的过滤器LogoutFilter到FilterChain。当我们指定了http元素的auto-config属性为true时logout定义是会自动配置的,此时我们默认退出登录的URL为“/j_spring_secu
- 透过源码学前端 之 Backbone 三 Model
逐行分析JS源代码
backbone源码分析js学习
Backbone 分析第三部分 Model
概述: Model 提供了数据存储,将数据以JSON的形式保存在 Model的 attributes里,
但重点功能在于其提供了一套功能强大,使用简单的存、取、删、改数据方法,并在不同的操作里加了相应的监听事件,
如每次修改添加里都会触发 change,这在据模型变动来修改视图时很常用,并且与collection建立了关联。
- SpringMVC源码总结(七)mvc:annotation-driven中的HttpMessageConverter
乒乓狂魔
springMVC
这一篇文章主要介绍下HttpMessageConverter整个注册过程包含自定义的HttpMessageConverter,然后对一些HttpMessageConverter进行具体介绍。
HttpMessageConverter接口介绍:
public interface HttpMessageConverter<T> {
/**
* Indicate
- 分布式基础知识和算法理论
bluky999
算法zookeeper分布式一致性哈希paxos
分布式基础知识和算法理论
BY
[email protected]
本文永久链接:http://nodex.iteye.com/blog/2103218
在大数据的背景下,不管是做存储,做搜索,做数据分析,或者做产品或服务本身,面向互联网和移动互联网用户,已经不可避免地要面对分布式环境。笔者在此收录一些分布式相关的基础知识和算法理论介绍,在完善自我知识体系的同
- Android Studio的.gitignore以及gitignore无效的解决
bell0901
androidgitignore
github上.gitignore模板合集,里面有各种.gitignore : https://github.com/github/gitignore
自己用的Android Studio下项目的.gitignore文件,对github上的android.gitignore添加了
# OSX files //mac os下 .DS_Store
- 成为高级程序员的10个步骤
tomcat_oracle
编程
What
软件工程师的职业生涯要历经以下几个阶段:初级、中级,最后才是高级。这篇文章主要是讲如何通过 10 个步骤助你成为一名高级软件工程师。
Why
得到更多的报酬!因为你的薪水会随着你水平的提高而增加
提升你的职业生涯。成为了高级软件工程师之后,就可以朝着架构师、团队负责人、CTO 等职位前进
历经更大的挑战。随着你的成长,各种影响力也会提高。
- mongdb在linux下的安装
xtuhcy
mongodblinux
一、查询linux版本号:
lsb_release -a
LSB Version: :base-4.0-amd64:base-4.0-noarch:core-4.0-amd64:core-4.0-noarch:graphics-4.0-amd64:graphics-4.0-noarch:printing-4.0-amd64:printing-4.0-noa
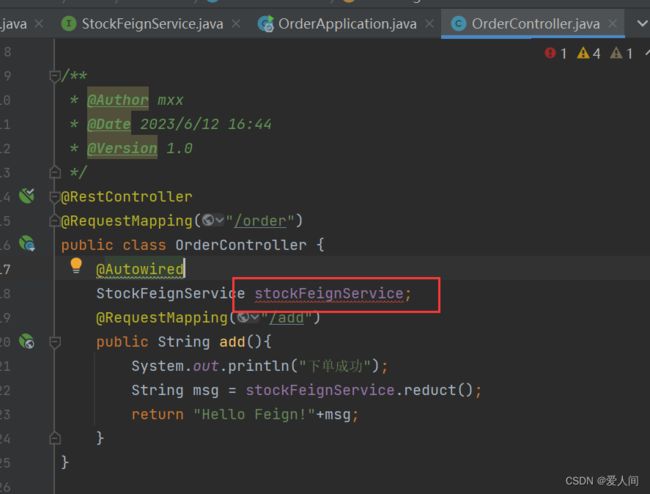
 将创建的feign注入到OrderController中,然后调用里面的方法,如下:


