gitlab部署与使用
2 Gitlab 部署与使用
# Gitlab 服务的安装文档
https://about.gitlab.com/install/

# 安装环境要求
https://docs.gitlab.com/ce/install/requirements.html

# 安装包下载地址
https://packages.gitlab.com/gitlab/gitlab-ce

# rpm 包国内下载地址
https://mirrors.tuna.tsinghua.edu.cn/gitlab-ce/yum/

# ubuntu 国内下载地址
https://mirrors.tuna.tsinghua.edu.cn/gitlab-ce/ubuntu/pool/
https://mirrors.tuna.tsinghua.edu.cn/gitlab-ce/apt/packages.gitlab.com/gitlab/gitlab-ce/ubuntu/pool/bionic/main/g/gitlab-ce/
2.1 下载并部署 gitlab
wget https://mirrors.tuna.tsinghua.edu.cn/gitlab-ce/apt/packages.gitlab.com/gitlab/gitlab-ce/ubuntu/pool/bionic/main/g/gitlab-ce/gitlab-ce_14.0.7-ce.0_amd64.deb

dpkg -i gitlab-ce_14.0.7-ce.0_amd64.deb
2.2 gitlab 配置使用
[root@gitlab ~]# grep -Ev "^#|^$" /etc/gitlab/gitlab.rb
external_url 'http://172.18.8.9'

# 可选邮件通知设置
gitlab_rails['smtp_enable'] = true
gitlab_rails['smtp_address'] = "smtp.qq.com"
gitlab_rails['smtp_port'] = 465
gitlab_rails['smtp_user_name'] = "[email protected]"
gitlab_rails['smtp_password'] = "PdDAdio9U86aDf5x"
gitlab_rails['smtp_domain'] = "qq.com"
gitlab_rails['smtp_authentication'] = :login
gitlab_rails['smtp_enable_starttls_auto'] = true
gitlab_rails['smtp_tls'] = true
gitlab_rails['gitlab_email_from'] = "[email protected]"
user["git_user_email"] = "[email protected]"
[root@gitlab ~]#
2.3 初始化服务
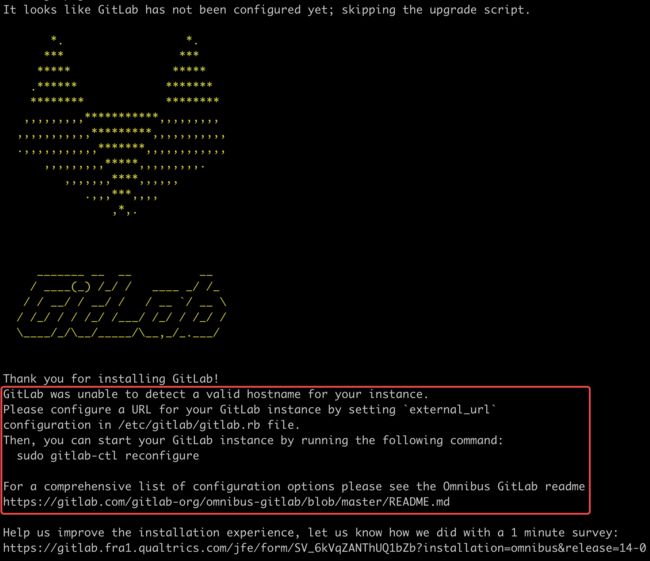
执行配置并启动服务
# 修改完配置文件要执行此操作
gitlab-ctl reconfigure
查看密码,并使用临时密码登录 gitlab ,修改新密码
Notes:
Default admin account has been configured with following details:
Username: root
Password: You didn't opt-in to print initial root password to STDOUT.
Password stored to /etc/gitlab/initial_root_password. This file will be cleaned up in first reconfigure run after 24 hours.

NOTE: Because these credentials might be present in your log files in plain text, it is highly recommended to reset the password following https://docs.gitlab.com/ee/security/reset_user_password.html#reset-your-root-password.

gitlab Reconfigured!
root@gitlab:~# cat /etc/gitlab/initial_root_password
# WARNING: This value is valid only in the following conditions
#          1. If provided manually (either via `GITLAB_ROOT_PASSWORD` environment variable or via `gitlab_rails['initial_root_password']` setting in `gitlab.rb`, it was provided before database was seeded for the first time (usually, the first reconfigure run).
#          2. Password hasn't been changed manually, either via UI or via command line.
#
#          If the password shown here doesn't work, you must reset the admin password following https://docs.gitlab.com/ee/security/reset_user_password.html#reset-your-root-password.

Password: 0QRRTruVzEF4fxq0RVCbjh9QfNrbDgu+ZTVgtBxjhD8=

# NOTE: This file will be automatically deleted in the first reconfigure run after 24 hours.
root@gitlab:~#
gitlab 相关的目录有哪些
| header 1 | header 2 |
|---|---|
| /etc/gitlab | 配置文件目录 |
| /run/gitlab | 运行 pid 目录 |
| /opt/gitlab | 安装目录 |
| /var/opt/gitlab | 数据目录 |
| /var/log/gitlab | 日志目录 |
2.4 常用命令
2.4.1 gitlab-rails
用于启动控制台进行特殊操作,比如修改管理员密码、打开数据库控制台( gitlab-rails dbconsole)等
示例
root@gitlab:~# gitlab-rails dbconsole
psql (12.6)
Type "help" for help.

gitlabhq_production=> \db
         List of tablespaces
    Name    |    Owner    | Location
------------+-------------+----------
 pg_default | gitlab-psql |
 pg_global  | gitlab-psql |
(2 rows)

gitlabhq_production=>
2.4.2 gitlab-psql
数据库命令行
示例
2.4.3 gitlab-rake
数据备份恢复等数据操作
示例
2.4.4 gitlab-ctl
客户端命令行操作行
[root@gitlab ~]# gitlab-ctl
I don't know that command.
omnibus-ctl: command (subcommand)
check-config
  Check if there are any configuration in gitlab.rb that is removed in specified version
deploy-page
  Put up the deploy page
diff-config
  Compare the user configuration with package available configuration
get-redis-master
  Get connection details to Redis master
prometheus-upgrade
  Upgrade the Prometheus data to the latest supported version
remove-accounts
  Delete *all* users and groups used by this package
reset-grafana
  Reset Grafana instance to its initial state by removing the data directory
set-grafana-password
  Reset admin password for Grafana
upgrade
  Run migrations after a package upgrade
upgrade-check
  Check if the upgrade is acceptable
General Commands:
  cleanse
    Delete *all* gitlab data, and start from scratch.
  help
    Print this help message.
  reconfigure
    Reconfigure the application.
  show-config
    Show the configuration that would be generated by reconfigure.
  uninstall
    Kill all processes and uninstall the process supervisor (data will be preserved).
Service Management Commands:
  graceful-kill
    Attempt a graceful stop, then SIGKILL the entire process group.
  hup
    Send the services a HUP.
  int
    Send the services an INT.
  kill
    Send the services a KILL.
  once
    Start the services if they are down. Do not restart them if they stop.
  restart
    Stop the services if they are running, then start them again.
  service-list
    List all the services (enabled services appear with a *.)
  start
    Start services if they are down, and restart them if they stop.
  status
    Show the status of all the services.
  stop
    Stop the services, and do not restart them.
  tail
    Watch the service logs of all enabled services.
  term
    Send the services a TERM.
  usr1
    Send the services a USR1.
  usr2
    Send the services a USR2.
Let's Encrypt Commands:
  renew-le-certs
    Renew the existing Let's Encrypt certificates
Database Commands:
  pg-password-md5
    Generate MD5 Hash of user password in PostgreSQL format
  pg-upgrade
    Upgrade the PostgreSQL DB to the latest supported version
  revert-pg-upgrade
    Run this to revert to the previous version of the database
  set-replication-password
    Set database replication password
Backup Commands:
  backup-etc
    Backup GitLab configuration [options]
Container Registry Commands:
  registry-garbage-collect
    Run Container Registry garbage collection.
[root@gitlab ~]#
2.4.5 gitlab-ctl stop
停止 gitlab
[root@gitlab ~]# gitlab-ctl stop
ok: down: alertmanager: 0s, normally up
ok: down: gitaly: 0s, normally up
ok: down: gitlab-exporter: 1s, normally up
ok: down: gitlab-workhorse: 0s, normally up
ok: down: grafana: 1s, normally up
ok: down: logrotate: 0s, normally up
ok: down: nginx: 0s, normally up
ok: down: node-exporter: 1s, normally up
ok: down: postgres-exporter: 0s, normally up
ok: down: postgresql: 0s, normally up
ok: down: prometheus: 0s, normally up
ok: down: puma: 0s, normally up
ok: down: redis: 0s, normally up
ok: down: redis-exporter: 1s, normally up
ok: down: sidekiq: 0s, normally up
[root@gitlab ~]#
2.4.6 gitlab-ctl start
启动 gitlab
[root@gitlab ~]# gitlab-ctl start
ok: run: alertmanager: (pid 24624) 0s
ok: run: gitaly: (pid 24634) 1s
ok: run: gitlab-exporter: (pid 24652) 0s
ok: run: gitlab-workhorse: (pid 24657) 0s
ok: run: grafana: (pid 24666) 1s
ok: run: logrotate: (pid 24674) 0s
ok: run: nginx: (pid 24681) 1s
ok: run: node-exporter: (pid 24683) 0s
ok: run: postgres-exporter: (pid 24697) 1s
ok: run: postgresql: (pid 24713) 0s
ok: run: prometheus: (pid 24722) 0s
ok: run: puma: (pid 24731) 1s
ok: run: redis: (pid 24737) 0s
ok: run: redis-exporter: (pid 24743) 1s
ok: run: sidekiq: (pid 24751) 0s
[root@gitlab ~]#
2.4.7 gitlab-ctl restart
重启 gitlab
[root@gitlab ~]# gitlab-ctl restart
ok: run: alertmanager: (pid 18623) 1s
timeout: run: gitaly: (pid 13834) 144519s, got TERM
ok: run: gitlab-exporter: (pid 18686) 1s
ok: run: gitlab-workhorse: (pid 18688) 1s
ok: run: grafana: (pid 18700) 1s
ok: run: logrotate: (pid 18719) 0s
ok: run: nginx: (pid 18726) 1s
ok: run: node-exporter: (pid 18737) 0s
ok: run: postgres-exporter: (pid 18743) 1s
ok: run: postgresql: (pid 18756) 0s
ok: run: prometheus: (pid 18765) 0s
ok: run: puma: (pid 18818) 0s
ok: run: redis: (pid 18827) 1s
ok: run: redis-exporter: (pid 18834) 0s
ok: run: sidekiq: (pid 18861) 0s
[root@gitlab ~]#
2.4.8 gitlab-ctl status
查看组件运行状态
示例:验证 gitlab 启动完成
[root@gitlab ~]# gitlab-ctl status
run: alertmanager: (pid 13851) 2622s; run: log: (pid 13081) 2959s
run: gitaly: (pid 13834) 2625s; run: log: (pid 12524) 3155s
run: gitlab-exporter: (pid 13797) 2629s; run: log: (pid 13010) 2980s
run: gitlab-workhorse: (pid 13775) 2631s; run: log: (pid 12908) 3000s
run: grafana: (pid 13873) 2621s; run: log: (pid 13608) 2712s
run: logrotate: (pid 12426) 3174s; run: log: (pid 12438) 3171s
run: nginx: (pid 12937) 2995s; run: log: (pid 12950) 2992s
run: node-exporter: (pid 13786) 2630s; run: log: (pid 12989) 2986s
run: postgres-exporter: (pid 13864) 2621s; run: log: (pid 13117) 2945s
run: postgresql: (pid 12659) 3145s; run: log: (pid 12673) 3144s
run: prometheus: (pid 13811) 2627s; run: log: (pid 13050) 2968s
run: puma: (pid 12859) 3013s; run: log: (pid 12866) 3012s
run: redis: (pid 12473) 3167s; run: log: (pid 12485) 3164s
run: redis-exporter: (pid 13803) 2628s; run: log: (pid 13025) 2976s
run: sidekiq: (pid 12875) 3007s; run: log: (pid 12889) 3004s
[root@gitlab ~]#
2.4.9 gitlab-ctl tail nginx
查看某个组件的日志
[root@gitlab ~]# gitlab-ctl tail nginx
==> /var/log/gitlab/nginx/access.log <==

==> /var/log/gitlab/nginx/gitlab_access.log <==
172.18.60.171 - - [07/Aug/2021:10:01:43 +0000] "GET /-/profile/notifications HTTP/1.1" 200 21779 "http://172.18.8.9/-/profile/preferences" "Mozilla/5.0 (Macintosh; Intel Mac OS X 10.14; rv:90.0) Gecko/20100101 Firefox/90.0" 4.44
172.18.60.171 - - [07/Aug/2021:10:01:43 +0000] "GET /assets/webpack/pages.profiles.notifications.show.073c41ea.chunk.js HTTP/1.1" 200 36660 "http://172.18.8.9/-/profile/notifications" "Mozilla/5.0 (Macintosh; Intel Mac OS X 10.14; rv:90.0) Gecko/20100101 Firefox/90.0" -
172.18.60.171 - - [07/Aug/2021:10:01:43 +0000] "GET /assets/webpack/commons-pages.groups.details-pages.groups.show-pages.profiles.notifications.show-pages.projects.show.5b243f42.chunk.js HTTP/1.1" 200 8884 "http://172.18.8.9/-/profile/notifications" "Mozilla/5.0 (Macintosh; Intel Mac OS X 10.14; rv:90.0) Gecko/20100101 Firefox/90.0" -
172.18.60.171 - - [07/Aug/2021:10:01:44 +0000] "GET /-/profile/password/edit HTTP/1.1" 200 20925 "http://172.18.8.9/-/profile/notifications" "Mozilla/5.0 (Macintosh; Intel Mac OS X 10.14; rv:90.0) Gecko/20100101 Firefox/90.0" 4.49
2.4.10 验证端口及状态
80 端口是在初始化 gitlib 的时候启动的,因此如果之前的有程序占用会导致初始 化失败或无法访问!
[root@gitlab ~]# lsof -i:80
COMMAND   PID       USER   FD   TYPE DEVICE SIZE/OFF NODE NAME
nginx   12937       root    7u  IPv4 109641      0t0  TCP *:http (LISTEN)
nginx   12938 gitlab-www    7u  IPv4 109641      0t0  TCP *:http (LISTEN)
nginx   12939 gitlab-www    7u  IPv4 109641      0t0  TCP *:http (LISTEN)
nginx   12940 gitlab-www    7u  IPv4 109641      0t0  TCP *:http (LISTEN)
nginx   12941 gitlab-www    7u  IPv4 109641      0t0  TCP *:http (LISTEN)
[root@gitlab ~]#
2.4.11 重新加载配置
[root@gitlab ~]# gitlab-ctl reconfigure
2.5 登录 gitlab web 界面
登录,默认用户为 root
登录 web 页面并设置密码,最少 8 位
汉化
2.5.1 关闭账号注册
默认情况下可以直接注册账号,因此一般都关闭次功能
取消账户注册功能之后点 Save changes
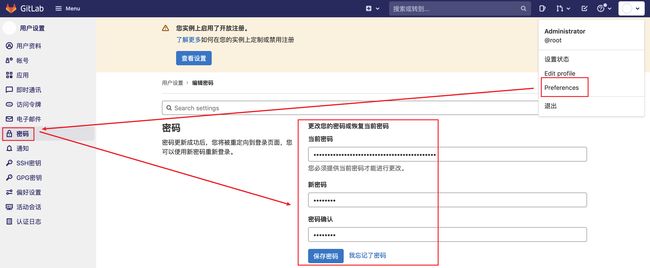
2.5.2 重新设置密码
使用第一次使用新账号登录要设置密码
通过邮件重置用户密码,在收件箱打开邮件设置密码
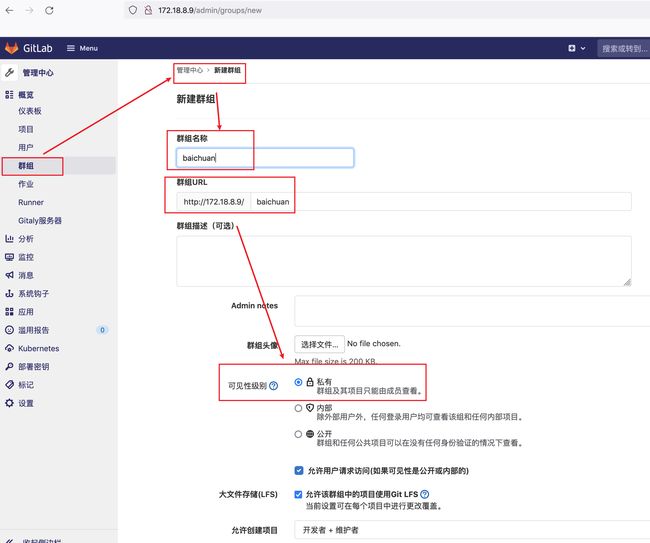
2.5.3 创建组
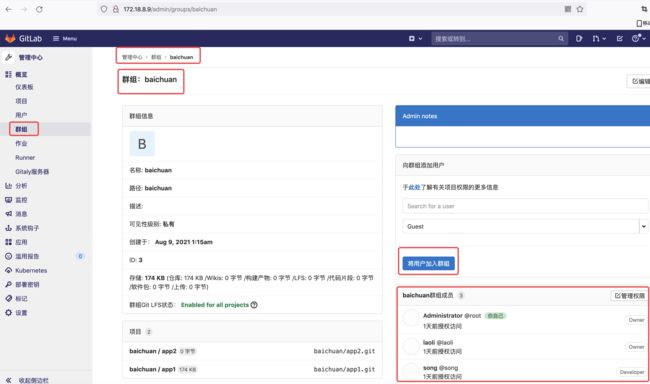
使用管理员 root 创建组,一个组里面可以有多个项目分支,可以将开发添加到组里 面进行设置权限,不同的组就是公司不同的开发项目或者服务模块,不同的组添加不同的开发即可实现对开发设置权限的管理。
2.5.4 创建 git 账户
Menu-->Admin--->用户
新建用户默认没有密码,可以在新建之后编辑添加密码或者使用邮箱找回密码
2.5.5 使用管理员创建项目
2.5.6 创建一个测试页面
2.5.7 将用户添加到组
2.5.8 git 客户端测试 clone 项目
另找一台服务器测试是否可用
[root@ha_keepalive1test ~]# apt -y install git  # 安装 git
[root@ha_keepalive1test ~]# cd /opt/
[root@ha_keepalive1test /opt]# git clone http://172.18.8.9/baichuan/app1.git             # clone app1 的代码
Cloning into 'app1'...
Username for 'http://172.18.8.9': root          # 输入 root,生产中需要输入所有者自己的名字
Password for 'http://[email protected]':
remote: Enumerating objects: 3, done.
remote: Counting objects: 100% (3/3), done.
remote: Total 3 (delta 0), reused 0 (delta 0), pack-reused 0
Unpacking objects: 100% (3/3), done.
[root@ha_keepalive1test /opt]# ls
app1  containerd
[root@ha_keepalive1test /opt]# cd app1/
[root@ha_keepalive1test /opt/app1]# ls
index.html
[root@ha_keepalive1test /opt/app1]# vim index.html  # 编辑内容
[root@ha_keepalive1test /opt/app1]# cat index.html  # 查看内容
<h1>V111111111111111</h1>
<h1>V222222222222222</h1>
[root@ha_keepalive1test /opt/app1]# git add .           # 添加到暂存区
[root@ha_keepalive1test /opt/app1]# git commit -m "v2"  # 提交到本地仓库
[main f245002] v2
 Committer: root <root@ha_keepalive1test.com>
Your name and email address were configured automatically based
on your username and hostname. Please check that they are accurate.
You can suppress this message by setting them explicitly. Run the
following command and follow the instructions in your editor to edit
your configuration file:

    git config --global --edit

After doing this, you may fix the identity used for this commit with:

    git commit --amend --reset-author

 1 file changed, 1 insertion(+)
[root@ha_keepalive1test /opt/app1]# git push        # 上传远程仓库
Username for 'http://172.18.8.9': root
Password for 'http://[email protected]':
Counting objects: 3, done.
Delta compression using up to 4 threads.
Compressing objects: 100% (2/2), done.
Writing objects: 100% (3/3), 257 bytes | 257.00 KiB/s, done.
Total 3 (delta 0), reused 0 (delta 0)
To http://172.18.8.9/baichuan/app1.git
   12e0c5e..f245002  main -> main
[root@ha_keepalive1test /opt/app1]#
2.6 gitlab 使用
2.6.1 数据保方式
SVN 与 CVS
每次提交的文件都单独保存,即按照文件的提交时间区分不同的版本,保存至不同的逻辑存储区域,后期恢复的时候直接基于之前版本恢复
Gitlab
Gitlab 与 SVN 的数据保存方式不一样,gitlab 虽然也会在内部对数据进行逻辑划分保存,但是当后期提交的数据如果和之前提交过的数据没有变化,其就直接快照之前的文件,而不是在将文件重新上传一份在保存一遍,这样既节省了空间又加快了代码提交速度
2.6.2 常用 git 命令
使用 git 命令下载代码与提交代码等操作
| header 1 | header 2 |
|---|---|
git config --global user.name "name" |
设置全局用户名 |
git config --global user.email [email protected] |
设置全局邮箱 |
git config --global --list |
列出用户全局设置 |
git add index.html / . |
添加指定文件、目录或当前目录下所有数据到暂存区 |
git commit -m "11" |
提交文件到工作区 |
git status |
查看工作区的状态 |
git push |
提交代码到服务器 |
git pull |
获取代码到本地 |
git log |
查看操作日志 |
vim .gitignore |
定义忽略文件上传至 gitlab |
git reset --hard HEAD^^ |
git 版本回滚, HEAD 为当前版本,加一个^为上一个,^^为上上一个版本 |
git reflog # |
获取每次提交的 ID,可以使用 --hard 根据提交的 ID 进行版本回退 |
git reset --hard 5ae4b06 |
回退到指定 id 的版本 |
git branch |
查看当前所处的分支 |
git checkout -b develop |
创建并切换到一个新分支 |
git checkout develop |
切换分支 |
示例:查看修改状态
[root@ha_keepalive1test /opt/app1]# vim index.html
[root@ha_keepalive1test /opt/app1]# cat index.html
V111111111111111
V222222222222222
V333333333333333
V444444444444444
[root@ha_keepalive1test /opt/app1]# git add .
[root@ha_keepalive1test /opt/app1]# git status
On branch main
Your branch is up to date with 'origin/main'.

Changes to be committed:
  (use "git reset HEAD ..." to unstage)

	modified:   index.html

[root@ha_keepalive1test /opt/app1]# git commit -m "v4"
[main 3519426] v4
 Committer: root
Your name and email address were configured automatically based
on your username and hostname. Please check that they are accurate.
You can suppress this message by setting them explicitly. Run the
following command and follow the instructions in your editor to edit
your configuration file:

    git config --global --edit

After doing this, you may fix the identity used for this commit with:

    git commit --amend --reset-author

 1 file changed, 1 insertion(+)
[root@ha_keepalive1test /opt/app1]# git status
On branch main
Your branch is ahead of 'origin/main' by 1 commit.
  (use "git push" to publish your local commits)

nothing to commit, working tree clean
[root@ha_keepalive1test /opt/app1]# git log
commit 3519426dff120610d57295af81dac04b4ed7753e (HEAD -> main)
Author: root
Date:   Tue Aug 10 07:31:00 2021 +0000

    v4

commit 400e347a97d93883fc1416b820a0ab69f2ee1a7c (origin/main, origin/HEAD)
Author: root
Date:   Tue Aug 10 07:09:12 2021 +0000

    v3

commit f245002226e4fb088951a822cb866a1c1878664c
Author: root
Date:   Tue Aug 10 03:31:46 2021 +0000

    v2

commit 12e0c5e595fb80ac83ea973695b1833eefe80f8a
Author: Administrator
Date:   Tue Aug 10 03:19:11 2021 +0000

    更新index.html
[root@ha_keepalive1test /opt/app1]#
示例:隐藏信息
某些信息只需要在本地使用,出于安全考虑并不需要上传到 gitlab 上
[root@ha_keepalive1test /opt/app1]# vim redis.conf
[root@ha_keepalive1test /opt/app1]# ls
index.html  mysql.conf  redis.conf
[root@ha_keepalive1test /opt/app1]# git add .
[root@ha_keepalive1test /opt/app1]# git status
On branch main
Your branch is up to date with 'origin/main'.

Changes to be committed:
  (use "git reset HEAD ..." to unstage)

	new file:   redis.conf

[root@ha_keepalive1test /opt/app1]# git commit -m "add redis.conf"
[main 928a081] add redis.conf
 Committer: root
Your name and email address were configured automatically based
on your username and hostname. Please check that they are accurate.
You can suppress this message by setting them explicitly. Run the
following command and follow the instructions in your editor to edit
your configuration file:

    git config --global --edit

After doing this, you may fix the identity used for this commit with:

    git commit --amend --reset-author

 1 file changed, 3 insertions(+)
 create mode 100644 redis.conf
[root@ha_keepalive1test /opt/app1]# git push
Username for 'http://172.18.8.9': song
Password for 'http://[email protected]':
Counting objects: 3, done.
Delta compression using up to 4 threads.
Compressing objects: 100% (2/2), done.
Writing objects: 100% (3/3), 342 bytes | 342.00 KiB/s, done.
Total 3 (delta 0), reused 0 (delta 0)
To http://172.18.8.9/baichuan/app1.git
   e6ca350..928a081  main -> main
[root@ha_keepalive1test /opt/app1]#
mysql.conf 并没有添加进来,只有 redis.conf 被提交过来了
示例:git reflog #
获取每次提交的 ID,可以使用 --hard 根据提交的 ID 进行版本回退
[root@ha_keepalive1test /opt/app1]# git reflog
928a081 (HEAD -> main, origin/main, origin/HEAD) HEAD@{0}: commit: add redis.conf
e6ca350 HEAD@{1}: pull: Fast-forward
400e347 HEAD@{2}: reset: moving to HEAD^
3519426 HEAD@{3}: commit: v4
400e347 HEAD@{4}: commit: v3
f245002 HEAD@{5}: clone: from http://172.18.8.9/baichuan/app1.git
[root@ha_keepalive1test /opt/app1]# git reset --hard 400e347 # 回滚到 v3 版本
2.6.3 git 缓存区与工作区等概念
-
工作区:
clone的代码或者开发自己编写的代码文件所在的目录,通常是代码所在的一个服务的目录名称 -
暂存区:用于存储在工作区中对代码进行修改后的文件所保存的地方,使用
git add添加。 -
本地仓库:用于提交存储在工作区和暂存区中改过的文件地方,使用
git commit提交 -
远程仓库:多个开发共同协作提交代码的仓库,即
gitlab服务器
示例:回滚代码
[root@ha_keepalive1test /opt/app1]# git commit -m "v4"  # git commit 提交到本地仓库,如果修改有问题,是可以在本地进行回滚的
[main 3519426] v4
 Committer: root <root@ha_keepalive1test.com>
Your name and email address were configured automatically based
on your username and hostname. Please check that they are accurate.
You can suppress this message by setting them explicitly. Run the
following command and follow the instructions in your editor to edit
your configuration file:

    git config --global --edit

After doing this, you may fix the identity used for this commit with:

    git commit --amend --reset-author

 1 file changed, 1 insertion(+)
[root@ha_keepalive1test /opt/app1]# git reset --hard HEAD^  # git 版本回滚, HEAD 为当前版本,加一个^为上一个,^^为上上一个版本
HEAD is now at 400e347 v3
[root@ha_keepalive1test /opt/app1]# cat index.html
<h1>V111111111111111</h1>
<h1>V222222222222222</h1>
<h1>V333333333333333</h1>
[root@ha_keepalive1test /opt/app1]#
2.6.4 gitlab 数据备份恢复
2.6.4.1 停止 gitlab 数据服务
# 备份过程中禁止再往 gitlab 写入数据
[root@gitlab ~]# gitlab-ctl stop unicorn sidekiq
2.6.4.2 手动备份数据
# 在任意目录即可备份当前 gitlab 数据
[root@gitlab ~]# gitlab-rake gitlab:backup:create
2021-08-10 07:14:18 +0000 -- Dumping database ...
Dumping PostgreSQL database gitlabhq_production ... [DONE]
2021-08-10 07:14:25 +0000 -- done
2021-08-10 07:14:25 +0000 -- Dumping repositories ...
......
Uploading backup archive to remote storage  ... skipped
Deleting tmp directories ... done
done
done
done
done
done
done
done
Deleting old backups ... skipping
Warning: Your gitlab.rb and gitlab-secrets.json files contain sensitive data
and are not included in this backup. You will need these files to restore a backup.
Please back them up manually.
Backup task is done.
[root@gitlab ~]#

# 备份完成后启动 gitlab
gitlab-ctl start
示例:生产备份
[root@gitlab ~]# cat backup.sh
#!/bin/bash
#
gitlab-ctl stop unicorn sidekiq
if [ $? -ne 0 ];then
  exit 1
fi
gitlab-rake gitlab:backup:create
if [ $? -ne 0 ];then
  exit 1
fi

fileDir="/var/opt/gitlab/backups"
fileName=$(ls -ltr $fileDir/*_gitlab_backup.tar|tail -n1|awk '{print $NF}')

scp $fileName [email protected]:/data/gitlabbak
if [ $? -eq 0 ];then
  sleep 3
  rm -rf $fileName
fi

gitlab-ctl start unicorn sidekiq
[root@gitlab ~]#
2.6.4.3 查看要恢复的文件
| header 1 | header 2 |
|---|---|
| /var/opt/gitlab/backups/ | Gitlab 数据备份目录,需要使用命令备份的 |
| /var/opt/gitlab/nginx/conf | nginx 配置文件 |
| /etc/gitlab/gitlab.rb | gitlab 配置文件 |
| /etc/gitlab/gitlab-secrets.json | key 文件 |
# 默认备份文件存放地址
[root@gitlab ~]# ll /var/opt/gitlab/backups/
total 348
drwx------  2 git  root   4096 Aug 10 07:14 ./
drwxr-xr-x 21 root root   4096 Aug 10 06:24 ../
-rw-------  1 git  git  348160 Aug 10 07:14 1628579667_2021_08_10_14.0.6_gitlab_backup.tar
-rw-------  1 git  git  348160 Aug 10 08:49 1628585374_2021_08_10_14.0.6_gitlab_backup.tar
[root@gitlab ~]#
2.6.4.4 执行恢复
删除一些数据,测试能否恢复
gitlab-ctl stop unicorn sidekiq     # 恢复数据之前停止服务

gitlab-rake gitlab:backup:restore BACKUP=备份文件名
示例
[root@gitlab ~]# ll /var/opt/gitlab/backups/
total 348
drwx------  2 git  root   4096 Aug 10 07:14 ./
drwxr-xr-x 21 root root   4096 Aug 10 06:24 ../
-rw-------  1 git  git  348160 Aug 10 07:14 1628579667_2021_08_10_14.0.6_gitlab_backup.tar
-rw-------  1 git  git  348160 Aug 10 08:49 1628585374_2021_08_10_14.0.6_gitlab_backup.tar
[root@gitlab ~]# gitlab-ctl stop unicorn sidekiq
[root@gitlab ~]# gitlab-rake gitlab:backup:restore BACKUP=1628585374_2021_08_10_14.0.6
Unpacking backup ... done
Be sure to stop Puma, Sidekiq, and any other process that
connects to the database before proceeding. For Omnibus
installs, see the following link for more information:
https://docs.gitlab.com/ee/raketasks/backup_restore.html#restore-for-omnibus-gitlab-installations

Before restoring the database, we will remove all existing
tables to avoid future upgrade problems. Be aware that if you have
custom tables in the GitLab database these tables and all data will be
removed.

Do you want to continue (yes/no)? yes   # 输入 yes
......
2021-08-10 08:21:52 +0000 -- done
This task will now rebuild the authorized_keys file.
You will lose any data stored in the authorized_keys file.
Do you want to continue (yes/no)? yes   # 输入 yes

Warning: Your gitlab.rb and gitlab-secrets.json files contain sensitive data
and are not included in this backup. You will need to restore these files manually.
Restore task is done.
[root@gitlab ~]#
确认恢复数据
2.6.4.5 启动服务
[root@gitlab ~]# gitlab-ctl start sidekiq unicorn
ok: run: sidekiq: (pid 27039) 6485s
[root@gitlab ~]#
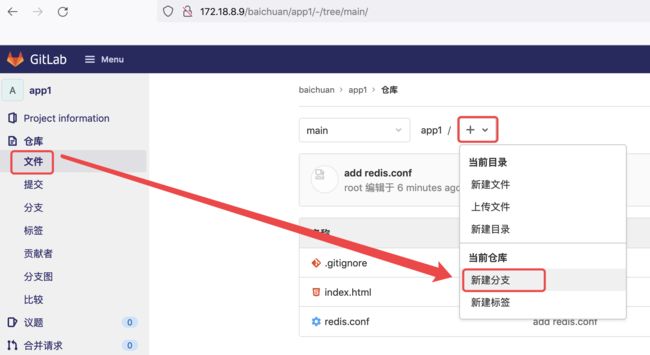
2.7 gitlab 分支管理
分支和 tag 区别
-
分支:可以进行代码提交
-
用于稳定版本的代码备份,代码后期不再改动,tag 不可以提交代码(只读)
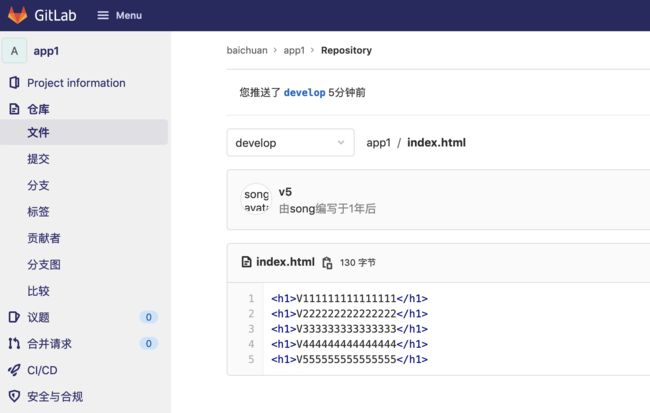
[root@ha_keepalive2 /opt]# git clone -b develop http://172.18.8.9/baichuan/app1.git
Cloning into 'app1'...
Username for 'http://172.18.8.9': song
Password for 'http://[email protected]':
remote: Enumerating objects: 31, done.
remote: Counting objects: 100% (31/31), done.
remote: Compressing objects: 100% (16/16), done.
remote: Total 31 (delta 7), reused 31 (delta 7), pack-reused 0
Unpacking objects: 100% (31/31), done.
[root@ha_keepalive2 /opt]# ls
app1  containerd
[root@ha_keepalive2 /opt]# cd app1/
[root@ha_keepalive2 /opt/app1]# ls
index.html  redis.conf
[root@ha_keepalive2 /opt/app1]# vim index.html
[root@ha_keepalive2 /opt/app1]# cat index.html
V111111111111111
V222222222222222
V333333333333333
V444444444444444
V555555555555555
[root@ha_keepalive2 /opt/app1]# git add .
[root@ha_keepalive2 /opt/app1]# git commit -m "v5"
[develop 059983c] v5
 1 file changed, 2 insertions(+)
[root@ha_keepalive2 /opt/app1]# git push
Username for 'http://172.18.8.9': song
Password for 'http://[email protected]':
Counting objects: 3, done.
Delta compression using up to 4 threads.
Compressing objects: 100% (3/3), done.
Writing objects: 100% (3/3), 330 bytes | 330.00 KiB/s, done.
Total 3 (delta 0), reused 0 (delta 0)
remote:
remote: To create a merge request for develop, visit:
remote:   http://172.18.8.9/baichuan/app1/-/merge_requests/new?merge_request%5Bsource_branch%5D=develop
remote:
To http://172.18.8.9/baichuan/app1.git
   eb9f2de..059983c  develop -> develop
[root@ha_keepalive2 /opt/app1]#
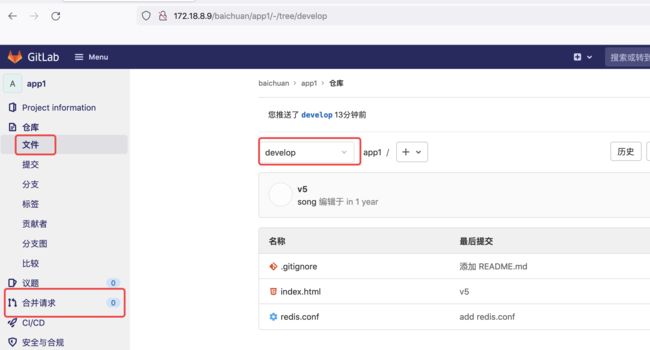
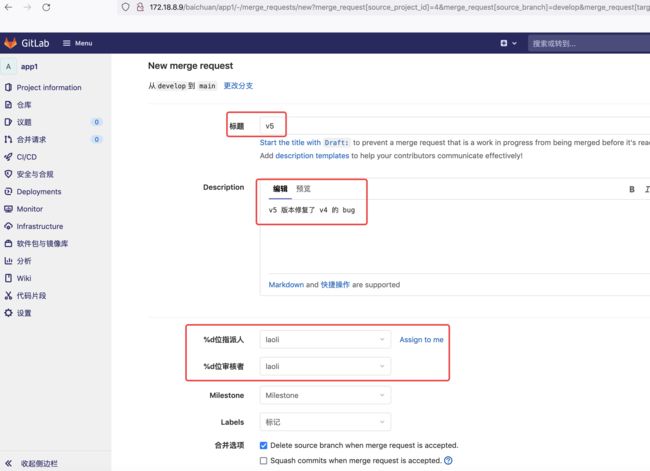
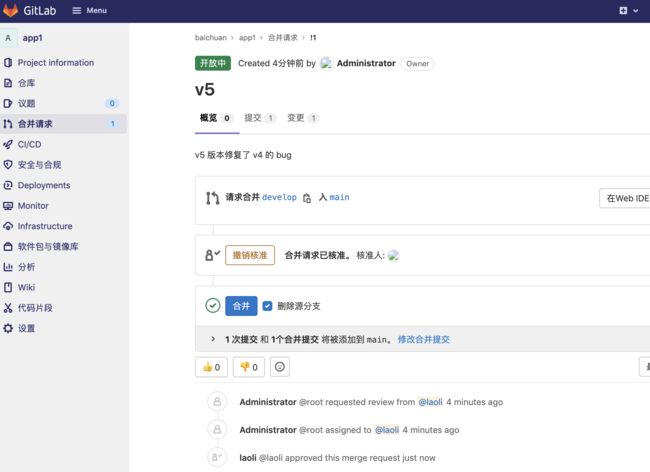
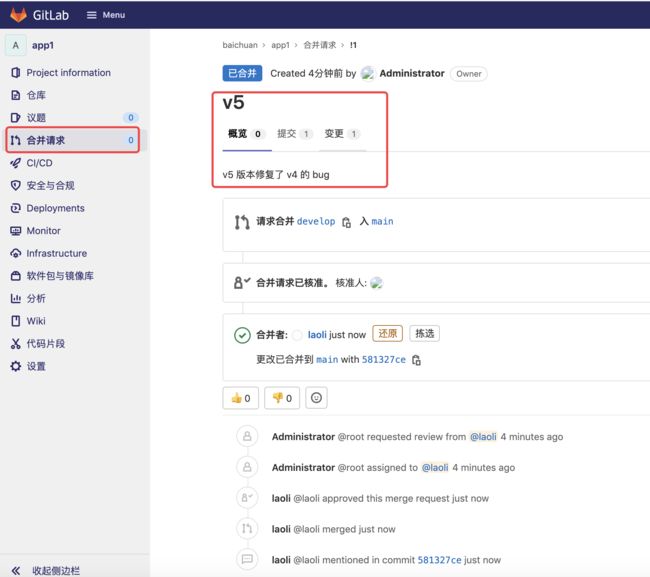
将开发分支(develop)的代码合并到主分支(main)
开发发送合并邮件请求,开发 leader 进行代码合并
[外链图片转存失败,源站可能有防盗链机制,建议将图片保存下来直接上传(img-JRb42gLB-1635051919324)(https://gitee.com/i-am-also-a-pedestrian/blog-images/raw/master/img/gitlab-hebing-2.png)]
3 常见的代码部署方式
3.1 蓝绿部署
蓝绿部署指的是不停老版本代码(不影响上一个版本访问),而是在另外一套环境部署新版本然后进行测试,测试通过后将用户流量切到新版本,其特点为业务无中断,升级风 险相对较小。
具体过程
- 当前版本业务正常访问(V1)
- 在另外一套环境部署新代码(V2),代码可能是增加了功能或者是修复了某些 bug
- 测试通过之后将用户请求流量切到新版本环境
- 观察一段时间,如有异常直接切换旧版本
- 下次升级,将旧版本升级到新版本(V3)
蓝绿部署适用的场景
-
不停止老版本,额外部署一套新版本,等测试发现新版本 OK 后,删除老版本
-
蓝绿发布是一种用于升级与更新的发布策略,部署的最小维度是容器,而发布的最小维度是应用。
-
蓝绿发布对于增量升级有比较好的支持,但是对于涉及数据表结构变更等不可逆转的升级,并不完全合适用蓝绿发布来实现,需要结合一些业务的逻辑以及数据迁移与回滚的策略才可以完全满足需求
3.2 金丝雀发布
金丝雀发布也叫灰度发布,是指在黑与白之间,能够平滑过渡的一种发布方式,灰度布是增量发布的一种类型,灰度发布是在原有版本可用的情况下,同时部署一个新版本应用作为“金丝雀”(小白鼠),测试新版本的性能和表现,以保障整体系统稳定的情况下,尽早发现、调整问题
“金丝雀”的由来:17世纪,英国矿井工人发现,金丝雀对瓦斯这种气体十分敏感。空气中哪怕有极其微量的瓦斯,金丝雀也会停止歌唱;而当瓦斯含量超过一定限度时,虽然鲁钝的人类毫无察觉,金丝雀却早已毒发身亡。当时在采矿设备相对简陋的条件下,工人们每次下井都会带上一只金丝雀作为“瓦斯检测指标”,以便在危险状况下紧急撤离。
金丝雀发布/灰度发布步骤组成
- 准备好部署各个阶段的工件,包括:构建工件,测试脚本,配置文件和部署清单文件
- 从负载均衡列表中移除掉“金丝雀”服务器
- 升级“金丝雀”应用(排掉原有流量并进行部署)。
- 对应用进行自动化测试。
- 将“金丝雀”服务器重新添加到负载均衡列表中(连通性和健康检查)
- 如果“金丝雀”在线使用测试成功,升级剩余的其他服务器。(否则就回滚)
灰度发布可以保证整体系统的稳定,在初始灰度的时候就可以发现、调整问题,以保证其影响度
灰度发布/金丝雀部署适用的场景
-
不停止老版本,额外搞一套新版本,不同版本应用共存
-
灰度发布中,常常按照用户设置路由权重,例如:90%的用户维持使用老版本,10%的用户尝鲜新版本。
-
经常与 A/B 测试一起使用,用于测试选择多种方案
3.3 滚动发布
滚动发布,一般是取出一个或者多个服务器停止服务,执行更新,并重新将其投入使用。周而复始,直到集群中所有的实例都更新成新版本
3.4 A/B 测试
A/B 测试也是同时运行两个 APP 环境,但是蓝绿部署完全是两码事,A/B 测试是用来测 试应用功能表现的方法,例如可用性、受欢迎程度、可见性等等,蓝绿部署的目的是安全稳定地发布新版本应用,并在必要时回滚,即蓝绿部署是一套正式环境环境在线,而 A/B 测试是两套正式环境在线
