池化层的作用
目录
- 1. 池化层理解
- 2. 池化层的作用:
- 3. 函数解析 tf.nn.max_pool(value, ksize, strides, padding, name=None)
- 4. 代码演示详解维度变化
1. 池化层理解
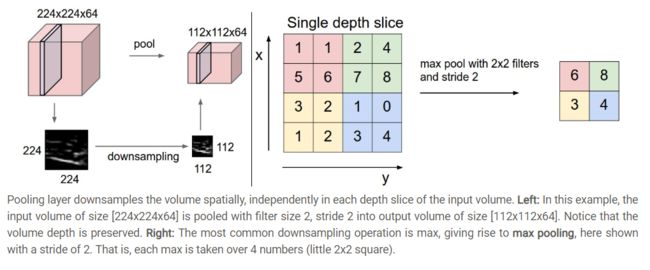
池化层夹在连续的卷积层中间, 用于压缩数据和参数的量。
简而言之,如果输入是图像的话,那么池化层的最主要作用就是压缩图像。
个人理解的同图片resize方法类似(双线性插值法,邻近法),只不过池化层用的是取最大值法。

2. 池化层的作用:
个人觉得主要是两个作用:
- invariance(不变性),这种不变性包括translation(平移),rotation(旋转),scale(尺度)
- 保留主要的特征同时减少参数(降维,效果类似PCA)和计算量,防止过拟合,提高模型泛化能力
A: 特征不变性,也就是我们在图像处理中经常提到的特征的尺度不变性,池化操作就是图像的resize,平时一张狗的图像被缩小了一倍我们还能认出这是一张狗的照片,这说明这张图像中仍保留着狗最重要的特征,我们一看就能判断图像中画的是一只狗,图像压缩时去掉的信息只是一些无关紧要的信息,而留下的信息则是具有尺度不变性的特征,是最能表达图像的特征。
B. 特征降维,我们知道一幅图像含有的信息是很大的,特征也很多,但是有些信息对于我们做图像任务时没有太多用途或者有重复,我们可以把这类冗余信息去除,把最重要的特征抽取出来,这也是池化操作的一大作用
3. 函数解析 tf.nn.max_pool(value, ksize, strides, padding, name=None)
参数是四个,和卷积很类似:
第一个参数value:需要池化的输入,一般池化层接在卷积层后面,所以输入通常是feature map,依然是[batch, height, width, channels]这样的shape
第二个参数ksize:池化窗口的大小,取一个四维向量,一般是[1, height, width, 1],因为我们不想在batch和channels上做池化,所以这两个维度设为了1
第三个参数strides:和卷积类似,窗口在每一个维度上滑动的步长,一般也是[1, stride,stride, 1]
第四个参数padding:和卷积类似,可以取’VALID’ 或者’SAME’
返回一个Tensor,类型不变,shape仍然是[batch, height, width, channels]这种形式
4. 代码演示详解维度变化
import tensorflow as tf
import numpy as np


#  [ batch, in_height, in_weight, in_channel ]
input_data = np.random.randn(32, 32).reshape(1, 32, 32, 1)
# [ filter_height, filter_weight, in_channel, out_channels ]
# 8: 输出有 8 个   1: 同 input_data 中的 1 对应
filter_ = np.random.randn(5, 5, 8).reshape(5, 5, 1, 8)

# 一层卷积
conv = tf.nn.conv2d(input_data, filter_, strides=[1, 1, 1, 1], padding='VALID')
# VALID:不会补0。 28如何得到的:  32 - 5 + 1,宽度和高度的shape变化都是这个公式
# SAME:补0,得到的就是 32 * 32 同输入一样的大小。
# (1, 28, 28, 8)
print(conv.shape)
# 池化层, 此函数参数同 tf.nn.conv2d 一样
# [1, 2, 2, 1]: 输入:1  高度:2  宽度:2 channel:1
max_pool = tf.nn.max_pool(conv, ksize=[1, 2, 2, 1], strides=[1, 2, 2, 1], padding="SAME")
# (1, 14, 14, 8)
print(max_pool.shape)

# 激活层,不改变维度
relu = tf.nn.relu(max_pool)
# (1, 14, 14, 8)
print(relu.shape)

# dropout
dropput = tf.nn.dropout(relu, keep_prob=0.6)
# (1, 14, 14, 8)
print(dropput.shape)

# 第二层卷积
# 高度:5  宽度:5   输入8:同dropout中的8   输出:20
filter2_ = np.random.randn(5, 5, 8, 20)
conv2 = tf.nn.conv2d(dropput, filter2_, strides=[1, 1, 1, 1], padding='VALID')
# (1, 10, 10, 20)
print(conv2.shape)

# 池化层
# [1, 2, 2, 1]: 输入:1  高度:2  宽度:2 channel:1
max_pool = tf.nn.max_pool(conv2, ksize=[1, 2, 2, 1], strides=[1, 2, 2, 1], padding="SAME")
# (1, 5, 5, 20)
print(max_pool.shape)
#
# # 激活层
# sigmoid = tf.nn.sigmoid(max_pool)
# # (1, 5, 5, 20)
# print(relu.shape)
#
# # dropout
# dropput2 = tf.nn.dropout(sigmoid, keep_prob=0.5)
# # (1, 5, 5, 20)
# print(dropput.shape)
#
# # 全连接层
# # 500: 上面:5*5*20
# dense = np.random.randn(500, 120)
# fc = tf.reshape(dropput2, shape=[1, 5*5*20])
# conn = tf.matmul(fc, dense)
# # (1, 120)
# print(conn.shape)
#
# # out输出层
# w = np.random.randn(120, 9)
#
# b = np.random.randn(9)
#
# out = tf.matmul(conn, w) + b
# # (1, 9)
# print(out.shape)
