- Ubuntu,centos下源码安装cmake指定版本
你若盛开,清风自来!
ubuntucentoslinux
网址:Indexof/files/v3.23常规安装出错1.先把安装包cmake-3.12.4-Linux-x86_64.tar.gz复制到指定目录2.解压tar-zxvfcmake-3.12.4-Linux-x86_64.tar.gz3.进入解压之后的文件夹cdcmake-3.12.4-Linux-x86_64.tar.gz4.运行下面命令出错bash:./bootstrap:Nosuchfil
- Maven详解:从入门到进阶
CarlowZJ
mavenjava
前言Maven是一款广泛应用于Java项目的构建和管理工具,通过标准化的项目结构和生命周期管理,极大地简化了项目构建过程。本文将从Maven的基础知识讲起,逐步深入到其核心概念、常用命令、依赖管理、插件使用以及实战应用,帮助读者全面掌握Maven。1.Maven概述1.1为什么使用Maven在传统的Java项目开发中,开发者需要手动下载依赖包、管理包的版本以及解决依赖冲突。Maven的出现解决了这
- JS获取时间戳的五种方法
暴怒的代码
#JavaScriptjavascript开发语言ecmascript
一、JavasCRIPT时间转时间戳JavaScript获得时间戳的方法有五种,后四种都是通过实例化时间对象newDate()来进一步获取当前的时间戳,JavaScript处理时间主要使用时间对象Date。方法一:Date.now()Date.now()可以获得当前的时间戳:console.log(Date.now())//1642471441587方法二:Date.parse()Date.par
- Day30 第八章 贪心算法 part03
TAK_AGI
贪心算法算法
一.学习文章及资料1005.K次取反后最大化的数组和134.加油站135.分发糖果二.学习内容1.K次取反后最大化的数组和(1)贪心策略:使用了两次贪心局部最优:让绝对值大的负数变为正数,当前数值达到最大全局最优:整个数组和达到最大如果将负数都转变为正数了,K依然大于0,此时的问题是一个有序正整数序列,如何转变K次正负,让数组和达到最大局部最优:只找数值最小的正整数进行反转,当前数值和可以达到最大
- JavaSE : 注解 Annotation
Edenyt
java-eejava
注解Java中的注解(Annotation)是一种元数据形式,用于向编译器或JVM提供有关程序元素(如类、方法、变量、参数和包)的附加信息。注解不会直接影响程序的行为或结构,但它们可以被编译器、开发工具或运行时环境用于生成代码、进行验证、执行处理或提供信息。以下是关于Java注解的几个关键点:1.注解的种类1.1.内置标准注解:@Override:指示一个方法覆盖了超类中的方法。@Deprecat
- C进阶 自定义类型
一只自律的鸡
C进阶c语言开发语言
目录前言一结构体二结构体的存储三位段四枚举五联合体总结前言我们之前学习的intchardouble......都是内置类型,但是我们今天所学习的是自定义类型,比如联合体,结构体,枚举一结构体结构体是一些值的集合,这些值统称为成员变量,每个成员都是可以用不同的的基本数据类型结构体的使用场景:结构体的意义在于可以进行封装一个整体的所有变量,这个是十分便捷的,这样就可以不用重复的操作进行重复的定义相同的
- 七个合法学习黑客技术的平台,让你从萌新成为大佬
黑客白帽子黑爷
学习php开发语言web安全网络
1、HackThisSite提供在线IRC聊天和论坛,让用户交流更加方便。网站涵盖多种主题,包括密码破解、网络侦察、漏洞利用、社会工程学等。非常适用于个人提高网络安全技能2、HackaDay涵盖多个领域,包括黑客技术、科技、工程和DIY等内容,站内提供大量有趣的文章、视频、教程和新闻,帮助用户掌握黑客技术和DIY精神。3、OffensiveSecurity一个专门提供网络安全培训和认证的公司,课程
- 【2025年】全国CTF夺旗赛-从零基础入门到竞赛,看这一篇就稳了!
白帽黑客鹏哥
web安全CTF网络安全大赛pythonLinux
基于入门网络安全/黑客打造的:黑客&网络安全入门&进阶学习资源包目录一、CTF简介二、CTF竞赛模式三、CTF各大题型简介四、CTF学习路线4.1、初期1、html+css+js(2-3天)2、apache+php(4-5天)3、mysql(2-3天)4、python(2-3天)5、burpsuite(1-2天)4.2、中期1、SQL注入(7-8天)2、文件上传(7-8天)3、其他漏洞(14-15
- Java-- 异常--try/catch/finally 的执行顺序
刘小炮吖i
Java后端开发面试题Javajava开发语言面试
直接说结论:当catch或者finally中有return语句时,catch和finally代码块之后的程序部分将不会被执行到。如果catch和finally中都存在return语句,最终的返回值将是finally中的return语句所指定的值。无论try代码块中是否出现异常,只要try或catch执行到了return之前,finally代码块都会被执行。为了代码的可读性和健壮性,尽量避免在try
- Java中字符流和字节流的区别
刘小炮吖i
Java后端开发面试题Javajava开发语言
相同点在Java的I/O体系中,字节流和字符流都配备了缓冲机制的实现类,以此显著提升数据读写的效率。字符流:借助BufferedReader和BufferedWriter,它们在处理字符数据时,会将数据先缓存起来,减少与底层数据源或目标的交互次数,从而加速操作。例如,当逐行读取大文本文件时,BufferedReader的缓冲功能能避免频繁的磁盘I/O操作。字节流:BufferedInputStre
- SpringBoot备份神通数据库
松岛的枫叶
springboot数据库后端
SpringBoot备份神通数据库····直接上代码···publicStringbackupOsrdb(){//构建命令Listcommand=newArrayList<>();command.add("osrexp");command.add("-u");command.add("SYSDBA"+"/"+"szoscar55");//用户名/密码command.add("-d");comman
- 【现代前端框架中本地图片资源的处理方案】
Gazer_S
前端框架前端缓存javascriptchrome
现代前端框架中本地图片资源的处理方案前言在前端开发中,正确引用本地图片资源是一个常见但容易被忽视的问题。我们不能像在HTML中那样简单地使用相对路径,因为JavaScript模块中的路径解析规则与HTML不同,且现代构建工具对静态资源有特殊的处理机制。本文将详细探讨在webpack和Vite等构建工具中处理本地图片引用的各种方法。传统方式的局限性在传统开发中,我们可能习惯这样引用图片:constl
- pytorch基础-layernormal 与 batchnormal
yuweififi
pytorch人工智能python
nn.LayerNorm(层归一化)和nn.BatchNorm(批量归一化)是深度学习中常用的两种归一化方法,都有助于提高模型的训练效率和稳定性,但它们在归一化维度、应用场景、计算方式等方面存在明显区别,以下为你详细介绍:1、归一化维度nn.LayerNorm:对单个样本的特征维度进行归一化。无论输入数据的形状如何,它会计算每个样本在特征维度上的均值和方差,然后进行归一化。例如,对于一个形状为(b
- javaweb将上传的图片保存在项目文件webapp下的upload文件夹下
yuren_xia
后端技术前端技术webappjavatomcateclipse
前端HTML表单(upload.html)首先,创建一个HTML页面,允许用户选择并上传图片。图片上传上传图片注意:表单的method设置为"post",enctype需设置成"multipart/form-data"2.后端Servlet(UploadServlet.java)接下来,创建一个Servlet来处理文件上传请求,并将上传的图片保存到webapp/load目录下。packagecom
- 通俗理解闭包
yuren_xia
前端技术javascript
JavaScript在ES6之前并没有类的概念,但通过原型链和闭包,开发者可以实现类似继承和封装的功能(原型链实现继承,闭包实现封装)。ES6引入了类语法,但闭包仍然是实现私有数据封装的重要手段之一。另外,使用闭包还可用于保存上下文信息等场景。一、定义从函数角度闭包是指有权访问另一个函数作用域中的变量的函数。即使外部函数已经返回,闭包仍然可以访问外部函数内部的变量。例如:functionouter
- 【面试实战】Spring基础、IoC、AOP、MVC、Mybatis、Spring Boot
Sivan_Xin
技术实战专栏(已上云)面试mvcspring
version:1.0文章目录SpringSpring基础/IoC♂️面试官:举例Spring的模块?♂️面试官:Spring、SpringMVC、SpringBoot关系?♂️面试官:说说对SpringIoC的了解?♂️面试官:什么是SpringBean?♂️面试官:Bean的作用域?♂️面试官:Bean的生命周期?♂️面试官:单例Bean的线程安全问题了解吗?♂️面试官:@Co
- 我在广州学 Mysql 系列——存储过程与存储函数详解
练小杰
数据库相关mysqlandroid数据库学习adbsql
ℹ️大家好,我是练小杰,今天周五了,一周就这样从手上溜走了,还有两星期过年!!本文将学习MYSQL中存储过程与存储函数的概念~~回顾:【索引详解】【索引相关练习】数据库专栏【数据库专栏】~想要了解更多内容,主页【练小杰的CSDN】文章目录存储过程与存储函数存储过程(StoredProcedure)存储函数(StoredFunction)⚠️主要区别选择存储过程还是存储函数创建存储过程命令解释创建存
- 通过TensorFlow实现简单深度学习模型(2)
yyc_audio
人工智能深度学习python机器学习
前文我们已经实现了对每批数据的训练,下面继续实现一轮完整的训练。完整的训练循环一轮训练就是对训练数据的每个批量都重复上述训练步骤,而完整的训练循环就是重复多轮训练。deffit(model,images,labels,epochs,batch_size=128):forepoch_counterinrange(epochs):print(f"Epoch{epoch_counter}")batch_
- c语言字母概率,C/C++知识点之智邮普创c语言面试题 ---- 字母概率
OK up
c语言字母概率
本文主要向大家介绍了C/C++知识点之智邮普创c语言面试题----字母概率,通过具体的内容向大家展示,希望对大家学习C/C++知识点有所帮助。题目描述小明最近对概率问题很感兴趣。一天,小明和小红一起玩一个概率游戏,首先小明给出一个字母和一个单词,然后由小红计算这个字母在这个单词中出现的概率。字母不区分大小写。例如,给定的字母是a,单词是apple,那么概率是0.20000。输入输入包含多组测试数据
- 说说 Spring MVC 的执行流程?
浮生带你学Java
Java面试题Springspringmvcjava
高频面试题:说说SpringMVC的执行流程?大家好,我是浮生,一个工作了十四年的java程序员!昨天,一个工作2年的粉丝在面试的时候,面试官要求他说SpringMVC的执行流程。他没回答上来,错过了这个offer。一、问题解析SpringMVC的执行流程,一个面试频率超级高的问题,但是缺难倒了无数的程序员。这个问题的考察范围主要是3~5年,甚至5年以上都会问到。和它同类型的问题还有Bean的加载
- 蓝桥杯二分题
练习时长两年半1
算法数据结构java蓝桥杯
P1083[NOIP2012提高组]借教室题目描述在大学期间,经常需要租借教室。大到院系举办活动,小到学习小组自习讨论,都需要向学校申请借教室。教室的大小功能不同,借教室人的身份不同,借教室的手续也不一样。面对海量租借教室的信息,我们自然希望编程解决这个问题。我们需要处理接下来n天的借教室信息,其中第i天学校有ri个教室可供租借。共有m份订单,每份订单用三个正整数描述,分别为,,dj,sj,tj,
- SpringCloud/Boot集成LogBack
azoon.top
springcloudlogbackspringlog4jslf4j
一.简要介绍什么是SLF4J?官网介绍:SimpleLoggingFacadeforJava(SLF4J)充当简单的各种日志记录框架的Facade或抽象(e.g.java.util.logging、logback、log4j)允许最终用户在部署时插入所需的日志记录框架。类似java中的接口,如果只集成SLF4J,日志只能输出在控制台,并没有输出到文件的能力,要实现真正的日志能力,需要引入其实现层:
- 从入门到精通,解锁AI新高度——DeepSeek学习手册
周师姐
学习
资料链接:https://pan.quark.cn/s/c927326f70c5你是否渴望掌握前沿AI技术,却在复杂的理论和实践中迷茫?现在,一本由清华大学出品的《DeepSeek:从入门到精通》学习手册横空出世,为你开启AI新世界的大门。作为人工智能领域的新兴力量,DeepSeek以其卓越的性能和创新的技术,正在重塑我们对AI的认知。这本手册,由清华大学顶尖科研团队精心编写,是DeepSeek技
- spring boot、spring cloud、spring cloud alibaba 之间的版本对应关系
薄荷街的兔比先生
springbootspringcloudjava
大家在引用pom的时候还是要以官方推荐版本为主,不然容易出现未知的问题。1.springboot和springcloud的版本关系官方提供的版本对照表https://start.spring.io/actuator/info{"git":{"branch":"93e528fc7e79e41a513e493d057499401a15eb67","commit":{"id":"93e528f","ti
- Python连接SQL SEVER数据库全流程
m0_74824865
面试学习路线阿里巴巴数据库pythonsql
背景介绍在数据分析领域,经常需要从数据库中获取数据进行分析和处理。而SQLServer是一种常用的关系型数据库管理系统,因此学习如何使用Python连接SQLServer数据库并获取数据是非常有用的。以下是Python使用pymssql连接SQLServer数据库的全流程:安装pymssql库本地账号设置脚本连接数据导入函数实现一、安装pymssqlpymssql是Python连接SQLServe
- SpringBoot + vue 管理系统
m0_74825565
面试学习路线阿里巴巴springbootvue.js后端
SpringBoot+vue管理系统文章目录SpringBoot+vue管理系统1、成品效果展示2、项目准备3、项目开发3.1、部门管理3.1.1、前端核心代码3.1.2、后端代码实现3.2、员工管理3.2.1、前端核心代码3.2.2、后端代码实现3.3、班级管理3.3.1、前端核心代码3.3.2、后端代码实现3.4、学生管理3.4.1、前端核心代码3.4.2、后端代码实现3.5、数据统计3.5.
- Spring 核心技术解析【纯干货版】- XII:Spring 数据访问模块 Spring-R2dbc 模块精讲
m0_74825003
面试学习路线阿里巴巴springjava后端
在现代应用架构中,高并发、低延迟的需求推动了响应式编程的发展,而传统的JDBC由于其同步阻塞机制,在高吞吐场景下可能成为瓶颈。R2DBC(ReactiveRelationalDatabaseConnectivity)作为响应式关系型数据库访问标准,正是为了解决这一问题而诞生的。SpringR2DBC作为Spring生态对R2DBC的封装,提供了非阻塞、异步的数据库访问能力,并与SpringWebF
- Spring Boot的项目结构
m0_74823983
面试学习路线阿里巴巴springboot后端java
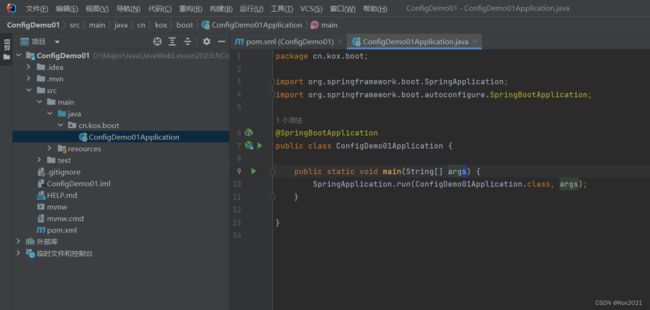
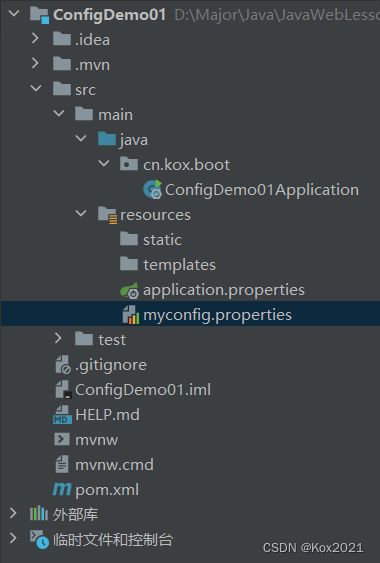
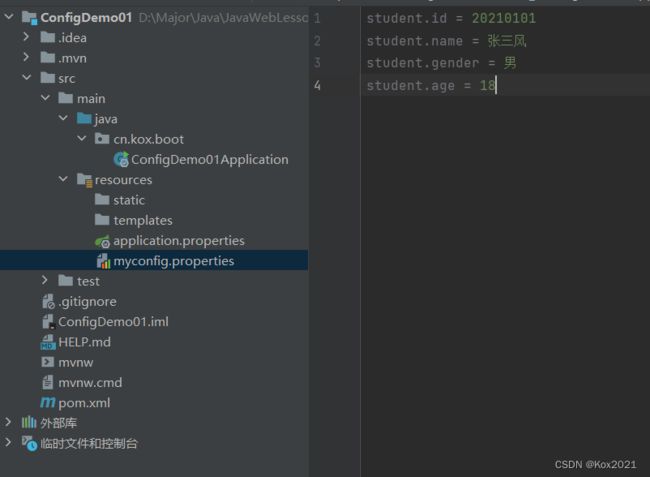
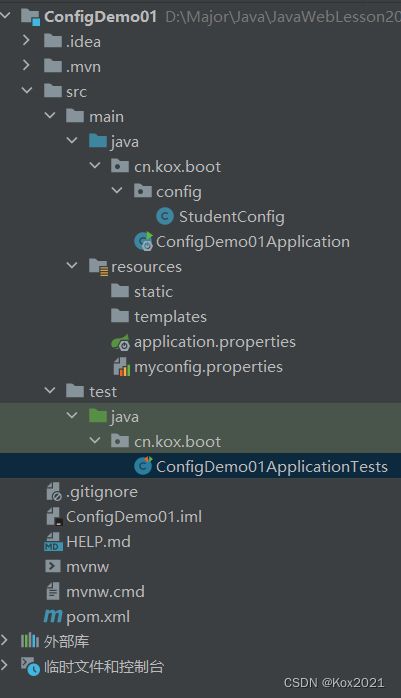
SpringBoot的项目结构技术背景SpringBoot项目结构遵循Maven或Gradle的标准目录结构,同时融入了SpringBoot的特定约定。良好的项目结构不仅有助于代码组织,还能提高开发效率和项目可维护性。了解SpringBoot的项目结构对于开发高质量的应用至关重要。1.基础项目结构1.1标准目录结构基本的SpringBoot项目结构如下:myproject/├──src/│├──m
- 深入剖析 Weblogic、ThinkPHP、Jboss、Struct2 历史漏洞
阿贾克斯的黎明
网络安全web安全
目录深入剖析Weblogic、ThinkPHP、Jboss、Struct2历史漏洞一、Weblogic漏洞(一)漏洞原理(二)漏洞利用代码(Python示例)(三)防范措施二、ThinkPHP漏洞(一)漏洞原理(二)漏洞利用代码(示例,假设存在漏洞的代码片段)(三)防范措施三、Jboss漏洞(一)漏洞原理(二)漏洞利用代码(Java示例,用于构造恶意序列化数据)(三)防范措施四、Struct2漏洞
- 深入剖析 Java 反序列化:FASTjson 漏洞与 Shiro 漏洞
阿贾克斯的黎明
网络安全phpweb安全开发语言
目录深入剖析Java反序列化:FASTjson漏洞与Shiro漏洞引言Java反序列化原理示例代码FASTjson漏洞分析漏洞成因示例代码防护措施Shiro漏洞分析漏洞成因示例代码(模拟攻击场景)防护措施总结引言在Java应用开发中,反序列化是一项重要的技术,但同时也隐藏着巨大的安全风险。FASTjson和Shiro作为Java开发中常用的工具和框架,其反序列化漏洞曾引发了广泛关注。本文将深入探讨
- 项目中 枚举与注解的结合使用
飞翔的马甲
javaenumannotation
前言:版本兼容,一直是迭代开发头疼的事,最近新版本加上了支持新题型,如果新创建一份问卷包含了新题型,那旧版本客户端就不支持,如果新创建的问卷不包含新题型,那么新旧客户端都支持。这里面我们通过给问卷类型枚举增加自定义注解的方式完成。顺便巩固下枚举与注解。
一、枚举
1.在创建枚举类的时候,该类已继承java.lang.Enum类,所以自定义枚举类无法继承别的类,但可以实现接口。
- 【Scala十七】Scala核心十一:下划线_的用法
bit1129
scala
下划线_在Scala中广泛应用,_的基本含义是作为占位符使用。_在使用时是出问题非常多的地方,本文将不断完善_的使用场景以及所表达的含义
1. 在高阶函数中使用
scala> val list = List(-3,8,7,9)
list: List[Int] = List(-3, 8, 7, 9)
scala> list.filter(_ > 7)
r
- web缓存基础:术语、http报头和缓存策略
dalan_123
Web
对于很多人来说,去访问某一个站点,若是该站点能够提供智能化的内容缓存来提高用户体验,那么最终该站点的访问者将络绎不绝。缓存或者对之前的请求临时存储,是http协议实现中最核心的内容分发策略之一。分发路径中的组件均可以缓存内容来加速后续的请求,这是受控于对该内容所声明的缓存策略。接下来将讨web内容缓存策略的基本概念,具体包括如如何选择缓存策略以保证互联网范围内的缓存能够正确处理的您的内容,并谈论下
- crontab 问题
周凡杨
linuxcrontabunix
一: 0481-079 Reached a symbol that is not expected.
背景:
*/5 * * * * /usr/IBMIHS/rsync.sh
- 让tomcat支持2级域名共享session
g21121
session
tomcat默认情况下是不支持2级域名共享session的,所有有些情况下登陆后从主域名跳转到子域名会发生链接session不相同的情况,但是只需修改几处配置就可以了。
打开tomcat下conf下context.xml文件
找到Context标签,修改为如下内容
如果你的域名是www.test.com
<Context sessionCookiePath="/path&q
- web报表工具FineReport常用函数的用法总结(数学和三角函数)
老A不折腾
Webfinereport总结
ABS
ABS(number):返回指定数字的绝对值。绝对值是指没有正负符号的数值。
Number:需要求出绝对值的任意实数。
示例:
ABS(-1.5)等于1.5。
ABS(0)等于0。
ABS(2.5)等于2.5。
ACOS
ACOS(number):返回指定数值的反余弦值。反余弦值为一个角度,返回角度以弧度形式表示。
Number:需要返回角
- linux 启动java进程 sh文件
墙头上一根草
linuxshelljar
#!/bin/bash
#初始化服务器的进程PId变量
user_pid=0;
robot_pid=0;
loadlort_pid=0;
gateway_pid=0;
#########
#检查相关服务器是否启动成功
#说明:
#使用JDK自带的JPS命令及grep命令组合,准确查找pid
#jps 加 l 参数,表示显示java的完整包路径
#使用awk,分割出pid
- 我的spring学习笔记5-如何使用ApplicationContext替换BeanFactory
aijuans
Spring 3 系列
如何使用ApplicationContext替换BeanFactory?
package onlyfun.caterpillar.device;
import org.springframework.beans.factory.BeanFactory;
import org.springframework.beans.factory.xml.XmlBeanFactory;
import
- Linux 内存使用方法详细解析
annan211
linux内存Linux内存解析
来源 http://blog.jobbole.com/45748/
我是一名程序员,那么我在这里以一个程序员的角度来讲解Linux内存的使用。
一提到内存管理,我们头脑中闪出的两个概念,就是虚拟内存,与物理内存。这两个概念主要来自于linux内核的支持。
Linux在内存管理上份为两级,一级是线性区,类似于00c73000-00c88000,对应于虚拟内存,它实际上不占用
- 数据库的单表查询常用命令及使用方法(-)
百合不是茶
oracle函数单表查询
创建数据库;
--建表
create table bloguser(username varchar2(20),userage number(10),usersex char(2));
创建bloguser表,里面有三个字段
&nbs
- 多线程基础知识
bijian1013
java多线程threadjava多线程
一.进程和线程
进程就是一个在内存中独立运行的程序,有自己的地址空间。如正在运行的写字板程序就是一个进程。
“多任务”:指操作系统能同时运行多个进程(程序)。如WINDOWS系统可以同时运行写字板程序、画图程序、WORD、Eclipse等。
线程:是进程内部单一的一个顺序控制流。
线程和进程
a. 每个进程都有独立的
- fastjson简单使用实例
bijian1013
fastjson
一.简介
阿里巴巴fastjson是一个Java语言编写的高性能功能完善的JSON库。它采用一种“假定有序快速匹配”的算法,把JSON Parse的性能提升到极致,是目前Java语言中最快的JSON库;包括“序列化”和“反序列化”两部分,它具备如下特征:
- 【RPC框架Burlap】Spring集成Burlap
bit1129
spring
Burlap和Hessian同属于codehaus的RPC调用框架,但是Burlap已经几年不更新,所以Spring在4.0里已经将Burlap的支持置为Deprecated,所以在选择RPC框架时,不应该考虑Burlap了。
这篇文章还是记录下Burlap的用法吧,主要是复制粘贴了Hessian与Spring集成一文,【RPC框架Hessian四】Hessian与Spring集成
- 【Mahout一】基于Mahout 命令参数含义
bit1129
Mahout
1. mahout seqdirectory
$ mahout seqdirectory
--input (-i) input Path to job input directory(原始文本文件).
--output (-o) output The directory pathna
- linux使用flock文件锁解决脚本重复执行问题
ronin47
linux lock 重复执行
linux的crontab命令,可以定时执行操作,最小周期是每分钟执行一次。关于crontab实现每秒执行可参考我之前的文章《linux crontab 实现每秒执行》现在有个问题,如果设定了任务每分钟执行一次,但有可能一分钟内任务并没有执行完成,这时系统会再执行任务。导致两个相同的任务在执行。
例如:
<?
//
test
.php
- java-74-数组中有一个数字出现的次数超过了数组长度的一半,找出这个数字
bylijinnan
java
public class OcuppyMoreThanHalf {
/**
* Q74 数组中有一个数字出现的次数超过了数组长度的一半,找出这个数字
* two solutions:
* 1.O(n)
* see <beauty of coding>--每次删除两个不同的数字,不改变数组的特性
* 2.O(nlogn)
* 排序。中间
- linux 系统相关命令
candiio
linux
系统参数
cat /proc/cpuinfo cpu相关参数
cat /proc/meminfo 内存相关参数
cat /proc/loadavg 负载情况
性能参数
1)top
M:按内存使用排序
P:按CPU占用排序
1:显示各CPU的使用情况
k:kill进程
o:更多排序规则
回车:刷新数据
2)ulimit
ulimit -a:显示本用户的系统限制参
- [经营与资产]保持独立性和稳定性对于软件开发的重要意义
comsci
软件开发
一个软件的架构从诞生到成熟,中间要经过很多次的修正和改造
如果在这个过程中,外界的其它行业的资本不断的介入这种软件架构的升级过程中
那么软件开发者原有的设计思想和开发路线
- 在CentOS5.5上编译OpenJDK6
Cwind
linuxOpenJDK
几番周折终于在自己的CentOS5.5上编译成功了OpenJDK6,将编译过程和遇到的问题作一简要记录,备查。
0. OpenJDK介绍
OpenJDK是Sun(现Oracle)公司发布的基于GPL许可的Java平台的实现。其优点:
1、它的核心代码与同时期Sun(-> Oracle)的产品版基本上是一样的,血统纯正,不用担心性能问题,也基本上没什么兼容性问题;(代码上最主要的差异是
- java乱码问题
dashuaifu
java乱码问题js中文乱码
swfupload上传文件参数值为中文传递到后台接收中文乱码 在js中用setPostParams({"tag" : encodeURI( document.getElementByIdx_x("filetag").value,"utf-8")});
然后在servlet中String t
- cygwin很多命令显示command not found的解决办法
dcj3sjt126com
cygwin
cygwin很多命令显示command not found的解决办法
修改cygwin.BAT文件如下
@echo off
D:
set CYGWIN=tty notitle glob
set PATH=%PATH%;d:\cygwin\bin;d:\cygwin\sbin;d:\cygwin\usr\bin;d:\cygwin\usr\sbin;d:\cygwin\us
- [介绍]从 Yii 1.1 升级
dcj3sjt126com
PHPyii2
2.0 版框架是完全重写的,在 1.1 和 2.0 两个版本之间存在相当多差异。因此从 1.1 版升级并不像小版本间的跨越那么简单,通过本指南你将会了解两个版本间主要的不同之处。
如果你之前没有用过 Yii 1.1,可以跳过本章,直接从"入门篇"开始读起。
请注意,Yii 2.0 引入了很多本章并没有涉及到的新功能。强烈建议你通读整部权威指南来了解所有新特性。这样有可能会发
- Linux SSH免登录配置总结
eksliang
ssh-keygenLinux SSH免登录认证Linux SSH互信
转载请出自出处:http://eksliang.iteye.com/blog/2187265 一、原理
我们使用ssh-keygen在ServerA上生成私钥跟公钥,将生成的公钥拷贝到远程机器ServerB上后,就可以使用ssh命令无需密码登录到另外一台机器ServerB上。
生成公钥与私钥有两种加密方式,第一种是
- 手势滑动销毁Activity
gundumw100
android
老是效仿ios,做android的真悲催!
有需求:需要手势滑动销毁一个Activity
怎么办尼?自己写?
不用~,网上先问一下百度。
结果:
http://blog.csdn.net/xiaanming/article/details/20934541
首先将你需要的Activity继承SwipeBackActivity,它会在你的布局根目录新增一层SwipeBackLay
- JavaScript变换表格边框颜色
ini
JavaScripthtmlWebhtml5css
效果查看:http://hovertree.com/texiao/js/2.htm代码如下,保存到HTML文件也可以查看效果:
<html>
<head>
<meta charset="utf-8">
<title>表格边框变换颜色代码-何问起</title>
</head>
<body&
- Kafka Rest : Confluent
kane_xie
kafkaRESTconfluent
最近拿到一个kafka rest的需求,但kafka暂时还没有提供rest api(应该是有在开发中,毕竟rest这么火),上网搜了一下,找到一个Confluent Platform,本文简单介绍一下安装。
这里插一句,给大家推荐一个九尾搜索,原名叫谷粉SOSO,不想fanqiang谷歌的可以用这个。以前在外企用谷歌用习惯了,出来之后用度娘搜技术问题,那匹配度简直感人。
环境声明:Ubu
- Calender不是单例
men4661273
单例Calender
在我们使用Calender的时候,使用过Calendar.getInstance()来获取一个日期类的对象,这种方式跟单例的获取方式一样,那么它到底是不是单例呢,如果是单例的话,一个对象修改内容之后,另外一个线程中的数据不久乱套了吗?从试验以及源码中可以得出,Calendar不是单例。
测试:
Calendar c1 =
- 线程内存和主内存之间联系
qifeifei
java thread
1, java多线程共享主内存中变量的时候,一共会经过几个阶段,
lock:将主内存中的变量锁定,为一个线程所独占。
unclock:将lock加的锁定解除,此时其它的线程可以有机会访问此变量。
read:将主内存中的变量值读到工作内存当中。
load:将read读取的值保存到工作内存中的变量副本中。
- schedule和scheduleAtFixedRate
tangqi609567707
javatimerschedule
原文地址:http://blog.csdn.net/weidan1121/article/details/527307
import java.util.Timer;import java.util.TimerTask;import java.util.Date;
/** * @author vincent */public class TimerTest {
- erlang 部署
wudixiaotie
erlang
1.如果在启动节点的时候报这个错 :
{"init terminating in do_boot",{'cannot load',elf_format,get_files}}
则需要在reltool.config中加入
{app, hipe, [{incl_cond, exclude}]},
2.当generate时,遇到:
ERROR