荔枝派Zero(全志V3S)驱动开发之hello驱动程序
文章目录
- 前言
- 一、设备驱动分类
- 二、字符设备驱动简介
- 三、字符设备驱动开发
-
- 1、APP打开的文件在内核中如何表示
- 2、编写驱动程序的步骤
- 3、hello 驱动程序编写
-
- <1>、试验程序编写
- <2>、测试程序编写
- <3>、编写 Makefile
- <4>、编译
- 3、运行测试
-
- <1>、上传程序到开发板执行
- <2>、加载驱动模块
- <3>、创建设备节点文件
- <4>、hello_drv 设备操作测试
- <5>、卸载驱动模块
- 总结
前言
-
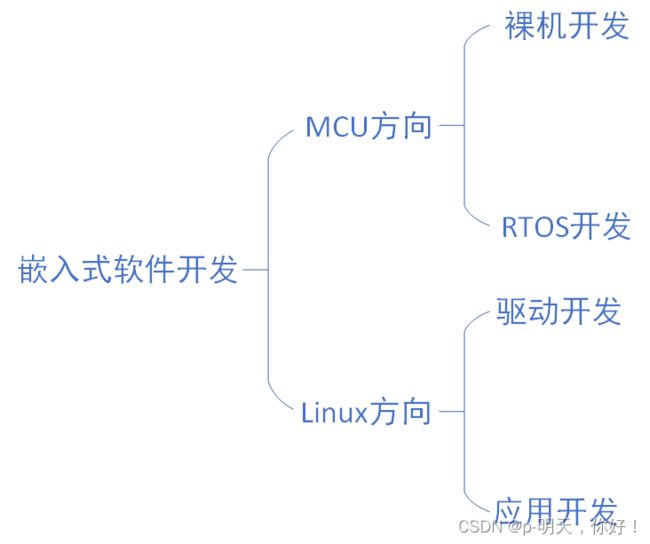
搞嵌入式有两个方向,一个是嵌入式软件开发 (MCU 方向),另一个是嵌入式软件开发 (Linux 方向)。其中 MCU 方向基本是裸机开发和 RTOS 开发。而 Linux 开发方向又分为驱动开发和应用开发。其中应用开发相比于驱动开发来说简单一些,因为搞驱动请你要和 Linux 内核打交道。而我们普通的单片机开发就是应用开发,和 Linux 开发没多大区别,单片机你去调别人写好的库,Linux 应用你也是调别人的驱动程序。
-
很多人学习的路线是:单片机到 RTOS,再到 Linux,这个路线其实是非常好,循序渐进。因为你学了单片机,所以你对 RTOS 的学习会很容易理解,单片机 + RTOS 在市面上也可以找到一个很好的工作。因为你学了 RTOS,你会发现 Linux 驱动开发其实和 RT-Thread 的驱动程序非常像,其实 RT-Thread 驱动大概率可能是仿 Linux 驱动而写的。所以如果你现在在学 RT-Thread,那么你后面去搞 Linux 驱动也是非常容易上手。
-
当然做驱动去之前你还是要学习一下 ubuntu 操作系统、ARM 裸机和 linux 系统移植,其目的就是为学习嵌入式 linux 驱动开发做准备。
本文通过在荔枝派上实现一个 hello 驱动程序,其目的是深入的了解加载驱动程序的运作过程。
一、设备驱动分类
在Linux中,驱动分为三大类:
- 字符设备驱动
- 字符设备驱动是占用篇幅最大的一类驱动,因为字符设备最多,从最简单的点灯到 I2C、SPI、音频等都属于字符设备驱动的类型。
- 块设备驱动
- 块设备和网络设备驱动要比字符设备驱动复杂,就是因为其复杂所以半导体厂商一般都给我们编写好了,大多数情况下都是直接可以使用的。
- 所谓的块设备驱动就是存储器设备的驱动,比如 EMMC、NAND、SD 卡和 U 盘等存储设备,因为这些存储设备的特点是以存储块为基础,因此叫做块设备。
- 网络设备驱动
- 网络设备驱动很好理解,不管是有线的还是无线的,都属于网络设备驱动的范畴。一个设备可以属于多种设备驱动类型,比如 USB WIFI,其使用 USB 接口,所以属于字符设备,但是其又能上网,所以也属于网络设备驱动。
我使用的Linux内核版本为 5.2.0,其支持设备树Device tree。
二、字符设备驱动简介
字符设备是Linux驱动中最基本的一类设备驱动,字符设备就是一个一个字节,按照字节流进行读写操作的设备,读写数据是分先后顺序的。比如我们最常见的点灯、按键、IIC、SPI,LCD 等等都是字符设备,这些设备的驱动就叫做字符设备驱动。
那么在Linux下的应用程序是如何调用驱动程序的呢?Linux 应用程序对驱动程序的调用如图所示:
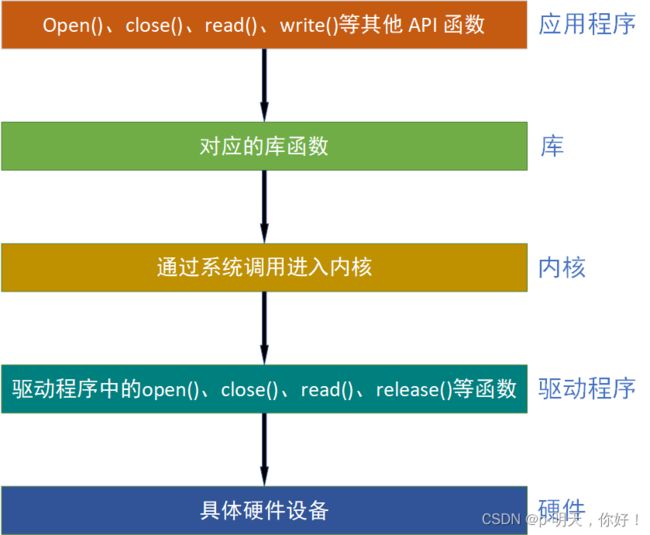
写驱动的人必须要懂linux内核,因为驱动程序就是根据内核的函数去写的,写应用的人不需要懂linux内核,只需要熟悉驱动函数就可以了。
比如现在有个叫做 /dev/led 的驱动文件,是 led 灯的驱动文件。应用程序使用 open 函数来打开文件 /dev/led,使用完成以后使用 close 函数关闭 /dev/led 这个文件。open 和 close 就是打开和关闭 led 驱动的函数,如果要点亮或关闭 led,那么就使用 write 函数来操作,也就是向此驱动写入数据,这个数据就是要关闭还是要打开 led 的控制参数。如果要获取 led 灯的状态,就用 read 函数从驱动中读取相应的状态。
应用程序运行在用户空间,而 Linux 驱动属于内核的一部分,因此驱动运行于内核空间。当我们在用户空间想要实现对内核的操作,比如使用 open函数打开 /dev/led 这个驱动,因为用户空间不能直接对内核进行操作,因此必须使用一个叫做“系统调用”的方法来实现从用户空间“陷入”到内核空间,这样才能实现对底层驱动的操作。
open、close、write 和 read等这些函数是由 C 库提供的,在 Linux 系统中,系统调用作为 C 库的一部分。当我们调用 open 函数的时候流程如图所示:

在 Linux 内核文件 include/linux/fs.h 中有个叫做 file_operations 的结构体,此结构体就是Linux 内核驱动操作函数集合,内容如下所示:
struct file_operations {
    struct module *owner;
    loff_t (*llseek) (struct file *, loff_t, int);
    ssize_t (*read) (struct file *, char __user *, size_t, loff_t *);
    ssize_t (*write) (struct file *, const char __user *, size_t, loff_t *);
    ssize_t (*read_iter) (struct kiocb *, struct iov_iter *);
    ssize_t (*write_iter) (struct kiocb *, struct iov_iter *);
    int (*iopoll)(struct kiocb *kiocb, bool spin);
    int (*iterate) (struct file *, struct dir_context *);
    int (*iterate_shared) (struct file *, struct dir_context *);
    __poll_t (*poll) (struct file *, struct poll_table_struct *);
    long (*unlocked_ioctl) (struct file *, unsigned int, unsigned long);
    long (*compat_ioctl) (struct file *, unsigned int, unsigned long);
    int (*mmap) (struct file *, struct vm_area_struct *);
    unsigned long mmap_supported_flags;
    int (*open) (struct inode *, struct file *);
    int (*flush) (struct file *, fl_owner_t id);
    int (*release) (struct inode *, struct file *);
    int (*fsync) (struct file *, loff_t, loff_t, int datasync);
    int (*fasync) (int, struct file *, int);
    int (*lock) (struct file *, int, struct file_lock *);
    ssize_t (*sendpage) (struct file *, struct page *, int, size_t, loff_t *, int);
    unsigned long (*get_unmapped_area)(struct file *, unsigned long, unsigned long, unsigned long, unsigned long);
    int (*check_flags)(int);
    int (*flock) (struct file *, int, struct file_lock *);
    ssize_t (*splice_write)(struct pipe_inode_info *, struct file *, loff_t *, size_t, unsigned int);
    ssize_t (*splice_read)(struct file *, loff_t *, struct pipe_inode_info *, size_t, unsigned int);
    int (*setlease)(struct file *, long, struct file_lock **, void **);
    long (*fallocate)(struct file *file, int mode, loff_t offset,
              loff_t len);
	void (*show_fdinfo)(struct seq_file *m, struct file *f);
#ifndef CONFIG_MMU
    unsigned (*mmap_capabilities)(struct file *);
#endif
    ssize_t (*copy_file_range)(struct file *, loff_t, struct file *,
            loff_t, size_t, unsigned int);
    loff_t (*remap_file_range)(struct file *file_in, loff_t pos_in,
                   struct file *file_out, loff_t pos_out,
                   loff_t len, unsigned int remap_flags);
    int (*fadvise)(struct file *, loff_t, loff_t, int);
} __randomize_layout;

- 第 1790 行,owner 拥有该结构体的模块的指针,一般设置为THIS_MODULE。
- 第 1791 行,llseek 函数用于修改文件当前的读写位置。
- 第 1792 行,read 函数用于读取设备文件。
- 第 1793 行,write 函数用于向设备文件写入(发送)数据。
- 第 1799 行,poll 是个轮询函数,用于查询设备是否可以进行非阻塞的读写。
- 第 1800 行,unlocked_ioctl 函数提供对于设备的控制功能,与应用程序中的 ioctl 函数对应。
- 第 1801 行,compat_ioctl 函数与 unlocked_ioctl 函数功能一样,区别在于在 64 位系统上,32 位的应用程序调用将会使用此函数。在 32 位的系统上运行 32 位的应用程序调用的是 unlocked_ioctl。
- 第 1802 行,mmap 函数用于将将设备的内存映射到进程空间中(也就是用户空间),一般帧缓冲设备会使用此函数,比如 LCD 驱动的显存,将帧缓冲(LCD 显存)映射到用户空间中以后应用程序就可以直接操作显存了,这样就不用在用户空间和内核空间之间来回复制。
- 第 1804 行,open 函数用于打开设备文件。
- 第 1806 行,release 函数用于释放(关闭)设备文件,与应用程序中的 close 函数对应。
- 第 1807 行,fasync 函数用于刷新待处理的数据,用于将缓冲区中的数据刷新到磁盘中。
三、字符设备驱动开发
学习裸机或者 STM32 的时候关于驱动的开发就是初始化相应的外设寄存器,在 Linux 驱动开发中肯定也是要初始化相应的外设寄存器,这个是毫无疑问的。只是在 Linux 驱动开发中我们需要按照其规定的框架来编写驱动,所以说学 Linux 驱动开发重点是学习其驱动框架。
1、APP打开的文件在内核中如何表示
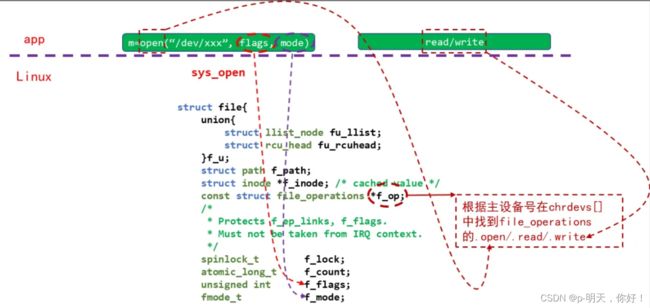
APP 使用 open 函数打开文件时,可以得到一个整数,这个整数被称为文件句柄。对于APP 的每一个文件句柄,在内核里面都有一个 struct file 与之对应。
struct file {
    union {
        struct llist_node   fu_llist;
        struct rcu_head     fu_rcuhead;
    } f_u;
    struct path     f_path;
    struct inode        *f_inode;   /* cached value */
    const struct file_operations    *f_op;

    /*
     * Protects f_ep_links, f_flags.
     * Must not be taken from IRQ context.
     */
    spinlock_t      f_lock;
    enum rw_hint        f_write_hint;
    atomic_long_t       f_count;
    unsigned int        f_flags;
    fmode_t         f_mode;
    struct mutex        f_pos_lock;
    loff_t          f_pos;
    struct fown_struct  f_owner;
    const struct cred   *f_cred;
    struct file_ra_state    f_ra;

    u64         f_version;
#ifdef CONFIG_SECURITY
    void            *f_security;
#endif
    /* needed for tty driver, and maybe others */
    void            *private_data;
#ifdef CONFIG_EPOLL
    /* Used by fs/eventpoll.c to link all the hooks to this file */
    struct list_head    f_ep_links;
    struct list_head    f_tfile_llink;
#endif /* #ifdef CONFIG_EPOLL */
    struct address_space    *f_mapping;
    errseq_t        f_wb_err;
} __randomize_layout
  __attribute__((aligned(4)));  /* lest something weird decides that 2 is OK */

我们使用open打开文件时,传入的 flags、mode 等参数会被记录在内核中对应的 struct file 结构体里(f_flags、f_mode):
int open(const char *pathname, int flags, mode_t mode);
去读写文件时,文件的当前偏移地址也会保存在 struct file 结构体的 f_pos 成员里。
打开字符设备节点时,内核中也有对应的 struct file,注意这个结构体中的结构体:struct file_operations *f_op,这是由驱动程序提供的。

2、编写驱动程序的步骤
- 确定主设备号,也可以让内核分配。
- 定义自己的 file_operations 结构体。
- 实现对应的 drv_open/drv_read/drv_write 等函数,填入 file_operations 结构体。
- 把file_operations结构体告诉内核:register_chrdev。
- 谁来注册驱动程序啊?得有一个入口函数:安装驱动程序时,就会去调用这个入口函数。
- 有入口函数就应该有出口函数:卸载驱动程序时,出口函数调用 unregister_chrdev。
- 其他完善:提供设备信息,自动创建设备节点:class_create,device_create。
3、hello 驱动程序编写
<1>、试验程序编写
应用程序调用 open 函数打开 hello_drv 这个设备,打开以后可以使用 write 函数向hello_drv 的写缓冲区 writebuf 中写入数据(不超过 100 个字节),也可以使用 read 函数读取读缓冲区 readbuf 中的数据操作,操作完成以后应用程序使用 close 函数关闭 chrdevbase 设备。
hello_drv.c
#include <2>、测试程序编写
驱动编写好以后是需要测试的,一般编写一个简单的测试 APP,测试 APP 运行在用户空间。测试 APP 很简单,通过输入相应的指令来对 hello_drv 设备执行读或者写操作。
hello_drv_test.c
#include \n" , argv[0]);
printf(" %s -r\n", argv[0]);
return -1;
}
/* 2. 打开文件 */
fd = open("/dev/hello_drv", O_RDWR);
if (fd == -1)
{
printf("can not open file /dev/hello_drv\n");
return -1;
}
/* 3. 写文件或读文件 */
if ((0 == strcmp(argv[1], "-w")) && (argc == 3))
{
len = strlen(argv[2]) + 1;
len = len < 1024 ? len : 1024;
write(fd, argv[2], len);
}
else
{
len = read(fd, buf, 1024);
buf[1023] = '\0';
printf("APP read : %s\n", buf);
}
close(fd);
return 0;
}
<3>、编写 Makefile
KERNELDIR := /home/Gnep/licheepi_zero/linux
CURRENT_PATH := $(shell pwd)
obj-m := hello_drv.o

build: kernel_modules

kernel_modules:
	$(MAKE) -C $(KERNELDIR) M=$(CURRENT_PATH) modules
	$(CROSS_COMPILE)arm-linux-gnueabihf-gcc -o hello_drv_test hello_drv_test.c

clean:
	$(MAKE) -C $(KERNELDIR) M=$(CURRENT_PATH) clean
- 第 1 行,KERNELDIR 表示开发板所使用的 Linux 内核源码目录,使用绝对路径,大家根据自己的实际情况填写。
- 第2行,CURRENT_PATH 表示当前路径,直接通过运行 pwd 命令来获取当前所处路径。
- 第3行,obj-m 表示将 hello_drv.c 这个文件编译为 hello_drv.ko 模块。
- 第8行,具体的编译命令,后面的 modules 表示编译模块,-C 表示将当前的工作目录切换到指定目录中,也就是 KERNERLDIR 目录。M 表示模块源码目录,make modules 命令中加入 M=dir 以后程序会自动到指定的 dir 目录中读取模块的源码并将其编译为 .ko 文件。
- 第9行,使用交叉编译工具链将 hello_drv_test.c 编译成可以在 arm 板子上运行的hello_drv_test 可执行文件。
至此,目录下存在以下三个文件,分别是 hello_drv.c、hello_drv_test.c、Makefile

<4>、编译
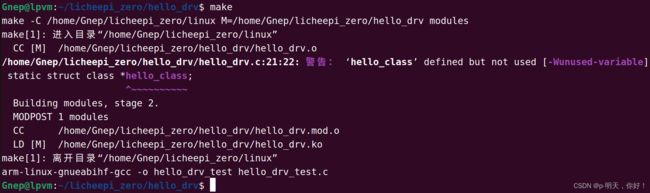
Makefile 编写好以后输入 make 命令编译驱动模块,编译过程如图所示。
注:ubuntu 中的 linux 源码需要之前编译过,编译的具体步骤请参考:
荔枝派Zero(全志V3S)编译Kernel
编译成功以后就会生成一个叫做 hello_drv.ko 的文件,此文件就是 hello_drv 设备的驱动模块。至此,hello_drv设备的驱动就编译成功。

3、运行测试
<1>、上传程序到开发板执行
主机 ip :192.168.25.25
板子 ip :192.168.25.20
这里通过 tftp 命令将文件直接上传到板子上,具体的 tftp 服务器搭建及使用方法可以参考:SSH 服务器、NFS 服务器、TFTP 服务器详解及测试
在板子串口测执行以下指令将 hello_drv.ko、 hello_drv_test 传输到板子上
tftp -g -l hello_drv.ko 192.168.25.25
tftp -g -l hello_drv_test 192.168.25.25
ls

<2>、加载驱动模块
驱动模块 hello_drv.ko 和 hello_drv_test 可执行文件都已经准备好了,接下来就是运行测试。输入如下命令加载 hello_drv.ko 驱动文件:
insmod hello_drv.ko

输入 lsmod 命令即可查看当前系统中存在的模块
lsmod

当前系统只有 hello_drv 这一个模块。输入如下命令查看当前系统中有没有 hello_drv 这个设备:
cat /proc/devices
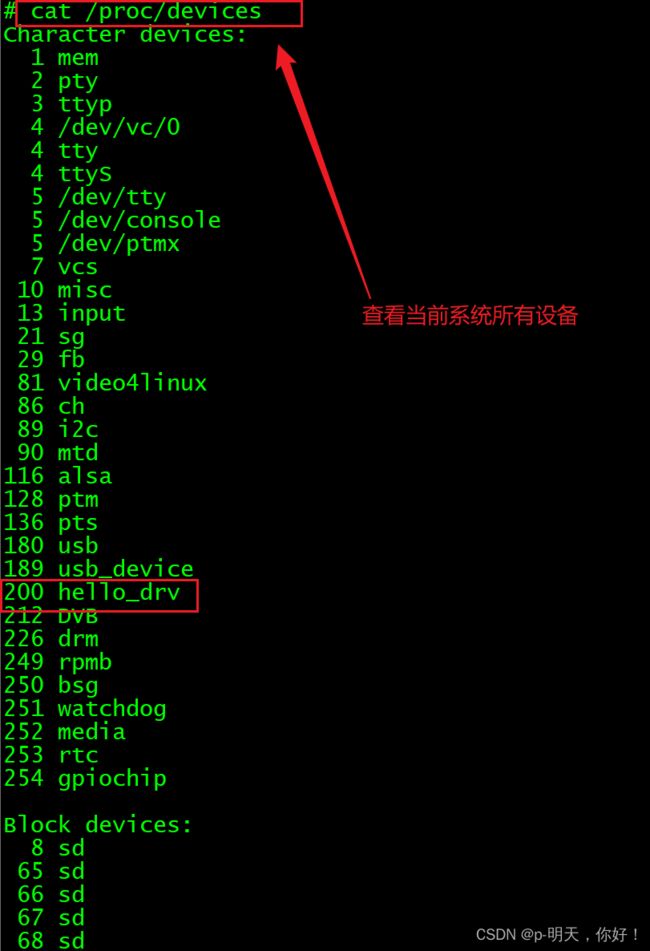
可以看出,当前系统存在 hello_drv 这个设备,主设备号为 200,跟我们设置的主设备号一致。
<3>、创建设备节点文件
驱动加载成功需要在 /dev 目录下创建一个与之对应的设备节点文件,应用程序就是通过操作这个设备节点文件来完成对具体设备的操作。输入如下命令创建 /dev/hello_drv 这个设备节点文件:
mknod /dev/hello_drv c 200 0
其中 mknod 是创建节点命令,/dev/hello_drv 是要创建的节点文件,c 表示这是个字符设备,200 是设备的主设备号,0 是设备的次设备号。创建完成以后就会存在 /dev/hello_drv 这个文件。
如果 hello_drv_test 想要读写 hello_drv 设备,直接对 /dev/hello_drv 进行读写操作即可。相当于 /dev/hello_drv 这个文件是 hello_drv 设备在用户空间中的实现。Linux 下一切皆文件,包括设备也是文件,现在大家应该是有这个概念了吧?
<4>、hello_drv 设备操作测试
一切准备就绪。使用 hello_drv_test 软件操作 hello_drv 这个设备,看看读写是否正常,首先进行写操作,将字符串输入 hello Licheepi !!! 写入到内核中
./hello_drv_test -w "hello Licheepi !!!"

然后再从内核中将刚写入的字符串读出来
./hello_drv_test -r

可以看到读写正常,说明我们编写的 hello_drv 驱动是没有问题的。
<5>、卸载驱动模块
如果不再使用某个设备的话可以将其驱动卸载掉,比如输入如下命令卸载掉 hello_drv 这个设备:
rmmod hello_drv.ko
卸载以后使用 lsmod 命令查看 hello_drv 这个模块还存不存在:
lsmod

可以看出,此时系统已经没有任何模块了,hello_drv 这个模块也不存在了,说明模块卸载成功。
至此,hello_drv 这个设备的整个驱动就验证完成了,驱动工作正常。以后的字符设备驱动实验基本都可以此为模板进行编写。
参考:
https://zhuanlan.zhihu.com/p/584572352
总结
上面就是Linux中的字符驱动,做嵌入式还是要把 C 语言的基础打牢,尤其是结构体、指针和链表,如果这第三个你能很好的理解那么 Linux 驱动编程就非常容易,因为驱动开发就 = 软件架构 + 硬件操作。而软件架构就需要你要非常熟悉 C 语言,硬件操作就是你单片机的那几个寄存器操作。
我的qq:2442391036,欢迎交流!