ubuntu常用命令
设置root密码
安装好ubuntu后谁也不知道root密码是多少,可以借助于passwd命令来设置root密码。
sudo passwd root
同理修改其他用户只需替换上方用户名即可
换源
-
备份原始文件
sudo cp /etc/apt/sources.list /etc/apt/sources.list.bak -
修改源文件
sudo vim /etc/apt/sources.list
先按gg光标返回第一行,然后d -> G清空文件内容 -
使用清华大学源
将https://mirror.tuna.tsinghua.edu.cn/help/ubuntu-ports/中最对应ubuntu最新的源复制到文件中
也可以使用如下# 默认注释了源码镜像以提高 apt update 速度,如有需要可自行取消注释 deb https://mirrors.tuna.tsinghua.edu.cn/ubuntu-ports/ jammy main restricted universe multiverse # deb-src https://mirrors.tuna.tsinghua.edu.cn/ubuntu-ports/ jammy main restricted universe multiverse deb https://mirrors.tuna.tsinghua.edu.cn/ubuntu-ports/ jammy-updates main restricted universe multiverse # deb-src https://mirrors.tuna.tsinghua.edu.cn/ubuntu-ports/ jammy-updates main restricted universe multiverse deb https://mirrors.tuna.tsinghua.edu.cn/ubuntu-ports/ jammy-backports main restricted universe multiverse # deb-src https://mirrors.tuna.tsinghua.edu.cn/ubuntu-ports/ jammy-backports main restricted universe multiverse # deb https://mirrors.tuna.tsinghua.edu.cn/ubuntu-ports/ jammy-security main restricted universe multiverse # # deb-src https://mirrors.tuna.tsinghua.edu.cn/ubuntu-ports/ jammy-security main restricted universe multiverse deb http://ports.ubuntu.com/ubuntu-ports/ jammy-security main restricted universe multiverse # deb-src http://ports.ubuntu.com/ubuntu-ports/ jammy-security main restricted universe multiverse # 预发布软件源,不建议启用 # deb https://mirrors.tuna.tsinghua.edu.cn/ubuntu-ports/ jammy-proposed main restricted universe multiverse # # deb-src https://mirrors.tuna.tsinghua.edu.cn/ubuntu-ports/ jammy-proposed main restricted universe multiverse -
接下来就是更新源了
sudo apt-get updateps:如出现依赖问题,解决方式如下:
sudo apt-get -f install -
更新软件
sudo apt-get upgrade耐心等待一会~
使用ssh内网穿透
@知乎用户2rDK1w 转自 https://zhuanlan.zhihu.com/p/97149314
SSH内网穿透原理
User(Internet)<----> broker(SSH tunnel)<----> Website(LAN)
公网用户A         能够通过公网ssh到的内网服务器B             网页所在服务器C
B 就像一个中间站,它给A和C之间的通信搭建桥梁,负责转发所有通信数据。
穿透步骤
- A通过ssh到B主机在A本地建立socks代理
# username, Bserver是B主机的用户名和ip
ssh -D 10088 -p 22 username@Bserver
-
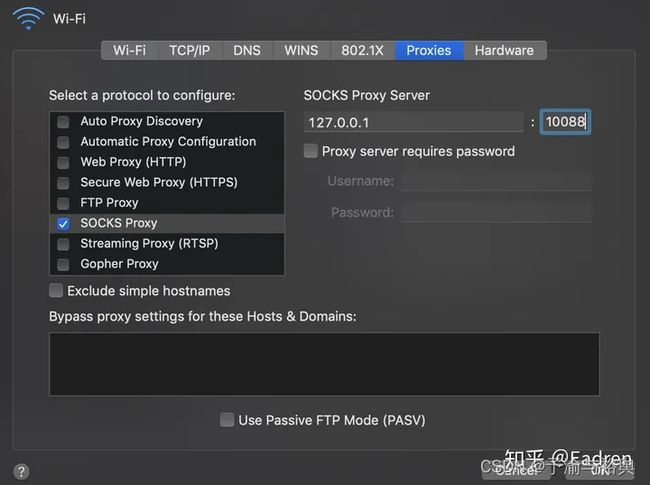
修改浏览器代理或者全局代理为socks代理,端口号为10088
-
在浏览器直接输入C的内网网页地址即可访问
修改ssh端口
-
打开sshd_config配置文件。
vim /etc/ssh/sshd_config -
在文件内容中找到#Port 22,修改如下
# Package generated configuration file
# See the sshd_config(5) manpage for details
# What ports, IPs and protocols we listen for
Port 22
Port 10122
- 最后重启使修改生效即可。
/etc/init.d/ssh restart
安装MySQL
更新列表
sudo apt-get update
安装MySQL服务器
sudo apt-get install mysql-server
在安装过程中,系统将提示您创建root密码。选择一个安全的,并确保记住它,因为后面需要用到这个密码。
配置MySQL
运行MySQL初始化安全脚本
sudo mysql_secure_installation
配置MySQL远程登录
有时候,为了开发方便,我们需要使用本地电脑远程访问和管理MySQL数据库。默认情况下,为了安全MySQL只允许本地登录,如果要开启远程连接
则需要修改
/etc/mysql/mysql.conf.d/mysqld.cnf
配置文件。

找到bind-address = 127.0.0.1这一行
改为bind-address = 0.0.0.0即可或简单一点注释掉也行
修改完成保存后,需要重启MySQL服务才会生效
mysql8 修改密码方式
alter user ‘root’@‘localhost’ identified by ‘这里填你要的密码’;
MySQL数据库基本使用
用户登录
mysql -u root -p
创建用户
CREATE USER 'username'@'host' IDENTIFIED BY 'password';
用户授权
GRANT privileges ON databasename.tablename TO 'username'@'host';

GRANT ALL privileges ON *.* TO 'pig'@'%';
刷新授权
flush privileges;
启动MySQL数据库服务
sudo service mysql start
或
sudo systemctl start mysql.service
重启MySQL数据库服务
sudo service mysql restart
或
sudo systemctl restart mysql.service
停止MySQL数据库服务
sudo service mysql stop
或
sudo systemctl stop mysql.service
MySQL的配置文件
sudo vim /etc/mysql/mysql.conf.d/mysqld.cnf
使用脚本安装open
– 转自 https://github.com/hwdsl2/open-install/blob/master
@ author hwdsl2 侵联删谢谢
OpenVPN 服务器一键安装脚本
使用 Linux 脚本一键快速搭建自己的 OpenVPN 服务器
支持 Ubuntu, Debian, AlmaLinux, Rocky Linux, CentOS, Fedora 和 Amazon Linux 2
该脚本可让你在几分钟内建立自己的 VPN 服务器,即使你以前没有使用过 OpenVPN。OpenVPN 是一种开源、强大且高度灵活的 VPN 协议。
另见:WireGuard 和 IPsec VPN 服务器一键安装脚本。
功能特性
- 全自动的 OpenVPN 服务器配置,无需用户输入
- 支持使用自定义选项进行交互式安装
- 生成 VPN 配置文件以自动配置 Windows, macOS, iOS 和 Android 设备
- 支持管理 OpenVPN 用户和证书
- 优化
sysctl设置以提高 VPN 性能
安装说明
首先在你的 Linux 服务器* 上下载脚本:
wget -O open.sh https://get.setup.net/o
如果无法下载,可以使用 curl 下载:
curl -fL -o open.sh https://get.setup.net/o
或者,你也可以使用这些链接:
https://github.com/hwdsl2/open-install/raw/master/open-install.sh
https://gitlab.com/hwdsl2/open-install/-/raw/master/open-install.sh
选项 1: 使用默认选项自动安装 OpenVPN。
sudo bash open.sh --auto
查看脚本的示例输出(终端记录)
注: 此终端记录仅用于演示目的。

对于有外部防火墙的服务器(比如 EC2/GCE),请为 VPN 打开 UDP 端口 1194。
选项 2: 使用自定义选项进行交互式安装。
sudo bash open.sh
高级:使用自定义选项自动安装。
高级用户可以使用自定义选项自动安装 OpenVPN,方法是提供一个 Bash “here document” 作为安装脚本的输入。此方法还可用于在安装后提供输入以管理用户。
首先,使用自定义选项以交互方式安装 OpenVPN,并写下你对脚本的所有输入值。
sudo bash open.sh
如需删除 OpenVPN,请再次运行脚本并选择适当的选项。
然后使用你的输入值创建自定义安装命令。例如:
sudo bash open.sh <<ANSWERS
1
1194
2
client
y
ANSWERS
注: 安装选项可能会在脚本的未来版本中发生变化。
* 一个云服务器,虚拟专用服务器 (VPS) 或者专用服务器。
下一步
安装完成后,你可以再次运行脚本来管理用户或者卸载 OpenVPN。
配置你的计算机或其它设备使用 VPN。请参见:
配置 OpenVPN 客户端
OpenVPN 客户端 在 Windows, macOS, iOS, Android 和 Linux 上可用。macOS 用户也可以使用 Tunnelblick。
要添加 VPN 连接,首先将生成的 .o 文件安全地传送到你的设备,然后打开 OpenVPN 应用程序并导入 VPN 配置文件。
要管理 OpenVPN 客户端,请再次运行安装脚本:sudo bash open.sh。
致谢
再次感谢原作者 @hwdsl2