高性能Shiro开发?这一篇文章就够了
本文目录
-
- 前言
- shiro几大核心组件
- shiro配置信息
- Cookie被禁用了还可以使用Shiro框架吗?
- Cookie过期了会自动删除缓存的Session信息吗?
- shiro实现Cookie、Token双兼容
- 如何做到登出后清除认证、授权、Session缓存?
- 如何对Session进行CRUD
- 测试开启Cookie
- 测试禁用Cookie
- 测试Session自动失效
- 附页 Debug源码小技巧(反序列化Session)干货满满
前言
最近整合了一套shiro脚手架出现了很多问题…比较多的问题其实还是我自测出来的,主要是关于一些shiro 中内置 session 污染、缓存污染方面的问题,在排查 bug的过程中我都一度想禁用shiro中的session功能了,但是想想研究研究这个东西万一以后用的上呢?因为不是说你开发的每一个项目都是分布式项目。都可以用到重量级的 spring security。当然不是说 spring security不好,为了体现出本文的价值,我想说:shiro天下第一、shiro是天底下最好的权限框架
shiro几大核心组件
先来说一下shiro中的几大核心组件间以及各组件的核心职能吧
- ShiroFilterFactoryBean:shiro提供的一个工厂Bean,通过这个Bean我们可以对整个权限系统的接口做一个管控,包括接口级权限设置、自定义过滤器设置,最终目的就是定义路由的跳转规则,其他会话级别的安全保证是由 SecurityManager 来控制的
- SecurityManager:安全管理器,可以利用 SecurityManager 配置哪些 Realm、SessionManager、CacheManager 会生效
- SessionManager:会话管理器,主要就是对 shiro.session 的 CRUD,可以使用 shiro 默认提供的 SessionManager,也可以使用自己实现的 SessionManager,但是都需注入对应的 SessionDAO,同样可以使用默认的 SessionDAO或者是自己实现的 SessionDAO
- CacheManager:缓存管理器,一般用来缓存 Realm 返回的信息,Realm 中会返回 AuthenticationInfo(认证信息)、AuthorizationInfo(授权信息),缓存管理器的目的就是为了缓存这些信息
shiro配置信息
我个人是不建议自己编写CacheManager来管理缓存的(大佬请忽略我这句话),如果有人不信的话很多意想不到的bug在等着你(笔者亲测、主要是关于多人登录时出现的session污染上的bug),下文中的RedisCacheManager是我整合第三方的包(shiro-redis),里面实现了一整套对Cache的增删改查逻辑,其中包括读者关心的对Session序列化与反序列化的问题、shiro整合Token的问题…
Cookie被禁用了还可以使用Shiro框架吗?
下文中的SessionManager是我自定义实现的一个会话管理器,使用默认的也行,如果系统不是一个Web项目那么你还坚持使用DefaultWebSessionManager,由于cookie的被禁用,系统的权限这块就瘫痪了,因为DefaultWebSessionManager默认是从前端传过来的Cookie中获取SessionId的,正是因为shiro是通过内置session+cookie来实现的权限控制的原因,所以我实现了自定义的SessionManager(重写getSessionId方法),shiro如果可以检索到对应的SessionId,那么shiro就无需重新创建session,可以通过检索到的SessionId获取对应的Session,如果没有重写getSessionId方法,由于Cookie的被禁用Session将会被反复创建,这也是Session污染的来源之一,所以可以通过重写SessionManager中的getSessionId方法,来控制Session污染。同时只要是浏览器能正确的携带正确的SessionId过来,Shiro就能正常使用,至于携带SessionId的的媒介可以选择Token、Jwt、字符串、Cookie,前端只要将这个媒介放入Herder即可
Cookie过期了会自动删除缓存的Session信息吗?
服务端虽然可以根据Cookie中的SessionId进行删除Redis中的session操作,但是cookie过期了,在客户端每次发起请求的时候将不会携带Cookie了,是无法带动删除session的操作的,要么就是设置超时Session时间、要么就是设置Redis缓存过期时间(不建议这么做、授权、认证、session信息的超时时间是捆绑在一块的)来管理过期的session
@Configuration
public class ShiroConfig {
    @Autowired
    RedisConnectionFactory redisConnectionFactory;
    @Value("${shiro.cache.authenticationCache}")
    private String AUTHENTICATIONCACHEPREFIX;

    @Value("${shiro.cache.authorizationCache}")
    private String AUTHORIZATIONCACHEPREFIX;

    @Bean(name = "shiroCacheManager")
    public RedisCacheManager shiroCacheManager() {
        RedisCacheManager redisCacheManager = new RedisCacheManager();
        redisCacheManager.setRedisManager(redisManager());
        //redis中根据userName来缓存用户
        redisCacheManager.setPrincipalIdFieldName("userName");
        //用户权限信息缓存时间
        redisCacheManager.setExpire(200000);
        return redisCacheManager;
    }

    @Bean
    public RedisManager redisManager() {
        RedisManager redisManager = new RedisManager();
        redisManager.setHost("192.168.20.201:6379");
        return redisManager;
    }

    /**
     * 注意user和authc不同:当应用开启了rememberMe时,用户下次访问时可以是一个user,但绝不会是authc,因为authc是需要重新认证的
     * user表示用户不一定已通过认证,只要曾被Shiro记住过登录状态的用户就可以正常发起请求,比如rememberMe 说白了,以前的一个用户登录时开启了rememberMe,然后他关闭浏览器,下次再访问时他就是一个user,而不会authc
     */
    @Bean
    public ShiroFilterFactoryBean shiroFilterFactoryBean() {
        ShiroFilterFactoryBean bean = new ShiroFilterFactoryBean();
        LinkedHashMap<String, String> chain = new LinkedHashMap<String, String>();
        LinkedHashMap<String, Filter> filters = new LinkedHashMap<>();
        //filters.put("pems",new ZaFilter());
        filters.put("controllerFilter", new ControllerFilter());
        chain.put("/login", "anon");
        chain.put("/oauth/login/**", "anon");
        chain.put("/oauth/loginOut", "anon");
        chain.put("/css/**", "anon");
        chain.put("/img/**", "anon");
        chain.put("/js/**", "anon");
        chain.put("/lib/**", "anon");
        chain.put("/favicon.ico", "anon");
        //禁用session,一般采用token验证时开启
        //chain.put("/**", "authc,noSessionCreation");
        chain.put("/**", "authc");
        bean.setFilterChainDefinitionMap(chain);
        //session失效、没有登录都会跳转到此页面
        bean.setLoginUrl("/login");
        bean.setSecurityManager(securityManager());
        bean.setFilters(filters);
        return bean;
    }


    @Bean
    public SecurityManager securityManager() {
        DefaultSecurityManager securityManager = new DefaultWebSecurityManager();
        securityManager.setRealm(loginRealm());
        //realm被shiroCacheManager管理,本质也是被redis管理
        securityManager.setCacheManager(shiroCacheManager());
        securityManager.setSessionManager(sessionManager());
        return securityManager;
    }


    @Bean
    public SessionManager sessionManager() {
        DefaultWebSessionManager sessionManager = new WebSessionManager();
        //session的有效时长为10秒,每隔5秒去扫描session的状态,扫描到超时的session时,会清除redis中的session缓存
        //一般将session的过期时间与cookie的过期时间保持一致
        sessionManager.setGlobalSessionTimeout(60 * 1000);
        sessionManager.setSessionValidationInterval(5 * 1000);
        sessionManager.setSessionIdUrlRewritingEnabled(false);
        //session交给sesionDao管理
        sessionManager.setSessionDAO(sessionDao());
        return sessionManager;
    }

    @Bean
    public SessionDAO sessionDao() {
        //sessionDao被shiroCacheManager操控,shiroCacheManager被redis操控
        ShiroSessionDao shiroSessionDao = new ShiroSessionDao(shiroCacheManager());
        return shiroSessionDao;
    }


    /**
     * 开启认证、授权的缓存,且指定缓存的名字
     */
    @Bean
    public LoginRealm loginRealm() {
        String[] za = AUTHORIZATIONCACHEPREFIX.split("%");
        String[] ca = AUTHENTICATIONCACHEPREFIX.split("%");
        LoginRealm shiroRealm = new LoginRealm(AUTHENTICATIONCACHEPREFIX);
        shiroRealm.setCachingEnabled(true);
        shiroRealm.setAuthenticationCachingEnabled(true);
        shiroRealm.setAuthenticationCacheName(ca[1]);
        shiroRealm.setAuthorizationCachingEnabled(true);
        shiroRealm.setAuthorizationCacheName(za[1]);
        return shiroRealm;
    }

    /**
     * 开启后端shiro标签使用
     */
    @Bean
    public AuthorizationAttributeSourceAdvisor authorizationAttributeSourceAdvisor(SecurityManager securityManager) {
        AuthorizationAttributeSourceAdvisor authorizationAttributeSourceAdvisor
                = new AuthorizationAttributeSourceAdvisor();
        authorizationAttributeSourceAdvisor.setSecurityManager(securityManager);
        return authorizationAttributeSourceAdvisor;
    }

    @Bean
    public AuthorizationAttributeSourceAdvisor authorizationAttributeSourceAdvisor() {
        AuthorizationAttributeSourceAdvisor advisor = new AuthorizationAttributeSourceAdvisor();
        advisor.setSecurityManager(securityManager());
        return advisor;
    }
}
shiro实现Cookie、Token双兼容
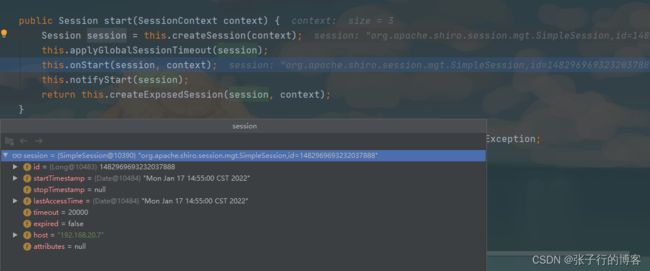
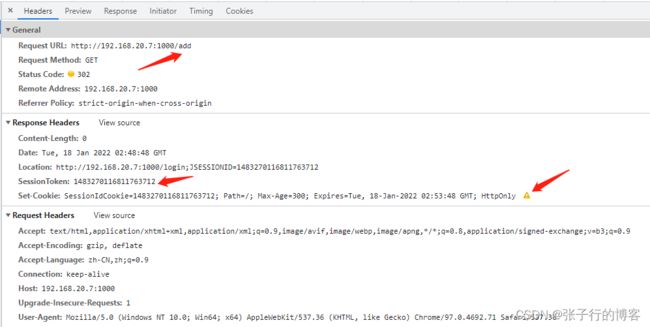
重写 getSessionId 方法如果前端携带了Token则从Token中获取 sessionId、反之从Cookie中获取 sessionId,如果都没有那么只能创建Session了,第一次登录的时候既没有Token也没有Cookie,那么我们如何将 SessonId 保存在Token || Cookie中然后返回给前端呢?在session创建完成之后会进行调用 onStart 方法,我们对他进行重写将 Token、Cookie填充到Reponse中的 Header 中就好了。
@Slf4j
public class WebSessionManager extends DefaultWebSessionManager {
    public final String TOKEN_NAME = "SessionToken";
    public final String COOKIE_NAME = "SessionIdCookie";

    @Override
    protected Serializable getSessionId(ServletRequest request, ServletResponse response) {
        String sessionId = WebUtils.toHttp(request).getHeader(TOKEN_NAME);
        if (StringUtils.isEmpty(sessionId)) {
            Cookie[] cookies = WebUtils.toHttp(request).getCookies();
            if (null != cookies) {
                for (Cookie cookie : cookies) {
                    if (COOKIE_NAME.equals(cookie.getName())) {
                        return cookie.getValue();
                    }
                    continue;
                }
            }
        }
        return sessionId;
    }

    /**
     * 开启cookie机制
     */
    @Override
    public void setSessionIdCookieEnabled(boolean sessionIdCookieEnabled) {
        super.setSessionIdCookieEnabled(true);
    }

    /**
     * 这段代码没啥好研究的 copy 父类的代码,增加了返回Cookie、Token的逻辑
     */
    @Override
    protected void onStart(Session session, SessionContext context) {
        System.out.println("执行onStart");
        if (!WebUtils.isHttp(context)) {
            log.debug("SessionContext argument is not HTTP compatible or does not have an HTTP request/response pair. No session ID cookie will be set.");
        } else {
            HttpServletRequest request = WebUtils.getHttpRequest(context);
            HttpServletResponse response = WebUtils.getHttpResponse(context);
            Serializable sessionId = session.getId();
            this.storeSessionId(sessionId, request, response);
            request.removeAttribute(ShiroHttpServletRequest.REFERENCED_SESSION_ID_SOURCE);
            request.setAttribute(ShiroHttpServletRequest.REFERENCED_SESSION_IS_NEW, Boolean.TRUE);
        }
    }

    /**
     * 假设一个用户没有登录过系统,但是却调用了需要权限的接口,会跳转到登录页面,此时shiro会为此用户分配一个session会话(会话一)
     * 如果跳转到登录页面的用户此时立即登录,那么shiro又会为此用户分配一个session会话(会话二),但是如果此时的用户在请求头设置 SessionToken=会话一
     * 那么系统就能够通过 token机制来获取到shiro内置的session对象了,从而避免了重复创建会话二的目的
     */
    private void storeSessionId(Serializable sessionId, HttpServletRequest request, HttpServletResponse response) {
        if (sessionId == null) {
            String msg = "sessionId cannot be null when persisting for subsequent requests.";
            throw new IllegalArgumentException(msg);
        } else {
            String sId = sessionId.toString();
            //返回给前端的token[SessionToken=sessionId]
            response.setHeader(this.TOKEN_NAME, sId);
            //返回给前端的cookie[SessionIdCookie=sessionId]
            SimpleCookie sessionCookie = new SimpleCookie("SessionIdCookie");
            sessionCookie.setValue(sId);
            sessionCookie.setMaxAge(10);
            sessionCookie.saveTo(request, response);
        }
    }
}
如何做到登出后清除认证、授权、Session缓存?
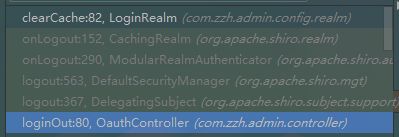
在用户登出的时候将会执行 Subject.LoginOut()的操作,观察其调用栈发现最终会执行一个叫做 clearCache 的方法,最终会自动清除认证缓存,但是涉及到Redis缓存的东西就定会遇到叫做缓存一致性的问题,如果在生产环境某个用户的权限被修改了,切记一定要考虑更新redis中的数据,以下代码我是直接用户一登出认证、授权缓存全给干掉了

@Slf4j
public class LoginRealm extends AuthorizingRealm implements Serializable {
    private Jedis jedis = new Jedis("192.168.20.201", 6379);
    private String authenticationCachePrefix;

    public LoginRealm(String authenticationcacheprefix) {
        this.authenticationCachePrefix = authenticationcacheprefix;
    }

    /**
     * 授权
     */
    @Override
    protected AuthorizationInfo doGetAuthorizationInfo(PrincipalCollection principals) {
        log.info("授权~");
        LoginUser user = (LoginUser) principals.getPrimaryPrincipal();
        System.err.println(user);
        SimpleAuthorizationInfo simpleAuthorizationInfo = new SimpleAuthorizationInfo();
        ArrayList<String> perms = new ArrayList<>();
        perms.add("add");
        perms.add("save");
        simpleAuthorizationInfo.addRole(user.getUserName());
        simpleAuthorizationInfo.addStringPermissions(perms);
        log.info("授权完成~");
        return simpleAuthorizationInfo;
    }

    /**
     * 认证
     */
    @Override
    protected AuthenticationInfo doGetAuthenticationInfo(AuthenticationToken authenticationToken) throws AuthenticationException {
        log.info("认证~");
        UsernamePasswordToken token = (UsernamePasswordToken) authenticationToken;
        LoginUser loginUser = new LoginUser();
        loginUser.setUserName(token.getUsername());
        loginUser.setPassword(String.valueOf(token.getPassword()));
        SimpleAuthenticationInfo info =
                new SimpleAuthenticationInfo(loginUser, token.getPassword(), getName());
        log.info("认证完成~");
        return info;
    }

    /**
     * 清除当前用户的的 授权缓存
     */
    @Override
    public void clearCachedAuthorizationInfo(PrincipalCollection principals) {
        super.clearCachedAuthorizationInfo(principals);
    }

    /**
     * 清除当前用户的 认证缓存
     */
    @Override
    public void clearCachedAuthenticationInfo(PrincipalCollection principals) {
        super.clearCachedAuthenticationInfo(principals);
    }

    /**
     * 触发时机:subject.LoginOut()
     * 清除当前用户缓存,经过测试发现清除认证缓存的时候key居然是LoginUser对象,但是redis中的key是userName
     * 因此这里做了手动清除认证缓存的处理
     */
    @Override
    public void clearCache(PrincipalCollection principals) {
        LoginUser user = (LoginUser) principals.getPrimaryPrincipal();
        String replace = authenticationCachePrefix.replace("%", "");
        jedis.del(replace + user.getUserName());
        clearCachedAuthorizationInfo(principals);
    }

    /**
     * 清除所有人的授权缓存
     */
    public void clearAllCachedAuthorizationInfo() {
        getAuthorizationCache().clear();
    }

    /**
     * 清除所有人的认证缓存
     */
    public void clearAllCachedAuthenticationInfo() {
        getAuthenticationCache().clear();
    }

    /**
     * 清除所有人的认证缓存、授权缓存
     */
    public void clearAllCache() {
        clearAllCachedAuthenticationInfo();
        clearAllCachedAuthorizationInfo();
    }
}
如何对Session进行CRUD
public class ShiroSessionDao extends EnterpriseCacheSessionDAO {
    private String activeSessionName = "session";
    private static Serializable sessionId = null;

    public ShiroSessionDao(CacheManager cacheManager) {
        super.setActiveSessionsCacheName(activeSessionName);
        super.setCacheManager(cacheManager);
    }


    @Override
    protected void doUpdate(Session session) {
        super.doUpdate(session);
    }

    @Override
    protected void doDelete(Session session) {
        System.err.println("删除session:" + session.getId());
        super.doDelete(session);
    }

    @Override
    protected Serializable doCreate(Session session) {
        IdWorker idWorker = new IdWorker();
        sessionId = idWorker.nextId();
        System.out.println(("创建session: " + sessionId));
        super.assignSessionId(session, sessionId);
        return sessionId;
    }


    @Override
    protected Session doReadSession(Serializable sessionId) {
        System.err.println(sessionId);
        return super.doReadSession(sessionId);
    }
}
测试开启Cookie
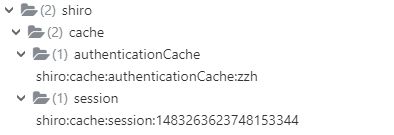
打开俩个浏览器(都支持Cookie)正常登录一波系统然后调用接口,权限、认证、Session都存入了 Redis
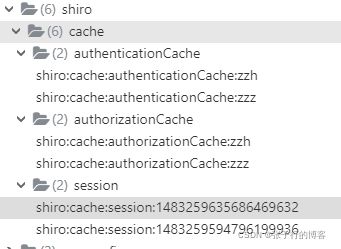
zzz用户退出登录,清除相关的所有信息

打开一个浏览器,直接访问需要权限的接口,由于没有登录直接跳转到登录页面,但是可以看到已经创建了会话Session了


紧接着进行登录操作,发现并没有重复创建Session,原因就是前端携带了装有SessionId的Cookie给我门进行检索
测试禁用Cookie
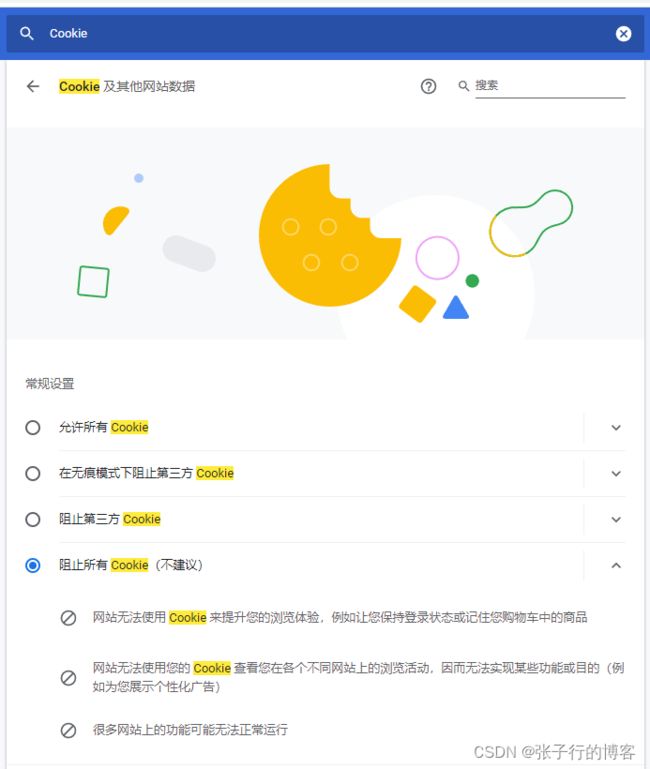
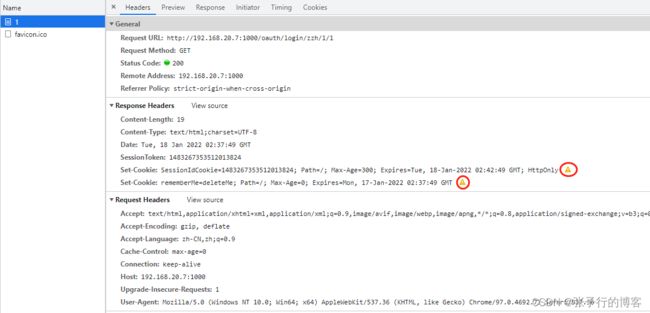
调用登录接口,Cookie是接收不到的但是返回的Token中有SessionId,
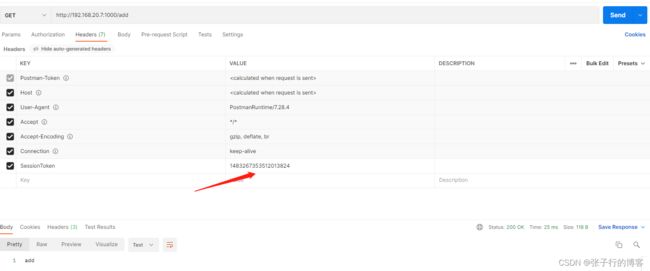
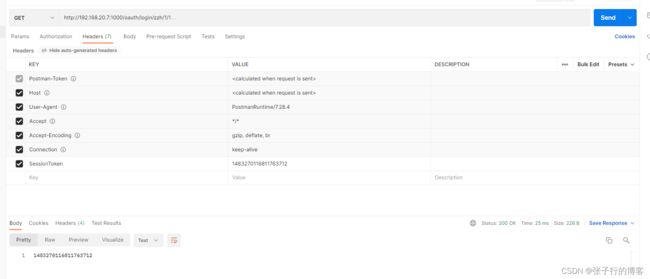
请求需要权限的接口在请求头中添加Token就好了(也是没有问题的),value值为上一步接收到的SessionId
看一眼Redis也是没有Session污染的问题出现的
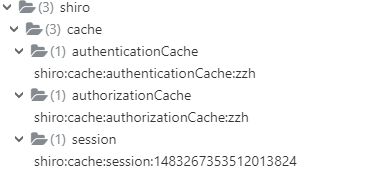
使用Token+Shiro登出操作切记也要传入Token进行操作(Shiro是根据SessionId来登出用户的),即使是登出接口无需权限也能访问,也需要这样做,否则登出操作无效

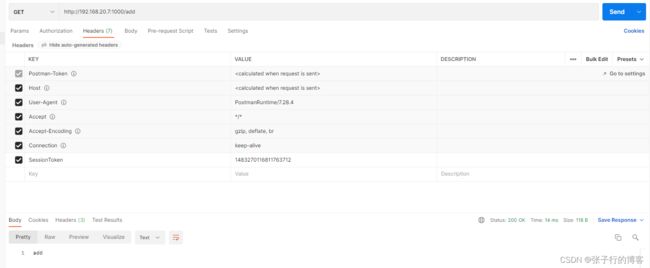
先调用需要权限的add接口,会返回装有SessionId的Token给我们,之后携带这个Token不管是先登录然后访问需要权限的系统、先访问权限的接口提示你需要登录,然后登录,都不会出现Session污染的问题了
测试Session自动失效
每个一秒自动扫描失效Session,扫描到了然后清除Redis中的Session信息

附页 Debug源码小技巧(反序列化Session)干货满满
由于之前我已经知道了Shiro缓存数据的原理了,虽然这个demo是整合第三方的RedisManger,但是万变肯定不离其宗啊,直接点击RedisManger中找到set方法然后打个断点,重启项目接着再调用登录接口,肯定缓存的是Session信息勒,顺着栈帧找一下序列化规则,简简单单的引用一下序列化器整合到我们自己的接口中来就好了
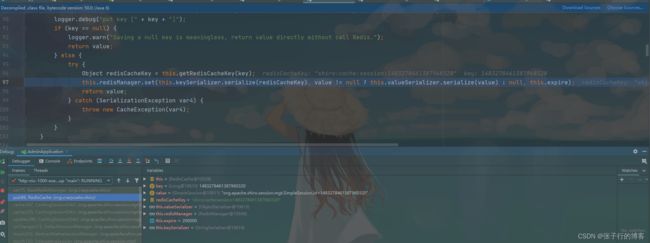
往 session 中添加 IsLogin字段是为了方便实现SSO,别的系统从Redis中获取Session且IsLogin为1就表示无需登录了
@Api("测试接口")
@Slf4j
@Controller
@RequestMapping
public class OauthController {
    private Jedis jedis = new Jedis("192.168.20.201", 6379);
    private RedisSerializer valueSerializer = new ObjectSerializer();
    @Value("${shiro.cache.sessionPrefix}")
    private String sessionPrefix;

    @ResponseBody
    @ApiOperation(value = "/oauth/login", notes = "b")
    @GetMapping(value = "/oauth/login/{userName}/{password}/{rememberMe}")
    public String reg(@PathVariable("userName") String userName,
                      @PathVariable("password") String password,
                      @PathVariable("rememberMe") Integer rememberMe,
                      HttpServletRequest request) throws SerializationException {
        Cookie[] cookies = request.getCookies();
        if (null != cookies) {
            for (Cookie cookie : cookies) {
                if ("SessionIdCookie".equals(cookie.getName())) {
                    String sessionId = cookie.getValue();
                    byte[] bytes = jedis.get((sessionPrefix + sessionId).getBytes());
                    if (null == bytes) break;
                    Session session = (Session) valueSerializer.deserialize(bytes);
                    Integer isLogin = (Integer) session.getAttribute("isLogin");
                    if (null != isLogin && 1 == isLogin) return "已经登录过了";
                }
                continue;
            }
        }
        Subject subject = SecurityUtils.getSubject();
        UsernamePasswordToken token = new UsernamePasswordToken(userName, password);
        if (subject.isAuthenticated()) return "已经登录过了";
        else {
            subject.login(token);
            Session session = subject.getSession();
            //主要是做单点登录用的
            session.setAttribute("isLogin", 1);
        }
        return subject.getSession().getId().toString();
    }

    @ApiOperation(value = "/oauth/loginOut", notes = "b")
    @GetMapping(value = "/oauth/loginOut")
    public String loginOut() {
        Subject subject = SecurityUtils.getSubject();
        //触发LoginRelam.clearCache()方法
        subject.logout();
        return "login";
    }


    @ResponseBody
    @RequiresPermissions("add")
    @RequestMapping("/add")
    @RequiresRoles({"zzh"})
    public String add() {
        return "add";
    }

    @ResponseBody
    @RequiresPermissions("save")
    @RequestMapping("/save")
    @RequiresRoles({"zzh"})
    public String save() {
        return "save";
    }

    @ResponseBody
    @RequestMapping("/delete")
    @RequiresPermissions("delete")
    public String delete() {
        return "delete";
    }

    @ResponseBody
    @RequiresRoles(value = {"hd"}, logical = Logical.OR)
    @RequestMapping("/select")
    public String select() {
        return "select";
    }

}
