nacos-配置中心-源码
一、springboot引入nacos
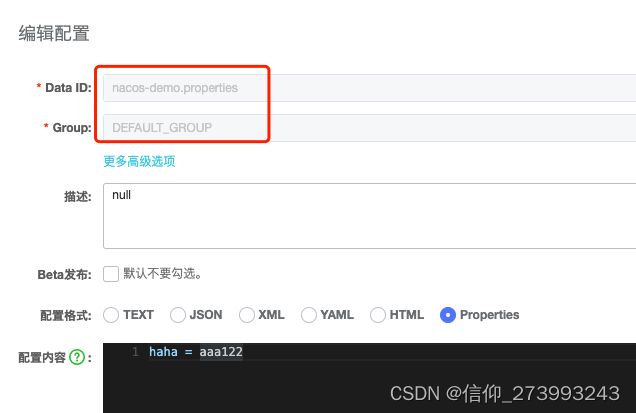
1、进入nacos后台配置内容

注意DataId和Group
2、pom文件添加
<dependency>
	<groupId>com.alibaba.cloudgroupId>
	<artifactId>spring-cloud-starter-alibaba-nacos-configartifactId>
	<version>2.2.3.RELEASEversion>
dependency>
3、在bootstrap.yml添加配置,注意是bootstrap不是application.yml
spring:
  cloud:
    nacos:
      config:
        name: nacos-demo
        server-addr: 127.0.0.1:8848			#nacos地址
        extension-configs:
          - data-id: nacos-demo.properties   #和nacos后台配置dataId一致
            refresh: true
4、代码中引入
@Value("${haha}")
private String haha;
注意当我们引入nacos配置的时候,希望动态刷新还需要在类上添加@RefreshScope注解
引入还是很简单的,使用也很方便,还支持动态变化。下面开始分析下源码。
二、执行流程
先说下nacos作为配置中心,从spring启动到加载到项目中,包括更改了nacos配置,项目是如何感知拿到最新的数据的整个流程
1、项目启动通过加载nacos的spring.factories配置文件,创建一个Bean
2、这个Bean会发送http请求从nacos服务端读取配置的数据,加载到项目中
3、当项目启动完成后,会通过线程池里面的定时任务发送http请求监听nacos服务端。
4、nacos每次更改会生成一个新的MD5字符串,通过项目中保存的MD5和nacos后台的MD5对比,如果不一致,就重行拉取一次最新配置。
5、然后通过RefreshScopeRefreshedEvent刷新容器中值。
三、源码分析
nacos作为配置中心,主要是向容器中注册NacosConfigBootstrapConfiguration这个类,而NacosConfigBootstrapConfiguration类里面会又会完成下面2个Bean的创建,所有的功能都在上面2个Bean里面完成
1、NacosConfigManager
2、NacosPropertySourceLocator
看下NacosConfigBootstrapConfiguration这个类
@Configuration(proxyBeanMethods = false)
@ConditionalOnProperty(name = "spring.cloud.nacos.config.enabled", matchIfMissing = true)
public class NacosConfigBootstrapConfiguration {

	@Bean
	@ConditionalOnMissingBean
	public NacosConfigManager nacosConfigManager(
			NacosConfigProperties nacosConfigProperties) {
		return new NacosConfigManager(nacosConfigProperties);
	}

	@Bean
	public NacosPropertySourceLocator nacosPropertySourceLocator(
			NacosConfigManager nacosConfigManager) {
		return new NacosPropertySourceLocator(nacosConfigManager);
	}
}
3.1 NacosConfigManager类
NacosConfigManager有2个属性,最主要的是ConfigService属性,后面会重点用到这个ConfigService
//ConfigService主要是创建一个周期执行轮询的线程池+发送http请求的工具AgentHttp
private static ConfigService service = null;

//这个我们配置在bootstrap.yml里面内容
private NacosConfigProperties nacosConfigProperties;
NacosConfigManager的构造方法主要完成对这个2个属性赋值
public NacosConfigManager(NacosConfigProperties nacosConfigProperties) {
	this.nacosConfigProperties = nacosConfigProperties;

	createConfigService(nacosConfigProperties);//调用createConfigService方法
}

static ConfigService createConfigService(NacosConfigProperties nacosConfigProperties) {
	//创建ConfigService对象赋值给NacosConfigManager的属性ConfigService
	service =
	NacosFactory.createConfigService(nacosConfigProperties.assembleConfigServiceProperties());
}
看下assembleConfigServiceProperties方法和createConfigService方法做了什么?
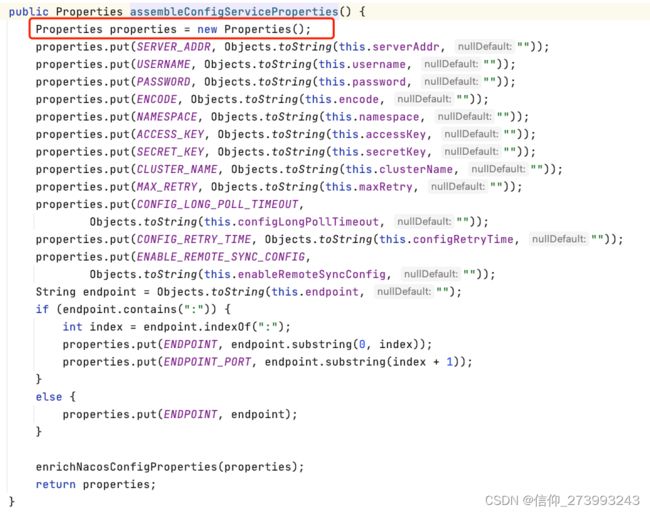
1、assembleConfigServiceProperties方法
主要是把nacosConfigProperties转成Properties方便后面解析。
2、createConfigService方法
通过反射创建ConfigService对象
public static ConfigService createConfigService(Properties properties) throws NacosException {
    Class<?> driverImplClass = Class.forName("com.alibaba.nacos.client.config.NacosConfigService");
	#获取参数是Properties的构造方法
    Constructor constructor = driverImplClass.getConstructor(Properties.class);
    #执行构造方法返回ConfigService对象
    ConfigService vendorImpl = (ConfigService) constructor.newInstance(properties);
    return vendorImpl;
}
NacosConfigService的构造方法很重要,下面会重点介绍
3.2 NacosPropertySourceLocator类
@Bean
public NacosPropertySourceLocator nacosPropertySourceLocator(NacosConfigManager nacosConfigManager) {
	//参数nacosConfigManager就是前面创建好了的Bean
	return new NacosPropertySourceLocator(nacosConfigManager);
}
拓展知识
1、Spring中有个PropertySourceLocator接口,该接口支持扩展自定义配置加载到Spring Environment中,像我们引入nacos的目的就是为了把nacos东西加载到Spring Environment中。
2、而我们的NacosPropertySourceLocator就继承PropertySourceLocator,重写了locate方法。
下面看下locate方法
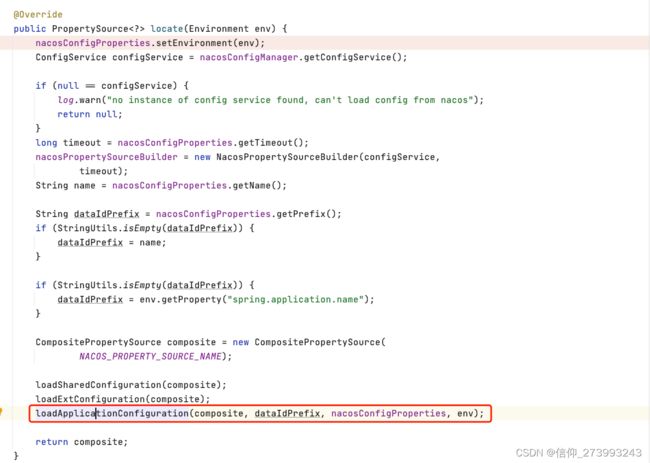
locate主要看loadApplicationConfiguration方法,其他的代码都是从properties对象里面读配置,然后组装成loadApplicationConfiguration所需要的参数
private void loadApplicationConfiguration(CompositePropertySource compositePropertySource, String dataIdPrefix,NacosConfigProperties properties, Environment environment) {
	//获取配置所需要的参数
	String fileExtension = properties.getFileExtension();
	String nacosGroup = properties.getGroup();

	//1、通过dataId + nacosGroup + properties + autoRefre->去调用nacos服务端配置
	loadNacosDataIfPresent(compositePropertySource, dataIdPrefix, nacosGroup,fileExtension, true);

	//2、通过dataId + nacosGroup + properties + autoRefre->去调用nacos服务端配置
	loadNacosDataIfPresent(compositePropertySource,dataIdPrefix + DOT + fileExtension, nacosGroup, fileExtension, true);

	//3、通过带环境的dataId去nacos服务端拿配置
	for (String profile : environment.getActiveProfiles()) {
		String dataId = dataIdPrefix + SEP1 + profile + DOT + fileExtension;
		loadNacosDataIfPresent(compositePropertySource, dataId, nacosGroup, fileExtension, true);
	}
}
都是通过loadNacosDataIfPresent方法加载配置,这里一共分为3种情况
1、只根据服务名称加载
2、服务名称与文档类型拼接后加载
3、根据启动的不提环境加载对应文件
注意:重点说第三个点,如果我们nacos只有一个环境,那么其实我们可以通过在dataId里面加一个pre、prd、test等字段来区分环境,但是我们是实际开发中,nacos是有三套环境域名,所以在需要在配置server-addr的时候指定不同地址就可以了。
#1、下面是loadNacosDataIfPresent方法
private void loadNacosDataIfPresent(final CompositePropertySource composite,
  									final String dataId,
  									final String group,
  									String fileExtension,
  									boolean isRefreshable) {
	//调用loadNacosPropertySource方法
	NacosPropertySource propertySource = this.loadNacosPropertySource(dataId, group,fileExtension, isRefreshable);
	this.addFirstPropertySource(composite, propertySource, false);
}

#2、看下loadNacosPropertySource做了什么
private NacosPropertySource loadNacosPropertySource(final String dataId,final String group, String fileExtension, boolean isRefreshable) {
	//调用build方法
	return nacosPropertySourceBuilder.build(dataId, group, fileExtension,isRefreshable);
}

#3、build方法
NacosPropertySource build(String dataId, String group, String fileExtension,boolean isRefreshable) {
	//1、获取nacos服务端配置
	Map<String, Object> p = loadNacosData(dataId, group, fileExtension);

	NacosPropertySource nacosPropertySource = new NacosPropertySource(group, dataId,p, new Date(), isRefreshable);
	NacosPropertySourceRepository.collectNacosPropertySource(nacosPropertySource);
	return nacosPropertySource;
}

#3、loadNacosData方法
private Map<String, Object> loadNacosData(String dataId, String group,String fileExtension) {
	//正真获取nacos服务端配置的代码
	String data = configService.getConfig(dataId, group, timeout);

	Map<String, Object> dataMap = NacosDataParserHandler.getInstance().parseNacosData(data, fileExtension);
	return dataMap == null ? EMPTY_MAP : dataMap;
}
主要是通过configService的getConfig方法来获取nacos服务端配置
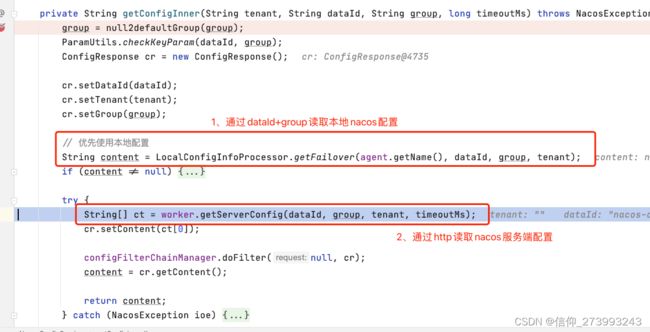
这里我们看到主要分为两步:
1、通过LocalConfigInfoProcessor 加载本地缓存,如果存在就把内容读取出来直接返回,就不走http请求了
2、通过worker.getServerConfig加载远程变量
本地缓存路径放在了,如果存在就不走http请求nacos服务端了

本地缓存没有就通过worker.getServerConfig发送http请求到nacos服务端获取配置
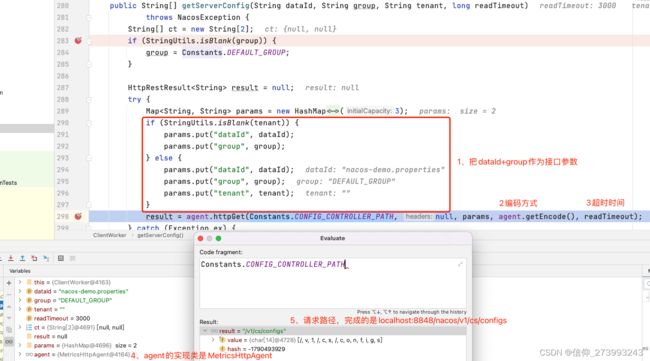
总结:以上就是启动时通过http加载nacos服务端的配置
那么如果启动完成后,nacos服务端更改了配置,项目是怎么动态感知的。
3.3 动态获取nacos服务端更新配置
还记得前面会创建ConfigService吧,那么ConfigService是通过NacosConfigService这个类创建的,并且调用NacosConfigService类的构造方法
public static ConfigService createConfigService(Properties properties) throws NacosException {
    Class<?> driverImplClass = Class.forName("com.alibaba.nacos.client.config.NacosConfigService");
	#获取参数是Properties的构造方法
    Constructor constructor = driverImplClass.getConstructor(Properties.class);
    #执行构造方法返回ConfigService对象
    ConfigService vendorImpl = (ConfigService) constructor.newInstance(properties);
    return vendorImpl;
}
下面看下NacosConfigService类的构造方法长什么样

里面创建2个非常重要的对象agent+worker
1、agent对象是用来发http请求到nacos服务端的
2、ClientWorker是用来长轮训nacos服务端来感知配置更新
WorkClient
客户端初始请求配置完成后,会通过WorkClient 进行长轮询查询配置, 重点看下ClientWorker的构造方法
public ClientWorker(final HttpAgent agent, final ConfigFilterChainManager configFilterChainManager,final Properties properties) {

    this.agent = agent;
    this.configFilterChainManager = configFilterChainManager;

    init(properties);

    // 用来调用checkConfigInfo方法的线程池
    this.executor = Executors.newScheduledThreadPool(1, new ThreadFactory() {
        @Override
        public Thread newThread(Runnable r) {
            Thread t = new Thread(r);
            t.setName("com.alibaba.nacos.client.Worker." + agent.getName());
            t.setDaemon(true);
            return t;
        }
    });

    //长轮询线程,用来给nacos发送请求的线程池
    this.executorService = Executors.newScheduledThreadPool(Runtime.getRuntime().availableProcessors(), new ThreadFactory() {
         @Override
         public Thread newThread(Runnable r) {
             Thread t = new Thread(r);
             t.setName("com.alibaba.nacos.client.Worker.longPolling." + agent.getName());
             t.setDaemon(true);
             return t;
         }
     });

    //1秒后调用checkConfigInfo方法,后面会间隔10秒再次执行checkConfigInfo方法,依次类推
    this.executor.scheduleWithFixedDelay(new Runnable() {
        @Override
        public void run() {
            try {
                checkConfigInfo();
            } catch (Throwable e) {
                LOGGER.error("[" + agent.getName() + "] [sub-check] rotate check error", e);
            }
        }
    }, 1L, 10L, TimeUnit.MILLISECONDS);
}
这里初始化了两个线程池:
1、第一个线程池主要是用来初始化做长轮询的
2、第二个线程池使用来做检查的,会每间隔 10 秒钟执行一次检查方法 checkConfigInfo
补充说下scheduleWithFixedDelay方法
schedulewithfixeddelay(runnable command,long initialdelay,long delay,timeunit unit)
参数:command - 要执行的任务
参数:initialdelay - 首次执行的延迟时间
参数:delay - 一次执行终止和下一次执行开始之间的延迟
参数:unit - initialdelay 和 delay 参数的时间单位创建并执行一个在给定初始延迟后首次启用的定期操作,随后,在每一次执行终止和下一次执行开始之间都存在给定的延迟。如果任务的任一执行遇到异常,就会取消后续执行
checkConfigInfo
在这个方法里面主要是分配任务,给每个 task 分配一个 taskId , 后面会去检查本地配置和远程配置,最终调用的是 LongPollingRunable 的 run 方法。
public void checkConfigInfo() {
    int listenerSize = cacheMap.size();
    int longingTaskCount = (int) Math.ceil(listenerSize / ParamUtil.getPerTaskConfigSize());
    if (longingTaskCount > currentLongingTaskCount) {
    	//根据监听器数量是否开启LongPollingRunnable任务
        for (int i = (int) currentLongingTaskCount; i < longingTaskCount; i++) {
            //执行LongPollingRunnable方法
            executorService.execute(new LongPollingRunnable(i));
        }
        currentLongingTaskCount = longingTaskCount;
    }
}
LongPollingRunnable
长轮询线程实现,首先第一步检查本地配置信息,然后通过 dataId 去检查服务端是否有变动的配置信息,如果有就更新下来然后刷新配置。
public void run() {
    List<CacheData> cacheDatas = new ArrayList<CacheData>();
    List<String> inInitializingCacheList = new ArrayList<String>();

    for (CacheData cacheData : cacheMap.values()) {
        if (cacheData.getTaskId() == taskId) {
            cacheDatas.add(cacheData);
            try {
                checkLocalConfig(cacheData);
                if (cacheData.isUseLocalConfigInfo()) {
                    // 触发回调
                    cacheData.checkListenerMd5();
                }
            } catch (Exception e) {
                LOGGER.error("get local config info error", e);
            }
        }
    }
	//获取有变化的配置列表dataid+group,里面会通过http访问nacos服务端的/listener接口,拿到有更新的dataid+group集合
    List<String> changedGroupKeys = checkUpdateDataIds(cacheDatas, inInitializingCacheList);
  	//遍历有更新的dataid+group
    for (String groupKey : changedGroupKeys) {
        try {
        	//1、既然后更新就获取nacos服务端最新的配置内容
            String[] ct = getServerConfig(dataId, group, tenant, 3000L);
            //2、把最新的内容设置到缓存里面去。
			CacheData cache = cacheMap.get(GroupKey.getKeyTenant(dataId, group, tenant));
            cache.setContent(ct[0]);
            if (null != ct[1]) {
                cache.setType(ct[1]);
            }
        } catch (NacosException ioe) {}
    }


    for (CacheData cacheData : cacheDatas) {
        if (判断是否有更新) {
            cacheData.checkListenerMd5();//检查是否有变化,有变化就通知
            cacheData.setInitializing(false);
        }
    }
    inInitializingCacheList.clear();

    executorService.execute(this);   //再次执行任务,相当于轮询nacos服务端
}
run的大致流程就是
整个轮询获取配置信息的过程,首先会遍历所有的CacheData,加入到一个集合里,然后去请求服务器获取配置信息,如果是有更新服务器就会立即返回,否则会被挂起,这个原因就是为了不进行频繁的空轮询,又能实现动态配置,只要在挂起的时间段内有改变,就可以理解响应给客户端。
checkUpdateDataIds
看下checkUpdateDataIds是怎么知道有变化的
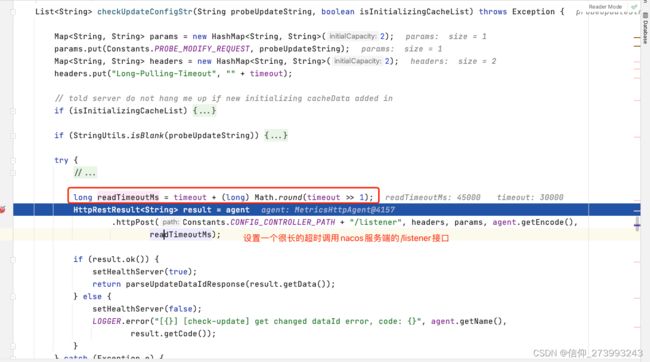
每个dataId+group都有一个MD5,拿本地缓存的MD5去和nacos服务端的MD5对比,如果有更新那么/listener就会立即返回,如果没有就等待超时,如果在超时时间内nacos服务端有更新,就会在更新的那一刻返回。
回调触发
如果md5 值发生变化过,也就是通过checkListenerMd5方法判断,就会调用 safeNotifyListener 方法然后将配置信息发送给对应的监听器
void checkListenerMd5() {
    for (ManagerListenerWrap wrap : listeners) {
        if (!md5.equals(wrap.lastCallMd5)) {
            safeNotifyListener(dataId, group, content, type, md5, wrap);
        }
    }
}
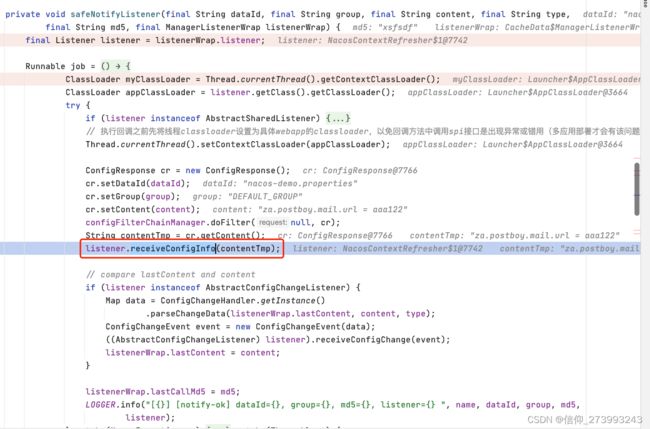
receiveConfigInfo最后会调用下面这个方法来发布一直刷新的事件
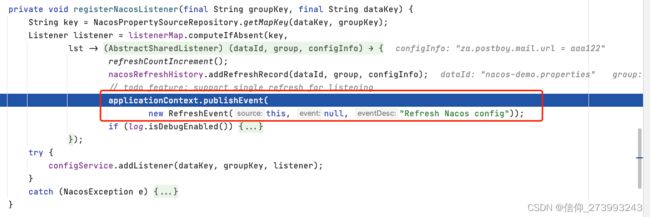
刷新时间最终调的是RefreshScope#refreshAll方法,然后重行生成NacosConfigManager和NacosPropertySourceLocator对象,获取最新的Nacos配置到容器中。
四、看下Nacos服务端的代码
https://blog.csdn.net/uuuyy_/article/details/122218623