confd和etcd 的安装与使用
一、概述
当系统变的复杂,配置项越来越多,一方面配置管理变得繁琐,另一方面配置修改后需要重新上线同样十分痛苦。这时候,需要有一套集中化配置管理系统,一方面提供统一的配置管理,另一方面提供配置变更的自动下发,及时生效。
说道统一配置管理系统,大家应该比较熟悉,常见的:zookeeper、etcd、consul、git等等。
上述的集中配置中心使用的时候,部署图大致是这样的:
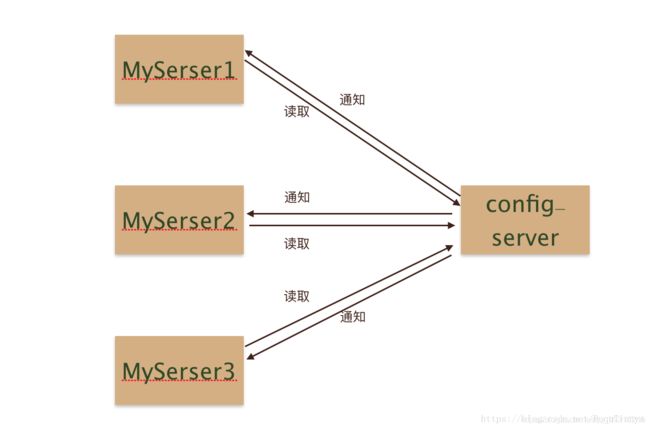
server端只需要调用config-server对应客户端获取配置,和监听配置变更就可以了。总体来说没有太大难度。
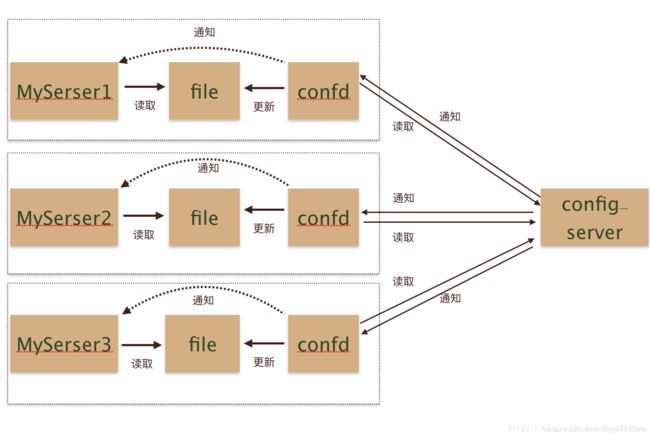
接下来要说一下confd,它提供了一种新的集成思路。confd的存在有点类似于快递员,买了东西不需要自己到店去取货了,confd这个快递员回把货取过来,然后送到家里,并且通知你货已经送到了。加入confd之后的架构大致是这样的:
二、confd是如何工作的
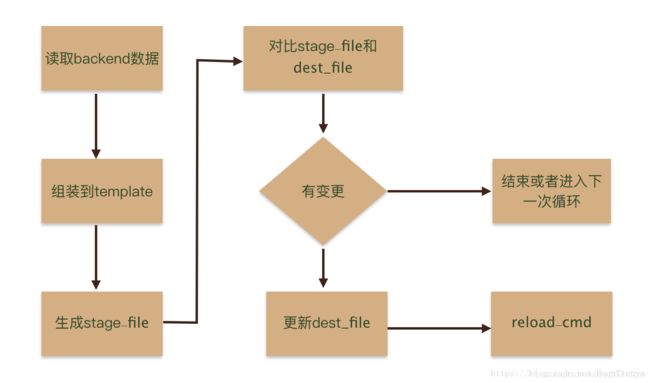
confd使用时有几个概念需要熟悉,并且熟悉他们之间的依赖关系,才能理解如何配置confd,不然会比较懵。这里我们先看一下confd配置的几个概念之间是如何交互的:
三、confd的部署
以下Linux系统为例。
下载confd的二进制文件,下载地址为:https://github.com/kelseyhightower/confd/releases。例如:
下面展示一些 内联代码片。
# 安装wget
[root@master01 ~]# yum -y install wget

# 查看wget是否安装成功
[root@master01 ~]# wget --help

# Download the binary
wget https://github.com/kelseyhightower/confd/releases/download/v0.16.0/confd-0.16.0-linux-amd64

# 重命名二进制文件,并移动到PATH的目录下
mv confd-0.16.0-linux-amd64 /usr/local/bin/confd
chmod +x /usr/local/bin/confd

# 验证是否安装成功
confd --help
四、confd的配置
Confd通过读取后端存储的配置信息来动态更新对应的配置文件,对应的后端存储可以是etcd,redis等,其中etcd的v3版本对应的存储后端为etcdv3。
1. 创建confdir
confdir底下包含两个目录:
- conf.d:confd的配置文件,主要包含配置的生成逻辑,例如模板源,后端存储对应的keys,命令执行等。
- templates:配置模板Template,即基于不同组件的配置,修改为符合 Golang text templates的模板文件。
sudo mkdir -p /etc/confd/{conf.d,templates}
2. Template Resources
模板源配置文件是TOML格式的文件,主要包含配置的生成逻辑,例如模板源,后端存储对应的keys,命令执行等。默认目录在/etc/confd/conf.d。
参数说明:
必要参数
- dest (string) - The target file. 字符串 -目标文件
- keys (array of strings) - An array of keys. 字符串数组 -键数组
- src (string) - The relative path of a configuration template. 字符串 -配置模板的相对路径
可选参数
- gid (int) - The gid that should own the file. Defaults to the effective gid.
应该拥有该文件的gid。默认为有效的gid。 - mode (string) - The permission mode of the file.
文件的权限模式。 - uid (int) - The uid that should own the file. Defaults to the effective uid.
应该拥有该文件的uid。默认为有效的uid。 - reload_cmd (string) - The command to reload config.
重新加载配置的命令。 - check_cmd (string) - The command to check config. Use {{.src}} to reference the rendered source template.
检查配置的命令。 - prefix (string) - The string to prefix to keys.
键前缀的字符串。
例子
例如:/etc/confd/conf.d/myapp-nginx.toml
[template]
prefix = "/myapp"
src = "nginx.tmpl"
dest = "/tmp/myapp.conf"
owner = "nginx"
mode = "0644"
keys = [
  "/services/web"
]
check_cmd = "/usr/sbin/nginx -t -c {{.src}}"
reload_cmd = "/usr/sbin/service nginx reload"
3. Template
Template定义了单一应用配置的模板,默认存储在/etc/confd/templates目录下,模板文件符合Go的text/template格式。
模板文件常用函数有base,get,gets,lsdir,json等。具体可参考https://github.com/kelseyhightower/confd/blob/master/docs/templates.md。
例子:
/etc/confd/templates/nginx.tmpl
{{range $dir := lsdir "/services/web"}}
upstream {{base $dir}} {
    {{$custdir := printf "/services/web/%s/*" $dir}}{{range gets $custdir}}
    server {{$data := json .Value}}{{$data.IP}}:80;
    {{end}}
}

server {
    server_name {{base $dir}}.example.com;
    location / {
        proxy_pass {{base $dir}};
    }
}
{{end}}
五、 创建后端存储的配置数据
以etcdv3存储为例,在etcd中创建以下数据。
etcdctl --endpoints=$endpoints set /services/web/cust1/2 '{"IP": "10.0.0.2"}'
etcdctl --endpoints=$endpoints set /services/web/cust2/2 '{"IP": "10.0.0.4"}'
etcdctl --endpoints=$endpoints set /services/web/cust2/1 '{"IP": "10.0.0.3"}'
etcdctl --endpoints=$endpoints set /services/web/cust1/1 '{"IP": "10.0.0.1"}'
六、 启动confd的服务
confd支持以daemon或者onetime两种模式运行,当以daemon模式运行时,confd会监听后端存储的配置变化,并根据配置模板动态生成目标配置文件。
如果以daemon模式运行,则执行以下命令:
confd -watch -backend etcdv3 -node http://192.168.1.207
以onetime模式运行。其中对应的后端存储类型是etcdv3。
这块作者遇到了个问题,etcdv3获取不到数据,文件正确创建出来里面无内容,使用etcd正常获取数据。
# 执行命令
confd -onetime -backend etcdv3 -node http://192.168.1.207
以定时机制运行。只要服务器端的数据变化,客户端隔60秒后去更新配置文件,默认值是600秒
confd -interval 60 -backend etcd-node http://192.168.1.207
七、查看生成的配置文件
在/etc/confd/conf.d/myapp-nginx.toml中定义的配置文件的生成路径为/tmp/myapp.conf。
[root@k8s-dbg-master-1 dest]# cat myapp.conf
upstream cust1 {
    server 10.0.0.1:80;
    server 10.0.0.2:80;
}

server {
    server_name cust1.example.com;
    location / {
        proxy_pass cust1;
    }
}

upstream cust2 {
    server 10.0.0.3:80;
    server 10.0.0.4:80;
}

server {
    server_name cust2.example.com;
    location / {
        proxy_pass cust2;
    }
}
八、confd动态更新配置文件
confd环境和服务器存储环境搭建好后,以daemon模式或定时机制运行confd,就可以实现。
九、etcd安装
etcd在生产环境中一般推荐集群方式部署。我这边主要是进行confd和etcd的结合使用etcd是单机安装
#通过yum源安装etcd
yum -y install etcd

#启动etcd服务
systemctl start etcd

#查看启动状态
systemctl status etcd
参考至:https://blog.csdn.net/bbwangj/article/details/82953786
感谢作者的分享