基于QGIS初探PostgreSQL的PostGIS插件,包括YUM和编译安装PostGIS
写在前面:本文介绍 QGIS,只是为了展示怎么使用 PostGIS,因作者本人追求的是 PostgreSQL,所以本文的重点还是 PostGIS 这个 PostgreSQL 的插件,QGIS软件只做简单介绍,留给地理空间开发工程师研究吧。在学这篇文章之前,我也只是小白,都是在网上边学边实验边记录的,写这篇文章花了我整整3天的时间,在PostGIS编译安装的时候走了不少弯路,文章如有错误或侵权的,望留言指出,立即改正。
除 QGIS 外,其他支持 PostGIS 的软件详见:https://trac.osgeo.org/postgis/wiki/UsersWikiToolsSupportPostgis
一简介
QGIS (原称Quantum GIS)是一个方便使用的免费开源且跨平台的桌面GIS软件,可运行在 Windows、Linux、MacOS 和 BSD 上,并支持众多矢量、栅格、和数据库格式及功能。
QGIS的最大特点在于界面很友好,熟悉ArcGIS的人都能很快的掌握QGIS的操作,支持WMS并无缝集成PostGIS(对象-关系型数据库管理系统),几乎完全照搬了GRASS的分析功能,因此其分析功能也很强大。相比于商业GIS软件,QGIS的文件体积更小,需要的内存和处理能力也更小,因此它可以在旧的硬件上或CPU运算能力被限制的环境下运行,是一款轻量化的桌面GIS软件。
QGIS的官网:https://www.qgis.org/en/site/

PostGIS 也是免费开源的,PostGIS通过向PostgreSQL添加对空间数据类型、空间索引和空间函数的支持,将PostgreSQL数据库管理系统转换为空间数据库。
因为PostGIS是建立在PostgreSQL之上的,所以PostGIS自动继承了重要的"企业级"特性以及开放源代码的标准。
可以说PostGIS仅仅只是PostgreSQL的一个插件,但是它将PostgreSQL变成了一个强大的空间数据库!
关于 PostGIS 更多介绍以及为什么使用 PostGIS,参考这个文章或自行百度:https://zhuanlan.zhihu.com/p/62034688,本文部分介绍性文字也是截取此处。
PostGIS的官网:http://postgis.net/
PostGIS的WIKI:https://trac.osgeo.org/postgis/wiki
Developers PostGIS Wiki: https://trac.osgeo.org/postgis/wiki/DevWikiMain
二QGIS 的简单操作
QGIS的官网下载独立安装版,Windows上安装比较简单,直接下一步就行,在QGIS软件安装完成后,再在QGIS中安装以下两个插件。
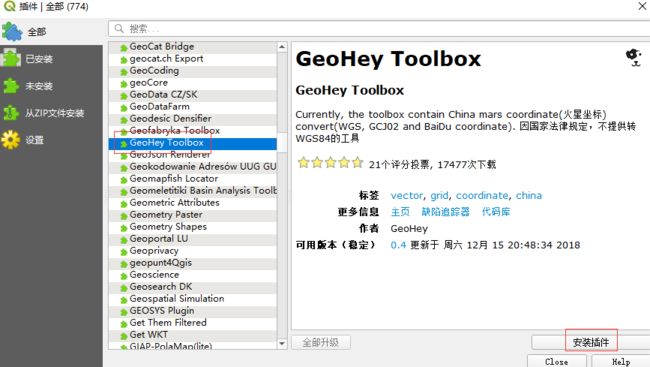
1.安装QGIS的坐标转换插件 GeoHey Toolbox
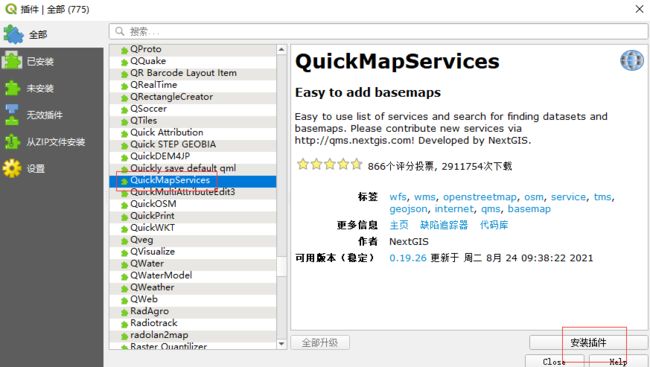
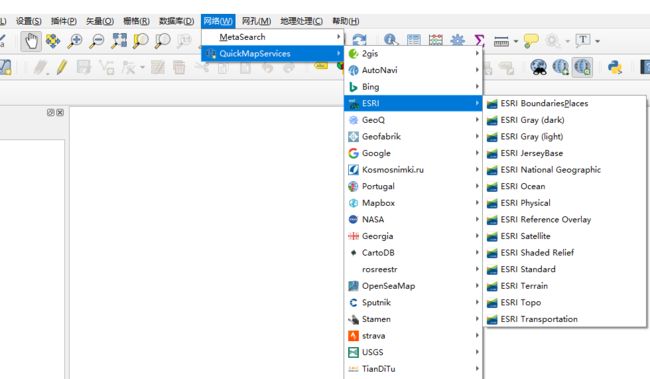
2.安装QGIS的底图插件Quick Map Services
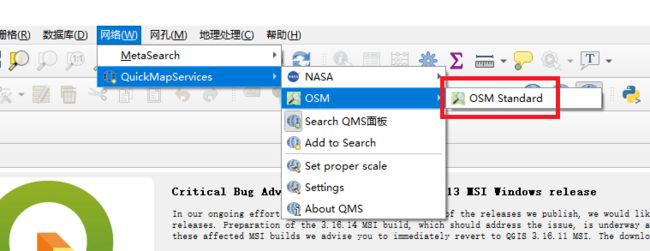
配置底图。
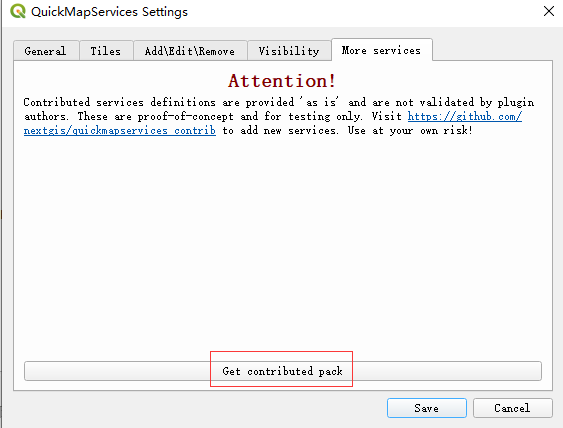
此时只有一个OSM的标准底图,可以在 Settings 中 Get 更多的底图。
更多的底图也是有的能用,有的只能在国外网才能用。
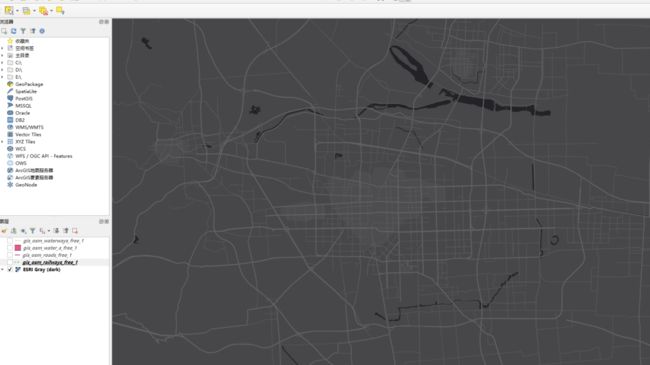
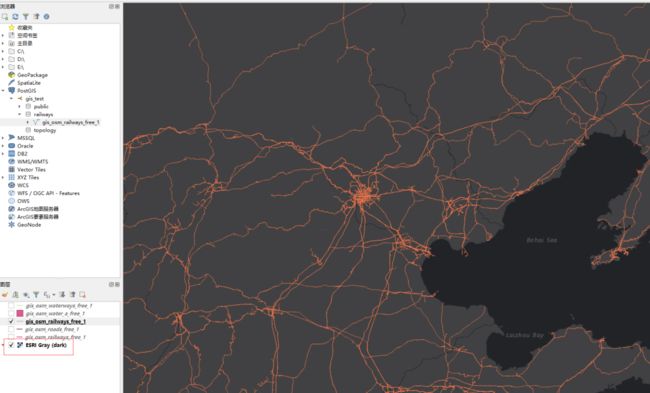
本示例选用了 ESRI 的 ESRI Gray (dark) 作为底图。
3.下载全国路网数据
可通过OSM Geofabrik项目下载中国水系、道路路网、建筑物、湖泊河网数据,数据坐标系为WGS84,下载地址:http://download.geofabrik.de/asia/china-latest-free.shp.zip 。
gis_osm_roads_free_1.shp :# 全国公路路网数据
gis_osm_railways_free_1.shp:# 全国铁路网数据
gis_osm_waterways_free_1.shp:# 全国河流网数据
gis_osm_water_a_free_1.shp:# 全国湖泊数据
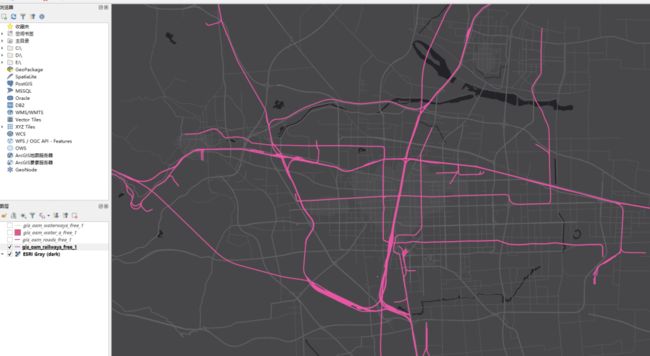
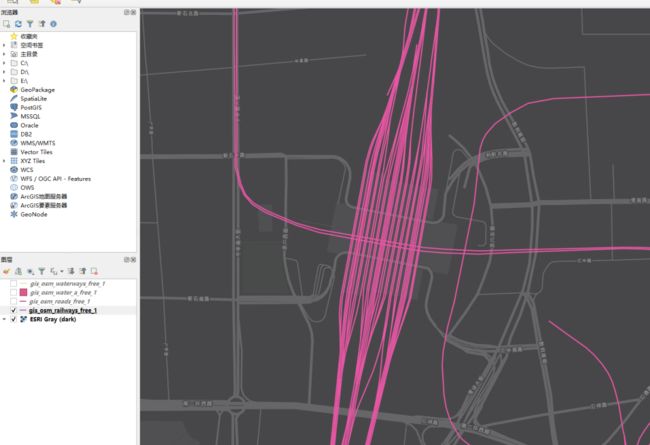
4.QGIS上展示全国路网数据
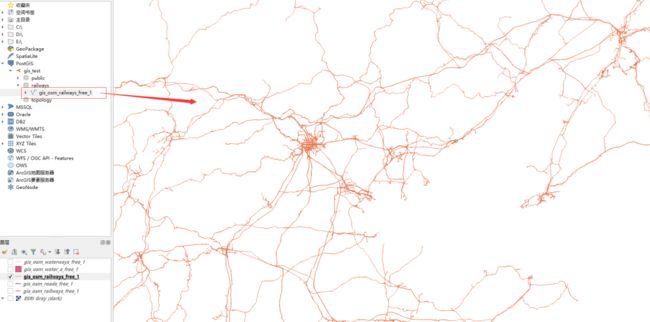
将想要展示的shp文件拖到 QGIS 中就能展示,如下展示全国铁路网数据。
三使用PostGIS来存储 Shapefiles 文件的数据
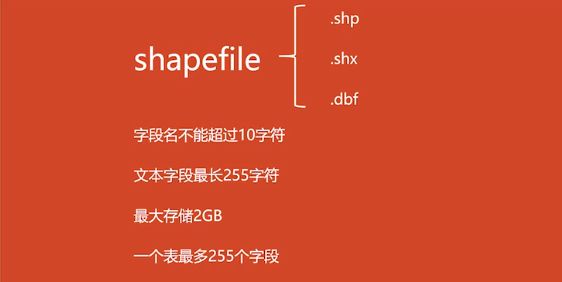
自 GIS 软件被首次编写以来,Shapefile(和其他文件格式)一直是空间数据的存储和交互的标准方式。
但是,这些平面文件还存在以下缺点:
文件需要特殊的应用程序才能读写 —— SQL是对随机数据访问和分析的抽象。如果没有这种抽象,你将需要自己编写所有的访问和分析数据的代码
并发操作可能导致损坏数据 —— 虽然可以编写额外的代码以确保对同一文件的多次写入不会损坏数据,但当你解决了问题并同时解决了相关性能问题时,你已经编写了数据库系统的较多部分。那为什么不直接使用标准数据库呢?
复杂的问题需要复杂的应用程序来回答 —— 复杂而有趣的空间分析问题(空间连接、聚合等)可以在数据库中使用一行SQL代码来表达,但是在对文件进行编程时,需要数百行专门的代码来解决。
大多数 PostGIS 用户都在建立多个应用程序访问数据的系统,因此,使用标准的SQL访问方法可以简化部署和开发。
有些用户正在处理大型数据集,如果使用文件存储,它们可能被分成多个文件;但在数据库中,它们可以存储在单个大的二维表中。
总之,对多个用户的支持,复杂的即时查询和对于大型数据集的高性能表现,是空间数据库比文件系统的优越之处。
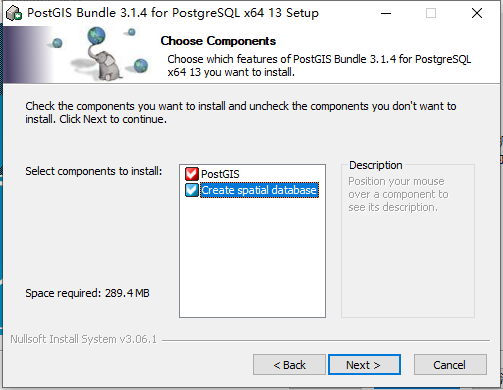
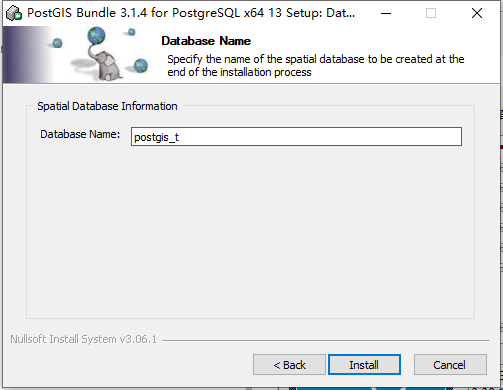
1.Windows平台下载安装 PostGIS 插件
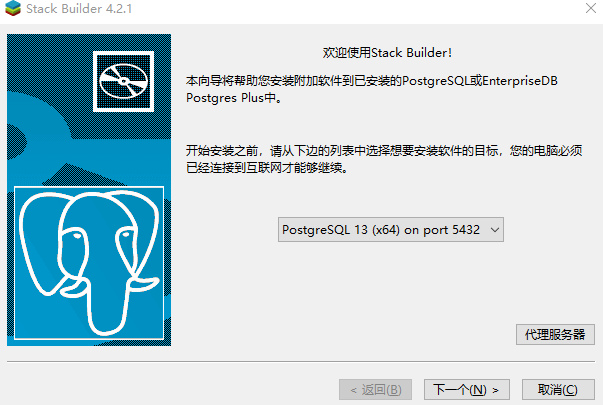
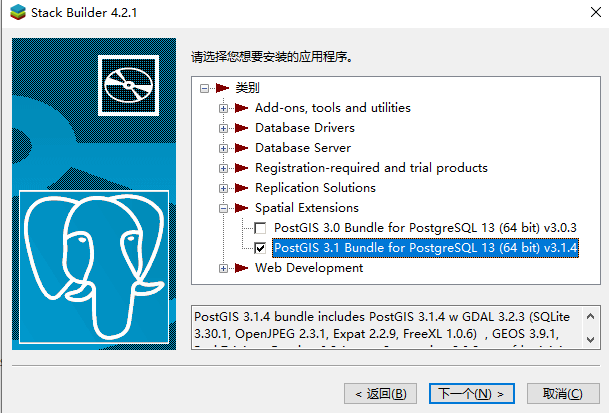
相对 Linux 平台,对于 Windows 平台的 EDB,安装 PostGIS 插件还是比较简单的,安装数据库软件完成后可以在 Stack Buider 中直接安装 PostGIS。
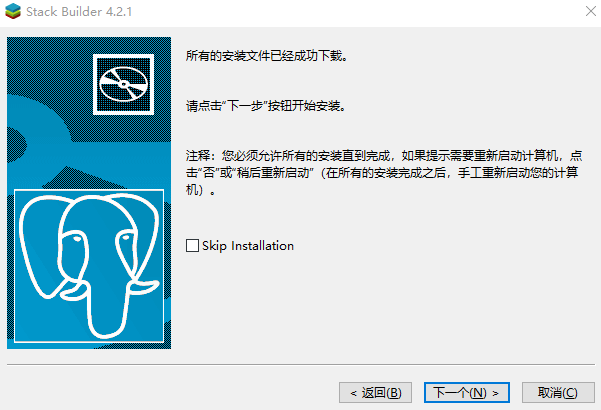
下载速度不是很快!!下载完成后直接安装。
出现对话框都点“是”,直到安装完成。
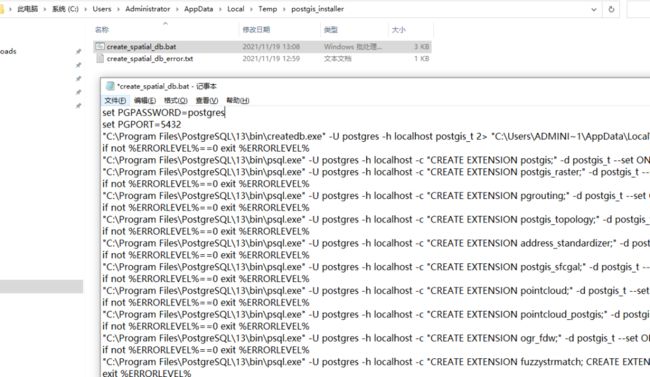
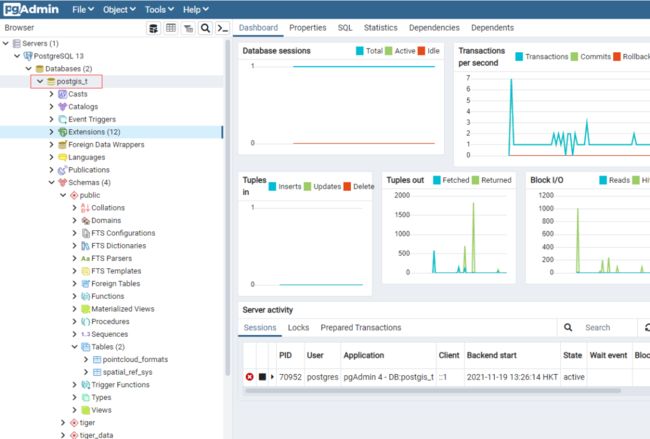
出现个小插曲,我的数据库用户密码输入错误了,可以先完成 PostGIS 插件的安装,安装完成后执行它的建库脚本就行了。
2.Linux平台下载安装 PostGIS 插件
Linux平台安装 PostGIS 插件分三种安装方式:第一种是下载源码编译安装,这种安装过程可能会比较痛苦;第二种是从 Docker 构建,我还没研究 Docker,本文不做说明,PostGIS 官网有关于 Docker 上的拉取方式 http://postgis.net/install/,最后一种是通过 pre-built packages 安装,也就是通过 yum 已经编译好的rpm包进行安装,省去了编译安装之苦。
各种操作系统的 PostGIS 的 Pre-built 二进制包分布: https://trac.osgeo.org/postgis/wiki/UsersWikiPackages
以下列出了我知道的部分平台,详细的请进入链接查看:


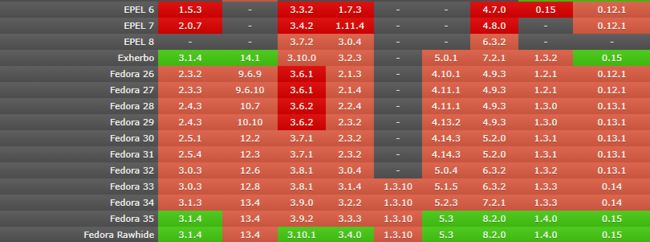

由此可见,CentOS 的系统镜像包里没有 PostGIS 软件,不能直接通过 yum rpm 包直接安装,ELEP 7 里有 PostGIS 软件,但是版本较低(2.0.7),但是根据 PostGIS 对 PostgreSQL 的兼容矩阵(https://trac.osgeo.org/postgis/wiki/UsersWikiPostgreSQLPostGIS)来看,2.0.7 版本的 PostGIS 只支持 PostgreSQL 9.1 和 9.2 版本,而对于Debian 12、Fedora 35 和 Ubuntu 22 这种系统安装 PostGIS 应该会比较轻松,而且支持的功能相对较全。
示例1:从 ELEP 7 中预编译安装 PostGIS 软件,版本 2.0.7(如果想安装较新的版本,请看下个示例)
这种方式适用于创建新环境或者现有数据库的扩展插件位置在 /usr/share/pgsql/extension,如果系统里没有通过 YUM 方式安装 PostgreSQL,yum install postgis 的同时会安装 PostgreSQL 9.2,对于已经存在 PostgreSQL 数据库的环境,只有 PostgreSQL 是 YUM 方式安装在默认位置,执行 CREATE EXTENSION postgis; 才会创建上 postgis 插件,因为 yum install postgis 安装在默认位置 /usr/share/pgsql/extension(至于 yum 安装能否指定安装路径就不晓得了,同样也不建议这样使用,以免出现意外情况),否则在数据库里执行 CREATE EXTENSION postgis; 创建插件时会提示找不到postgis.control,而通过源码编译安装的 PostgreSQL,其扩展插件的默认位置也是 /usr/share/pgsql/extension,是否能通过 yum install postgis 成功安装也不得而知,但是还是建议预编译安装方式和编译安装方式不要混用,YUM 安装的 PostgreSQL 就用 YUM 方式安装 PostGIS,源码编译安装的 PostgreSQL 就用 源码编译安装 PostGIS,关于源码安装的 PostGIS 参考下面的 示例3 。
本示例的 ELEP 选用阿里开源镜像站: http://mirrors.aliyun.com/repo/epel-7.repo
# 对于可以直接连接互联网的主机,直接下载 epel-7.repo 再 yum install postgis 即可完成安装
[root@proxy ~]# wget -O /etc/yum.repos.d/epel.repo http://mirrors.aliyun.com/repo/epel-7.repo
[root@proxy ~]# yum install postgis


# 对于内网环境又没有YUM源,可以用老方法,在外网主机上下载制作YUM源传到内网主机上进行安装
# 对于没有外网的小伙伴,可以直接使用我打包好的进行测试,链接:https://pan.baidu.com/s/1Pfho2dIDoO7HaX3CTk-sjA 提取码:lj2r
[root@proxy ~]# wget -O /etc/yum.repos.d/epel.repo http://mirrors.aliyun.com/repo/epel-7.repo
[root@proxy ~]# mkdir postgis-2.0.7-rpm
# 下载 postgis 及其依赖包
[root@proxy ~]# yum install postgis --downloadonly --downloaddir=/root/postgis-2.0.7-rpm
# 下载 制作YUM源的工具 createrepo
[root@proxy ~]# yum install http://createrepo.baseurl.org/download/createrepo-0.4.4-1.noarch.rpm -y
[root@proxy ~]# cd /root/postgis-2.0.7-rpm/
# 创建YUM源
[root@proxy postgis-2.0.7-rpm]# createrepo -v ./
# 打包
[root@proxy postgis-2.0.7-rpm]# cd ..
[root@proxy ~]# tar -zcvf /root/postgis-2.0.7-rpm.tar.gz postgis-2.0.7-rpm
# 将打好的包传输到内网主机并配置YUM安装,这里我直接使用外网主机测试
[root@proxy ~]# cd /enmo/soft
[root@proxy soft]# tar -zxvf postgis-2.0.7-rpm.tar.gz
# 配置yum源,加入以下内容
[root@proxy soft]# vi /etc/yum.repos.d/enmo.repo
[postgis]
name=postgis
baseurl=file:///enmo/soft/postgis-2.0.7-rpm
enabled=yes
gpgcheck=0


# 执行yum安装
[root@proxy ~]# yum clean all
[root@proxy ~]# yum install -y postgis


# 初始化数据库,对于已经存在 PostgreSQL 数据库的环境,可以选择忽略此步骤
[root@proxy ~]# /usr/bin/postgresql-setup initdb
Initializing database ... OK
[root@proxy ~]# systemctl enable postgresql
Created symlink from /etc/systemd/system/multi-user.target.wants/postgresql.service to /usr/lib/systemd/system/postgresql.service.
[root@proxy ~]# systemctl start postgresql


# 新建数据库,安装 PostGIS 插件,每个新建的数据库,如果想用 PostGIS 插件,必须执行以下步骤创建 PostGIS 扩展
[root@proxy ~]# su - postgres
-bash-4.2$ createdb postgis
-bash-4.2$ psql -d postgis
psql (9.2.24)
Type "help" for help.


postgis=# CREATE EXTENSION postgis;
CREATE EXTENSION
postgis=# CREATE EXTENSION postgis_topology;
CREATE EXTENSION
本示例安装的 PostGIS 和 PostgreSQL 数据库版本都比较老,而 PostgreSQL 有其自己的RPM存储库,从中可以安装较新的版本,目前最新的版本是 postgis32_13 (PostGIS 3.2.0)。
示例2:从 PostgreSQL RPM repository 中预编译安装 PostGIS 软件,版本 3.2.0
同样这种方式也只适用于创建新环境或者现有数据库的扩展插件位置在 /usr/pgsql-13/share/extension,如果系统里没有通过 YUM 方式安装 PostgreSQL,yum install postgis 的同时会安装 PostgreSQL 13.5,关于其他说明,这里不赘述,详见 示例1。
从这里能查看到 PostgreSQL 提供的RPM存储库中有哪些最新的软件包: https://yum.postgresql.org/13/redhat/rhel-7-x86_64/repoview/
# 对于可以直接连接互联网的主机,直接下载 pgdg-redhat-repo-latest.noarch.rpm 再 yum install postgis32_13 即可完成安装
# 一般安装操作系统会默认安装 PostgreSQL 9.2,建议先将其卸载掉,再安装新版本
[root@proxy ~]# yum remove postgresql*
[root@proxy ~]# yum -y install https://download.postgresql.org/pub/repos/yum/reporpms/EL-7-x86_64/pgdg-redhat-repo-latest.noarch.rpm
[root@proxy ~]# yum -y install postgis32_13


# 对于内网环境又没有YUM源,同样可以用老方法,在外网主机上下载制作YUM源传到内网主机上进行安装
# 对于没有外网的小伙伴,可以直接使用我打包好的进行测试,链接:https://pan.baidu.com/s/1OEmZM1eAiwFLNQbAYQtaxA 提取码:kqlf
[root@proxy ~]# yum remove postgresql*
[root@proxy ~]# yum -y install https://download.postgresql.org/pub/repos/yum/reporpms/EL-7-x86_64/pgdg-redhat-repo-latest.noarch.rpm
[root@proxy ~]# yum -y install postgis32_13 --downloadonly --downloaddir=/root/postgis32_13
[root@proxy ~]# yum install http://createrepo.baseurl.org/download/createrepo-0.4.4-1.noarch.rpm -y
[root@proxy ~]# cd /root/postgis32_13
# 创建YUM源
[root@proxy postgis32_13]# createrepo -v ./
# 打包
[root@proxy postgis32_13]# cd ..
[root@proxy ~]# tar -zcvf /root/postgis32_13-rpm.tar.gz postgis32_13
# 将打好的包传输到内网主机配置YUM安装,这里我直接使用外网主机测试
[root@proxy ~]# cd /enmo/soft
[root@proxy soft]# tar -zxvf postgis32_13-rpm.tar.gz
# 配置yum源,加入以下内容
[root@proxy soft]# vi /etc/yum.repos.d/enmo.repo
[postgis-32]
name=postgis
baseurl=file:///enmo/soft/postgis32_13
enabled=yes
gpgcheck=0


# 执行yum安装
[root@proxy ~]# yum clean all
[root@proxy ~]# yum -y install postgis32_13


# 初始化数据库,对于已经存在 PostgreSQL 数据库的环境,可以选择忽略此步骤
[root@proxy ~]# /usr/pgsql-13/bin/postgresql-13-setup initdb
Initializing database ... OK
[root@proxy ~]# systemctl enable postgresql-13
Created symlink from /etc/systemd/system/multi-user.target.wants/postgresql-13.service to /usr/lib/systemd/system/postgresql-13.service.
[root@proxy ~]# systemctl start postgresql-13


# 新建数据库,安装 PostGIS 插件,每个新建的数据库,如果想用 PostGIS 插件,必须执行以下步骤创建 PostGIS 扩展
[root@proxy ~]# su - postgres
Last login: Sat Nov 20 20:40:56 CST 2021 on pts/0
-bash-4.2$ createdb postgis
-bash-4.2$ psql
postgres=# CREATE EXTENSION postgis;
postgres=# CREATE EXTENSION postgis_raster;
postgres=# CREATE EXTENSION postgis_topology;
postgres=# CREATE EXTENSION address_standardizer;
postgres=# CREATE EXTENSION postgis_sfcgal;
postgres=# CREATE EXTENSION fuzzystrmatch;
postgres=# CREATE EXTENSION postgis_tiger_geocoder;
postgres=# CREATE EXTENSION address_standardizer_data_us;


postgis=# \dx
                                                                         List of installed extensions
             Name             |  Version   |   Schema   |                                                     Description
------------------------------+------------+------------+---------------------------------------------------------------------------------------------------------------------
 address_standardizer         | 3.2.0beta1 | public     | Used to parse an address into constituent elements. Generally used to support geocoding address normalization step.
 address_standardizer_data_us | 3.2.0beta1 | public     | Address Standardizer US dataset example
 fuzzystrmatch                | 1.1        | public     | determine similarities and distance between strings
 plpgsql                      | 1.0        | pg_catalog | PL/pgSQL procedural language
 postgis                      | 3.2.0beta1 | public     | PostGIS geometry and geography spatial types and functions
 postgis_raster               | 3.2.0beta1 | public     | PostGIS raster types and functions
 postgis_sfcgal               | 3.2.0beta1 | public     | PostGIS SFCGAL functions
 postgis_tiger_geocoder       | 3.2.0beta1 | tiger      | PostGIS tiger geocoder and reverse geocoder
 postgis_topology             | 3.2.0beta1 | topology   | PostGIS topology spatial types and functions
(9 rows)


# postgis32_13提供以下软件版本
PostGIS      3.2.0
PostgreSQL   13.5
GEOS         3.10.0
SFCGAL       1.3.1
GDAL         3.3.3
PROJ         7.2.1
json-c       0.11
示例3:最复杂的源码编译安装,这个安装过程比较既耗时又痛苦,比安装 Oracle RAC 还要费劲。
PostGIS 官方提出编译安装之前需要满足一些条件,这里不列出了,有需要的去官网看看吧。
PostGIS 官方的在Linux平台上源码编译安装指导: http://postgis.net/docs/postgis_installation.html#install_short_version
本次测试的 PostgreSQL 数据库环境沿用我之前测试 PostgreSQL 高可用的环境:PostgreSQL高可用测试系列之Patroni + etcd + HAProxy + Keepalived 离线部署。
安装之前建议到 PostGIS 的 WIKI 上查询一下 PostGIS 对 PostgreSQL 数据库以及 GEOS 和 GDAL 的兼容矩阵,提前规划合适的版本: https://trac.osgeo.org/postgis/wiki/UsersWikiPostgreSQLPostGIS


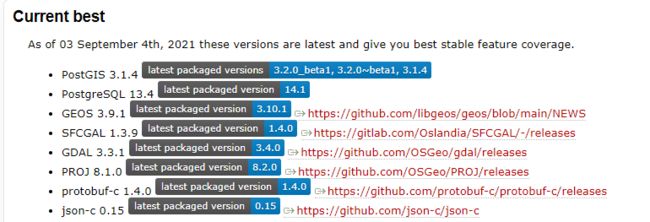
我的 PostgreSQL version 是 13 ,目前支持 PostGIS 3.0/3.1/3.2,本次测试选择 PostGIS 3.1.4,源码安装包下载地址:https://download.osgeo.org/postgis/source/postgis-3.1.4.tar.gz
而且那个WIKI的开头给出了当前最佳配置,本次测试根据这个最佳配置选择其他软件版本:
本文测试所需的所有软件包,不包含 PostgreSQL,PostgreSQL 需要提前编译安装,我安装的 PostgreSQL 13.3 版本。
| 软件包 | 版本 | 包名 | 下载地址 |
|---|---|---|---|
| GEOS | 3.9.1 | geos-3.9.1.tar.bz2 | http://download.osgeo.org/geos/geos-3.9.1.tar.bz2 |
| SFCGAL | 1.3.9 | sfcgal-v1.3.9.tar.gz | https://gitlab.com/Oslandia/SFCGAL/-/archive/v1.3.9/SFCGAL-v1.3.9.tar.gz |
| GDAL | 3.3.1 | gdal-3.3.1.tar.gz | https://github.com/OSGeo/gdal/releases/download/v3.3.1/gdal-3.3.1.tar.gz |
| Proj | 8.1.0 | proj-8.1.0.tar.gz | https://download.osgeo.org/proj/proj-8.1.0.tar.gz |
| protobuf-all | 3.19.1 | protobuf-all-3.19.1.tar.gz | https://github.com/protocolbuffers/protobuf/releases/download/v3.19.1/protobuf-all-3.19.1.tar.gz |
| protobuf-c | 1.4.0 | protobuf-c-1.4.0.tar.gz | https://github.com/protobuf-c/protobuf-c/releases/download/v1.4.0/protobuf-c-1.4.0.tar.gz |
| json-c | 0.15 | json-c-0.15-20200726.tar.gz | https://github.com/json-c/json-c/archive/refs/tags/json-c-0.15-20200726.tar.gz |
| sqlite | 3.36 | sqlite-autoconf-3360000.tar.gz | https://www.sqlite.org/2021/sqlite-autoconf-3360000.tar.gz |
| cmake | 3.16.8 | cmake-3.16.8.tar.gz | https://github.com/Kitware/CMake/releases/download/v3.16.8/cmake-3.16.8.tar.gz |
| CGAL | 4.14 | CGAL-4.14.tar.xz | https://distfiles.macports.org/cgal/cgal-4.14.tar.xz |
各个组件的简单介绍:
GEOS 官网:https://libgeos.org/ GNU Lesser General Public License (LGPL) 开源软件
GEOS 是一个 C/C++ 库,用于“地理信息系统(GIS)”软件通常使用的那种空间几何计算,GEOS 是 PostGIS、QGIS、GDAL 和 Shapely 的核心依赖项。
SFCGAL 可用于为 PostGIS 提供额外的 2D 和 3D 高级分析功能。官网:https://oslandia.gitlab.io/SFCGAL/ GNU Lesser General Public License 2+ 开源软件
SFCGAL 是一个围绕 CGAL 的 C++ 包装库,旨在支持 ISO 19107:2013 和 OGC Simple Features Access 1.2 标准模型上实现 2D 和 3D 操作。
GDAL 这是光栅支持所必需的。官网:https://gdal.org/ X/MIT 开源地理空间数据抽象库
GDAL(Geospatial Data Abstraction Library)是一个在 X/MIT 许可协议下的开源栅格和矢量地理空间数据转换库。它利用抽象数据模型来表达所支持的各种文件格式。它还有一系列命令行工具来进行数据转换和处理。
Proj 在 PostGIS 中提供坐标重投影功能。 官网:https://proj.org/ X/MIT 开源软件
PROJ 是一种通用坐标转换软件,可将地理空间坐标从一个坐标参考系统 (CRS) 转换为另一个,包括制图投影以及大地测量变换。
protobuf-c Google 的数据交换格式的 C 语言实现 BSD-2-Clause 开源软件
protobuf(Google Protocol Buffers) 是Google提供的一种轻便高效的结构化数据存储格式,可以用于结构化数据串行化,或者说序列化。它很适合做数据存储或 RPC 数据交换格式。可用于通讯协议、数据存储等领域的语言无关、平台无关、可扩展的序列化结构数据格式(类似Json),但相比于Json,Protobuf有更高的转化效率,时间效率和空间效率都是JSON的3-5倍。
protobuf-c,Google Protocol Buffers 数据序列化格式的 C 语言实现。它包括 libprotobuf-c,一个实现 protobuf 编码和解码的纯 C 库,以及 protoc-c,一个代码生成器,将 Protocol Buffer .proto 文件转换为 C 描述符代码,基于原始 protoc。protobuf-c 以前包含一个 RPC 实现;该代码已拆分为 protobuf-c-rpc 项目。
json-c 一个用于c语言的json解析库,目前用于通过函数 ST_GeomFromGeoJson 导入 GeoJSON。
LibXML2 目前用于导入 ST_GeomFromGML 和 ST_GeomFromKML 函数。
CGAL 官网:https://www.cgal.org/ 开源,但是应该尤其自己的开源规则
CGAL 是一个软件,它以 C++ 库的形式提供对高效可靠几何算法的轻松访问。 CGAL 用于需要几何计算的各个领域,例如地理信息系统、计算机辅助设计、分子生物学、医学成像、计算机图形学和机器人技术。
该库提供数据结构和算法,如三角剖分、Voronoi 图、多边形和多面体的布尔运算、点集处理、曲线排列、曲面和体积网格生成、几何处理、alpha 形状、凸包算法、形状重建、AABB 和 KD 树…
开始安装,我的环境是 PostgreSQL 高可用,需要在所有节点编译安装以下软件。
# yum 安装依赖包
[root@pgtest1 ~]# yum -y install libxml2 libxml2-devel libtiff libtiff-devel curl libcurl-devel sqlite-devel boost-devel gmp-devel mpfr-devel gcc gcc-c++ make
# 解压所需软件集合包,有需要的可以直接下载使用:链接:https://pan.baidu.com/s/1mJY4v6Gpw7lkqffrXzjJPQ 提取码:iqt8
[root@pgtest1 ~]# cd /enmo/soft/
[root@pgtest1 soft]# tar -xvf PostGIS-3.1.4-x86_64.tar.gz
# 编译安装 GEOS
[root@pgtest1 soft]# tar -xvf geos-3.9.1.tar.bz2
[root@pgtest1 soft]# cd geos-3.9.1
[root@pgtest1 geos-3.9.1]# ./configure
[root@pgtest1 geos-3.9.1]# make
[root@pgtest1 geos-3.9.1]# make install
# 编译安装 sqlite,这个是 proj 和 gdal 的依赖软件
[root@pgtest1 ~]# cd /enmo/soft/
[root@pgtest1 soft]# tar -zxvf sqlite-autoconf-3360000.tar.gz
[root@pgtest1 soft]# cd sqlite-autoconf-3360000
# 编译安装之前建议修改以下配置添加 SQLITE_ENABLE_COLUMN_METADATA,
# 不然安装 gdal 的 make 时会报错 libgdal.so: undefined reference to `sqlite3_column_origin_name' `sqlite3_column_table_name'
# https://www.cnblogs.com/xuanmanstein/p/13227545.html
[root@pgtest1 sqlite-autoconf-3360000]# sed -i '25i #define SQLITE_ENABLE_COLUMN_METADATA 1' sqlite3.c
[root@pgtest1 sqlite-autoconf-3360000]# ./configure
[root@pgtest1 sqlite-autoconf-3360000]# make
[root@pgtest1 sqlite-autoconf-3360000]# make install
# 编译安装 PROJ
[root@pgtest1 ~]# export PKG_CONFIG_PATH=/usr/local/lib/pkgconfig
[root@pgtest1 ~]# cd /enmo/soft/
[root@pgtest1 soft]# tar -zxvf proj-8.1.0.tar.gz
[root@pgtest1 soft]# cd proj-8.1.0
[root@pgtest1 geos-3.9.1]# ./configure
[root@pgtest1 geos-3.9.1]# make
[root@pgtest1 geos-3.9.1]# make install
# 编译安装 GDAL
[root@pgtest1 ~]# cd /enmo/soft/
[root@pgtest1 soft]# tar -zxvf gdal-3.3.1.tar.gz
[root@pgtest1 soft]# cd gdal-3.3.1
[root@pgtest1 gdal-3.3.1]# ./configure
[root@pgtest1 gdal-3.3.1]# make  # 时间比较长
[root@pgtest1 gdal-3.3.1]# make install
# 编译安装 protobuf ,以为 protobuf-c 是 protobuf 的C语言实现,所有要先安装 protobuf
[root@pgtest1 ~]# cd /enmo/soft/
[root@pgtest1 soft]# tar -zxvf protobuf-all-3.19.1.tar.gz
[root@pgtest1 soft]# cd protobuf-3.19.1
[root@pgtest1 protobuf-3.19.1]# ./configure
[root@pgtest1 protobuf-3.19.1]# make
[root@pgtest1 protobuf-3.19.1]# make install
# 编译安装 protobuf-c
[root@pgtest1 ~]# cd /enmo/soft/
[root@pgtest1 soft]# tar -zxvf protobuf-c-1.4.0.tar.gz
[root@pgtest1 soft]# cd protobuf-c-1.4.0
[root@pgtest1 protobuf-c-1.4.0]# ./configure
[root@pgtest1 protobuf-c-1.4.0]# make
[root@pgtest1 protobuf-c-1.4.0]# make install
# 需要使用 cmake 安装 SFCGAL CGAL SFCGAL json-c
[root@pgtest1 ~]# cd /enmo/soft/
[root@pgtest1 soft]# tar -zxvf cmake-3.16.8.tar.gz
[root@pgtest1 soft]# cd cmake-3.16.8
[root@pgtest1 cmake-3.16.8]# ./configure
[root@pgtest1 cmake-3.16.8]# gmake
[root@pgtest1 cmake-3.16.8]# gmake install
# SFCGAL需要依赖 Boost、CGAL、GMP、MPFR 这四个软件,Boost 、GMP 和 MPFR 已经用 YUM 解决
# 编译安装 SFCGAL 的依赖 CGAL
[root@pgtest1 ~]# cd /enmo/soft/
[root@pgtest1 soft]# tar -xvf cgal-4.14.tar.xz
[root@pgtest1 soft]# cd CGAL-4.14
[root@pgtest1 CGAL-4.14]# cmake -DCMAKE_BUILD_TYPE=Release .
[root@pgtest1 CGAL-4.14]# make
[root@pgtest1 CGAL-4.14]# make install
# 编译安装 SFCGAL
[root@pgtest1 ~]# cd /enmo/soft/
[root@pgtest1 soft]# tar -zxvf sfcgal-v1.3.9.tar.gz
[root@pgtest1 soft]# cd SFCGAL-v1.3.9
[root@pgtest1 SFCGAL-v1.3.9]# cmake -DCMAKE_BUILD_TYPE=Release .
[root@pgtest1 SFCGAL-v1.3.9]# make
[root@pgtest1 SFCGAL-v1.3.9]# make install
# 编译安装 json-c
[root@pgtest1 ~]# cd /enmo/soft/
[root@pgtest1 soft]# tar -zxvf json-c-0.15-20200726.tar.gz
[root@pgtest1 soft]# cd json-c-json-c-0.15-20200726
[root@pgtest1 json-c-json-c-0.15-20200726]# cmake -DCMAKE_BUILD_TYPE=Release .
[root@pgtest1 json-c-json-c-0.15-20200726]# make
[root@pgtest1 json-c-json-c-0.15-20200726]# make install
# 最后编译安装 PostGIS
[root@pgtest1 ~]# cd /enmo/soft/
[root@pgtest1 soft]# tar -zxvf postgis-3.1.4.tar.gz
[root@pgtest1 soft]# cd postgis-3.1.4
[root@pgtest1 postgis-3.1.4]# ./configure \
--with-pgconfig=/enmo/app/pg13/13.3/bin/pg_config \
--with-gdalconfig=/usr/local/bin/gdal-config \
--with-geosconfig=/usr/local/bin/geos-config \
--with-xml2config=/usr/bin/xml2-config \
--with-sfcgal=/usr/local/bin/sfcgal-config \
--without-protobuf
[root@pgtest1 postgis-3.1.4]# make
[root@pgtest1 postgis-3.1.4]# make install


# 建库创建扩展,主节点操作即可
[root@pgtest1 ~]# createdb postgis
[root@pgtest1 ~]# psql -d postgis


postgres=# CREATE EXTENSION postgis;
postgres=# CREATE EXTENSION postgis_raster;
postgres=# CREATE EXTENSION postgis_topology;
postgres=# CREATE EXTENSION address_standardizer;
postgres=# CREATE EXTENSION postgis_sfcgal;
postgres=# CREATE EXTENSION fuzzystrmatch;
postgres=# CREATE EXTENSION postgis_tiger_geocoder;
postgres=# CREATE EXTENSION address_standardizer_data_us;


# 创建扩展可能会报错以下错误,原因是找不到 libgeos_c.so.1 和 libSFCGAL.so.1
postgis=# CREATE EXTENSION postgis;
ERROR:  could not load library "/enmo/app/pg13/13.3/lib/postgis-3.so": libgeos_c.so.1: cannot open shared object file: No such file or directory


postgis=# CREATE EXTENSION postgis;
ERROR:  could not load library "/enmo/app/pg13/13.3/lib/postgis-3.so": libSFCGAL.so.1: cannot open shared object file: No such file or directory


# find / -name libgeos_c.so.1  找到路径后写进 /etc/ld.so.conf 就可以了
[root@pgtest1 ~]# echo "/enmo/app/pgsql/13.3/lib" >> /etc/ld.so.conf
[root@pgtest1 ~]# echo "/usr/local/lib" >> /etc/ld.so.conf
[root@pgtest1 ~]# echo "/usr/local/lib64" >> /etc/ld.so.conf
[root@pgtest1 ~]# ldconfig


# 主节点创建扩展完成后,从节点自动同步
[root@pgtest2 ~]# psql -d postgis
psql (13.3)
Type "help" for help.


postgis=# \dx
                                                                       List of installed extensions
             Name             | Version |   Schema   |                                                     Description
------------------------------+---------+------------+---------------------------------------------------------------------------------------------------------------------
 address_standardizer         | 3.1.4   | public     | Used to parse an address into constituent elements. Generally used to support geocoding address normalization step.
 address_standardizer_data_us | 3.1.4   | public     | Address Standardizer US dataset example
 fuzzystrmatch                | 1.1     | public     | determine similarities and distance between strings
 plpgsql                      | 1.0     | pg_catalog | PL/pgSQL procedural language
 postgis                      | 3.1.4   | public     | PostGIS geometry and geography spatial types and functions
 postgis_raster               | 3.1.4   | public     | PostGIS raster types and functions
 postgis_sfcgal               | 3.1.4   | public     | PostGIS SFCGAL functions
 postgis_tiger_geocoder       | 3.1.4   | tiger      | PostGIS tiger geocoder and reverse geocoder
 postgis_topology             | 3.1.4   | topology   | PostGIS topology spatial types and functions
(9 rows)
至此,PostGIS 编译安装完成,下面用 QGIS 做个简单的测试,详细的测试过程见下章节。
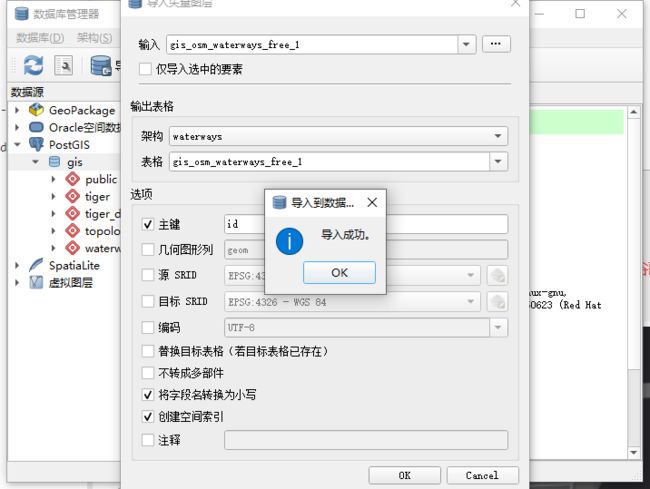
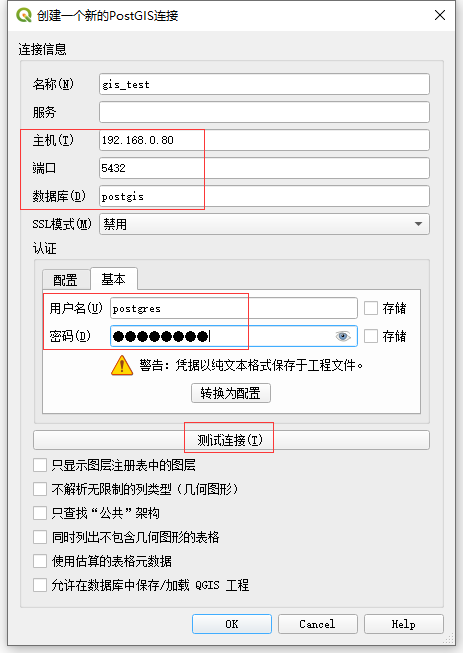
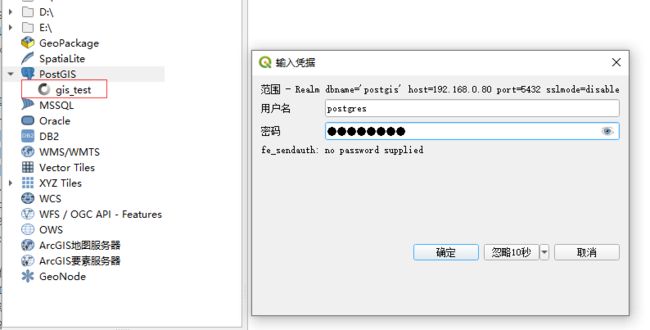
QGIS 使用 VIP + 5000 读写端口连接数据库成功。
QGIS 导入数据成功。
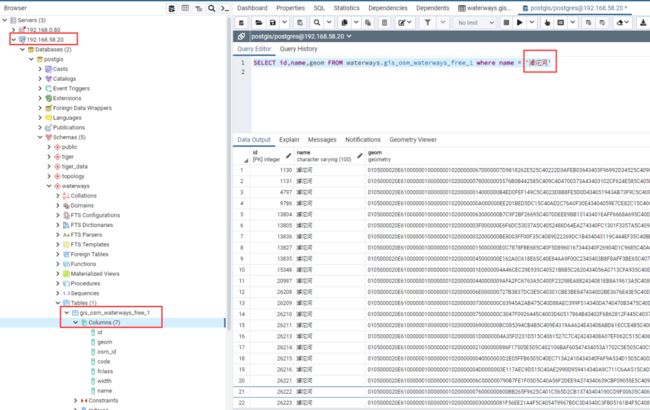
pgAdmin 查询导入的数据成功。
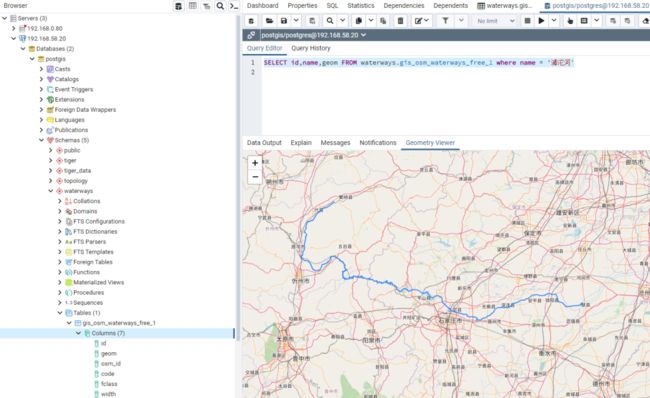
数据显示正常。
3.使用 QGIS 连接 PostGIS 数据库
QGIS 连接 PostGIS 数据库之前要先确定 PostgreSQL 数据库可供外界访问:
-bash-4.2$ psql
postgres=# ALTER USER postgres WITH PASSWORD 'postgres';
-bash-4.2$ cd $PGDATA
-bash-4.2$ vi pg_hba.conf
# IPv4 local connections:
host    all             all             127.0.0.1/32            scram-sha-256
host    all             all             192.168.0.0/24          scram-sha-256
-bash-4.2$ vi postgresql.conf
listen_addresses = '*'
[root@pgtest1 ~]# systemctl stop postgresql-13
[root@pgtest1 ~]# systemctl start postgresql-13
4.使用 QGIS 将 Shapefiles 文件的数据导入到 PostGIS 中
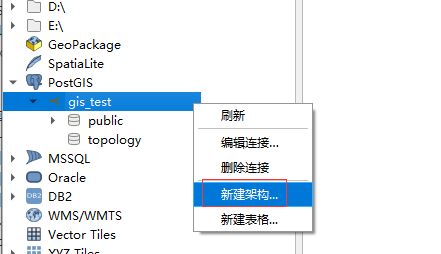


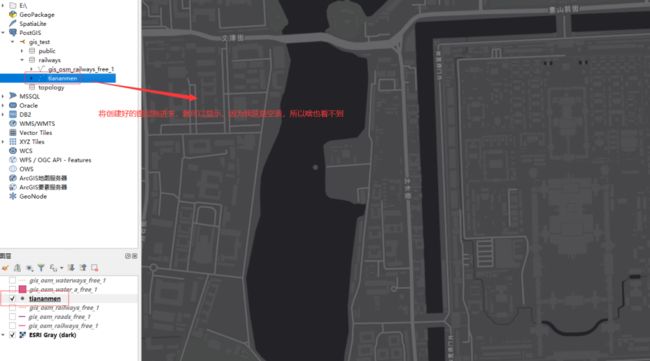
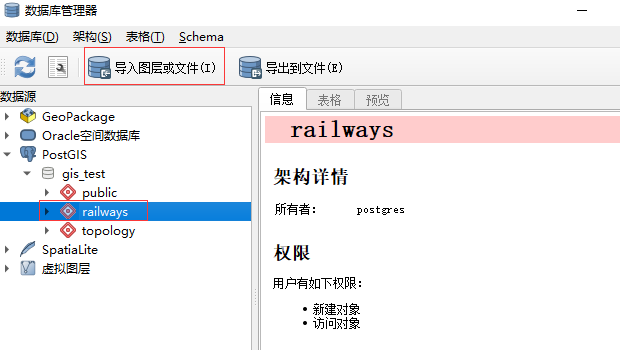
选中要导入到的 Schema,点击 导入图层或文件。
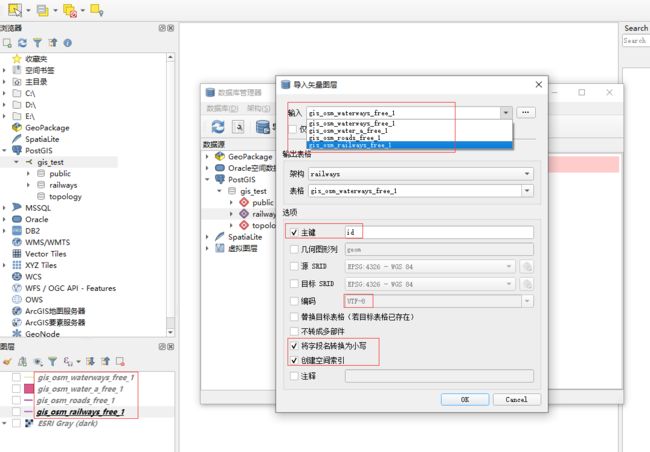
选择要导入的图层文件,因为我在左下角图层中已经打开了4个图层,所以这里会默认显示这4个,如果没有在QGIS中打开图层,可以点击后面的3个点去选择要导入的文件。
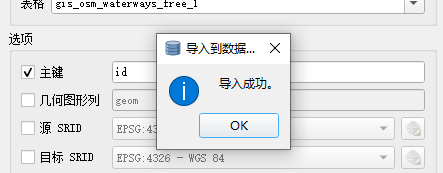
导入时建议勾选下面3项,并注意字符编码,然后点击 OK ,就能听到我的主机风扇在疯狂的转动,说明开始导入了,最后提示导入成功。
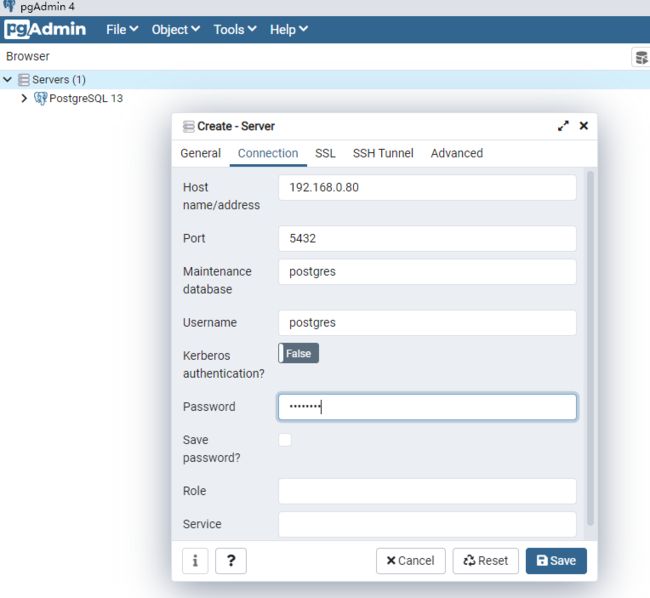
使用 pgAdmin 连接数据库查看导入的数据。
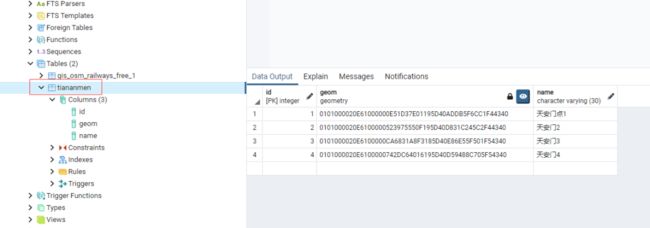
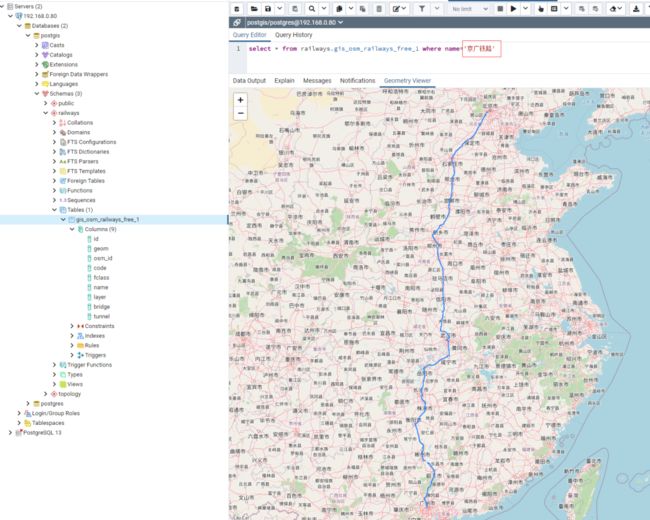
可以查询到导入进来的数据,其中geom字段就是存储几何图形数据的字段。
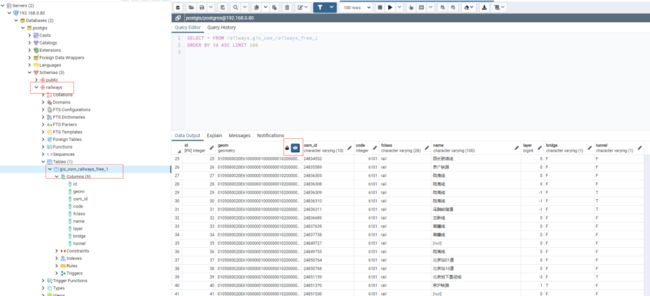
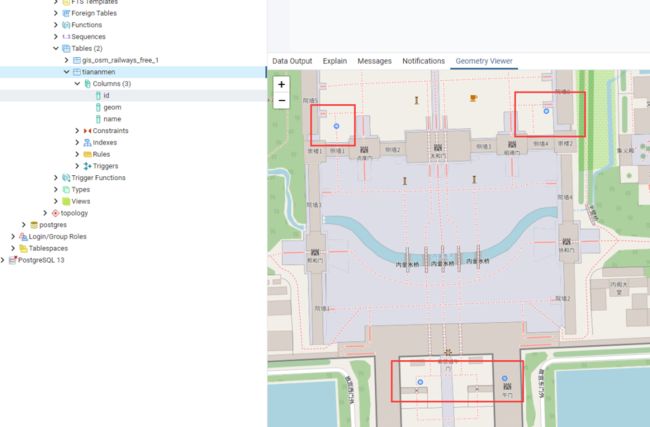
全选 geom 列,点击 geom 字段上蓝色的小眼睛图标,就可以直接浏览这些数据,比如我要查询 京广铁路。
pgAdmin 不用 GIS 软件就可以显示要查询的数据在哪。
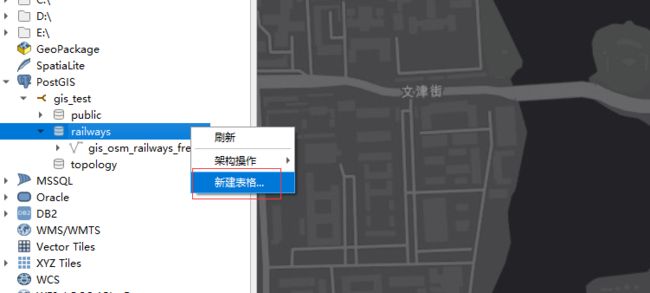
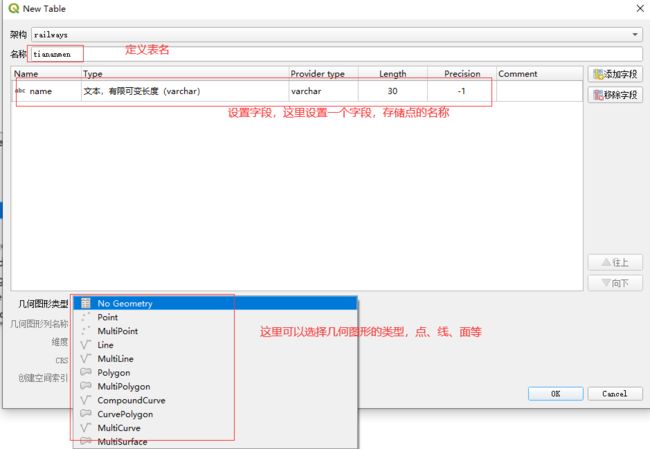
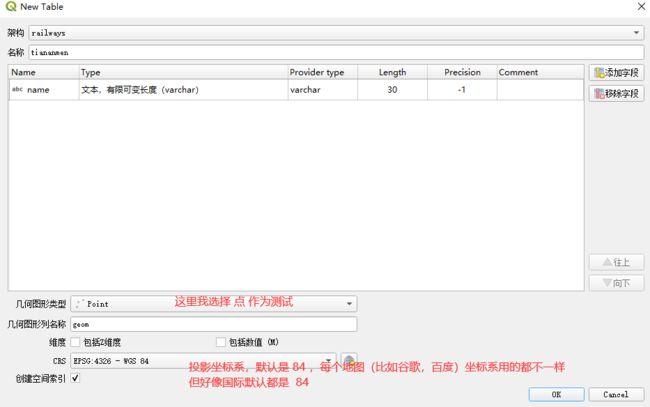
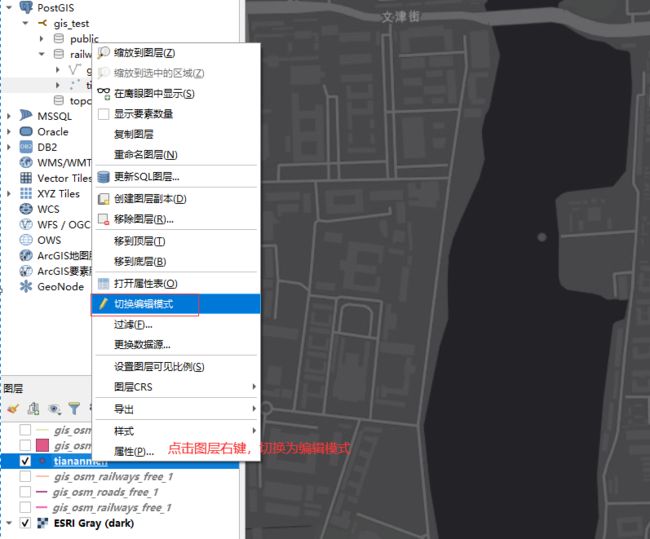
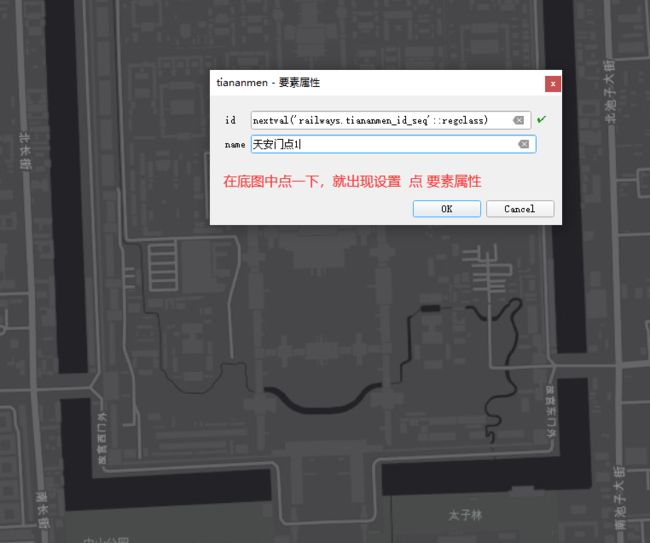
5.使用 QGIS 编辑 PostGIS 数据库
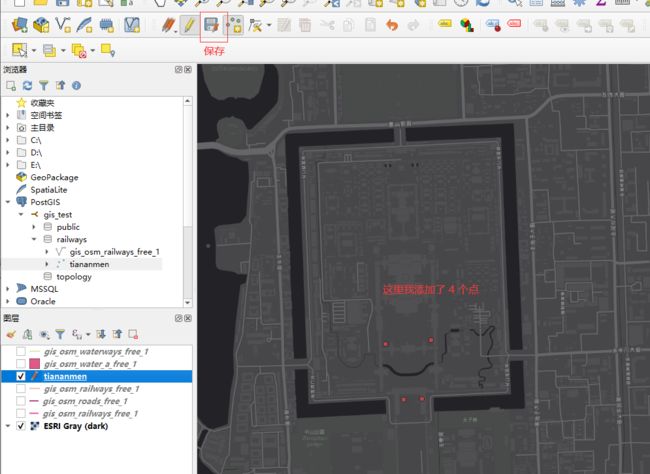
再次查询数据库,就可以查询到我新建的表和创建的 点 要素。
同样点击 geom 字段上蓝色的小眼睛图标,可以在地图上浏览到我点击的 点 要素。
墨天轮原文链接:https://www.modb.pro/db/172815?sjhy(复制到浏览器或者点击“阅读原文”立即查看)
关于作者
张玉龙,云和恩墨交付技术顾问,长期服务于移动运营商客户,从事Oracle和PostgreSQL的技术服务工作,拥有RHCE、PGCA、OBCA、TDSQL等证书,热衷于PostgreSQL数据库产品的研究。
END
更多数据库行业相关内容,欢迎光临 2021 数据技术嘉年华 :https://www.modb.pro/dtc2021(扫描下方二维码免费领取大会门票)
推荐阅读:267页!2020年度数据库技术年刊
推荐下载:2020数据技术嘉年华PPT下载
2020数据技术嘉年华近50个PPT下载、视频回放已上传墨天轮平台,可在“数据和云”公众号回复关键词“2020DTC”获得!
你知道吗?我们的视频号里已经发布了很多精彩的内容,快去看看吧!↓↓↓
点击下图查看更多 ↓
云和恩墨大讲堂 | 一个分享交流的地方
长按,识别二维码,加入万人交流社群
请备注:云和恩墨大讲堂
点个“在看”
你的喜欢会被看到❤

