YOLOv5部署到web端(flask+js简单易懂)
文章目录
- 前言
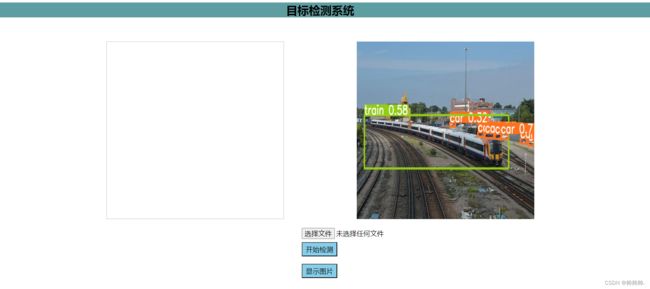
- 最终实现效果图
- 后端实现
-
- 主界面
- 检测函数+检测结果显示
- 前端实现
-
- 主界面(index.html)+显示图片界面
- 总结
前言
最近,老板让写一个程序把yolov5检测模型部署到web端,在网页直接进行目标检测。经过1个星期的努力,终于实现基本功能(累晕了)。网上查阅了很多资料,发现很多的技术比较复杂,当然他们的页面都比较漂亮,然后我打算自己写一篇简单记录一下哈哈。进入正题,该项目完全由Python的轻量级web框架flask完成,其实有一点js代码,简单易懂
最终实现效果图
检测结果显示:
哈哈 可以看到检测结果还是可以的
后端实现
首先,写了二个路由函数,分别是主界面、检测函数结果显示。如下所示
主界面
# 定义路由
@app.route('/', methods=['GET', 'POST'])
def upload():
    if request.method == 'POST':  #post是一种请求方式
        # 从表单中获取上传的文件
        f = request.files['file']  #request.files 函数作用就是获取前端名为 'file'的文件信息
        global filename  # 定义全局变量,方便其他地方调用filename,如果不定义全局变量,其他地方无法调用
        filename = f.filename  # 获取前端上传图片名字
        global file_path  #同理,定义全局变量

        # 将文件保存到服务器本地
        file_path = os.path.join(os.getcwd(), filename)  #本地路径+图片名字= 文件路径(file-path)

        print(file_path)  # 当时只是为了测试程序
        f.save(file_path)  # 保存上传的图片到本地目录下,方便后续推理,直接找到图片
        # 返回文件路径
        # return file_path

        #进行检测
        opt = parse_opt()
        main(opt)
    return render_template('index.html')
检测函数+检测结果显示
# 检测结果显示
def return_img_stream(img_local_path):
    """
    工具函数:
    获取本地图片流
    :param img_local_path:文件单张图片的本地绝对路径
    :return: 图片流
    """
    import base64
    img_stream = ''
    with open(img_local_path, 'rb') as img_f:
        img_stream = img_f.read()
        img_stream = base64.b64encode(img_stream).decode()
    return img_stream

@app.route('/sh', methods=['GET', 'POST'])  #定义新路由,显示图片
def hello_world():
    #图片路径,推理完之后,默认保存的就是runs\\detect\\exp,这里加上filename,是变成完整的图片路径,然后才能获取显示
    img_path = 'runs\\detect\\exp\\' + str(filename)
    img_stream = return_img_stream(img_path) #获取图片流
    return render_template('index.html', img_stream=img_stream)
最后,我把detect文件中的函数,parse_out函数直接放到app.py文件中了,因为这样传递图片路径比较方便。其中的main函数直接是调用的detect文件,如下所示:
# 检测图片的

def parse_opt():
    parser = argparse.ArgumentParser()
    parser.add_argument('--weights', nargs='+', type=str, default= 'yolov5s.pt', help='model path or triton URL')
    #parser.add_argument('--source', type=str, default=0, help='file/dir/URL/glob/screen/0(webcam)')
    parser.add_argument('--source', type=str, default= file_path, help='file/dir/URL/glob/screen/0(webcam)')
    parser.add_argument('--data', type=str, default= 'models/yolov5s.yaml', help='(optional) dataset.yaml path')
    parser.add_argument('--imgsz', '--img', '--img-size', nargs='+', type=int, default=[640], help='inference size h,w')
    parser.add_argument('--conf-thres', type=float, default=0.25, help='confidence threshold')
    parser.add_argument('--iou-thres', type=float, default=0.45, help='NMS IoU threshold')
    parser.add_argument('--max-det', type=int, default=1000, help='maximum detections per image')
    parser.add_argument('--device', default='', help='cuda device, i.e. 0 or 0,1,2,3 or cpu')
    parser.add_argument('--project', default= 'runs/detect', help='save results to project/name')
    parser.add_argument('--name', default='exp', help='save results to project/name')
    parser.add_argument('--exist-ok', action='store_true', help='existing project/name ok, do not increment')
    parser.add_argument('--vid-stride', type=int, default=1, help='video frame-rate stride')
    opt = parser.parse_args()
    opt.imgsz *= 2 if len(opt.imgsz) == 1 else 1  # expand
    #print_args(vars(opt))
    args = parser.parse_args(args=[])
    print(args)
    return opt
到这里,后端实现就基本写完了。接下来,看看前端页面 很简单,我都不好意思写
前端实现
主要就两个页面,分别是主页面index1.html和showimage.html。
主界面(index.html)+显示图片界面
index1.html就是主界面,显示的一些操作按钮。代码如下:
DOCTYPE html>
<html lang="en">
  <head>
    <title>目标检测系统title>
    <script src="https://cdn.bootcdn.net/ajax/libs/jquery/3.6.0/jquery.min.js">script>

  head>
  <body>
    <h2 id="title">目标检测系统h2>
    <br />
    <br />
    <img id="imageDisplay" width="500" height="500" />
    <img id="result_show" src="data:;base64,{{ img_stream }}">
    <br />
    <form method="POST" enctype="multipart/form-data">
      <br />
      <input type="file" id="imageFile" onchange="displayImage()"
         type="file" name="file">
        <br />
        <input id=button_detect  type="submit" value="开始检测">
    form>
    <br />
    <div id="imagePath">div>
    <script>
        function displayImage() {
            var fileInput = document.getElementById("imageFile");
            var imagePath = document.getElementById("imagePath");
            var imageDisplay = document.getElementById("imageDisplay");
            var file = fileInput.files[0];
            var reader = new FileReader();
            reader.readAsDataURL(file);
            reader.onload = function (e) {
              //imagePath.innerHTML = "Image Path: " + fileInput.value;
              imageDisplay.src = e.target.result;
            };
      }

      function Show() {
              var img = document.getElementById('img');
              img.src = '/sh';
          }
    script>

      <a href="http://127.0.0.1:5000/sh">
          <button id="button_show" onclick="Show()">显示图片button>
      a>

  body>
  <style>
    #title{
    text-align: center;
    color: black;
    font-size: xx-large;
    background-color: cadetblue;
}
    #imageDisplay{
        margin-left: 350px;
        position: relative;
    }
    #button_detect{
      width: 100px;
      height: 40px;
      background-color: skyblue;
      font-size: larger;
      margin-left: 900px;
      margin-top: auto;
    }
    #button_show{
      width: 100px;
      height: 40px;
      background-color: skyblue;
      font-size: larger;
      margin-left:900px;
      margin-top: auto;
    }
    #imageFile{
      width: 300px;
      height: 40px;
      background-color:white;
      font-size: larger;
      margin-left:900px;
      margin-top: auto;
    }
    #result_show{
      height: 500px;
      width: 500px;
      margin-left: 200px;

    }
  style>
html>
总结
写的比较潦草,代码的功能不难理解,相对比较基础。有什么问题可以在评论直接问。然后就是代码基本上都放上来了,可以直接复制然后用。
5.22 更新了一下代码
- 更加简洁了,没有那么多繁琐的步骤
- 加了一点点样式,增加了一些代码注释(不少人私信问我一些代码问题,之前忘记写了,不好意思)
- 然后大家可以根据自己的需要进行改进
·······························
如果觉得有用,就点点赞哈哈
我看代码需要的同学比较多,我直接把代码上传到github了,就不一个个私发你们了。
大家帮我点点赞或关注哈哈哈,然后自己下载吧
源码链接:https://github.com/Jss666/yolo_web

