导出符号表和字符设备驱动
目录
1. 导出符号表
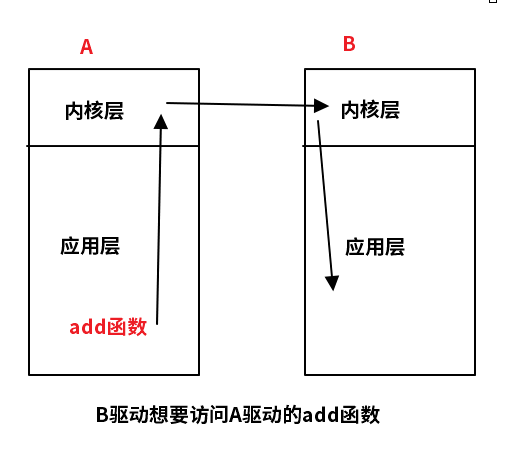
1.1. 应用场景:驱动B想要使用驱动A的函数
1.2. 函数解析
1.3. 撰写提供者.c文件
1.4. 撰写提供者makefile文件
1.5. 执行makefile文件生成Module.symvers
1.6. 撰写调用者.c文件
1.7. 撰写调用者的makefile
1.8. 调用验证
2. 字符设备驱动(重点)
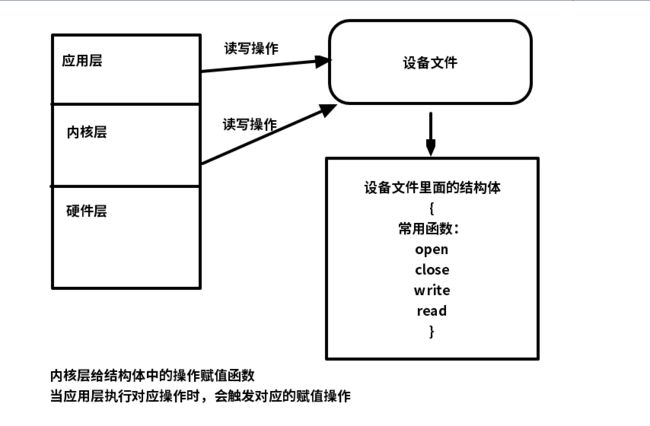
2.1. 应用场景:通过应用层读写设备驱动触发内核层操作
2.2. 函数解析
2.3. 撰写驱动.c文件
2.4. 撰写驱动.c的makefile文件
2.5. 执行make命令
2.6. 光有驱动是不行的,需要撰写应用层的.c文件
2.7. 手动创建设备文件
1. 导出符号表
1.1. 应用场景:驱动B想要使用驱动A的函数
1.2. 函数解析
函数原型:EXPORT_SYMBOL_GPL(FUNCTION NAME);
功能:导出符号表函数
参数:
	FUNCTION NAME 需要导出的函数名
1.3. 撰写提供者.c文件
hello.c
#include
#include
#include
//撰写提供函数
int add(int a,int b)
{
	return (a+b);
}
//使用导出符号表函数
EXPORT_SYMBOL_GPL(add);
static int __init hello_init(void)
{
return 0;
}
static void __exit hello_exit(void)
{
}
module_init(hello_init);
module_exit(hello_exit);
MODULE_LICENSE("GPL");
1.4. 撰写提供者makefile文件
hello文件的Makefile
KERNELDIR:=/lib/modules/$(shell uname -r)/build
#KERNELDIR:=/home/hq/temp/kernel-3.4.39/
PWD:=$(shell pwd)
all:
	make -C $(KERNELDIR) M=$(PWD) modules
clean:
	make -C $(KERNELDIR) M=$(PWD) clean
obj-m:=add.o
1.5. 执行makefile文件生成Module.symvers
执行make命令
我们可以看到在生成一个
vi Module.symvers 使用vi命令我们可以看到文件信息
第一个参数是add的函数的地址
1.6. 撰写调用者.c文件
add.c
#include
#include
#include
extern int add(int a,int b);//外部引用

static int __init hello_init(void)
{
return 0;
}

static void __exit hello_exit(void)
{
//此处调用了add函数
printk("add函数调用:%d\n",add(10,20));
}

module_init(hello_init);
module_exit(hello_exit);
MODULE_LICENSE("GPL");
1.7. 撰写调用者的makefile
add文件的Makefile
KERNELDIR:=/lib/modules/$(shell uname -r)/build
#KERNELDIR:=/home/hq/temp/kernel-3.4.39/
PWD:=$(shell pwd)
all:
	make -C $(KERNELDIR) M=$(PWD) modules
clean:
	make -C $(KERNELDIR) M=$(PWD) clean
obj-m:=add.o
1.8. 调用验证
验证分析:分析hello.c源代码得出拆卸hello.ko文件会调用add函数
》1.安装add.ko(提供者)文件
若是不安装add.ko文件在安装hello.ko时候会出现add.o未定义的情况
》2.安装hello.ko(调用者)文件
》3.根据分析拆卸会调用add函数
2. 字符设备驱动(重点)
2.1. 应用场景:通过应用层读写设备驱动触发内核层操作
2.2. 函数解析
》1.函数原型:int register_chrdev(unsigned int major, const char *name,const struct file_operations *fops)
函数功能:注册一个字符设备驱动
参数:
	major:主设备号	大于0为此设备号 等于0为默认分配设备号
	name: 设备名字
	fops:  操作方法的结构体
返回值:
	由major决定
    major>0,成功返回0,失败返回错误码(负数)
    major=0,成功返回主设备号,失败返回错误码
》2.函数原型:void unregister_chrdev(unsigned int major, const char *name)
函数功能:注销一个字符设备驱动
参数:
	major:主设备号
	name: 设备名字
	无返回值
关于fops结构体,我们只用到几个就可
struct file_operations {
	struct module *owner;
	loff_t (*llseek) (struct file *, loff_t, int);
	ssize_t (*read) (struct file *, char __user *, size_t, loff_t *);
	ssize_t (*write) (struct file *, const char __user *, size_t, loff_t *);
	ssize_t (*aio_read) (struct kiocb *, const struct iovec *, unsigned long, loff_t);
	ssize_t (*aio_write) (struct kiocb *, const struct iovec *, unsigned long, loff_t);
	int (*readdir) (struct file *, void *, filldir_t);
	unsigned int (*poll) (struct file *, struct poll_table_struct *);
	long (*unlocked_ioctl) (struct file *, unsigned int, unsigned long);
	long (*compat_ioctl) (struct file *, unsigned int, unsigned long);
	int (*mmap) (struct file *, struct vm_area_struct *);
	int (*open) (struct inode *, struct file *);
	int (*flush) (struct file *, fl_owner_t id);
	int (*release) (struct inode *, struct file *);
	int (*fsync) (struct file *, loff_t, loff_t, int datasync);
	int (*aio_fsync) (struct kiocb *, int datasync);
	int (*fasync) (int, struct file *, int);
	int (*lock) (struct file *, int, struct file_lock *);
	ssize_t (*sendpage) (struct file *, struct page *, int, size_t, loff_t *, int);
	unsigned long (*get_unmapped_area)(struct file *, unsigned long, unsigned long, unsigned long, unsigned long);
	int (*check_flags)(int);
	int (*flock) (struct file *, int, struct file_lock *);
	ssize_t (*splice_write)(struct pipe_inode_info *, struct file *, loff_t *, size_t, unsigned int);
	ssize_t (*splice_read)(struct file *, loff_t *, struct pipe_inode_info *, size_t, unsigned int);
	int (*setlease)(struct file *, long, struct file_lock **);
	long (*fallocate)(struct file *file, int mode, loff_t offset,
			  loff_t len);
};
2.3. 撰写驱动.c文件
//写一个字符设备驱动
#include
#include
#include
#include  //不要忘记添加头文件

unsigned int major =0; //主设备号
#define NAME "hello"//定义设备文件名

//2.填充函数和结构体
//定义read函数
ssize_t mycdev_read (struct file *file, char __user *ubuf, size_t size, loff_t * offs)
{
printk("hello read\n");
return 0;
}
//定义写函数
ssize_t mycdev_write (struct file *file, const char __user *ubuf, size_t size, loff_t *offs)
{
printk("hello write\n");
return 0;
}
//定义打开函数
int mycdev_open(struct inode *inode, struct file *file)
{
printk("hello open\n");
return 0;
}
//定义关闭函数
int mycdev_release (struct inode *inode, struct file *file)
{
printk("hello close\n");
return 0;
}

//填充设备文件结构体
struct file_operations fops={
.open=mycdev_open,
.write=mycdev_write,
.release=mycdev_release,
.read=mycdev_read,
};

static int __init hello_init(void)
{

//1.注册设备

major= register_chrdev(major, NAME, &fops);
if(major<0)
{
printk("register_chrdev error\n");
return major; //出错的话major为负值
}

return 0;
}

static void __exit hello_exit(void)
{
//3.拆卸的时候注销设备
unregister_chrdev(major, NAME);

}
module_init(hello_init);
module_exit(hello_exit);
MODULE_LICENSE("GPL");
2.4. 撰写驱动.c的makefile文件
KERNELDIR:=/lib/modules/$(shell uname -r)/build
#KERNELDIR:=/home/hq/temp/kernel-3.4.39/
PWD:=$(shell pwd)
all:
	make -C $(KERNELDIR) M=$(PWD) modules
clean:
	make -C $(KERNELDIR) M=$(PWD) clean
obj-m:=hello.o
2.5. 执行make命令
2.6. 光有驱动是不行的,需要撰写应用层的.c文件
在驱动同级目录下创建test.c文件
写入应用层程序
#include
#include
#include
#include
#include

char buf[128]={0};
int main(int argc,const char *argv[])
{
  int fd;
  fd=open("./hello",O_RDWR);
  if(fd==-1)
  {
    perror("open error");
    return -1;
  }
  write(fd,buf,sizeof(buf));
  read(fd,buf,sizeof(buf));
  close(fd);
  return 0;
}
使用gcc进行编译,生成a.out文件
2.7. 手动创建设备文件
》1.使用 sudo insmod xxxx.ko 安装驱动
》2.使用 cat /proc/devices 查看主设备号
》3.使用 sudo mknod <你的文件名字> c/b(c字符设备 b块设备) 主设备号 次设备号
可以手动创建设备文件
》4.修改设备文件的权限
sudo chmod 0777 hello 修改权限
》5.运行应用层的可执行程序,我的是a.out文件
能看到最后结果


